1. OpenGL ES实现
1.1 颜色填充
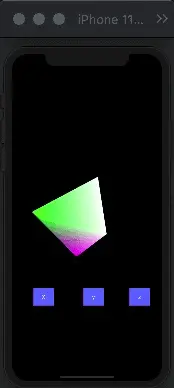
1.1.1 着色器
- 顶点着色器
attribute vec4 position;attribute vec4 positionColor;uniform mat4 projectionMatrix;uniform mat4 modelViewMatrix;varying lowp vec4 varyColor;void main() {varyColor = positionColor;vec4 vPos = projectionMatrix * modelViewMatrix * position;gl_Position = vPos;}
- 片元着色器
varying lowp vec4 varyColor;void main() {gl_FragColor = varyColor;}
1.1.2 绘制过程
- (void)drawPyramid{//1.设置图层[self setupLayer];//2.设置上下文[self setupContext];//3.清空缓存区[self deletBuffer];//4.设置renderBuffer[self setupRenderBuffer];//5.设置frameBuffer[self setupFrameBuffer];//6.绘制[self render];}
- 设置图层
- (void)setupLayer {self.myEagLayer = (CAEAGLLayer *)self.layer;[self setContentScaleFactor:[[UIScreen mainScreen]scale]];self.myEagLayer.opaque = YES;self.myEagLayer.drawableProperties = @{kEAGLDrawablePropertyRetainedBacking : @NO,kEAGLDrawablePropertyColorFormat : kEAGLColorFormatRGBA8};}
- 设置上下文
- (void)setupContext {EAGLRenderingAPI api = kEAGLRenderingAPIOpenGLES2;EAGLContext *context = [[EAGLContext alloc]initWithAPI:api];if (!context) {NSLog(@"Create Context Failed");return;}if (![EAGLContext setCurrentContext:context]) {NSLog(@"Set Current Context Failed");return;}self.myContext = context;}
- 清空缓存区
- (void)deletBuffer {glDeleteBuffers(1, &_myColorRenderBuffer);_myColorRenderBuffer = 0;glDeleteBuffers(1, &_myColorFrameBuffer);_myColorFrameBuffer = 0;}
- 设置renderBuffer
- (void)setupRenderBuffer {//1.定义一个缓存区GLuint buffer;//2.申请一个缓存区标志glGenRenderbuffers(1, &buffer);//3.self.myColorRenderBuffer = buffer;//4.将标识符绑定到GL_RENDERBUFFERglBindRenderbuffer(GL_RENDERBUFFER, self.myColorRenderBuffer);[self.myContext renderbufferStorage:GL_RENDERBUFFER fromDrawable:self.myEagLayer];}
- 设置frameBuffer
- (void)setupFrameBuffer {//1.定义一个缓存区GLuint buffer;//2.申请一个缓存区标志glGenFramebuffers(1, &buffer);//3.self.myColorFrameBuffer = buffer;//4.设置当前的framebufferglBindFramebuffer(GL_FRAMEBUFFER, self.myColorFrameBuffer);//5.将_myColorRenderBuffer 装配到GL_COLOR_ATTACHMENT0 附着点上glFramebufferRenderbuffer(GL_FRAMEBUFFER, GL_COLOR_ATTACHMENT0, GL_RENDERBUFFER, self.myColorRenderBuffer);}
- 绘制
- (void)render {//1.清屏颜色glClearColor(0, 0.0, 0, 1.0);glClear(GL_COLOR_BUFFER_BIT);CGFloat scale = [[UIScreen mainScreen] scale];//2.设置视口glViewport(self.frame.origin.x * scale, self.frame.origin.y * scale, self.frame.size.width * scale, self.frame.size.height * scale);//3.获取顶点着色程序、片元着色器程序文件位置NSString* vertFile = [[NSBundle mainBundle] pathForResource:@"shaderv" ofType:@"glsl"];NSString* fragFile = [[NSBundle mainBundle] pathForResource:@"shaderf" ofType:@"glsl"];//4.判断self.myProgram是否存在,存在则清空其文件if (self.myProgram) {glDeleteProgram(self.myProgram);self.myProgram = 0;}//5.加载程序到myProgram中来。self.myProgram = [self loadShader:vertFile frag:fragFile];//6.链接glLinkProgram(self.myProgram);GLint linkSuccess;//7.获取链接状态glGetProgramiv(self.myProgram, GL_LINK_STATUS, &linkSuccess);if (linkSuccess == GL_FALSE) {GLchar messages[256];glGetProgramInfoLog(self.myProgram, sizeof(messages), 0, &messages[0]);NSString *messageString = [NSString stringWithUTF8String:messages];NSLog(@"error%@", messageString);return ;}else {glUseProgram(self.myProgram);}//8.创建顶点数组 & 索引数组//(1)顶点数组 前3顶点值(x,y,z),后3位颜色值(RGB)GLfloat attrArr[] = {-0.5f, 0.5f, 0.0f, 1.0f, 0.0f, 1.0f, //左上00.5f, 0.5f, 0.0f, 1.0f, 0.0f, 1.0f, //右上1-0.5f, -0.5f, 0.0f, 1.0f, 1.0f, 1.0f, //左下20.5f, -0.5f, 0.0f, 1.0f, 1.0f, 1.0f, //右下30.0f, 0.0f, 1.0f, 0.0f, 1.0f, 0.0f, //顶点4};//(2).索引数组GLuint indices[] = {0, 3, 2,0, 1, 3,0, 2, 4,0, 4, 1,2, 3, 4,1, 4, 3,};//(3).判断顶点缓存区是否为空,如果为空则申请一个缓存区标识符if (self.myVertices == 0) {glGenBuffers(1, &_myVertices);}//9.-----处理顶点数据-------//(1).将_myVertices绑定到GL_ARRAY_BUFFER标识符上glBindBuffer(GL_ARRAY_BUFFER, _myVertices);//(2).把顶点数据从CPU内存复制到GPU上glBufferData(GL_ARRAY_BUFFER, sizeof(attrArr), attrArr, GL_DYNAMIC_DRAW);//(3).将顶点数据通过myPrograme中的传递到顶点着色程序的position//1.glGetAttribLocation,用来获取vertex attribute的入口的.//2.告诉OpenGL ES,通过glEnableVertexAttribArray,//3.最后数据是通过glVertexAttribPointer传递过去的。//注意:第二参数字符串必须和shaderv.vsh中的输入变量:position保持一致GLuint position = glGetAttribLocation(self.myProgram, "position");//(4).打开positionglEnableVertexAttribArray(position);//(5).设置读取方式//参数1:index,顶点数据的索引//参数2:size,每个顶点属性的组件数量,1,2,3,或者4.默认初始值是4.//参数3:type,数据中的每个组件的类型,常用的有GL_FLOAT,GL_BYTE,GL_SHORT。默认初始值为GL_FLOAT//参数4:normalized,固定点数据值是否应该归一化,或者直接转换为固定值。(GL_FALSE)//参数5:stride,连续顶点属性之间的偏移量,默认为0;//参数6:指定一个指针,指向数组中的第一个顶点属性的第一个组件。默认为0glVertexAttribPointer(position, 3, GL_FLOAT, GL_FALSE, sizeof(GLfloat) * 6, NULL);//10.--------处理顶点颜色值-------//(1).glGetAttribLocation,用来获取vertex attribute的入口的.//注意:第二参数字符串必须和shaderv.glsl中的输入变量:positionColor保持一致GLuint positionColor = glGetAttribLocation(self.myProgram, "positionColor");//(2).设置合适的格式从buffer里面读取数据glEnableVertexAttribArray(positionColor);//(3).设置读取方式//参数1:index,顶点数据的索引//参数2:size,每个顶点属性的组件数量,1,2,3,或者4.默认初始值是4.//参数3:type,数据中的每个组件的类型,常用的有GL_FLOAT,GL_BYTE,GL_SHORT。默认初始值为GL_FLOAT//参数4:normalized,固定点数据值是否应该归一化,或者直接转换为固定值。(GL_FALSE)//参数5:stride,连续顶点属性之间的偏移量,默认为0;//参数6:指定一个指针,指向数组中的第一个顶点属性的第一个组件。默认为0glVertexAttribPointer(positionColor, 3, GL_FLOAT, GL_FALSE, sizeof(GLfloat) * 6, (float *)NULL + 3);//11.找到myProgram中的projectionMatrix、modelViewMatrix 2个矩阵的地址。如果找到则返回地址,否则返回-1,表示没有找到2个对象。GLuint projectionMatrixSlot = glGetUniformLocation(self.myProgram, "projectionMatrix");GLuint modelViewMatrixSlot = glGetUniformLocation(self.myProgram, "modelViewMatrix");float width = self.frame.size.width;float height = self.frame.size.height;//12.创建4 * 4投影矩阵KSMatrix4 _projectionMatrix;//(1)获取单元矩阵ksMatrixLoadIdentity(&_projectionMatrix);//(2)计算纵横比例 = 长/宽float aspect = width / height; //长宽比//(3)获取透视矩阵/*参数1:矩阵参数2:视角,度数为单位参数3:纵横比参数4:近平面距离参数5:远平面距离参考PPT*/ksPerspective(&_projectionMatrix, 30.0, aspect, 5.0f, 20.0f); //透视变换,视角30°//(4)将投影矩阵传递到顶点着色器/*void glUniformMatrix4fv(GLint location, GLsizei count, GLboolean transpose, const GLfloat *value);参数列表:location:指要更改的uniform变量的位置count:更改矩阵的个数transpose:是否要转置矩阵,并将它作为uniform变量的值。必须为GL_FALSEvalue:执行count个元素的指针,用来更新指定uniform变量*/glUniformMatrix4fv(projectionMatrixSlot, 1, GL_FALSE, (GLfloat*)&_projectionMatrix.m[0][0]);//13.创建一个4 * 4 矩阵,模型视图矩阵KSMatrix4 _modelViewMatrix;//(1)获取单元矩阵ksMatrixLoadIdentity(&_modelViewMatrix);//(2)平移,z轴平移-10ksTranslate(&_modelViewMatrix, 0.0, 0.0, -10.0);//(3)创建一个4 * 4 矩阵,旋转矩阵KSMatrix4 _rotationMatrix;//(4)初始化为单元矩阵ksMatrixLoadIdentity(&_rotationMatrix);//(5)旋转ksRotate(&_rotationMatrix, xDegree, 1.0, 0.0, 0.0); //绕X轴ksRotate(&_rotationMatrix, yDegree, 0.0, 1.0, 0.0); //绕Y轴ksRotate(&_rotationMatrix, zDegree, 0.0, 0.0, 1.0); //绕Z轴//(6)把变换矩阵相乘.将_modelViewMatrix矩阵与_rotationMatrix矩阵相乘,结合到模型视图ksMatrixMultiply(&_modelViewMatrix, &_rotationMatrix, &_modelViewMatrix);//(7)将模型视图矩阵传递到顶点着色器/*void glUniformMatrix4fv(GLint location, GLsizei count, GLboolean transpose, const GLfloat *value);参数列表:location:指要更改的uniform变量的位置count:更改矩阵的个数transpose:是否要转置矩阵,并将它作为uniform变量的值。必须为GL_FALSEvalue:执行count个元素的指针,用来更新指定uniform变量*/glUniformMatrix4fv(modelViewMatrixSlot, 1, GL_FALSE, (GLfloat*)&_modelViewMatrix.m[0][0]);//14.开启剔除操作效果glEnable(GL_CULL_FACE);//15.使用索引绘图/*void glDrawElements(GLenum mode,GLsizei count,GLenum type,const GLvoid * indices);参数列表:mode:要呈现的画图的模型GL_POINTSGL_LINESGL_LINE_LOOPGL_LINE_STRIPGL_TRIANGLESGL_TRIANGLE_STRIPGL_TRIANGLE_FANcount:绘图个数type:类型GL_BYTEGL_UNSIGNED_BYTEGL_SHORTGL_UNSIGNED_SHORTGL_INTGL_UNSIGNED_INTindices:绘制索引数组*/glDrawElements(GL_TRIANGLES, sizeof(indices) / sizeof(indices[0]), GL_UNSIGNED_INT, indices);//16.要求本地窗口系统显示OpenGL ES渲染<目标>[self.myContext presentRenderbuffer:GL_RENDERBUFFER];}#pragma mark -- Shader-(GLuint)loadShader:(NSString *)vert frag:(NSString *)frag {//创建2个临时的变量,verShader,fragShaderGLuint verShader,fragShader;//创建一个ProgramGLuint program = glCreateProgram();//编译文件//编译顶点着色程序、片元着色器程序//参数1:编译完存储的底层地址//参数2:编译的类型,GL_VERTEX_SHADER(顶点)、GL_FRAGMENT_SHADER(片元)//参数3:文件路径[self compileShader:&verShader type:GL_VERTEX_SHADER file:vert];[self compileShader:&fragShader type:GL_FRAGMENT_SHADER file:frag];//创建最终的程序glAttachShader(program, verShader);glAttachShader(program, fragShader);//释放不需要的shaderglDeleteShader(verShader);glDeleteShader(fragShader);return program;}//链接shader- (void)compileShader:(GLuint *)shader type:(GLenum)type file:(NSString *)file {//读取文件路径字符串NSString *content = [NSString stringWithContentsOfFile:file encoding:NSUTF8StringEncoding error:nil];//获取文件路径字符串,C语言字符串const GLchar *source = (GLchar *)[content UTF8String];//创建一个shader(根据type类型)*shader = glCreateShader(type);//将顶点着色器源码附加到着色器对象上。//参数1:shader,要编译的着色器对象 *shader//参数2:numOfStrings,传递的源码字符串数量 1个//参数3:strings,着色器程序的源码(真正的着色器程序源码)//参数4:lenOfStrings,长度,具有每个字符串长度的数组,或NULL,这意味着字符串是NULL终止的glShaderSource(*shader, 1, &source, NULL);//把着色器源代码编译成目标代码glCompileShader(*shader);}#pragma mark - XYClick- (IBAction)XClick:(id)sender {//开启定时器[self myTimer];//更新的是X还是YbX = !bX;}- (IBAction)YClick:(id)sender {//开启定时器[self myTimer];//更新的是X还是YbY = !bY;}- (IBAction)ZClick:(id)sender {//开启定时器[self myTimer];//更新的是X还是YbZ = !bZ;}- (NSTimer *)myTimer {if (!_myTimer) {_myTimer = [NSTimer scheduledTimerWithTimeInterval:0.05 target:self selector:@selector(reDegree) userInfo:nil repeats:YES];}return _myTimer;}- (void)reDegree {//如果停止X轴旋转,X = 0则度数就停留在暂停前的度数.//更新度数xDegree += bX * 5;yDegree += bY * 5;zDegree += bZ * 5;//重新渲染[self render];}
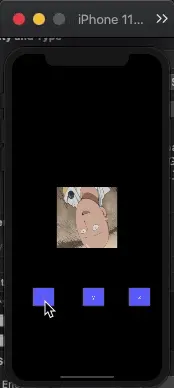
1.2 纹理填充
1.2.1 着色器
- 顶点着色器
attribute vec4 position;attribute vec2 textCoordinate;uniform mat4 projectionMatrix;uniform mat4 modelViewMatrix;varying lowp vec2 varyTextCoord;void main() {varyTextCoord = textCoordinate;vec4 vPos = projectionMatrix * modelViewMatrix * position;gl_Position = vPos;}
- 片元着色器
precision highp float;varying lowp vec2 varyTextCoord;uniform sampler2D colorMap;void main() {gl_FragColor = texture2D(colorMap, varyTextCoord);}
1.2.2 绘制过程
这里写了需要修改的部分。
GLfloat attrArr[] = {-0.5f, 0.5f, 0.0f, 0.0f, 1.0f,//左上0.5f, 0.5f, 0.0f, 1.0f, 1.0f,//右上-0.5f, -0.5f, 0.0f, 0.0f, 0.0f,//左下0.5f, -0.5f, 0.0f, 1.0f, 0.0f,//右下0.0f, 0.0f, 1.0f, 0.5f, 0.5f,//顶点};// 设置顶点坐标GLuint position = glGetAttribLocation(self.myProgram, "position");glEnableVertexAttribArray(position);glVertexAttribPointer(position, 3, GL_FLOAT, GL_FALSE, sizeof(GLfloat) * 5, NULL);// 设置纹理坐标GLuint textCoordinate = glGetAttribLocation(self.myProgram, "textCoordinate");glEnableVertexAttribArray(textCoordinate);glVertexAttribPointer(textCoordinate, 2, GL_FLOAT, GL_FALSE, sizeof(GLfloat) * 5, (float *)NULL + 3);// 设置纹理[self setupTexture:@"qiyu"];glUniform1i(glGetUniformLocation(self.myPrograme, "colorMap"), 0);
- 加载纹理
//从图片中加载纹理- (GLuint)setupTexture:(NSString *)fileName {//1、将 UIImage 转换为 CGImageRefCGImageRef spriteImage = [UIImage imageNamed:fileName].CGImage;//判断图片是否获取成功if (!spriteImage) {NSLog(@"Failed to load image %@", fileName);exit(1);}//2、读取图片的大小,宽和高size_t width = CGImageGetWidth(spriteImage);size_t height = CGImageGetHeight(spriteImage);//3.获取图片字节数 宽*高*4(RGBA)GLubyte * spriteData = (GLubyte *) calloc(width * height * 4, sizeof(GLubyte));//4.创建上下文/*参数1:data,指向要渲染的绘制图像的内存地址参数2:width,bitmap的宽度,单位为像素参数3:height,bitmap的高度,单位为像素参数4:bitPerComponent,内存中像素的每个组件的位数,比如32位RGBA,就设置为8参数5:bytesPerRow,bitmap的没一行的内存所占的比特数参数6:colorSpace,bitmap上使用的颜色空间 kCGImageAlphaPremultipliedLast:RGBA*/CGContextRef spriteContext = CGBitmapContextCreate(spriteData, width, height, 8, width*4,CGImageGetColorSpace(spriteImage), kCGImageAlphaPremultipliedLast);//5、在CGContextRef上--> 将图片绘制出来/*CGContextDrawImage 使用的是Core Graphics框架,坐标系与UIKit 不一样。UIKit框架的原点在屏幕的左上角,Core Graphics框架的原点在屏幕的左下角。CGContextDrawImage参数1:绘图上下文参数2:rect坐标参数3:绘制的图片*/CGRect rect = CGRectMake(0, 0, width, height);//6.使用默认方式绘制CGContextDrawImage(spriteContext, rect, spriteImage);//7、画图完毕就释放上下文CGContextRelease(spriteContext);//8、绑定纹理到默认的纹理ID(glBindTexture(GL_TEXTURE_2D, 0);//9.设置纹理属性/*参数1:纹理维度参数2:线性过滤、为s,t坐标设置模式参数3:wrapMode,环绕模式*/glTexParameteri( GL_TEXTURE_2D, GL_TEXTURE_MIN_FILTER, GL_LINEAR );glTexParameteri( GL_TEXTURE_2D, GL_TEXTURE_MAG_FILTER, GL_LINEAR );glTexParameteri( GL_TEXTURE_2D, GL_TEXTURE_WRAP_S, GL_CLAMP_TO_EDGE);glTexParameteri( GL_TEXTURE_2D, GL_TEXTURE_WRAP_T, GL_CLAMP_TO_EDGE);float fw = width, fh = height;//10.载入纹理2D数据/*参数1:纹理模式,GL_TEXTURE_1D、GL_TEXTURE_2D、GL_TEXTURE_3D参数2:加载的层次,一般设置为0参数3:纹理的颜色值GL_RGBA参数4:宽参数5:高参数6:border,边界宽度参数7:format参数8:type参数9:纹理数据*/glTexImage2D(GL_TEXTURE_2D, 0, GL_RGBA, fw, fh, 0, GL_RGBA, GL_UNSIGNED_BYTE, spriteData);//11.释放spriteDatafree(spriteData);return 0;}
1.3 纹理颜色混合
颜色混合逻辑主要在片元着色器中。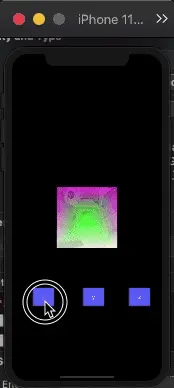
1.3.1 着色器
- 顶点着色器
attribute vec4 position;attribute vec4 positionColor;attribute vec2 textCoordinate;uniform mat4 projectionMatrix;uniform mat4 modelViewMatrix;varying lowp vec4 varyColor;varying lowp vec2 varyTextCoord;void main() {varyTextCoord = textCoordinate;varyColor = positionColor;vec4 vPos = projectionMatrix * modelViewMatrix * position;gl_Position = vPos;}
- 片元着色器 (核心逻辑)
precision highp float;varying lowp vec4 varyColor;varying lowp vec2 varyTextCoord;uniform sampler2D colorMap;void main() {vec4 textureColor = texture2D(colorMap, varyTextCoord);float alpha = 0.3;gl_FragColor = varyColor * (1.0 - alpha) + textureColor * alpha;}
1.3.2 绘制过程
这里写了需要修改的部分。
GLfloat attrArr[] = {-0.5f, 0.5f, 0.0f, 1.0f, 0.0f, 1.0f, 0.0f, 1.0f,//左上0.5f, 0.5f, 0.0f, 1.0f, 0.0f, 1.0f, 1.0f, 1.0f,//右上-0.5f, -0.5f, 0.0f, 1.0f, 1.0f, 1.0f, 0.0f, 0.0f,//左下0.5f, -0.5f, 0.0f, 1.0f, 1.0f, 1.0f, 1.0f, 0.0f,//右下0.0f, 0.0f, 1.0f, 0.0f, 1.0f, 0.0f, 0.5f, 0.5f,//顶点};// 设置顶点数据glEnableVertexAttribArray(GLKVertexAttribPosition);glVertexAttribPointer(GLKVertexAttribPosition, 3, GL_FLOAT, GL_FALSE, sizeof(GLfloat) * 8, NULL);// 设置颜色数据glEnableVertexAttribArray(GLKVertexAttribColor);glVertexAttribPointer(GLKVertexAttribColor, 3, GL_FLOAT, GL_FALSE, sizeof(GLfloat) * 8, (GLfloat *)NULL + 3);// 设置颜色数据glEnableVertexAttribArray(GLKVertexAttribTexCoord0);glVertexAttribPointer(GLKVertexAttribTexCoord0, 2, GL_FLOAT, GL_FALSE, sizeof(GLfloat) * 8, (GLfloat *)NULL + 6);
2. GLKit实现
GLKit实现会少很多代码,这里一次性给出代码。
2.1 纹理颜色混合
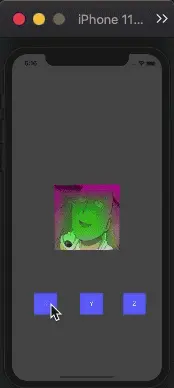
-(void)viewDidLoad {[super viewDidLoad];//1.新建图层[self setupContext];//2.渲染图形[self render];}//2.渲染图形-(void)render {//1.顶点数据//前3个元素,是顶点数据;中间3个元素,是顶点颜色值,最后2个是纹理坐标GLfloat attrArr[] = {-0.5f, 0.5f, 0.0f, 1.0f, 0.0f, 1.0f, 0.0f, 1.0f,//左上0.5f, 0.5f, 0.0f, 1.0f, 0.0f, 1.0f, 1.0f, 1.0f,//右上-0.5f, -0.5f, 0.0f, 1.0f, 1.0f, 1.0f, 0.0f, 0.0f,//左下0.5f, -0.5f, 0.0f, 1.0f, 1.0f, 1.0f, 1.0f, 0.0f,//右下0.0f, 0.0f, 1.0f, 0.0f, 1.0f, 0.0f, 0.5f, 0.5f,//顶点};//2.绘图索引GLuint indices[] = {0, 3, 2,0, 1, 3,0, 2, 4,0, 4, 1,2, 3, 4,1, 4, 3,};//顶点个数self.count = sizeof(indices) /sizeof(GLuint);//将顶点数组放入数组缓冲区中 GL_ARRAY_BUFFERGLuint buffer;glGenBuffers(1, &buffer);glBindBuffer(GL_ARRAY_BUFFER, buffer);glBufferData(GL_ARRAY_BUFFER, sizeof(attrArr), attrArr, GL_STATIC_DRAW);//将索引数组存储到索引缓冲区 GL_ELEMENT_ARRAY_BUFFERGLuint index;glGenBuffers(1, &index);glBindBuffer(GL_ELEMENT_ARRAY_BUFFER, index);glBufferData(GL_ELEMENT_ARRAY_BUFFER, sizeof(indices), indices, GL_STATIC_DRAW);//使用顶点数据glEnableVertexAttribArray(GLKVertexAttribPosition);glVertexAttribPointer(GLKVertexAttribPosition, 3, GL_FLOAT, GL_FALSE, sizeof(GLfloat) * 8, NULL);//使用颜色数据glEnableVertexAttribArray(GLKVertexAttribColor);glVertexAttribPointer(GLKVertexAttribColor, 3, GL_FLOAT, GL_FALSE, sizeof(GLfloat) * 8, (GLfloat *)NULL + 3);//使用纹理数据glEnableVertexAttribArray(GLKVertexAttribTexCoord0);glVertexAttribPointer(GLKVertexAttribTexCoord0, 2, GL_FLOAT, GL_FALSE, sizeof(GLfloat) * 8, (GLfloat *)NULL + 6);//着色器self.mEffect = [[GLKBaseEffect alloc]init];//加载纹理NSString *filePath = [[NSBundle mainBundle]pathForResource:@"qiyu" ofType:@"jpg"];NSDictionary *options = @{GLKTextureLoaderOriginBottomLeft : @(YES)};GLKTextureInfo *textureInfo = [GLKTextureLoader textureWithContentsOfFile:filePath options:options error:nil];self.mEffect.texture2d0.enabled = YES;self.mEffect.texture2d0.name = textureInfo.name;self.mEffect.texture2d0.target = textureInfo.target;//投影视图CGSize size = self.view.bounds.size;float aspect = fabs(size.width / size.height);GLKMatrix4 projectionMatrix = GLKMatrix4MakePerspective(GLKMathDegreesToRadians(90.0), aspect, 0.1f, 100.0);projectionMatrix = GLKMatrix4Scale(projectionMatrix, 1.0f, 1.0f, 1.0f);self.mEffect.transform.projectionMatrix = projectionMatrix;//模型视图GLKMatrix4 modelViewMatrix = GLKMatrix4Translate(GLKMatrix4Identity, 0.0f, 0.0f, -2.0f);self.mEffect.transform.modelviewMatrix = modelViewMatrix;//定时器double seconds = 0.1;timer = dispatch_source_create(DISPATCH_SOURCE_TYPE_TIMER, 0, 0, dispatch_get_main_queue());dispatch_source_set_timer(timer, DISPATCH_TIME_NOW, seconds * NSEC_PER_SEC, 0.0);dispatch_source_set_event_handler(timer, ^{self.XDegree += 0.1f * self.XB;self.YDegree += 0.1f * self.YB;self.ZDegree += 0.1f * self.ZB ;});dispatch_resume(timer);}//场景数据变化- (void)update {GLKMatrix4 modelViewMatrix = GLKMatrix4Translate(GLKMatrix4Identity, 0.0f, 0.0f, -2.5);modelViewMatrix = GLKMatrix4RotateX(modelViewMatrix, self.XDegree);modelViewMatrix = GLKMatrix4RotateY(modelViewMatrix, self.YDegree);modelViewMatrix = GLKMatrix4RotateZ(modelViewMatrix, self.ZDegree);self.mEffect.transform.modelviewMatrix = modelViewMatrix;}- (void)glkView:(GLKView *)view drawInRect:(CGRect)rect {glClearColor(0.3f, 0.3f, 0.3f, 1.0f);glClear(GL_COLOR_BUFFER_BIT | GL_DEPTH_BUFFER_BIT);[self.mEffect prepareToDraw];glDrawElements(GL_TRIANGLES, self.count, GL_UNSIGNED_INT, 0);}//1.新建图层- (void)setupContext{//1.新建OpenGL ES上下文self.mContext = [[EAGLContext alloc]initWithAPI:kEAGLRenderingAPIOpenGLES2];[EAGLContext setCurrentContext:self.mContext];glEnable(GL_DEPTH_TEST);GLKView *view = (GLKView *)self.view;view.context = self.mContext;view.drawableColorFormat = GLKViewDrawableColorFormatRGBA8888;view.drawableDepthFormat = GLKViewDrawableDepthFormat24;}#pragma mark -XYZClick- (IBAction)XClick:(id)sender {_XB = !_XB;}- (IBAction)YClick:(id)sender {_YB = !_YB;}- (IBAction)ZClick:(id)sender {_ZB = !_ZB;}

若有收获,就点个赞吧
0 人点赞
