如下图所示: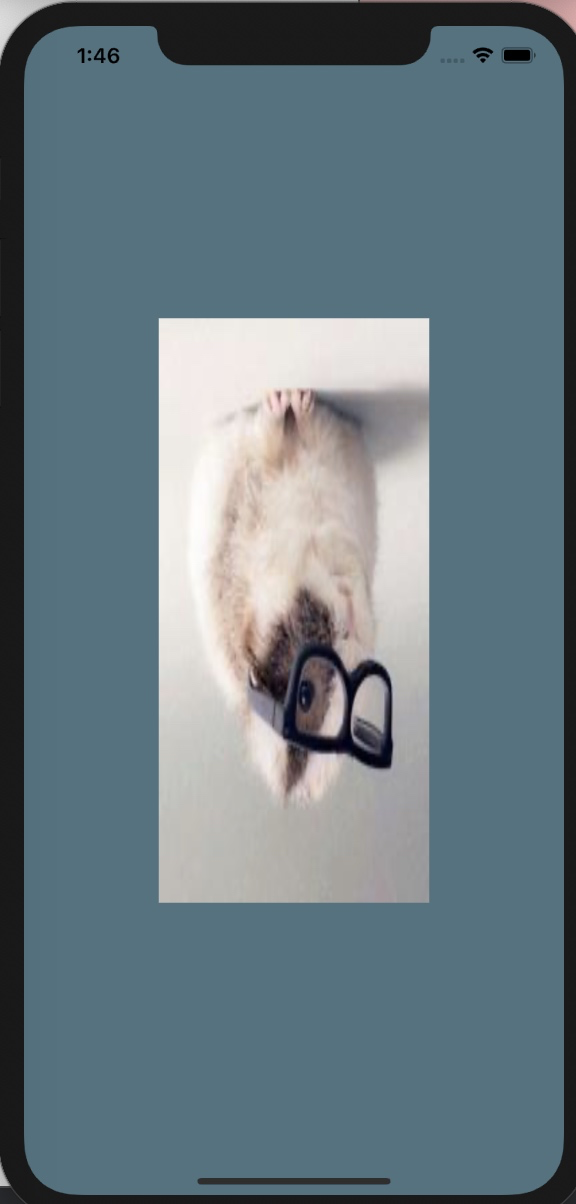
倒置的原因很简单,主要是由于纹理坐标的原点(0,0)是在左下角,而屏幕的坐标原点(0,0)是在左上角,形成倒置图形的过程如图所示: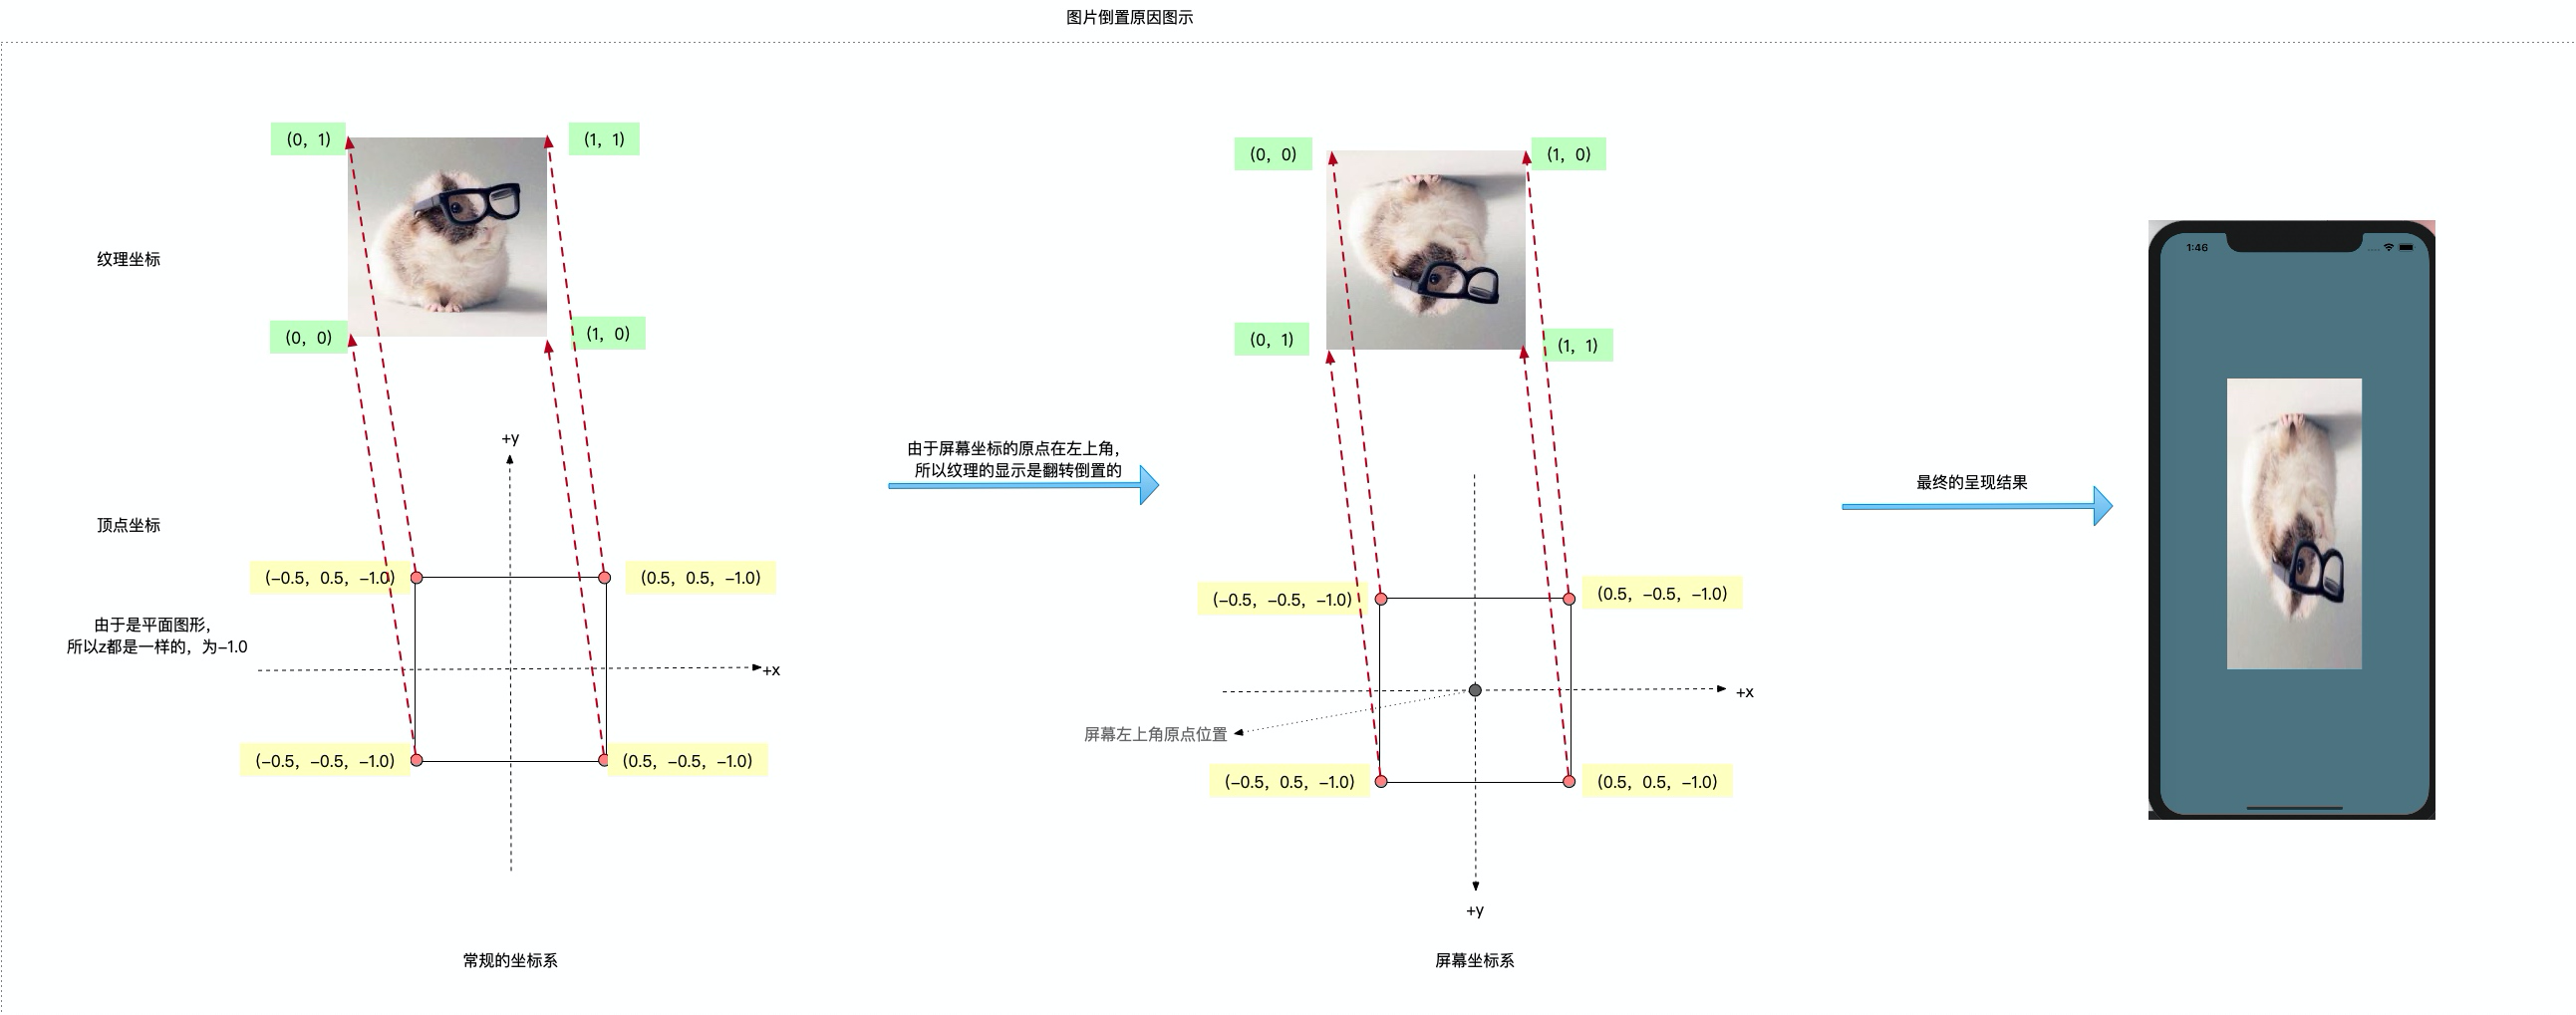
下面介绍几种纹理倒置的解决方案
方案一:图形顶点翻转180°,纹理保持原状
图形顶点利用旋转矩阵旋转180°,如图所示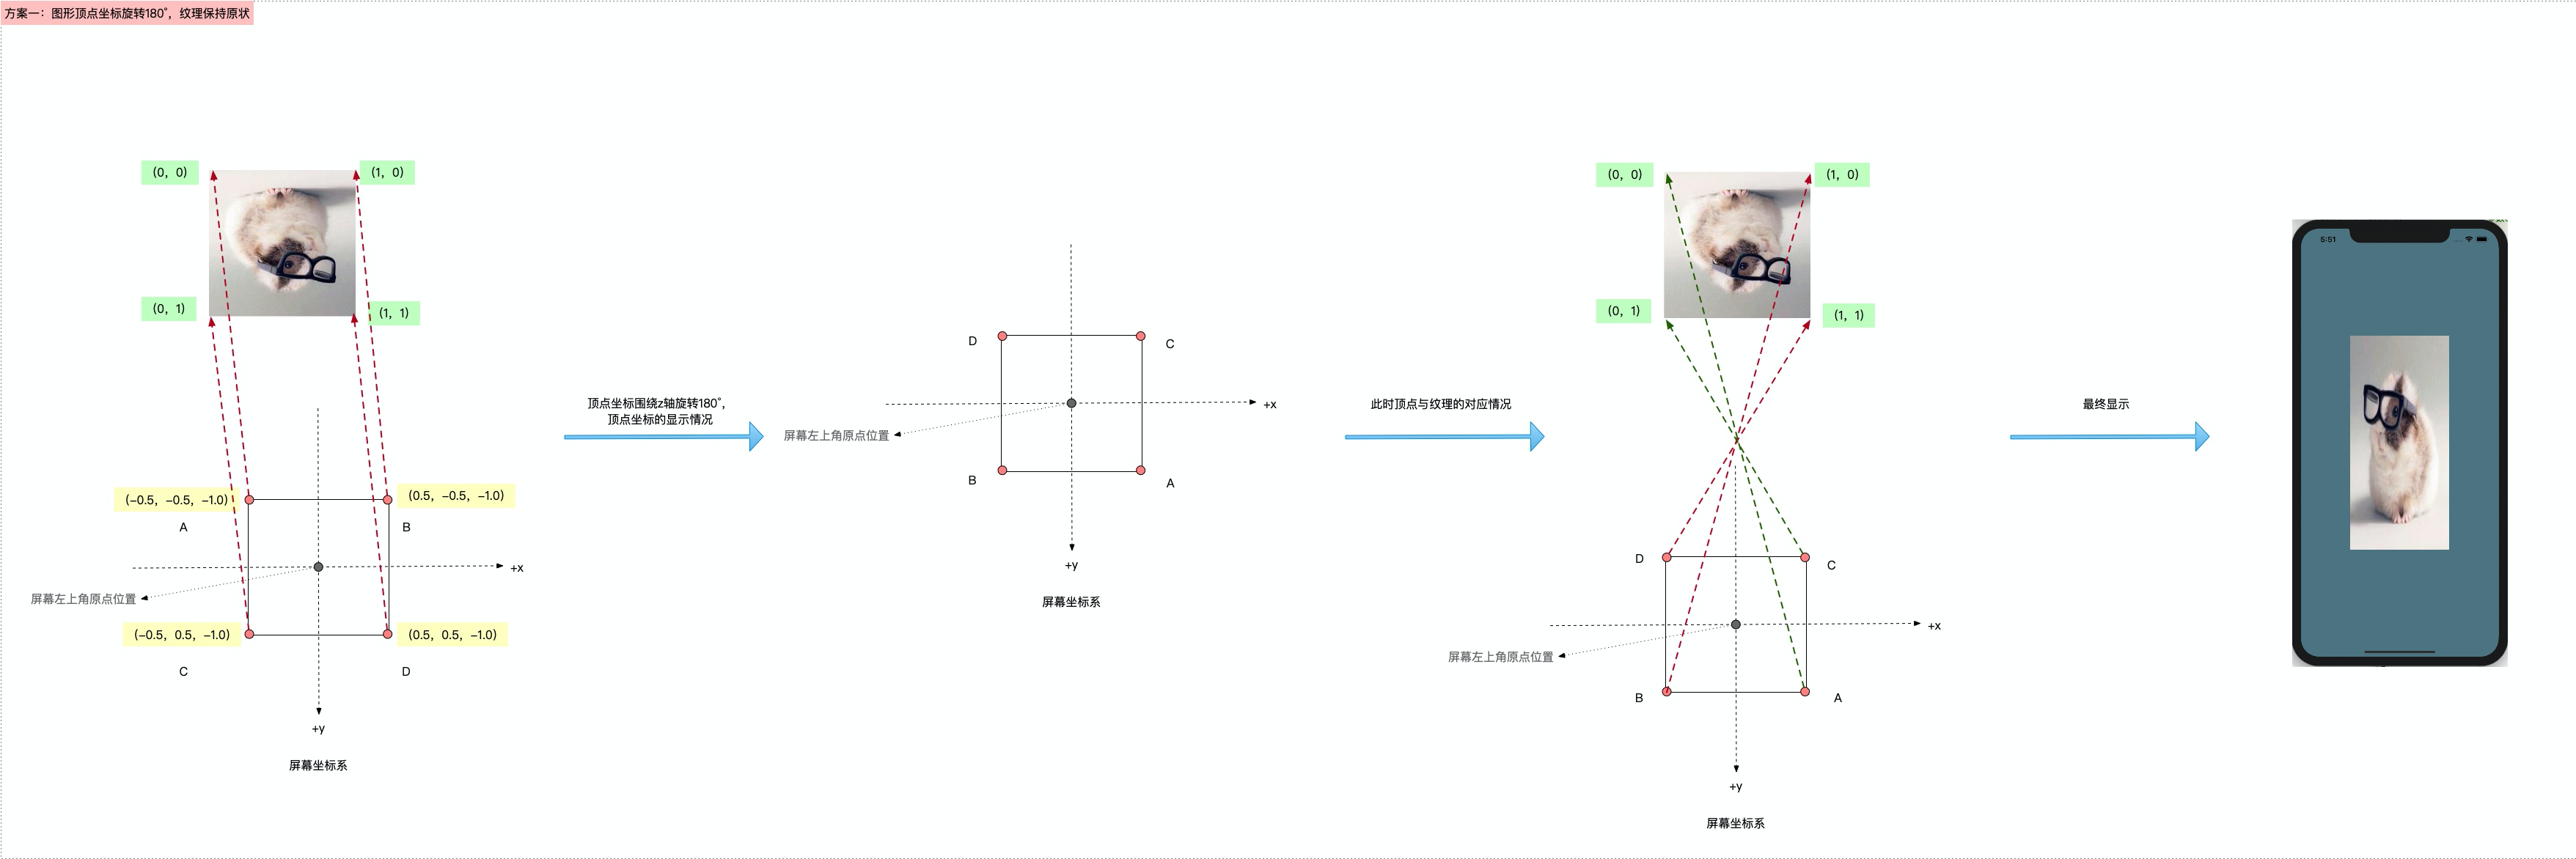
- 在自定义的顶点着色器中实现顶点数据的翻转180°,需要将顶点 * 旋转矩阵,得到新的顶点坐标,在赋值给内建变量
gl_Position
attribute vec4 position;attribute vec2 textCoordinate;uniform mat4 rotateMatrix;varying lowp vec2 varyTextCoord;void main(){varyTextCoord = textCoordinate;vec4 vPos = position;vPos = vPos * rotateMatrix;gl_Position = vPos;}
- 自定义方法:使用矩阵翻转图形顶点
- (void)rotateTextureImage{//注意,想要获取shader里面的变量,这里记得要在glLinkProgram后面,后面,后面!//1. rotate等于shaderv.vsh中的uniform属性,rotateMatrixGLuint rotate = glGetUniformLocation(self.myPrograme, "rotateMatrix");//2.获取渲旋转的弧度float radius = 180 * 3.14159f / 180.0f;//3.求得弧度对于的sin\cos值float s = sin(radius);float c = cos(radius);//4.因为在3D课程中用的是横向量,在OpenGL ES用的是列向量/*参考Z轴旋转矩阵*/GLfloat zRotation[16] = {c, -s, 0, 0,s, c, 0, 0,0, 0, 1, 0,0, 0, 0, 1,};//5.设置旋转矩阵/*glUniformMatrix4fv (GLint location, GLsizei count, GLboolean transpose, const GLfloat* value)location : 对于shader 中的IDcount : 个数transpose : 转置value : 指针*/glUniformMatrix4fv(rotate, 1, GL_FALSE, zRotation);}
在 renderLayer 函数中的设置纹理采样器之后调用[self rotateTextureImage] ;
问题
其实在上述步骤之后翻转的图片虽然翻转了,但是并不是我们期望的结果,所以,还需要再次进行翻转,即围绕x轴进行翻转,在上面代码的基础上增加以下代码
- shaderv.vsh中增加一个翻转矩阵uniform mat4 scaleMatrix;
- 修改main中矩阵相乘为vPos = vPos rotateMatrix scaleMatrix;
shaderv.vsh 完整源码如下
attribute vec4 position;attribute vec2 textCoordinate;uniform mat4 rotateMatrix;uniform mat4 scaleMatrix;varying lowp vec2 varyTextCoord;void main(){varyTextCoord = textCoordinate;vec4 vPos = position;vPos = vPos * rotateMatrix * scaleMatrix;gl_Position = vPos;}
- view中的rotateTextureImage函数中
- 拿到着色器中 scaleMatrix 的入口
- 在 zRotation 矩阵数组后新增一个翻转矩阵
- 再设置一个翻转矩阵 rotateTextureImage 完整代码如下
- (void)rotateTextureImage{//注意,想要获取shader里面的变量,这里记得要在glLinkProgram后面,后面,后面!//1. rotate等于shaderv.vsh中的uniform属性,rotateMatrixGLuint rotate = glGetUniformLocation(self.myPrograme, "rotateMatrix");GLuint scale = glGetUniformLocation(self.myPrograme, "scaleMatrix");//2.获取渲旋转的弧度float radius = 180 * 3.14159f / 180.0f;//3.求得弧度对于的sin\cos值float s = sin(radius);float c = cos(radius);//4.因为在3D课程中用的是横向量,在OpenGL ES用的是列向量/*参考Z轴旋转矩阵*/GLfloat zRotation[16] = {c, -s, 0, 0,s, c, 0, 0,0, 0, 1, 0,0, 0, 0, 1,};GLfloat scaleMartix[16] = {-1, 0, 0, 0,0, 1, 0, 0,0, 0, 1, 0,0, 0, 0, 1,};//5.设置旋转矩阵/*glUniformMatrix4fv (GLint location, GLsizei count, GLboolean transpose, const GLfloat* value)location : 对于shader 中的IDcount : 个数transpose : 转置value : 指针*/glUniformMatrix4fv(rotate, 1, GL_FALSE, zRotation);glUniformMatrix4fv(scale, 1, GL_FALSE, scaleMartix);}
方案二:解压图片时,将图片源文件翻转
在加载纹理 setupTexture 函数的第六步 使用默认方法绘制后,及 context 绘制的图片进行翻转,主要代码如下
//围绕x、y平移CGContextTranslateCTM(spriteContext, rect.origin.x, rect.origin.y);//围绕y平移CGContextTranslateCTM(spriteContext, 0, rect.size.height);//x⽅向不变 y⽅向沿着画布⾃己的 坐标系对应的y轴渲染CGContextScaleCTM(spriteContext, 1.0, -1.0);//翻转//相对于画布,在自己的坐标系上画图CGContextTranslateCTM(spriteContext, -rect.origin.x, -rect.origin.y);CGContextDrawImage(spriteContext, rect, spriteImage);
翻转过程图示如下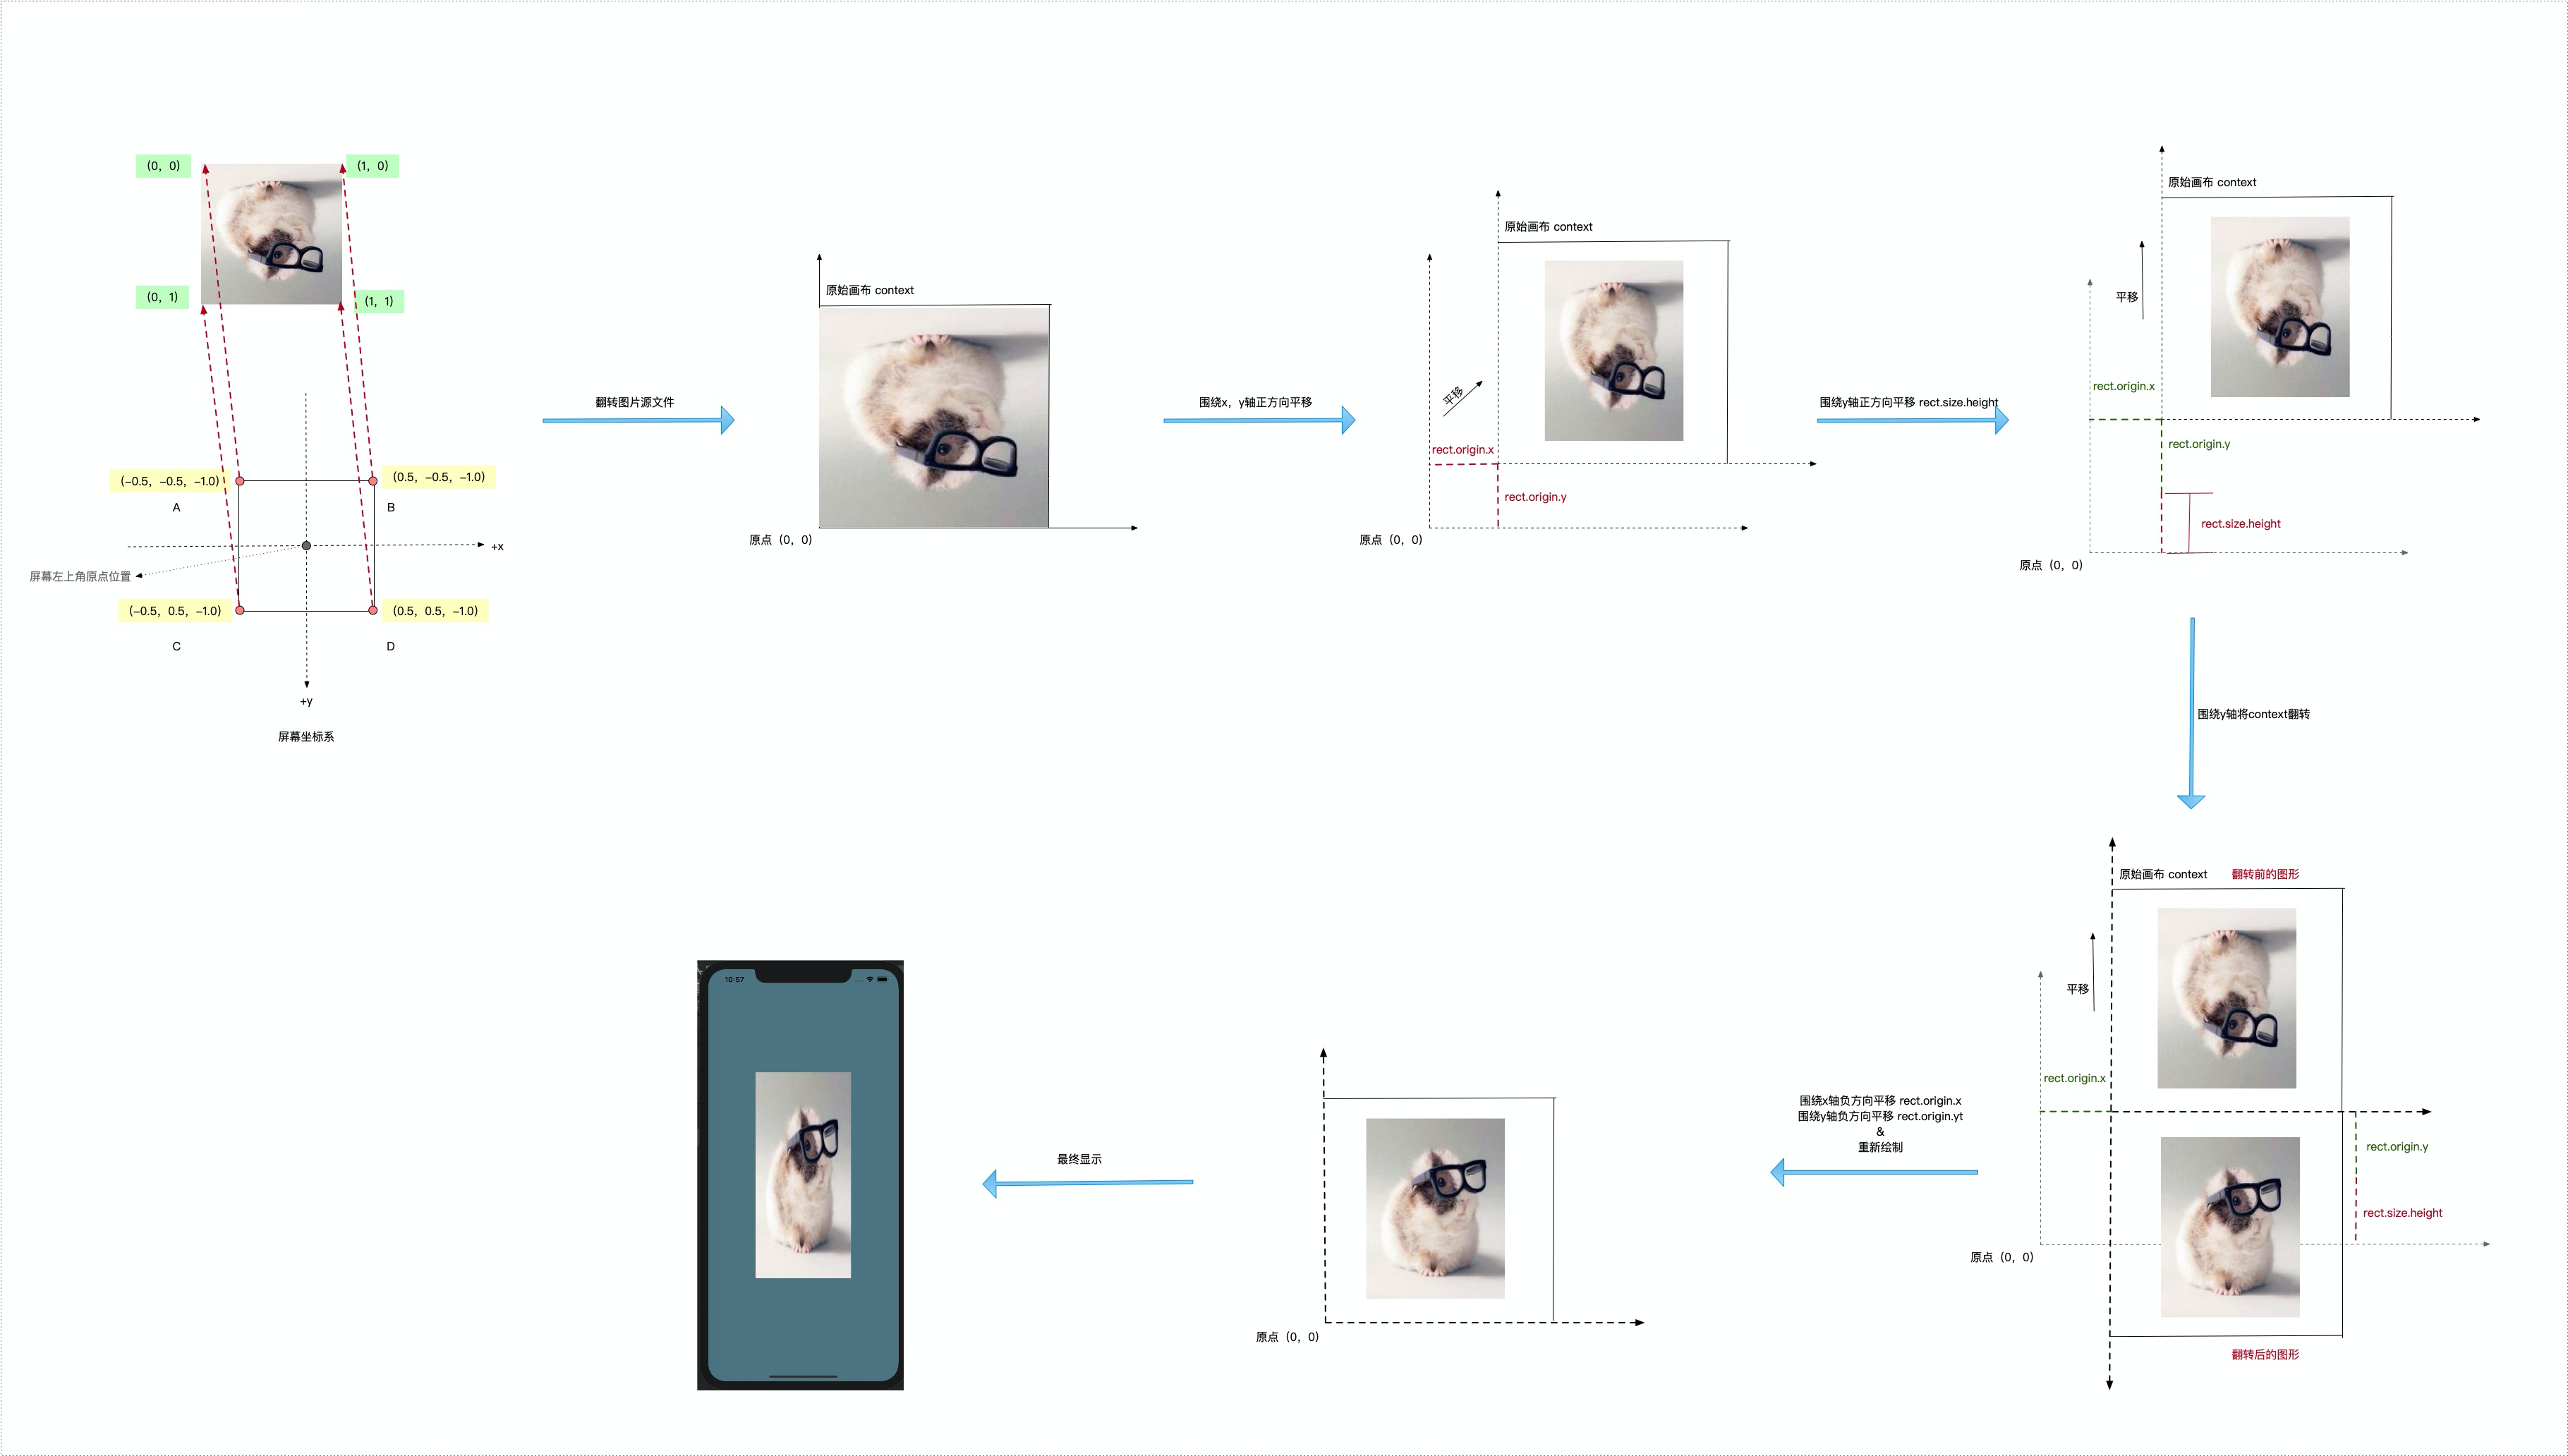
针对上面的这部分代码,其实可以简化成
CGContextTranslateCTM(spriteContext, 0, rect.size.height);//x⽅向不变 y⽅向沿着画布⾃己的 坐标系对应的y轴渲染CGContextScaleCTM(spriteContext, 1.0, -1.0);//翻转CGContextDrawImage(spriteContext, rect, spriteImage);
简化后的翻转图示如下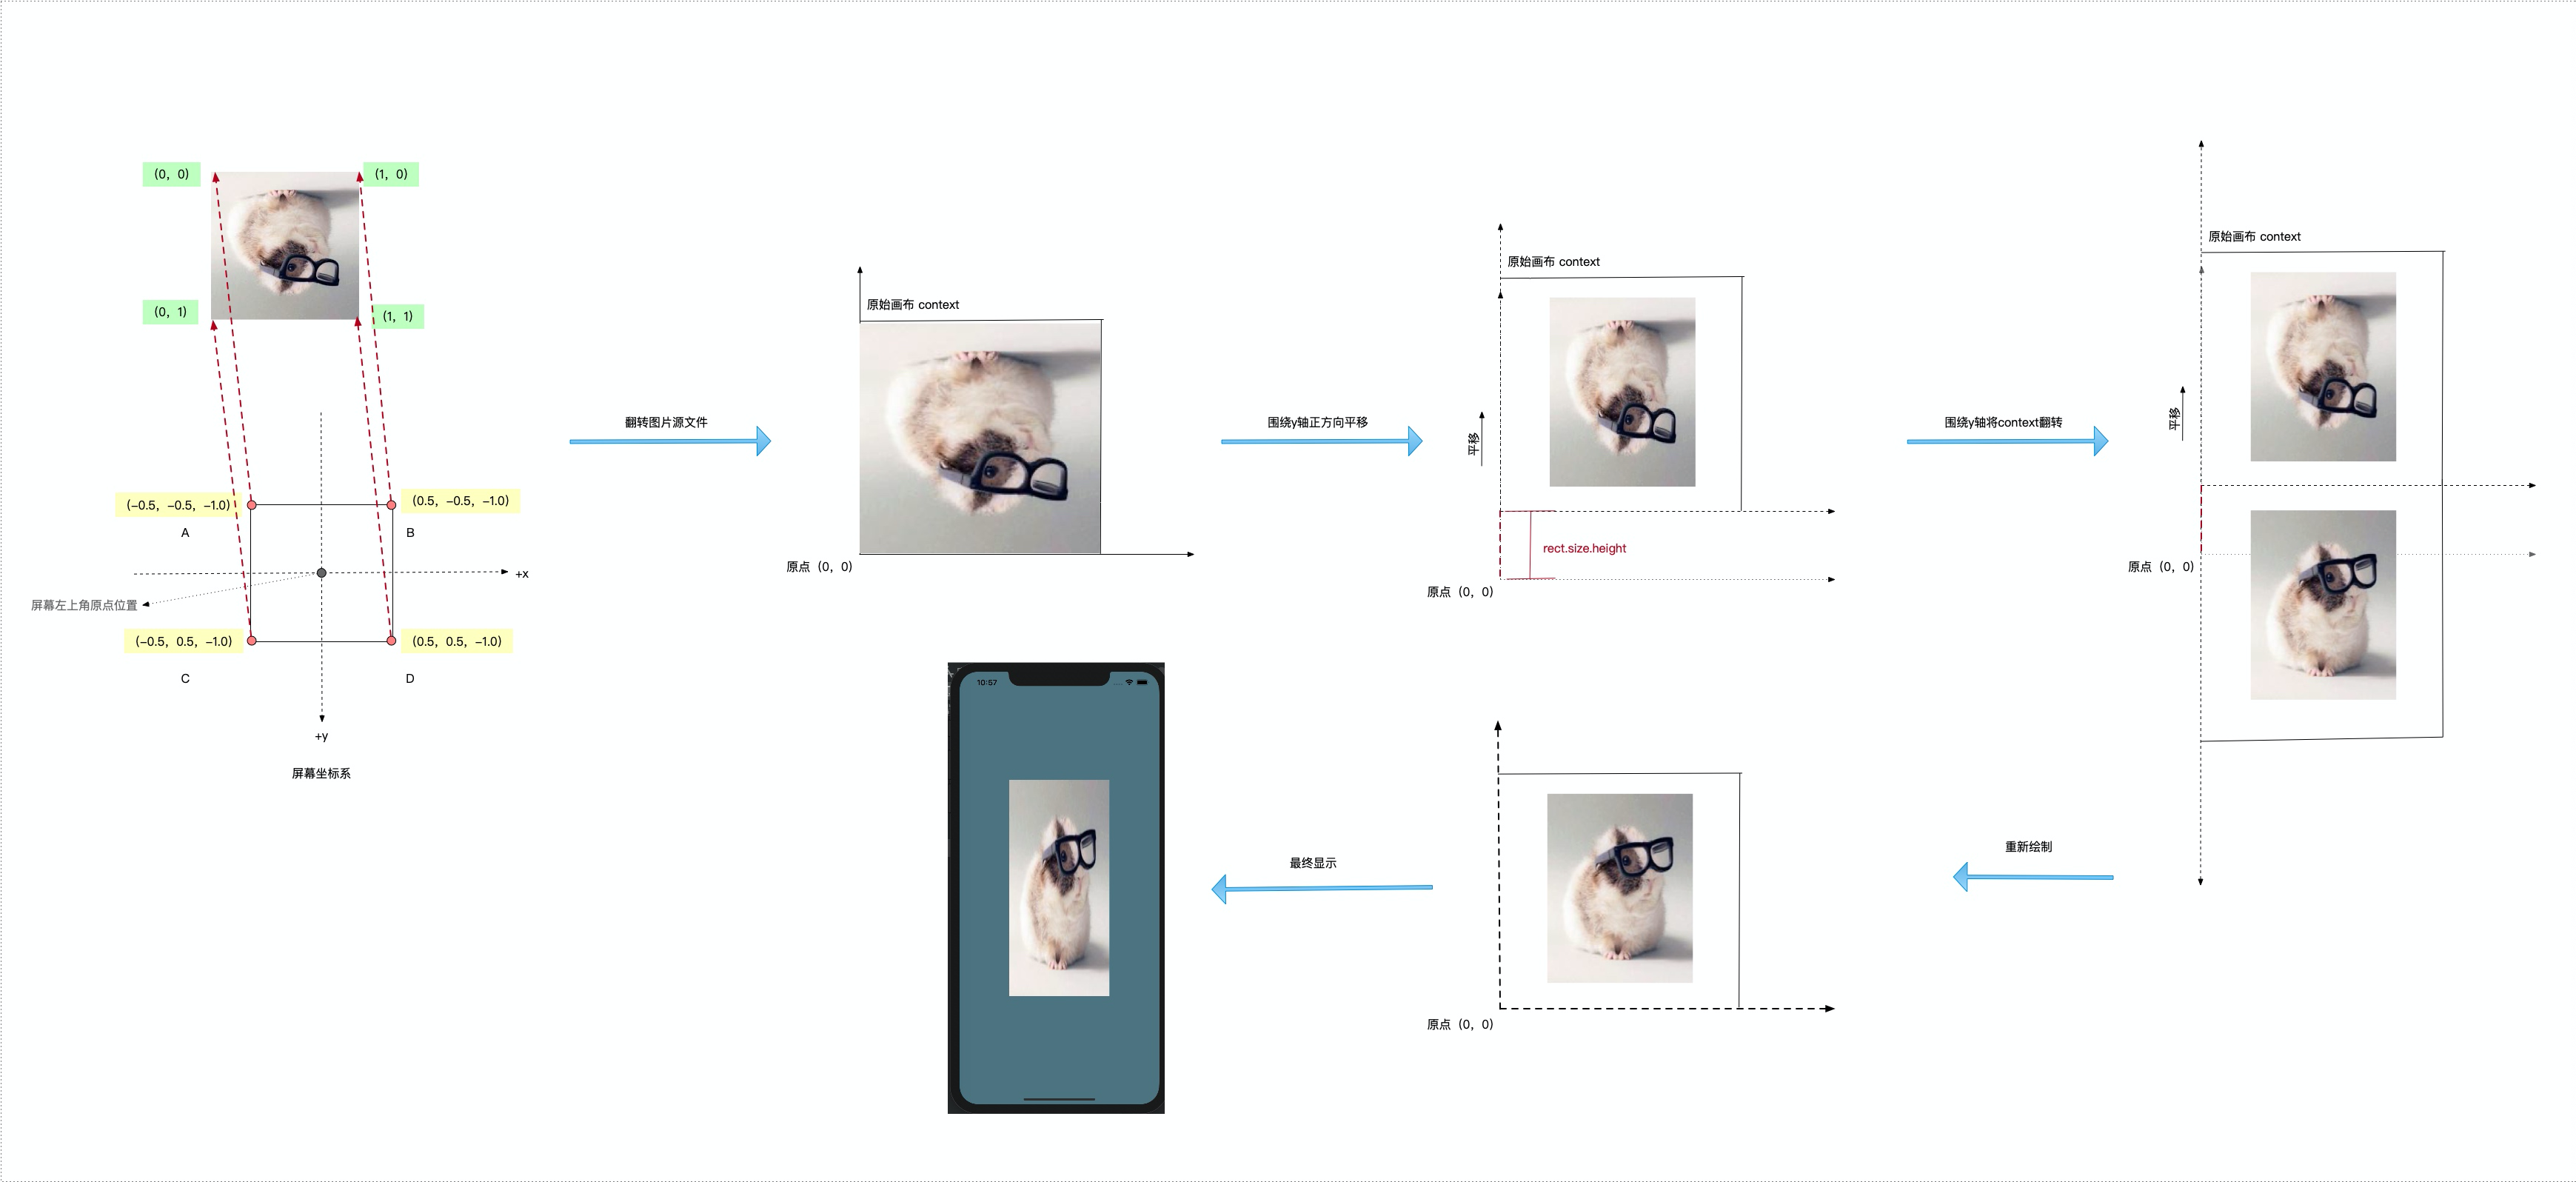
方案三:修改片元着色器,纹理坐标围绕y轴翻转
将 shaderf.fsh 中的 gl_FragColor = texture2D(colorMap, varyTextCoord); 改为 gl_FragColor = texture2D(colorMap, vec2(varyTextCoord.x,1.0-varyTextCoord.y));,将纹理坐标围绕y轴翻转
如下图所示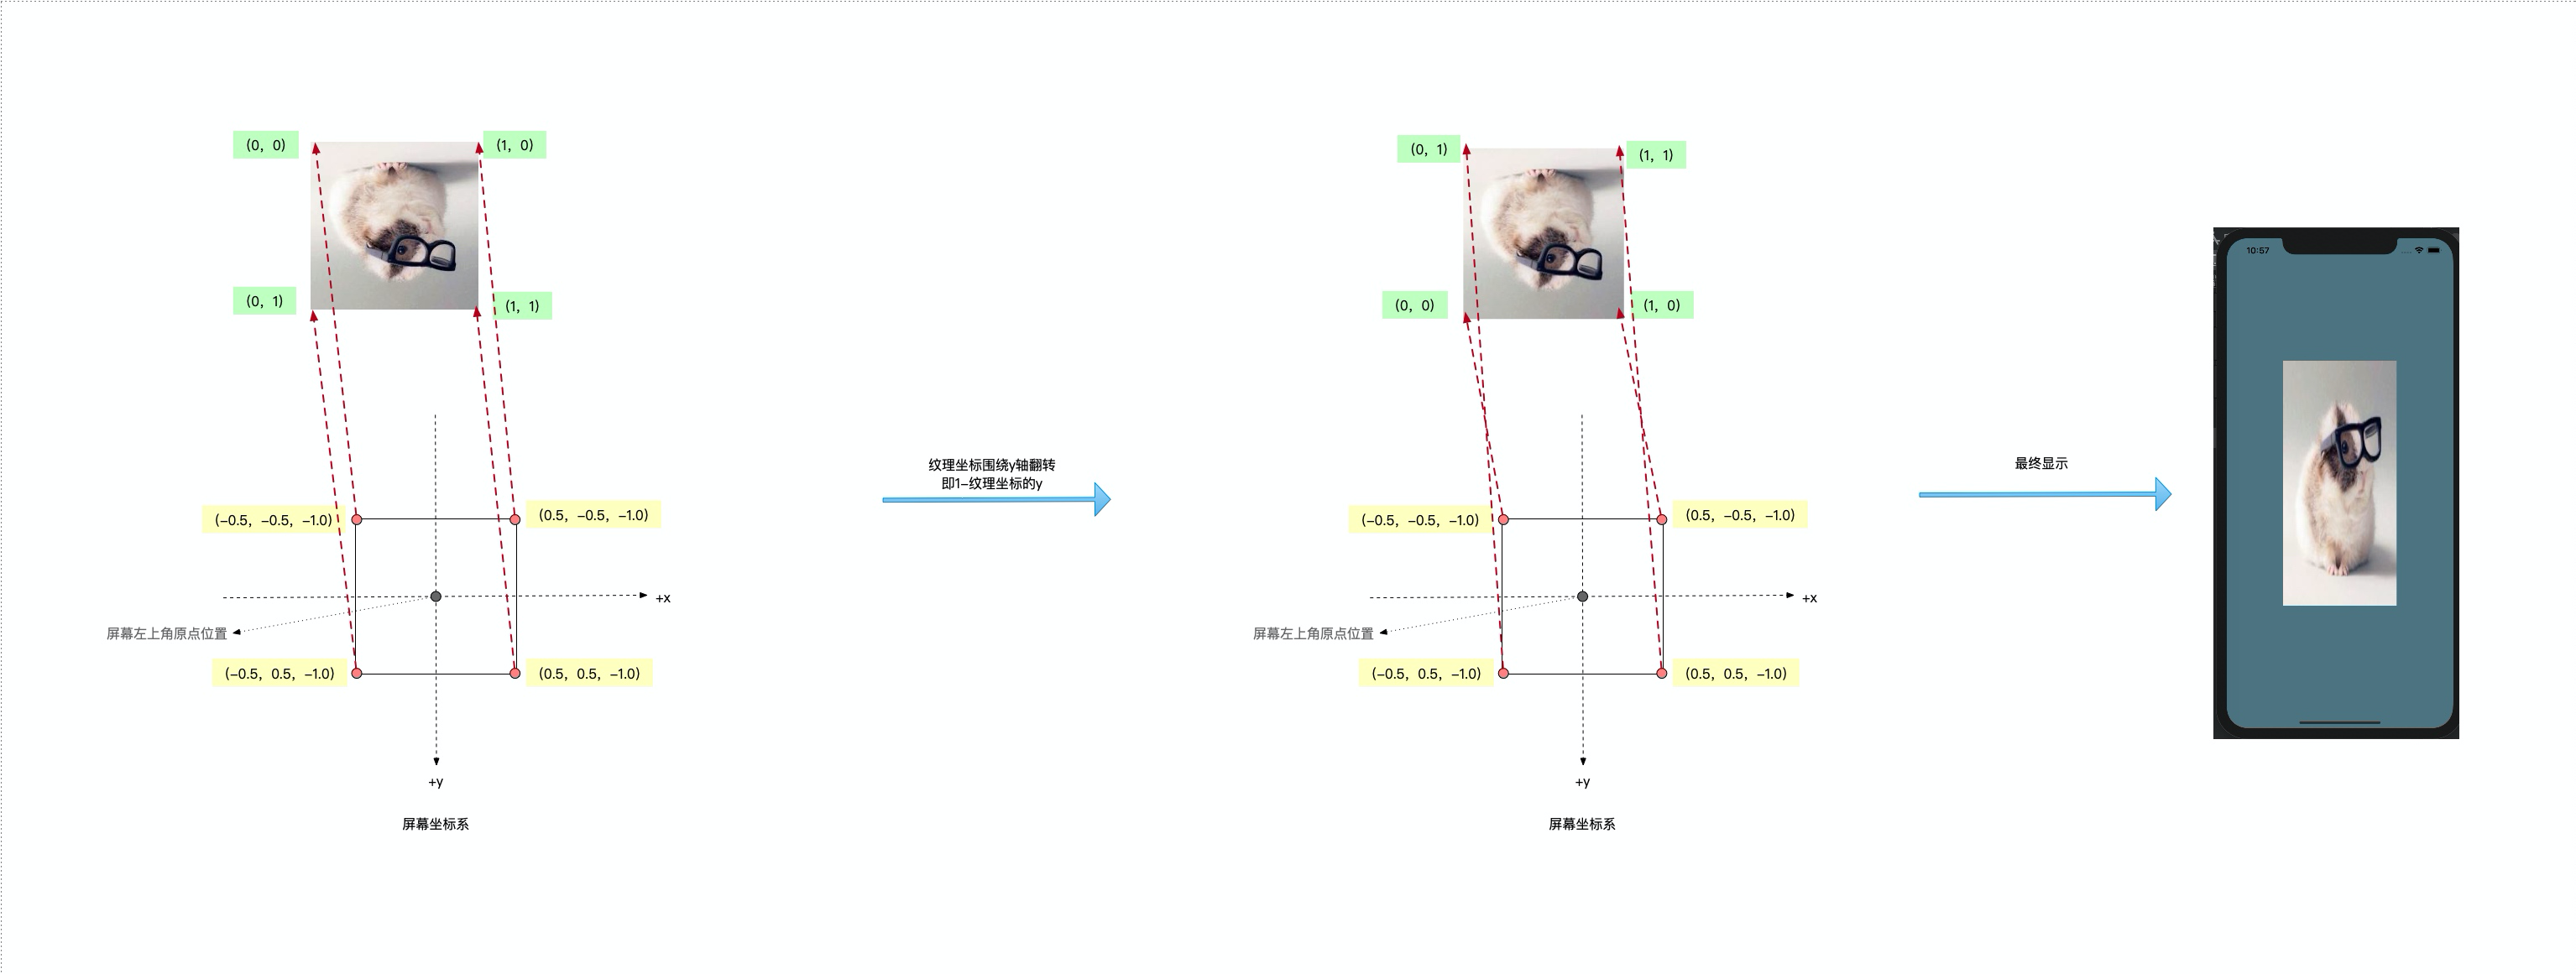
varying lowp vec2 varyTextCoord;uniform sampler2D colorMap;void main(){//gl_FragColor = texture2D(colorMap, varyTextCoord);gl_FragColor = texture2D(colorMap, vec2(varyTextCoord.x,1.0-varyTextCoord.y));}
方案四:修改顶点着色器,纹理坐标围绕y轴翻转
将 shaderv.vsh 中的 varyTextCoord = textCoordinate; 改为 varyTextCoord = vec2(textCoordinate.x,1.0-textCoordinate.y);,将纹理坐标围绕y轴翻转,其实方案四与方案三是一个原理,只是在不同的着色器中修改纹理坐标
attribute vec4 position;attribute vec2 textCoordinate;varying lowp vec2 varyTextCoord;void main(){//varyTextCoord = textCoordinate;varyTextCoord = vec2(textCoordinate.x,1.0-textCoordinate.y);gl_Position = position;}
方案五:直接修改顶点数组中的纹理坐标
原理同3、4一致,只是直接在顶点数组中修改源数据
- 原顶点数据数组
GLfloat attrArr[] ={0.5f, -0.5f, -1.0f, 1.0f, 0.0f,-0.5f, 0.5f, -1.0f, 0.0f, 1.0f,-0.5f, -0.5f, -1.0f, 0.0f, 0.0f,0.5f, 0.5f, -1.0f, 1.0f, 1.0f,-0.5f, 0.5f, -1.0f, 0.0f, 1.0f,0.5f, -0.5f, -1.0f, 1.0f, 0.0f,};
- 修改后的顶点数组
GLfloat attrArr[] ={0.5f, -0.5f, -1.0f, 1.0f, 1.0f,-0.5f, 0.5f, -1.0f, 0.0f, 0.0f,-0.5f, -0.5f, -1.0f, 0.0f, 1.0f,0.5f, 0.5f, -1.0f, 1.0f, 0.0f,-0.5f, 0.5f, -1.0f, 0.0f, 0.0f,0.5f, -0.5f, -1.0f, 1.0f, 1.0f,};
方案六:直接翻转顶点着色器中的顶点
在翻转顶点时,就不是直接对Y值用1去减,因为顶点的取值范围是[-1 1] ,所以我们直接加上负号做翻转即可
原理如图所示
attribute vec4 position;attribute vec2 textCoordinate;varying lowp vec2 varyTextCoord;void main(){varyTextCoord = textCoordinate;gl_Position = vec4(position.x, -position.y, position.z, 1);}
总结
根据本文提及的6个方案,可以简单归纳为以下三种倒置翻转的思路
- 翻转纹理坐标(可以在顶点着色器、片元着色器,甚至顶点数组中修改):方案三、方案四、方案五
- 翻转顶点坐标(通过矩阵旋转,或者定点着色器中修改顶点坐标):方案一、方案六
- 图片源文件翻转(其实也是通过将context通过矩阵变换进行翻转):方案二

若有收获,就点个赞吧
0 人点赞
