Containerd 仍然采用标准的 C/S 架构,服务端通过 GRPC 协议提供稳定的 API,客户端通过调用服务端的 API 进行高级的操作。
为了解耦,Containerd 将不同的职责划分给不同的组件,每个组件就相当于一个子系统(subsystem)。连接不同子系统的组件被称为模块。
总体上 Containerd 被划分为两个子系统:
- Bundle : 在 Containerd 中,
Bundle包含了配置、元数据和根文件系统数据,你可以理解为容器的文件系统。而 Bundle 子系统允许用户从镜像中提取和打包 Bundles。 - Runtime : Runtime 子系统用来执行 Bundles,比如创建容器。
其中,每一个子系统的行为都由一个或多个模块协作完成(架构图中的 Core 部分)。每一种类型的模块都以插件的形式集成到 Containerd 中,而且插件之间是相互依赖的。例如,上图中的每一个长虚线的方框都表示一种类型的插件,包括 Service Plugin、Metadata Plugin、GC Plugin、Runtime Plugin 等,其中 Service Plugin 又会依赖 Metadata Plugin、GC Plugin 和 Runtime Plugin。每一个小方框都表示一个细分的插件,例如 Metadata Plugin 依赖 Containers Plugin、Content Plugin 等。总之,万物皆插件,插件就是模块,模块就是插件。
这里介绍几个常用的插件:
- Content Plugin : 提供对镜像中可寻址内容的访问,所有不可变的内容都被存储在这里。
- Snapshot Plugin : 用来管理容器镜像的文件系统快照。镜像中的每一个 layer 都会被解压成文件系统快照,类似于 Docker 中的
graphdriver。 - Metrics : 暴露各个组件的监控指标。
从总体来看,Containerd 被分为三个大块:Storage、Metadata 和 Runtime,可以将上面的架构图提炼一下: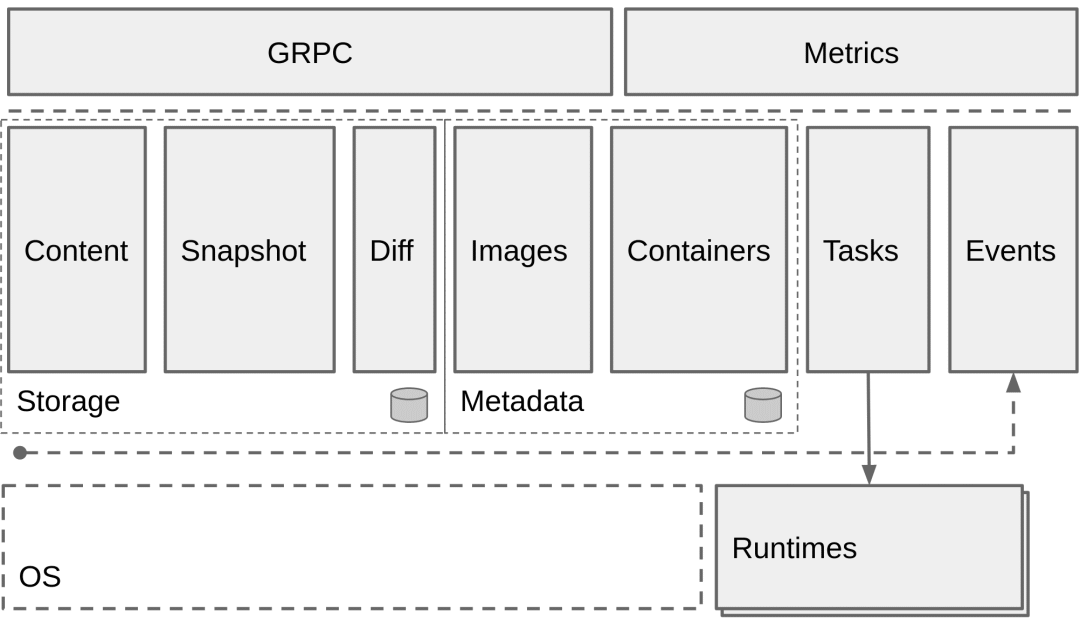
这是使用 bucketbench 对 Docker、crio 和 Containerd 的性能测试结果,包括启动、停止和删除容器,以比较它们所耗的时间: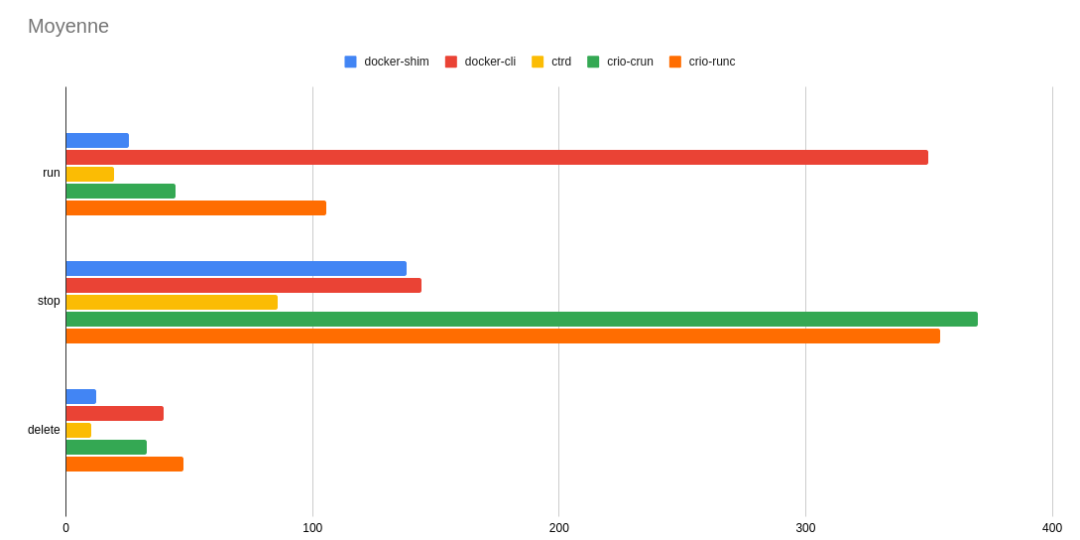
可以看到 Containerd 在各个方面都表现良好,总体性能还是优越于 Docker 和 crio 的。
3. Containerd 安装
了解了 Containerd 的概念后,就可以动手安装体验一把了。本文的演示环境为 Ubuntu 18.04。
安装依赖
为 seccomp 安装依赖:
🐳 → sudo apt-get update🐳 → sudo apt-get install libseccomp2
下载并解压 Containerd 程序
Containerd 提供了两个压缩包,一个叫 containerd-${VERSION}.${OS}-${ARCH}.tar.gz,另一个叫 cri-containerd-${VERSION}.${OS}-${ARCH}.tar.gz。其中 cri-containerd-${VERSION}.${OS}-${ARCH}.tar.gz 包含了所有 Kubernetes 需要的二进制文件。如果你只是本地测试,可以选择前一个压缩包;如果是作为 Kubernetes 的容器运行时,需要选择后一个压缩包。
Containerd 是需要调用 runc 的,而第一个压缩包是不包含 runc 二进制文件的,如果你选择第一个压缩包,还需要提前安装 runc。所以我建议直接使用 cri-containerd 压缩包。
首先从 release 页面下载最新版本的压缩包,当前最新版本为 1.4.3:
🐳 → wget https://github.com/containerd/containerd/releases/download/v1.4.3/cri-containerd-cni-1.4.3-linux-amd64.tar.gz# 也可以替换成下面的 URL 加速下载🐳 → wget https://download.fastgit.org/containerd/containerd/releases/download/v1.4.3/cri-containerd-cni-1.4.3-linux-amd64.tar.gz
可以通过 tar 的 -t 选项直接看到压缩包中包含哪些文件:
🐳 → tar -tf cri-containerd-cni-1.4.3-linux-amd64.tar.gzetc/etc/cni/etc/cni/net.d/etc/cni/net.d/10-containerd-net.conflistetc/crictl.yamletc/systemd/etc/systemd/system/etc/systemd/system/containerd.serviceusr/usr/local/usr/local/bin/usr/local/bin/containerd-shim-runc-v2usr/local/bin/ctrusr/local/bin/containerd-shimusr/local/bin/containerd-shim-runc-v1usr/local/bin/crictlusr/local/bin/critestusr/local/bin/containerdusr/local/sbin/usr/local/sbin/runcopt/opt/cni/opt/cni/bin/opt/cni/bin/vlanopt/cni/bin/host-localopt/cni/bin/flannelopt/cni/bin/bridgeopt/cni/bin/host-deviceopt/cni/bin/tuningopt/cni/bin/firewallopt/cni/bin/bandwidthopt/cni/bin/ipvlanopt/cni/bin/sbropt/cni/bin/dhcpopt/cni/bin/portmapopt/cni/bin/ptpopt/cni/bin/staticopt/cni/bin/macvlanopt/cni/bin/loopbackopt/containerd/opt/containerd/cluster/opt/containerd/cluster/versionopt/containerd/cluster/gce/opt/containerd/cluster/gce/cni.templateopt/containerd/cluster/gce/configure.shopt/containerd/cluster/gce/cloud-init/opt/containerd/cluster/gce/cloud-init/master.yamlopt/containerd/cluster/gce/cloud-init/node.yamlopt/containerd/cluster/gce/env
直接将压缩包解压到系统的各个目录中:
🐳 → sudo tar -C / -xzf cri-containerd-cni-1.4.3-linux-amd64.tar.gz
将 /usr/local/bin 和 /usr/local/sbin 追加到 ~/.bashrc 文件的 $PATH 环境变量中:
export PATH=$PATH:/usr/local/bin:/usr/local/sbin
立即生效:
🐳 → source ~/.bashrc
查看版本:
🐳 → ctr versionClient:Version: v1.4.3Revision: 269548fa27e0089a8b8278fc4fc781d7f65a939bGo version: go1.15.5Server:Version: v1.4.3Revision: 269548fa27e0089a8b8278fc4fc781d7f65a939bUUID: d1724999-91b3-4338-9288-9a54c9d52f70
生成配置文件
Containerd 的默认配置文件为 /etc/containerd/config.toml,我们可以通过命令来生成一个默认的配置:
🐳 → mkdir /etc/containerd🐳 → containerd config default > /etc/containerd/config.toml
镜像加速
由于某些不可描述的因素,在国内拉取公共镜像仓库的速度是极慢的,为了节约拉取时间,需要为 Containerd 配置镜像仓库的 mirror。Containerd 的镜像仓库 mirror 与 Docker 相比有两个区别:
- Containerd 只支持通过
CRI拉取镜像的 mirror,也就是说,只有通过crictl或者 Kubernetes 调用时 mirror 才会生效,通过ctr拉取是不会生效的。 Docker只支持为Docker Hub配置 mirror,而Containerd支持为任意镜像仓库配置 mirror。
配置镜像加速之前,先来看下 Containerd 的配置结构,乍一看可能会觉得很复杂,复杂就复杂在 plugin 的配置部分:
[plugins][plugins."io.containerd.gc.v1.scheduler"]pause_threshold = 0.02deletion_threshold = 0mutation_threshold = 100schedule_delay = "0s"startup_delay = "100ms"[plugins."io.containerd.grpc.v1.cri"]disable_tcp_service = truestream_server_address = "127.0.0.1"stream_server_port = "0"stream_idle_timeout = "4h0m0s"enable_selinux = falsesandbox_image = "k8s.gcr.io/pause:3.1"stats_collect_period = 10systemd_cgroup = falseenable_tls_streaming = falsemax_container_log_line_size = 16384disable_cgroup = falsedisable_apparmor = falserestrict_oom_score_adj = falsemax_concurrent_downloads = 3disable_proc_mount = false[plugins."io.containerd.grpc.v1.cri".containerd]snapshotter = "overlayfs"default_runtime_name = "runc"no_pivot = false[plugins."io.containerd.grpc.v1.cri".containerd.default_runtime]runtime_type = ""runtime_engine = ""runtime_root = ""privileged_without_host_devices = false[plugins."io.containerd.grpc.v1.cri".containerd.untrusted_workload_runtime]runtime_type = ""runtime_engine = ""runtime_root = ""privileged_without_host_devices = false[plugins."io.containerd.grpc.v1.cri".containerd.runtimes][plugins."io.containerd.grpc.v1.cri".containerd.runtimes.runc]runtime_type = "io.containerd.runc.v1"runtime_engine = ""runtime_root = ""privileged_without_host_devices = false[plugins."io.containerd.grpc.v1.cri".cni]bin_dir = "/opt/cni/bin"conf_dir = "/etc/cni/net.d"max_conf_num = 1conf_template = ""[plugins."io.containerd.grpc.v1.cri".registry][plugins."io.containerd.grpc.v1.cri".registry.mirrors][plugins."io.containerd.grpc.v1.cri".registry.mirrors."docker.io"]endpoint = ["https://registry-1.docker.io"][plugins."io.containerd.grpc.v1.cri".x509_key_pair_streaming]tls_cert_file = ""tls_key_file = ""[plugins."io.containerd.internal.v1.opt"]path = "/opt/containerd"[plugins."io.containerd.internal.v1.restart"]interval = "10s"[plugins."io.containerd.metadata.v1.bolt"]content_sharing_policy = "shared"[plugins."io.containerd.monitor.v1.cgroups"]no_prometheus = false[plugins."io.containerd.runtime.v1.linux"]shim = "containerd-shim"runtime = "runc"runtime_root = ""no_shim = falseshim_debug = false[plugins."io.containerd.runtime.v2.task"]platforms = ["linux/amd64"][plugins."io.containerd.service.v1.diff-service"]default = ["walking"][plugins."io.containerd.snapshotter.v1.devmapper"]root_path = ""pool_name = ""base_image_size = ""
每一个顶级配置块的命名都是 plugins."io.containerd.xxx.vx.xxx" 这种形式,其实每一个顶级配置块都代表一个插件,其中 io.containerd.xxx.vx 表示插件的类型,vx 后面的 xxx 表示插件的 ID。可以通过 ctr 一览无余:
🐳 → ctr plugin lsTYPE ID PLATFORMS STATUSio.containerd.content.v1 content - okio.containerd.snapshotter.v1 btrfs linux/amd64 errorio.containerd.snapshotter.v1 devmapper linux/amd64 errorio.containerd.snapshotter.v1 aufs linux/amd64 okio.containerd.snapshotter.v1 native linux/amd64 okio.containerd.snapshotter.v1 overlayfs linux/amd64 okio.containerd.snapshotter.v1 zfs linux/amd64 errorio.containerd.metadata.v1 bolt - okio.containerd.differ.v1 walking linux/amd64 okio.containerd.gc.v1 scheduler - okio.containerd.service.v1 containers-service - okio.containerd.service.v1 content-service - okio.containerd.service.v1 diff-service - okio.containerd.service.v1 images-service - okio.containerd.service.v1 leases-service - okio.containerd.service.v1 namespaces-service - okio.containerd.service.v1 snapshots-service - okio.containerd.runtime.v1 linux linux/amd64 okio.containerd.runtime.v2 task linux/amd64 okio.containerd.monitor.v1 cgroups linux/amd64 okio.containerd.service.v1 tasks-service - okio.containerd.internal.v1 restart - okio.containerd.grpc.v1 containers - okio.containerd.grpc.v1 content - okio.containerd.grpc.v1 diff - okio.containerd.grpc.v1 events - okio.containerd.grpc.v1 healthcheck - okio.containerd.grpc.v1 images - okio.containerd.grpc.v1 leases - okio.containerd.grpc.v1 namespaces - okio.containerd.internal.v1 opt - okio.containerd.grpc.v1 snapshots - okio.containerd.grpc.v1 tasks - okio.containerd.grpc.v1 version - okio.containerd.grpc.v1 cri linux/amd64 ok
顶级配置块下面的子配置块表示该插件的各种配置,比如 cri 插件下面就分为 containerd、cni 和 registry 的配置,而 containerd 下面又可以配置各种 runtime,还可以配置默认的 runtime。
镜像加速的配置就在 cri 插件配置块下面的 registry 配置块,所以需要修改的部分如下:
[plugins."io.containerd.grpc.v1.cri".registry][plugins."io.containerd.grpc.v1.cri".registry.mirrors][plugins."io.containerd.grpc.v1.cri".registry.mirrors."docker.io"]endpoint = ["https://dockerhub.mirrors.nwafu.edu.cn"][plugins."io.containerd.grpc.v1.cri".registry.mirrors."k8s.gcr.io"]endpoint = ["https://registry.aliyuncs.com/k8sxio"][plugins."io.containerd.grpc.v1.cri".registry.mirrors."gcr.io"]endpoint = ["xxx"]
- registry.mirrors.”xxx” : 表示需要配置 mirror 的镜像仓库。例如,
registry.mirrors."docker.io"表示配置 docker.io 的 mirror。 - endpoint : 表示提供 mirror 的镜像加速服务。例如,这里推荐使用西北农林科技大学提供的镜像加速服务作为
docker.io的 mirror。
至于 gcr.io,目前还没有公共的加速服务。我自己掏钱搭了个加速服务,拉取速度大概是 3M/s 左右,有加速需求的同学可以通过微信号:cloud-native-yang 加我为好友再详细咨询。
存储配置
Containerd 有两个不同的存储路径,一个用来保存持久化数据,一个用来保存运行时状态。
root = "/var/lib/containerd"state = "/run/containerd"
root用来保存持久化数据,包括 Snapshots, Content, Metadata 以及各种插件的数据。每一个插件都有自己单独的目录,Containerd 本身不存储任何数据,它的所有功能都来自于已加载的插件,真是太机智了。
🐳 → tree -L 2 /var/lib/containerd//var/lib/containerd/├── io.containerd.content.v1.content│ ├── blobs│ └── ingest├── io.containerd.grpc.v1.cri│ ├── containers│ └── sandboxes├── io.containerd.metadata.v1.bolt│ └── meta.db├── io.containerd.runtime.v1.linux│ └── k8s.io├── io.containerd.runtime.v2.task├── io.containerd.snapshotter.v1.aufs│ └── snapshots├── io.containerd.snapshotter.v1.btrfs├── io.containerd.snapshotter.v1.native│ └── snapshots├── io.containerd.snapshotter.v1.overlayfs│ ├── metadata.db│ └── snapshots└── tmpmounts18 directories, 2 files
state 用来保存临时数据,包括 sockets、pid、挂载点、运行时状态以及不需要持久化保存的插件数据。
🐳 → tree -L 2 /run/containerd//run/containerd/├── containerd.sock├── containerd.sock.ttrpc├── io.containerd.grpc.v1.cri│ ├── containers│ └── sandboxes├── io.containerd.runtime.v1.linux│ └── k8s.io├── io.containerd.runtime.v2.task└── runc└── k8s.io8 directories, 2 files
OOM
还有一项配置需要留意:
oom_score = 0
Containerd 是容器的守护者,一旦发生内存不足的情况,理想的情况应该是先杀死容器,而不是杀死 Containerd。所以需要调整 Containerd 的 OOM 权重,减少其被 OOM Kill 的几率。最好是将 oom_score 的值调整为比其他守护进程略低的值。这里的 oom_socre 其实对应的是 /proc/<pid>/oom_socre_adj,在早期的 Linux 内核版本里使用 oom_adj 来调整权重, 后来改用 oom_socre_adj 了。该文件描述如下:
The value of
/proc/<pid>/oom_score_adjis added to the badness score before it is used to determine which task to kill. Acceptable values range from -1000 (OOM_SCORE_ADJ_MIN) to +1000 (OOM_SCORE_ADJ_MAX). This allows userspace to polarize the preference for oom killing either by always preferring a certain task or completely disabling it. The lowest possible value, -1000, is equivalent to disabling oom killing entirely for that task since it will always report a badness score of 0.
在计算最终的 badness score 时,会在计算结果是中加上 oom_score_adj ,这样用户就可以通过该在值来保护某个进程不被杀死或者每次都杀某个进程。其取值范围为 -1000 到 1000。
如果将该值设置为 -1000,则进程永远不会被杀死,因为此时 badness score 永远返回0。
建议 Containerd 将该值设置为 -999 到 0 之间。如果作为 Kubernetes 的 Worker 节点,可以考虑设置为 -999。
Systemd 配置
建议通过 systemd 配置 Containerd 作为守护进程运行,配置文件在上文已经被解压出来了:
🐳 → cat /etc/systemd/system/containerd.service# Copyright The containerd Authors.## Licensed under the Apache License, Version 2.0 (the "License");# you may not use this file except in compliance with the License.# You may obtain a copy of the License at## http://www.apache.org/licenses/LICENSE-2.0## Unless required by applicable law or agreed to in writing, software# distributed under the License is distributed on an "AS IS" BASIS,# WITHOUT WARRANTIES OR CONDITIONS OF ANY KIND, either express or implied.# See the License for the specific language governing permissions and# limitations under the License.[Unit]Description=containerd container runtimeDocumentation=https://containerd.ioAfter=network.target local-fs.target[Service]ExecStartPre=-/sbin/modprobe overlayExecStart=/usr/local/bin/containerdType=notifyDelegate=yesKillMode=processRestart=alwaysRestartSec=5# Having non-zero Limit*s causes performance problems due to accounting overhead# in the kernel. We recommend using cgroups to do container-local accounting.LimitNPROC=infinityLimitCORE=infinityLimitNOFILE=1048576# Comment TasksMax if your systemd version does not supports it.# Only systemd 226 and above support this version.TasksMax=infinityOOMScoreAdjust=-999[Install]WantedBy=multi-user.target
这里有两个重要的参数:
- Delegate : 这个选项允许 Containerd 以及运行时自己管理自己创建的容器的
cgroups。如果不设置这个选项,systemd 就会将进程移到自己的cgroups中,从而导致 Containerd 无法正确获取容器的资源使用情况。 - KillMode : 这个选项用来处理 Containerd 进程被杀死的方式。默认情况下,systemd 会在进程的 cgroup 中查找并杀死 Containerd 的所有子进程,这肯定不是我们想要的。
KillMode字段可以设置的值如下。
我们需要将 KillMode 的值设置为process,这样可以确保升级或重启 Containerd 时不杀死现有的容器。- control-group(默认值):当前控制组里面的所有子进程,都会被杀掉
- process:只杀主进程
- mixed:主进程将收到 SIGTERM 信号,子进程收到 SIGKILL 信号
- none:没有进程会被杀掉,只是执行服务的 stop 命令。
现在到了最关键的一步:启动 Containerd。执行一条命令就完事:
🐳 → systemctl enable containerd --now
接下来进入本文最后一部分:Containerd 的基本使用方式。本文只会介绍 Containerd 的本地使用方法,即本地客户端 ctr 的使用方法,不会涉及到 crictl,后面有机会再介绍 crictl。
4. Containerd 快速安装
如果你想在一分钟内快速装好 Kubernetes 和 Containerd,可以使用 Sealos 来部署。该项目旨在做一个简单干净轻量级稳定的 kubernetes 安装工具,一条命令,离线安装,包含所有依赖,内核负载不依赖 haproxy keepalived,纯 golang 开发,99 年证书。1.12.0 版本的离线包搭载了最新版本的 Containerd,还支持 arm64 架构,简直就是简直了。
部署方法特别简单,首先下载并安装 sealos, sealos 是个 golang 的二进制工具,直接下载拷贝到 bin 目录即可, release 页面也可下载:
🐳 → wget -c https://sealyun.oss-cn-beijing.aliyuncs.com/latest/sealos🐳 → chmod +x sealos && mv sealos /usr/bin
下载离线资源包:
🐳 → wget -c https://sealyun.oss-cn-beijing.aliyuncs.com/7b6af025d4884fdd5cd51a674994359c-1.18.0/kube1.18.0.tar.gz
安装一个三 master 的高可用 Kubernetes 集群:
🐳 → sealos init --passwd 123456--master 192.168.0.2 --master 192.168.0.3 --master 192.168.0.4--node 192.168.0.5--pkg-url /root/kube1.18.0.tar.gz--version v1.18.0
然后就完事了。。。
详细使用方式请访问 https://sealyun.com。
5. ctr 使用
ctr 目前很多功能做的还没有 docker 那么完善,但基本功能已经具备了。下面将围绕镜像和容器这两个方面来介绍其使用方法。
镜像
镜像下载:
🐳 → ctr i pull docker.io/library/nginx:alpinedocker.io/library/nginx:alpine: resolved |++++++++++++++++++++++++++++++++++++++|index-sha256:efc93af57bd255ffbfb12c89ec0714dd1a55f16290eb26080e3d1e7e82b3ea66: done |++++++++++++++++++++++++++++++++++++++|manifest-sha256:6ceeeab513f7d15cea38c1f8dfe5455323b5a1bfd568516b3b0ee70406f75247: done |++++++++++++++++++++++++++++++++++++++|config-sha256:0fde4fb87e476fd1655b3f04f55aa5b4b3ef7de7c701eb46573bb5a5dcf66fd2: done |++++++++++++++++++++++++++++++++++++++|layer-sha256:abaddf4965e5e9ce9953f2e136b3bf9cc15365adbcf0c68b108b1cc26c12b1be: done |++++++++++++++++++++++++++++++++++++++|layer-sha256:05e7bc50f07f000e9993ec0d264b9ffcbb9a01a4d69c68f556d25e9811a8f7f4: done |++++++++++++++++++++++++++++++++++++++|layer-sha256:c78f7f670e47cf98494e7dbe08e463d34c160bf6a5939a2155ff4438cb8b0e80: done |++++++++++++++++++++++++++++++++++++++|layer-sha256:ce77cf6a2ede66c463dcdd39f1a43cfbac3723a99e94f697bc20faee0f7cce1b: done |++++++++++++++++++++++++++++++++++++++|layer-sha256:3080fd9f46494247c9298a6a3d9694f03f6a32898a07ffbe1c17a0752bae5c4e: done |++++++++++++++++++++++++++++++++++++++|elapsed: 17.3s total: 8.7 Mi (513.8 KiB/s)unpacking linux/amd64 sha256:efc93af57bd255ffbfb12c89ec0714dd1a55f16290eb26080e3d1e7e82b3ea66...done
本地镜像列表查询:
🐳 → ctr i lsREF TYPE DIGEST SIZE PLATFORMS LABELSdocker.io/library/nginx:alpine application/vnd.docker.distribution.manifest.list.v2+json sha256:efc93af57bd255ffbfb12c89ec0714dd1a55f16290eb26080e3d1e7e82b3ea66 9.3 MiB linux/386,linux/amd64,linux/arm/v6,linux/arm/v7,linux/arm64/v8,linux/ppc64le,linux/s390x -
这里需要注意PLATFORMS,它是镜像的能够运行的平台标识。
将镜像挂载到主机目录:
🐳 → ctr i mount docker.io/library/nginx:alpine /mnt🐳 → tree -L 1 /mnt/mnt├── bin├── dev├── docker-entrypoint.d├── docker-entrypoint.sh├── etc├── home├── lib├── media├── mnt├── opt├── proc├── root├── run├── sbin├── srv├── sys├── tmp├── usr└── var18 directories, 1 file
将镜像从主机目录上卸载:
🐳 → ctr i unmount /mnt
将镜像导出为压缩包:
🐳 → ctr i export nginx.tar.gz docker.io/library/nginx:alpine
从压缩包导入镜像:
🐳 → ctr i import nginx.tar.gz
其他操作可以自己查看帮助:
🐳 → ctr i --helpNAME:ctr images - manage imagesUSAGE:ctr images command [command options] [arguments...]COMMANDS:check check that an image has all content available locallyexport export imagesimport import imageslist, ls list images known to containerdmount mount an image to a target pathunmount unmount the image from the targetpull pull an image from a remotepush push an image to a remoteremove, rm remove one or more images by referencetag tag an imagelabel set and clear labels for an imageOPTIONS:--help, -h show help
对镜像的更高级操作可以使用子命令 content,例如在线编辑镜像的 blob 并生成一个新的 digest:
🐳 → ctr content lsDIGEST SIZE AGE LABELS......sha256:fdd7fff110870339d34cf071ee90fbbe12bdbf3d1d9a14156995dfbdeccd7923 740B 7 days containerd.io/gc.ref.content.2=sha256:4e537e26e21bf61836f827e773e6e6c3006e3c01c6d59f4b058b09c2753bb929,containerd.io/gc.ref.content.1=sha256:188c0c94c7c576fff0792aca7ec73d67a2f7f4cb3a6e53a84559337260b36964,containerd.io/gc.ref.content.0=sha256:b7199797448c613354489644be1f60aa2d8e9c2278989100c72ede3001334f7b,containerd.io/distribution.source.ghcr.fuckcloudnative.io=yangchuansheng/grafana-backup-tool🐳 → ctr content edit --editor vim sha256:fdd7fff110870339d34cf071ee90fbbe12bdbf3d1d9a14156995dfbdeccd7923
容器
创建容器:
🐳 → ctr c create docker.io/library/nginx:alpine nginx🐳 → ctr c lsCONTAINER IMAGE RUNTIMEnginx docker.io/library/nginx:alpine io.containerd.runc.v2
查看容器的详细配置:
# 和 docker inspect 类似🐳 → ctr c info nginx
其他操作可以自己查看帮助:
🐳 → ctr c --helpNAME:ctr containers - manage containersUSAGE:ctr containers command [command options] [arguments...]COMMANDS:create create containerdelete, del, rm delete one or more existing containersinfo get info about a containerlist, ls list containerslabel set and clear labels for a containercheckpoint checkpoint a containerrestore restore a container from checkpointOPTIONS:--help, -h show help
任务
上面 create 的命令创建了容器后,并没有处于运行状态,只是一个静态的容器。一个 container 对象只是包含了运行一个容器所需的资源及配置的数据结构,这意味着 namespaces、rootfs 和容器的配置都已经初始化成功了,只是用户进程(这里是 nginx)还没有启动。
然而一个容器真正的运行起来是由 task 对象实现的,task 代表任务的意思,可以为容器设置网卡,还可以配置工具来对容器进行监控等。
所以还需要通过 task 启动容器:
🐳 → ctr task start -d nginx🐳 → ctr task lsTASK PID STATUSnginx 131405 RUNNING
当然,也可以一步到位直接创建并运行容器:
🐳 → ctr run -d docker.io/library/nginx:alpine nginx
进入容器:
# 和 docker 的操作类似,但必须要指定 --exec-id,这个 id 可以随便写,只要唯一就行🐳 → ctr task exec --exec-id 0 -t nginx sh
暂停容器:
# 和 docker pause 类似🐳 → ctr task pause nginx
容器状态变成了 PAUSED:
🐳 → ctr task lsTASK PID STATUSnginx 149857 PAUSED
恢复容器:
🐳 → ctr task resume nginx
ctr 没有 stop 容器的功能,只能暂停或者杀死容器。
杀死容器:
🐳 → ctr task kill nginx
获取容器的 cgroup 信息:
# 这个命令用来获取容器的内存、CPU 和 PID 的限额与使用量。🐳 → ctr task metrics nginxID TIMESTAMPnginx 2020-12-15 09:15:13.943447167 +0000 UTCMETRIC VALUEmemory.usage_in_bytes 77131776memory.limit_in_bytes 9223372036854771712memory.stat.cache 6717440cpuacct.usage 194187935cpuacct.usage_percpu [0 335160 0 5395642 3547200 58559242 0 0 0 0 0 0 6534104 5427871 3032481 2158941 8513633 4620692 8261063 3885961 3667830 0 4367411 356280 0 0 0 0 0 0 0 0 0 0 0 0 0 0 0 0 0 0 0 0 0 0 0 0 0 1585841 0 7754942 5818102 21430929 0 0 0 0 0 0 1811840 2241260 2673960 6041161 8210604 2991221 10073713 1111020 3139751 0 640080 0 0 0 0 0 0 0 0 0 0 0 0 0 0 0 0 0 0 0 0 0 0 0 0 0 0 0 0 0 0 0 0 0 0 0 0 0 0 0 0 0 0 0 0 0 0 0 0 0 0 0 0 0 0 0 0 0 0 0 0 0 0 0 0 0 0 0 0 0 0 0 0 0 0 0 0 0 0 0 0 0 0 0 0 0 0 0 0 0 0 0 0 0 0 0 0 0 0 0 0 0 0 0 0 0 0 0 0 0 0 0 0 0 0 0 0 0 0 0 0 0 0 0 0 0 0 0 0 0 0 0 0 0 0 0 0 0 0 0 0 0 0 0 0 0 0 0 0 0 0 0 0 0 0 0 0 0 0 0 0 0 0 0 0 0 0 0 0 0 0 0 0 0 0 0 0 0 0 0 0 0 0 0 0 0]pids.current 97pids.limit 0
查看容器中所有进程的 PID:
🐳 → ctr task ps nginxPID INFO149857 -149921 -149922 -149923 -149924 -149925 -149926 -149928 -149929 -149930 -149932 -149933 -149934 -...
注意:这里的 PID 是宿主机看到的 PID,不是容器中看到的 PID。
命名空间
除了 k8s 有命名空间以外,Containerd 也支持命名空间。
🐳 → ctr ns lsNAME LABELSdefault
如果不指定,ctr 默认是 default 空间。
目前 Containerd 的定位还是解决运行时,所以目前他还不能完全替代 dockerd,例如使用 Dockerfile 来构建镜像。其实这不是什么大问题,我再给大家介绍一个大招:Containerd 和 Docker 一起用!
Containerd + Docker
事实上,Docker 和 Containerd 是可以同时使用的,只不过 Docker 默认使用的 Containerd 的命名空间不是 default,而是 moby。下面就是见证奇迹的时刻。
首先从其他装了 Docker 的机器或者 GitHub 上下载 Docker 相关的二进制文件,然后使用下面的命令启动 Docker:
🐳 → dockerd --containerd /run/containerd/containerd.sock --cri-containerd
接着用 Docker 运行一个容器:
🐳 → docker run -d --name nginx nginx:alpine
现在再回过头来查看 Containerd 的命名空间:
🐳 → ctr ns lsNAME LABELSdefaultmoby
查看该命名空间下是否有容器:
🐳 → ctr -n moby c lsCONTAINER IMAGE RUNTIMEb7093d7aaf8e1ae161c8c8ffd4499c14ba635d8e174cd03711f4f8c27818e89a - io.containerd.runtime.v1.linux
我艹,还可以酱紫?看来以后用 Containerd 不耽误我 docker build 了~~
最后提醒一句:Kubernetes 用户不用惊慌,Kubernetes 默认使用的是 Containerd 的 k8s.io 命名空间,所以 ctr -n k8s.io 就能看到 Kubernetes 创建的所有容器啦,也不用担心 crictl 不支持 load 镜像了,因为 ctr -n k8s.io 可以 load 镜像啊,嘻嘻😬
参考资料
[1]
bucketbench: https://github.com/estesp/bucketbench
[2]
release 页面: https://github.com/containerd/containerd/releases
[3]
Sealos: https://github.com/fanux/sealos

若有收获,就点个赞吧
0 人点赞
