6.1 问题提出
有如下需求,保证 account.withdraw 取款方法的线程安全
import java.util.ArrayList;import java.util.List;interface Account {// 获取余额Integer getBalance();// 取款void withdraw(Integer amount);/*** 方法内会启动 1000 个线程,每个线程做 -10 元 的操作* 如果初始余额为 10000 那么正确的结果应当是 0*/static void demo(Account account) {List<Thread> ts = new ArrayList<>();long start = System.nanoTime();for (int i = 0; i < 1000; i++) {ts.add(new Thread(() -> {account.withdraw(10);}));}ts.forEach(Thread::start);ts.forEach(t -> {try {t.join();} catch (InterruptedException e) {e.printStackTrace();}});long end = System.nanoTime();System.out.println(account.getBalance()+ " cost: " + (end-start)/1000_000 + " ms");}}
原有实现并不是线程安全的
class AccountUnsafe implements Account {private Integer balance;public AccountUnsafe(Integer balance) {this.balance = balance;}@Overridepublic Integer getBalance() {return balance;}@Overridepublic void withdraw(Integer amount) {balance -= amount;}}
执行测试代码
public static void main(String[] args) {Account.demo(new AccountUnsafe(10000));}
某次的执行结果
390 cost: 344 ms
withdraw 方法为什么不安全
public void withdraw(Integer amount) {balance -= amount;}
对应的字节码
ALOAD 0 // <- thisALOAD 0GETFIELD cn/itcast/AccountUnsafe.balance : Ljava/lang/Integer; // <- this.balanceINVOKEVIRTUAL java/lang/Integer.intValue ()I // 拆箱ALOAD 1 // <- amountINVOKEVIRTUAL java/lang/Integer.intValue ()I // 拆箱ISUB // 减法INVOKESTATIC java/lang/Integer.valueOf (I)Ljava/lang/Integer; // 结果装箱PUTFIELD cn/itcast/AccountUnsafe.balance : Ljava/lang/Integer; // -> this.balance
多线程执行流程
ALOAD 0 // thread-0 <- thisALOAD 0GETFIELD cn/itcast/AccountUnsafe.balance // thread-0 <- this.balanceINVOKEVIRTUAL java/lang/Integer.intValue // thread-0 拆箱ALOAD 1 // thread-0 <- amountINVOKEVIRTUAL java/lang/Integer.intValue // thread-0 拆箱ISUB // thread-0 减法INVOKESTATIC java/lang/Integer.valueOf // thread-0 结果装箱PUTFIELD cn/itcast/AccountUnsafe.balance // thread-0 -> this.balanceALOAD 0 // thread-1 <- thisALOAD 0GETFIELD cn/itcast/AccountUnsafe.balance // thread-1 <- this.balanceINVOKEVIRTUAL java/lang/Integer.intValue // thread-1 拆箱ALOAD 1 // thread-1 <- amountINVOKEVIRTUAL java/lang/Integer.intValue // thread-1 拆箱ISUB // thread-1 减法INVOKESTATIC java/lang/Integer.valueOf // thread-1 结果装箱PUTFIELD cn/itcast/AccountUnsafe.balance // thread-1 -> this.balance
解决思路-锁
首先想到的是给 Account 对象加锁
class AccountUnsafe implements Account {private Integer balance;public AccountUnsafe(Integer balance) {this.balance = balance;}@Overridepublic synchronized Integer getBalance() {return balance;}@Overridepublic synchronized void withdraw(Integer amount) {balance -= amount;}}
结果为
0 cost: 399 ms
解决思路-无锁
class AccountSafe implements Account {private AtomicInteger balance;public AccountSafe(Integer balance) {this.balance = new AtomicInteger(balance);}@Overridepublic Integer getBalance() {return balance.get();}@Overridepublic void withdraw(Integer amount) {while (true) {int prev = balance.get();int next = prev - amount;if (balance.compareAndSet(prev, next)) {break;}}// 可以简化为下面的方法// balance.addAndGet(-1 * amount);}}
执行测试代码
public static void main(String[] args) {Account.demo(new AccountSafe(10000));}
某次的执行结果
0 cost: 302 ms
6.2 CAS 与 volatile
前面看到的 AtomicInteger 的解决方法,内部并没有用锁来保护共享变量的线程安全。那么它是如何实现的呢?
public void withdraw(Integer amount) {while(true) {// 需要不断尝试,直到成功为止while (true) {// 比如拿到了旧值 1000int prev = balance.get();// 在这个基础上 1000-10 = 990int next = prev - amount;/**compareAndSet 正是做这个检查,在 set 前,先比较 prev 与当前值- 不一致了,next 作废,返回 false 表示失败比如,别的线程已经做了减法,当前值已经被减成了 990那么本线程的这次 990 就作废了,进入 while 下次循环重试- 一致,以 next 设置为新值,返回 true 表示成功*/if (balance.compareAndSet(prev, next)) {break;}}}}
其中的关键是 compareAndSet,它的简称就是 CAS (也有 Compare And Swap 的说法),它必须是原子操作。
注意 其实 CAS 的底层是 lock cmpxchg 指令(X86 架构),在单核 CPU 和多核 CPU 下都能够保证【比较-交换】的原子性。 在多核状态下,某个核执行到带 lock 的指令时,CPU 会让总线锁住,当这个核把此指令执行完毕,再开启总线。这个过程中不会被线程的调度机制所打断,保证了多个线程对内存操作的准确性,是原子的。
慢动作分析
@Slf4jpublic class SlowMotion {public static void main(String[] args) {AtomicInteger balance = new AtomicInteger(10000);int mainPrev = balance.get();log.debug("try get {}", mainPrev);new Thread(() -> {sleep(1000);int prev = balance.get();balance.compareAndSet(prev, 9000);log.debug(balance.toString());}, "t1").start();sleep(2000);log.debug("try set 8000...");boolean isSuccess = balance.compareAndSet(mainPrev, 8000);log.debug("is success ? {}", isSuccess);if(!isSuccess){mainPrev = balance.get();log.debug("try set 8000...");isSuccess = balance.compareAndSet(mainPrev, 8000);log.debug("is success ? {}", isSuccess);}}private static void sleep(int millis) {try {Thread.sleep(millis);} catch (InterruptedException e) {e.printStackTrace();}}}
输出结果
2019-10-13 11:28:37.134 [main] try get 100002019-10-13 11:28:38.154 [t1] 90002019-10-13 11:28:39.154 [main] try set 8000...2019-10-13 11:28:39.154 [main] is success ? false2019-10-13 11:28:39.154 [main] try set 8000...2019-10-13 11:28:39.154 [main] is success ? true
volatile
获取共享变量时,为了保证该变量的可见性,需要使用 volatile 修饰。
它可以用来修饰成员变量和静态成员变量,他可以避免线程从自己的工作缓存中查找变量的值,必须到主存中获取它的值,线程操作 volatile 变量都是直接操作主存。即一个线程对 volatile 变量的修改,对另一个线程可见。
注意 volatile 仅仅保证了共享变量的可见性,让其它线程能够看到最新值,但不能解决指令交错问题(不能保证原子性)
CAS 必须借助 volatile 才能读取到共享变量的最新值来实现【比较并交换】的效果
为什么无锁效率高
无锁情况下,即使重试失败,线程始终在高速运行,没有停歇,而 synchronized 会让线程在没有获得锁的时候,发生上下文切换,进入阻塞。
打个比喻线程就好像高速跑道上的赛车,高速运行时,速度超快,一旦发生上下文切换,就好比赛车要减速、熄火,等被唤醒又得重新打火、启动、加速… 恢复到高速运行,代价比较大
但无锁情况下,因为线程要保持运行,需要额外 CPU 的支持,CPU 在这里就好比高速跑道,没有额外的跑道,线程想高速运行也无从谈起,虽然不会进入阻塞,但由于没有分到时间片,仍然会进入可运行状态,还是会导致上下文切换。
CAS 的特点
结合 CAS 和 volatile 可以实现无锁并发,适用于线程数少、多核 CPU 的场景下。
- CAS 是基于乐观锁的思想:最乐观的估计,不怕别的线程来修改共享变量,就算改了也没关系,我吃亏点再重试呗。
- synchronized 是基于悲观锁的思想:最悲观的估计,得防着其它线程来修改共享变量,我上了锁你们都别想改,我改完了解开锁,你们才有机会。
- CAS 体现的是无锁并发、无阻塞并发,请仔细体会这两句话的意思
- 因为没有使用 synchronized,所以线程不会陷入阻塞,这是效率提升的因素之一
- 但如果竞争激烈,可以想到重试必然频繁发生,反而效率会受影响
6.3 原子整数
J.U.C 并发包提供了:
AtomicBoolean
AtomicInteger
AtomicLong
以 AtomicInteger 为例
AtomicInteger i = new AtomicInteger(0);// 获取并自增(i = 0, 结果 i = 1, 返回 0),类似于 i++System.out.println(i.getAndIncrement());// 自增并获取(i = 1, 结果 i = 2, 返回 2),类似于 ++iSystem.out.println(i.incrementAndGet());// 自减并获取(i = 2, 结果 i = 1, 返回 1),类似于 --iSystem.out.println(i.decrementAndGet());// 获取并自减(i = 1, 结果 i = 0, 返回 1),类似于 i--System.out.println(i.getAndDecrement());// 获取并加值(i = 0, 结果 i = 5, 返回 0)System.out.println(i.getAndAdd(5));// 加值并获取(i = 5, 结果 i = 0, 返回 0)System.out.println(i.addAndGet(-5));// 获取并更新(i = 0, p 为 i 的当前值, 结果 i = -2, 返回 0)// 其中函数中的操作能保证原子,但函数需要无副作用System.out.println(i.getAndUpdate(p -> p - 2));// 更新并获取(i = -2, p 为 i 的当前值, 结果 i = 0, 返回 0)// 其中函数中的操作能保证原子,但函数需要无副作用System.out.println(i.updateAndGet(p -> p + 2));// 获取并计算(i = 0, p 为 i 的当前值, x 为参数1, 结果 i = 10, 返回 0)// 其中函数中的操作能保证原子,但函数需要无副作用// getAndUpdate 如果在 lambda 中引用了外部的局部变量,要保证该局部变量是 final 的// getAndAccumulate 可以通过 参数1 来引用外部的局部变量,但因为其不在 lambda 中因此不必是 finalSystem.out.println(i.getAndAccumulate(10, (p, x) -> p + x));// 计算并获取(i = 10, p 为 i 的当前值, x 为参数1, 结果 i = 0, 返回 0)// 其中函数中的操作能保证原子,但函数需要无副作用System.out.println(i.accumulateAndGet(-10, (p, x) -> p + x));
6.4 原子引用
为什么需要原子引用类型?
AtomicReference
AtomicMarkableReference
AtomicStampedReference
有如下方法
public interface DecimalAccount {// 获取余额BigDecimal getBalance();// 取款void withdraw(BigDecimal amount);/*** 方法内会启动 1000 个线程,每个线程做 -10 元 的操作* 如果初始余额为 10000 那么正确的结果应当是 0*/static void demo(DecimalAccount account) {List<Thread> ts = new ArrayList<>();for (int i = 0; i < 1000; i++) {ts.add(new Thread(() -> {account.withdraw(BigDecimal.TEN);}));}ts.forEach(Thread::start);ts.forEach(t -> {try {t.join();} catch (InterruptedException e) {e.printStackTrace();}});System.out.println(account.getBalance());}}
试着提供不同的 DecimalAccount 实现,实现安全的取款操作
不安全实现
class DecimalAccountUnsafe implements DecimalAccount {BigDecimal balance;public DecimalAccountUnsafe(BigDecimal balance) {this.balance = balance;}@Overridepublic BigDecimal getBalance() {return balance;}@Overridepublic void withdraw(BigDecimal amount) {BigDecimal balance = this.getBalance();this.balance = balance.subtract(amount);}}
安全实现-使用锁
class DecimalAccountSafeLock implements DecimalAccount {private final Object lock = new Object();BigDecimal balance;public DecimalAccountSafeLock(BigDecimal balance) {this.balance = balance;}@Overridepublic BigDecimal getBalance() {return balance;}@Overridepublic void withdraw(BigDecimal amount) {synchronized (lock) {BigDecimal balance = this.getBalance();this.balance = balance.subtract(amount);}}}
安全实现-使用 CAS
class DecimalAccountSafeCas implements DecimalAccount {AtomicReference<BigDecimal> ref;public DecimalAccountSafeCas(BigDecimal balance) {ref = new AtomicReference<>(balance);}@Overridepublic BigDecimal getBalance() {return ref.get();}@Overridepublic void withdraw(BigDecimal amount) {while (true) {BigDecimal prev = ref.get();BigDecimal next = prev.subtract(amount);if (ref.compareAndSet(prev, next)) {break;}}}}
测试代码
DecimalAccount.demo(new DecimalAccountUnsafe(new BigDecimal("10000")));DecimalAccount.demo(new DecimalAccountSafeLock(new BigDecimal("10000")));DecimalAccount.demo(new DecimalAccountSafeCas(new BigDecimal("10000")));
运行结果
4310 cost: 425 ms0 cost: 285 ms0 cost: 274 ms
ABA 问题及解决
ABA 问题
static AtomicReference<String> ref = new AtomicReference<>("A");public static void main(String[] args) throws InterruptedException {log.debug("main start...");// 获取值 A// 这个共享变量被它线程修改过?String prev = ref.get();other();sleep(1);// 尝试改为 Clog.debug("change A->C {}", ref.compareAndSet(prev, "C"));}private static void other() {new Thread(() -> {log.debug("change A->B {}", ref.compareAndSet(ref.get(), "B"));}, "t1").start();sleep(0.5);new Thread(() -> {log.debug("change B->A {}", ref.compareAndSet(ref.get(), "A"));}, "t2").start();}
输出
11:29:52.325 c.Test36 [main] - main start...11:29:52.379 c.Test36 [t1] - change A->B true11:29:52.879 c.Test36 [t2] - change B->A true11:29:53.880 c.Test36 [main] - change A->C true
主线程仅能判断出共享变量的值与最初值 A 是否相同,不能感知到这种从 A 改为 B 又 改回 A 的情况,如果主线程
希望:
只要有其它线程【动过了】共享变量,那么自己的 cas 就算失败,这时,仅比较值是不够的,需要再加一个版本号
AtomicStampedReference
static AtomicStampedReference<String> ref = new AtomicStampedReference<>("A", 0);public static void main(String[] args) throws InterruptedException {log.debug("main start...");// 获取值 AString prev = ref.getReference();// 获取版本号int stamp = ref.getStamp();log.debug("版本 {}", stamp);// 如果中间有其它线程干扰,发生了 ABA 现象other();sleep(1);// 尝试改为 Clog.debug("change A->C {}", ref.compareAndSet(prev, "C", stamp, stamp + 1));}private static void other() {new Thread(() -> {log.debug("change A->B {}", ref.compareAndSet(ref.getReference(), "B",ref.getStamp(), ref.getStamp() + 1));log.debug("更新版本为 {}", ref.getStamp());}, "t1").start();sleep(0.5);new Thread(() -> {log.debug("change B->A {}", ref.compareAndSet(ref.getReference(), "A",ref.getStamp(), ref.getStamp() + 1));log.debug("更新版本为 {}", ref.getStamp());}, "t2").start();}
输出为
15:41:34.891 c.Test36 [main] - main start...15:41:34.894 c.Test36 [main] - 版本 015:41:34.956 c.Test36 [t1] - change A->B true15:41:34.956 c.Test36 [t1] - 更新版本为 115:41:35.457 c.Test36 [t2] - change B->A true15:41:35.457 c.Test36 [t2] - 更新版本为 215:41:36.457 c.Test36 [main] - change A->C false
AtomicStampedReference 可以给原子引用加上版本号,追踪原子引用整个的变化过程,如: A -> B -> A ->
C ,通过AtomicStampedReference,我们可以知道,引用变量中途被更改了几次。
但是有时候,并不关心引用变量更改了几次,只是单纯的关心是否更改过,所以就有了AtomicMarkableReference
AtomicMarkableReference
class GarbageBag {String desc;public GarbageBag(String desc) {this.desc = desc;}public void setDesc(String desc) {this.desc = desc;}@Overridepublic String toString() {return super.toString() + " " + desc;}}
@Slf4jpublic class TestABAAtomicMarkableReference {public static void main(String[] args) throws InterruptedException {GarbageBag bag = new GarbageBag("装满了垃圾");// 参数2 mark 可以看作一个标记,表示垃圾袋满了AtomicMarkableReference<GarbageBag> ref = new AtomicMarkableReference<>(bag, true);log.debug("主线程 start...");GarbageBag prev = ref.getReference();log.debug(prev.toString());new Thread(() -> {log.debug("打扫卫生的线程 start...");bag.setDesc("空垃圾袋");while (!ref.compareAndSet(bag, bag, true, false)) {}log.debug(bag.toString());}).start();Thread.sleep(1000);log.debug("主线程想换一只新垃圾袋?");boolean success = ref.compareAndSet(prev, new GarbageBag("空垃圾袋"), true, false);log.debug("换了么?" + success);log.debug(ref.getReference().toString());}}
输出
2019-10-13 15:30:09.264 [main] 主线程 start...2019-10-13 15:30:09.270 [main] cn.itcast.GarbageBag@5f0fd5a0 装满了垃圾2019-10-13 15:30:09.293 [Thread-1] 打扫卫生的线程 start...2019-10-13 15:30:09.294 [Thread-1] cn.itcast.GarbageBag@5f0fd5a0 空垃圾袋2019-10-13 15:30:10.294 [main] 主线程想换一只新垃圾袋?2019-10-13 15:30:10.294 [main] 换了么?false2019-10-13 15:30:10.294 [main] cn.itcast.GarbageBag@5f0fd5a0 空垃圾袋
6.5 原子数组
AtomicIntegerArray
AtomicLongArray
AtomicReferenceArray
有如下方法
/**参数1,提供数组、可以是线程不安全数组或线程安全数组参数2,获取数组长度的方法参数3,自增方法,回传 array, index参数4,打印数组的方法*/// supplier 提供者 无中生有 ()->结果// function 函数 一个参数一个结果 (参数)->结果 , BiFunction (参数1,参数2)->结果// consumer 消费者 一个参数没结果 (参数)->void, BiConsumer (参数1,参数2)->private static <T> void demo(Supplier<T> arraySupplier,Function<T, Integer> lengthFun,BiConsumer<T, Integer> putConsumer,Consumer<T> printConsumer ) {List<Thread> ts = new ArrayList<>();T array = arraySupplier.get();int length = lengthFun.apply(array);for (int i = 0; i < length; i++) {// 每个线程对数组作 10000 次操作ts.add(new Thread(() -> {for (int j = 0; j < 10000; j++) {putConsumer.accept(array, j%length);}}));}ts.forEach(t -> t.start()); // 启动所有线程ts.forEach(t -> {try {t.join();} catch (InterruptedException e) {e.printStackTrace();}}); // 等所有线程结束printConsumer.accept(array);}
不安全的数组
demo(()->new int[10],(array)->array.length,(array, index) -> array[index]++,array-> System.out.println(Arrays.toString(array)));
结果
[9870, 9862, 9774, 9697, 9683, 9678, 9679, 9668, 9680, 9698]
安全的数组
demo(()-> new AtomicIntegerArray(10),(array) -> array.length(),(array, index) -> array.getAndIncrement(index),array -> System.out.println(array));
结果
[10000, 10000, 10000, 10000, 10000, 10000, 10000, 10000, 10000, 10000]
6.6 字段更新器
AtomicReferenceFieldUpdater // 域 字段
AtomicIntegerFieldUpdater
AtomicLongFieldUpdater
利用字段更新器,可以针对对象的某个域(Field)进行原子操作,只能配合 volatile 修饰的字段使用,否则会出现异常
Exception in thread "main" java.lang.IllegalArgumentException: Must be volatile type
public class Test5 {private volatile int field;public static void main(String[] args) {AtomicIntegerFieldUpdater fieldUpdater =AtomicIntegerFieldUpdater.newUpdater(Test5.class, "field");Test5 test5 = new Test5();fieldUpdater.compareAndSet(test5, 0, 10);// 修改成功 field = 10System.out.println(test5.field);// 修改成功 field = 20fieldUpdater.compareAndSet(test5, 10, 20);System.out.println(test5.field);// 修改失败 field = 20fieldUpdater.compareAndSet(test5, 10, 30);System.out.println(test5.field);}}
输出
102020
6.7 原子累加器
累加器性能比较
private static <T> void demo(Supplier<T> adderSupplier, Consumer<T> action) {T adder = adderSupplier.get();long start = System.nanoTime();List<Thread> ts = new ArrayList<>();// 4 个线程,每人累加 50 万for (int i = 0; i < 40; i++) {ts.add(new Thread(() -> {for (int j = 0; j < 500000; j++) {action.accept(adder);}}));}ts.forEach(t -> t.start());ts.forEach(t -> {try {t.join();} catch (InterruptedException e) {e.printStackTrace();}});long end = System.nanoTime();System.out.println(adder + " cost:" + (end - start)/1000_000);}
比较 AtomicLong 与 LongAdder
for (int i = 0; i < 5; i++) {demo(() -> new LongAdder(), adder -> adder.increment());}for (int i = 0; i < 5; i++) {demo(() -> new AtomicLong(), adder -> adder.getAndIncrement());}
输出
1000000 cost:431000000 cost:91000000 cost:71000000 cost:71000000 cost:71000000 cost:311000000 cost:271000000 cost:281000000 cost:241000000 cost:22
性能提升的原因很简单,就是在有竞争时,设置多个累加单元,Therad-0 累加 Cell[0],而 Thread-1 累加
Cell[1]… 最后将结果汇总。这样它们在累加时操作的不同的 Cell 变量,因此减少了 CAS 重试失败,从而提高性
能。
源码之 LongAdder
LongAdder 是并发大师 @author Doug Lea (大哥李)的作品,设计的非常精巧
LongAdder 类有几个关键域
// 累加单元数组, 懒惰初始化transient volatile Cell[] cells;// 基础值, 如果没有竞争, 则用 cas 累加这个域transient volatile long base;// 在 cells 创建或扩容时, 置为 1, 表示加锁transient volatile int cellsBusy;
cas 锁
// 不要用于实践!!!public class LockCas {private AtomicInteger state = new AtomicInteger(0);public void lock() {while (true) {if (state.compareAndSet(0, 1)) {break;}}}public void unlock() {log.debug("unlock...");state.set(0);}}
测试
LockCas lock = new LockCas();new Thread(() -> {log.debug("begin...");lock.lock();try {log.debug("lock...");sleep(1);} finally {lock.unlock();}}).start();new Thread(() -> {log.debug("begin...");lock.lock();try {log.debug("lock...");} finally {lock.unlock();}}).start();
输出
18:27:07.198 c.Test42 [Thread-0] - begin...18:27:07.202 c.Test42 [Thread-0] - lock...18:27:07.198 c.Test42 [Thread-1] - begin...18:27:08.204 c.Test42 [Thread-0] - unlock...18:27:08.204 c.Test42 [Thread-1] - lock...18:27:08.204 c.Test42 [Thread-1] - unlock...
原理之伪共享
其中 Cell 即为累加单元
// 防止缓存行伪共享@sun.misc.Contendedstatic final class Cell {volatile long value;Cell(long x) { value = x; }// 最重要的方法, 用来 cas 方式进行累加, prev 表示旧值, next 表示新值final boolean cas(long prev, long next) {return UNSAFE.compareAndSwapLong(this, valueOffset, prev, next);}// 省略不重要代码}
得从缓存说起
缓存与内存的速度比较

因为 CPU 与 内存的速度差异很大,需要靠预读数据至缓存来提升效率。
而缓存以缓存行为单位,每个缓存行对应着一块内存,一般是 64 byte(8 个 long)
缓存的加入会造成数据副本的产生,即同一份数据会缓存在不同核心的缓存行中
CPU 要保证数据的一致性,如果某个 CPU 核心更改了数据,其它 CPU 核心对应的整个缓存行必须失效
因为 Cell 是数组形式,在内存中是连续存储的,一个 Cell 为 24 字节(16 字节的对象头和 8 字节的 value),因
此缓存行可以存下 2 个的 Cell 对象。这样问题来了:
Core-0 要修改 Cell[0]
Core-1 要修改 Cell[1]
无论谁修改成功,都会导致对方 Core 的缓存行失效,比如 Core-0 中 Cell[0]=6000, Cell[1]=8000 要累加
Cell[0]=6001, Cell[1]=8000 ,这时会让 Core-1 的缓存行失效
@sun.misc.Contended 用来解决这个问题,它的原理是在使用此注解的对象或字段的前后各增加 128 字节大小的
padding,从而让 CPU 将对象预读至缓存时占用不同的缓存行,这样,不会造成对方缓存行的失效
累加主要调用下面的方法
public void add(long x) {// as 为累加单元数组// b 为基础值// x 为累加值Cell[] as; long b, v; int m; Cell a;// 进入 if 的两个条件// 1. as 有值, 表示已经发生过竞争, 进入 if// 2. cas 给 base 累加时失败了, 表示 base 发生了竞争, 进入 ifif ((as = cells) != null || !casBase(b = base, b + x)) {// uncontended 表示 cell 没有竞争boolean uncontended = true;if (// as 还没有创建as == null || (m = as.length - 1) < 0 ||// 当前线程对应的 cell 还没有(a = as[getProbe() & m]) == null ||// cas 给当前线程的 cell 累加失败 uncontended=false ( a 为当前线程的 cell )!(uncontended = a.cas(v = a.value, v + x))) {// 进入 cell 数组创建、cell 创建的流程longAccumulate(x, null, uncontended);}}}
add 流程图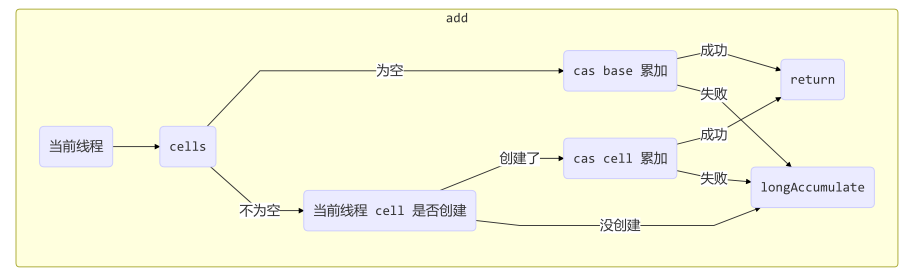
final void longAccumulate(long x, LongBinaryOperator fn,boolean wasUncontended) {int h;// 当前线程还没有对应的 cell, 需要随机生成一个 h 值用来将当前线程绑定到 cellif ((h = getProbe()) == 0) {// 初始化 probeThreadLocalRandom.current();// h 对应新的 probe 值, 用来对应 cellh = getProbe();wasUncontended = true;}// collide 为 true 表示需要扩容boolean collide = false;for (;;) {Cell[] as; Cell a; int n; long v;// 已经有了 cellsif ((as = cells) != null && (n = as.length) > 0) {// 还没有 cellif ((a = as[(n - 1) & h]) == null) {// 为 cellsBusy 加锁, 创建 cell, cell 的初始累加值为 x// 成功则 break, 否则继续 continue 循环}// 有竞争, 改变线程对应的 cell 来重试 caselse if (!wasUncontended)wasUncontended = true;// cas 尝试累加, fn 配合 LongAccumulator 不为 null, 配合 LongAdder 为 nullelse if (a.cas(v = a.value, ((fn == null) ? v + x : fn.applyAsLong(v, x))))break;// 如果 cells 长度已经超过了最大长度, 或者已经扩容, 改变线程对应的 cell 来重试 caselse if (n >= NCPU || cells != as)collide = false;// 确保 collide 为 false 进入此分支, 就不会进入下面的 else if 进行扩容了else if (!collide)collide = true;// 加锁else if (cellsBusy == 0 && casCellsBusy()) {// 加锁成功, 扩容continue;}// 改变线程对应的 cellh = advanceProbe(h);}// 还没有 cells, 尝试给 cellsBusy 加锁else if (cellsBusy == 0 && cells == as && casCellsBusy()) {// 加锁成功, 初始化 cells, 最开始长度为 2, 并填充一个 cell// 成功则 break;}// 上两种情况失败, 尝试给 base 累加else if (casBase(v = base, ((fn == null) ? v + x : fn.applyAsLong(v, x))))break;}}
longAccumulate 流程图

每个线程刚进入 longAccumulate 时,会尝试对应一个 cell 对象(找到一个坑位)
获取最终结果通过 sum 方法
public long sum() {Cell[] as = cells; Cell a;long sum = base;if (as != null) {for (int i = 0; i < as.length; ++i) {if ((a = as[i]) != null)sum += a.value;}}return sum;}
6.8 Unsafe
概述
Unsafe 对象提供了非常底层的,操作内存、线程的方法,Unsafe 对象不能直接调用,只能通过反射获得
public class UnsafeAccessor {static Unsafe unsafe;static {try {Field theUnsafe = Unsafe.class.getDeclaredField("theUnsafe");theUnsafe.setAccessible(true);unsafe = (Unsafe) theUnsafe.get(null);} catch (NoSuchFieldException | IllegalAccessException e) {throw new Error(e);}}static Unsafe getUnsafe() {return unsafe;}}
Unsafe CAS 操作
@Dataclass Student {volatile int id;volatile String name;}
Unsafe unsafe = UnsafeAccessor.getUnsafe();Field id = Student.class.getDeclaredField("id");Field name = Student.class.getDeclaredField("name");// 获得成员变量的偏移量long idOffset = UnsafeAccessor.unsafe.objectFieldOffset(id);long nameOffset = UnsafeAccessor.unsafe.objectFieldOffset(name);Student student = new Student();// 使用 cas 方法替换成员变量的值UnsafeAccessor.unsafe.compareAndSwapInt(student, idOffset, 0, 20); // 返回 trueUnsafeAccessor.unsafe.compareAndSwapObject(student, nameOffset, null, "张三"); // 返回 trueSystem.out.println(student);
输出
Student(id=20, name=张三)
使用自定义的 AtomicData 实现之前线程安全的原子整数 Account 实现
class AtomicData {private volatile int data;static final Unsafe unsafe;static final long DATA_OFFSET;static {unsafe = UnsafeAccessor.getUnsafe();try {// data 属性在 DataContainer 对象中的偏移量,用于 Unsafe 直接访问该属性DATA_OFFSET = unsafe.objectFieldOffset(AtomicData.class.getDeclaredField("data"));} catch (NoSuchFieldException e) {throw new Error(e);}}public AtomicData(int data) {this.data = data;}public void decrease(int amount) {int oldValue;while(true) {// 获取共享变量旧值,可以在这一行加入断点,修改 data 调试来加深理解oldValue = data;// cas 尝试修改 data 为 旧值 + amount,如果期间旧值被别的线程改了,返回 falseif (unsafe.compareAndSwapInt(this, DATA_OFFSET, oldValue, oldValue - amount)) {return;}}}public int getData() {return data;}}
Account 实现
Account.demo(new Account() {AtomicData atomicData = new AtomicData(10000);@Overridepublic Integer getBalance() {return atomicData.getData();}@Overridepublic void withdraw(Integer amount) {atomicData.decrease(amount);}});
本章小结
- CAS 与 volatile
- API
- 原子整数
- 原子引用
- 原子数组
- 字段更新器
- 原子累加器
- Unsafe
- 原理方面
- LongAdder 源码
- 伪共享
- 原理方面

若有收获,就点个赞吧
0 人点赞
