0.教学资源
以下是本节课的微课,配合文档学习效果更佳喔。
 动手2-人脸识别云台.pptx
1.复习一下
和颜色识别云台类似,我们这节课要做一个人脸识别云台。那么在开始动手之前,我们来复习一下:人脸识别的步骤。
人脸识别步骤
人脸识别步骤简单来说就是:将图像进行预处理之后,通过Haar级联强分类器,即可识别人脸和非人脸。
其中,Haar特征是用于提取人脸特征的一组特征点。它的作用就是,如果图像中有Haar特征点,那么这张图片可能是人脸。
但是,单靠一个特征点无法辨别出图像是否是人脸。所以我们可以通过很多个特征点组成强分类器,来让识别人脸的能力增强。
再但是,一个图像中的大部分区域都是非人脸的区域。所以我们要通过级联,将非人脸的区域排除,重点排查人脸的区域。
这就是在“人脸识别和Haar特征”的课中学习的人脸识别的基本步骤和原理。要是不记得可以转到那节课复习一下哦~
Haar级联分类器相关代码(HaarCascade)
face_cascade = image.HaarCascade("frontalface", stages=25)while (True):img = sensor.snapshot()objects = img.find_features(face_cascade, threshold=0.75, scale=1.35)
2.动手试试
人脸识别云台和颜色识别云台的代码很相似,我们对比一下看看有什么区别。
import sensor, image,lcdfrom pid import PIDfrom pyb import Servo #调用库x_servo=Servo(1)y_servo=Servo(2)x_pid = PID(p=0.06,d=0.01,i=0.02, imax=100)y_pid = PID(p=0.07,d=0.01,i=0.02, imax=75)sensor.reset() # 初始化摄像头.sensor.set_framesize(sensor.HQVGA)sensor.set_pixformat(sensor.GRAYSCALE) #注意人脸识别只能用灰度图sensor.set_hmirror(True) #水平方向翻转sensor.skip_frames(10) # 让新设定生效sensor.set_auto_whitebal(False) # 关闭白平衡lcd.init() # 初始化lcd屏幕face_cascade = image.HaarCascade("frontalface", stages=15) #加入一个Haar分类器def find_max(blobs):max_size=0for blob in blobs:if blob[2]*blob[3] > max_size: #blob[2]是该色块的宽,blob[3]是高max_blob=blobmax_size = blob[2]*blob[3]return max_blob #找到视野中的最大色素块while(True):img = sensor.snapshot()lcd.display(img)faces = img.find_features(face_cascade, threshold=0.5, scale=1.25)if faces:face = find_max(faces) #寻找最大的人脸cx = int(face[0]+face[2]/2) #face[0]是该色块左上角的x坐标,face[2]是该色块的宽cy = int(face[1]+face[3]/2) #face[0]是该色块左上角的y坐标,face[2]是该色块的长x_error = cx-img.width()/2 #x表示云台的水平轴 x_error代表目标偏移中心的水平值y_error = cy-img.height()/2 #y表示云台的纵轴 y_error代表目标偏移中心的纵轴值print("x_error: ", x_error) #打印色块中心坐标与视野中心坐标的偏离值,便于调试与修正img.draw_rectangle(face) # 画出矩形框img.draw_cross(cx,cy) # 画十字lcd.display(img)x_output=x_pid.get_pid(x_error,1)y_output=y_pid.get_pid(y_error,1)x_servo.angle(x_servo.angle()+x_output)y_servo.angle(y_servo.angle()+y_output)
3.如何改进
我们现在的云台,必须要连接电脑才能运行,有没有什么办法可以让OpenMV独立运行呢?
还有,我们现在学了颜色识别和人脸识别,有没有办法可以设立两个模式:人脸识别模式和颜色识别模式,并且通过一个按钮进行模式切换呢?
脱机运行OpenMV
脱机运行一共两个步骤:
1、将5v电源连接在OpenMV上。
2、将OpenMV内存中的main.py文件改成我们想要运行的代码。
在OpenMV内存里有一个main.py文件,里面装着是每次OpenMV通电时首先会运行的代码,我们来看看原先里面装的是什么。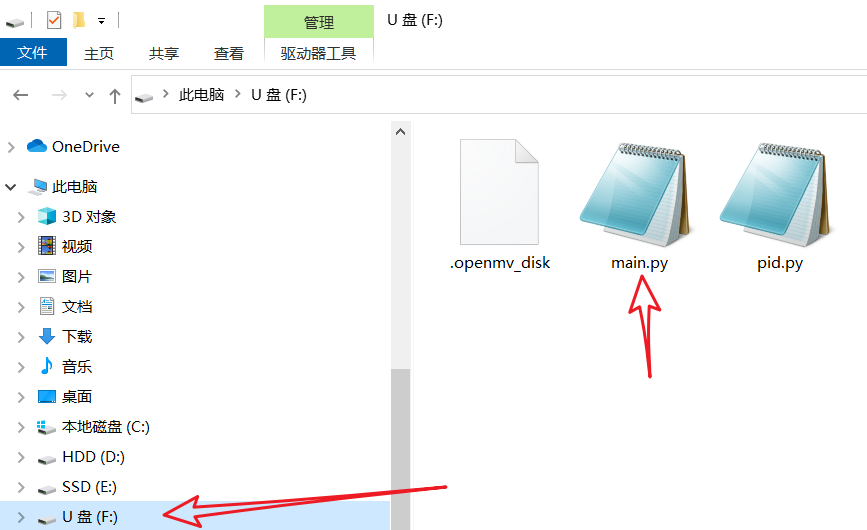
图1.main.py的位置
# Main Module Example## When your OpenMV Cam is disconnected from your computer it will either run the# main.py script on the SD card (if attached) or the main.py script on# your OpenMV Cam's internal flash drive.import time, pybled = pyb.LED(3) # Red LED = 1, Green LED = 2, Blue LED = 3, IR LEDs = 4.usb = pyb.USB_VCP() # This is a serial port object that allows you to# communciate with your computer. While it is not open the code below runs.while(not usb.isconnected()): #如果没有连接USB则执行以下代码led.on()time.sleep_ms(150)led.off()time.sleep_ms(100)led.on()time.sleep_ms(150)led.off()time.sleep_ms(600)led = pyb.LED(2)while(usb.isconnected()): #如果连接了USB则执行以下代码led.on()time.sleep_ms(150)led.off()time.sleep_ms(100)led.on()time.sleep_ms(150)led.off()time.sleep_ms(600)
只要将main.py的代码改成人脸识别云台的代码,我们就可以脱机运行人脸识别云台了。
在OpenMVIDE中点击工具-将打开的脚本保存到OpenMV Cam即可。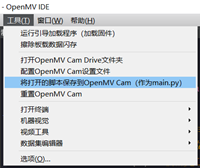
图3.将脚本保存至main.py
切换识别模式
我们可以通过OpenMV上的按钮:SW2来控制代码或者硬件。如何实现呢?要通过pin_control函数。
import sensor, image, time
from pyb import Pin

sw2 = Pin('PD8', Pin.IN, Pin.PULL_UP) #当开关闭合时,将信号变成低电平(value==0)
LED1 = Pin('PD9')
while(True):
    print(sw2.value()) #输出电位值
    if sw2.value()==0: #如果处于低电位
        LED1.value(1)  #点亮LED灯
    else:
        LED1.value(0)
我们将if和else语句下方分别换成颜色识别云台和人脸识别云台的代码就可以实现模式切换了。
import sensor, image,lcd
from pyb import Pin
from pid import PID
from pyb import Servo            #调用库

x_servo=Servo(1)
y_servo=Servo(2)
blue_threshold  = (26, 41, -32, 3, -40, -7)    #蓝色色素块
x_pid = PID(p=0.06,d=0.01,i=0.02, imax=100)
y_pid = PID(p=0.07,d=0.01,i=0.02, imax=75)

sw2 = Pin('PD8', Pin.IN, Pin.PULL_UP) #当开关闭合时,将信号变成低电平(value==0)


if sw2.value()==0: #如果处于低电位
        print("人脸识别")
        sensor.reset() # 初始化摄像头
        sensor.set_framesize(sensor.HQVGA)
        sensor.set_pixformat(sensor.GRAYSCALE) #注意人脸识别只能用灰度图
        sensor.set_hmirror(True)   #水平方向翻转
        sensor.skip_frames(10) # 让新设定生效
        sensor.set_auto_whitebal(False) # 关闭白平衡
        lcd.init() # 初始化lcd屏幕

        face_cascade = image.HaarCascade("frontalface", stages=15) #加入一个Haar分类器

        def find_max(blobs):
            max_size=0
            for blob in blobs:
                if blob[2]*blob[3] > max_size: #blob[2]是该色块的宽,blob[3]是高
                    max_blob=blob
                    max_size = blob[2]*blob[3]
            return max_blob    #找到视野中的最大色素块


        while(True):
            img = sensor.snapshot()
            lcd.display(img)
            faces = img.find_features(face_cascade, threshold=0.5, scale=1.25)
            if faces:
                face = find_max(faces) #寻找最大的人脸
                cx = int(face[0]+face[2]/2) #face[0]是该色块左上角的x坐标,face[2]是该色块的宽
                cy = int(face[1]+face[3]/2) #face[0]是该色块左上角的y坐标,face[2]是该色块的长

                x_error = cx-img.width()/2 #x表示云台的水平轴 x_error代表目标偏移中心的水平值
                y_error = cy-img.height()/2 #y表示云台的纵轴 y_error代表目标偏移中心的纵轴值

                print("x_error: ", x_error)    #打印色块中心坐标与视野中心坐标的偏离值,便于调试与修正

                img.draw_rectangle(face) # 画出矩形框
                img.draw_cross(cx,cy) # 画十字
                lcd.display(img)
                x_output=x_pid.get_pid(x_error,1)
                y_output=y_pid.get_pid(y_error,1)

                x_servo.angle(x_servo.angle()+x_output)
                y_servo.angle(y_servo.angle()+y_output)

else:
        print("颜色识别")
        sensor.reset()
        sensor.set_pixformat(sensor.RGB565)
        sensor.set_framesize(sensor.QQVGA)
        sensor.skip_frames(10)
        sensor.set_auto_whitebal(False)

        lcd.init() # 初始化LCD屏幕

        def find_max(blobs):
            max_size=0
            for blob in blobs:
                if blob[2]*blob[3] > max_size:  #blob[2]是该色块的宽,blob[3]是高
                    max_blob=blob
                    max_size = blob[2]*blob[3]
            return max_blob    #找到视野中的最大色素块


        while(True):
            img = sensor.snapshot()
            lcd.display(img)
            blobs = img.find_blobs([blue_threshold])
            if blobs:
                max_blob = find_max(blobs)
                x_error = max_blob.cx()-img.width()/2
                y_error = max_blob.cy()-img.height()/2

                print("x_error: ", x_error)            #在参数调试窗口打印色块偏离值,便于调试与修正

                img.draw_rectangle(max_blob.rect())                 #在色块外围四周处画框
                img.draw_cross(max_blob.cx(), max_blob.cy()) #色块中心坐标处画十字
                lcd.display(img)
                x_output=x_pid.get_pid(x_error,1)
                y_output=y_pid.get_pid(y_error,1)
                print("x_output",x_output)                   #在参数调试窗口打印坐标值,便于调试与修正
                x_servo.angle(x_servo.angle()-x_output/2)            #输出左右方向上的PWM波控制云台追踪色块标志
                y_servo.angle(y_servo.angle()+y_output/2)        #输出上下方向上的PWM波控制云台追踪色块标志

若有收获,就点个赞吧
0 人点赞
