TCP和UDP
https://www.cnblogs.com/fundebug/p/differences-of-tcp-and-udp.html
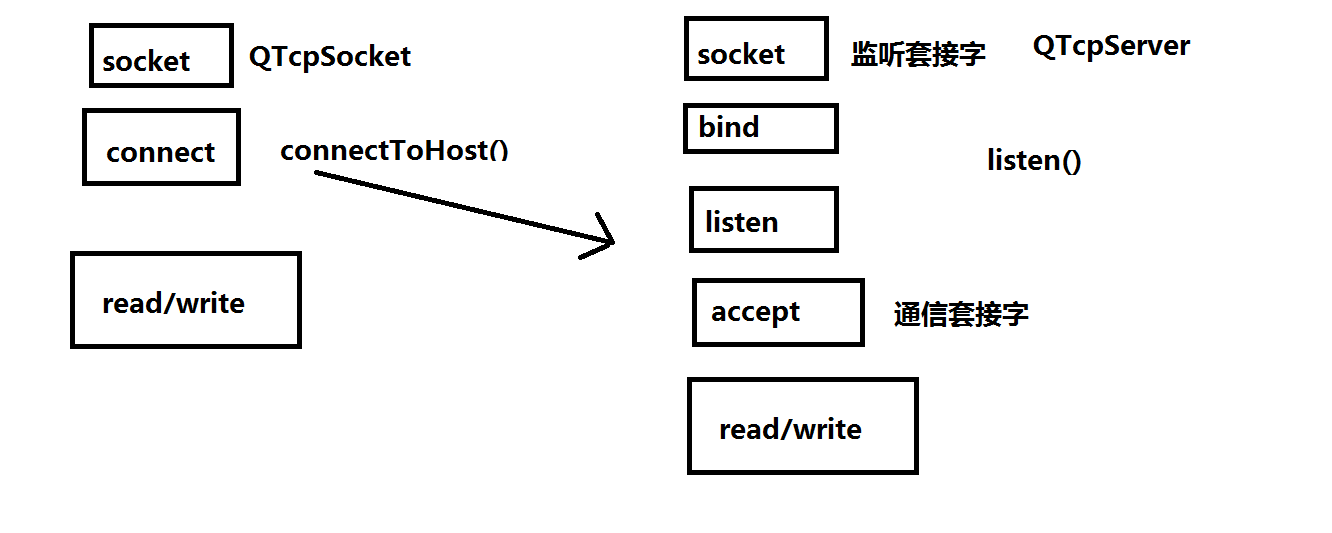
一、TCP通信
1.linux下TCP通信
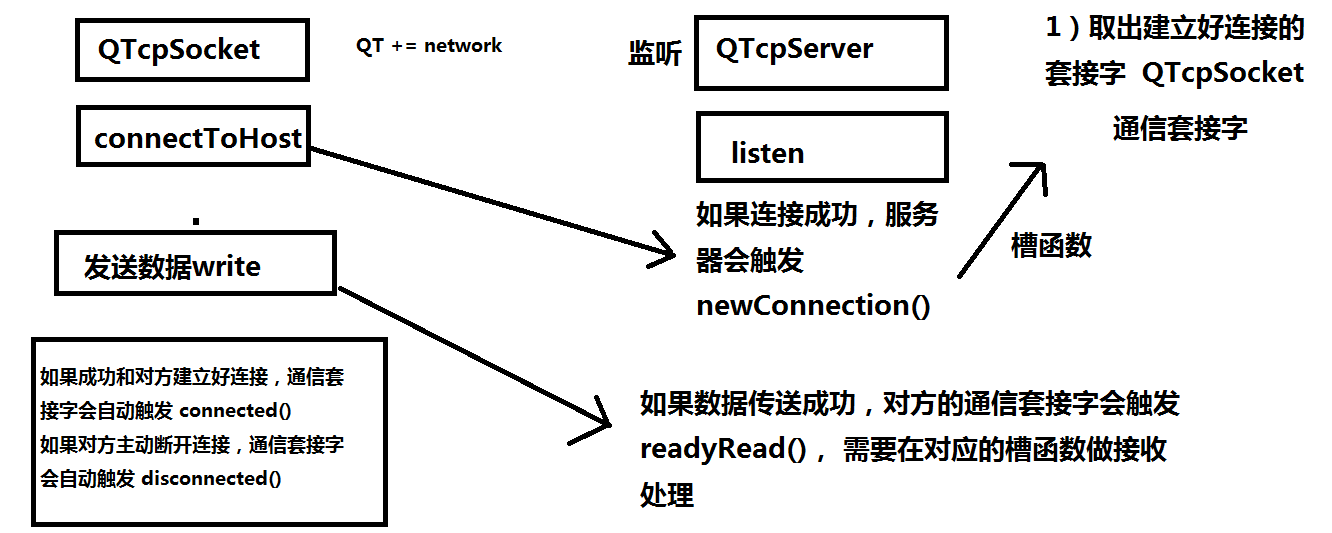
2.QT下的TCP通信
3.代码
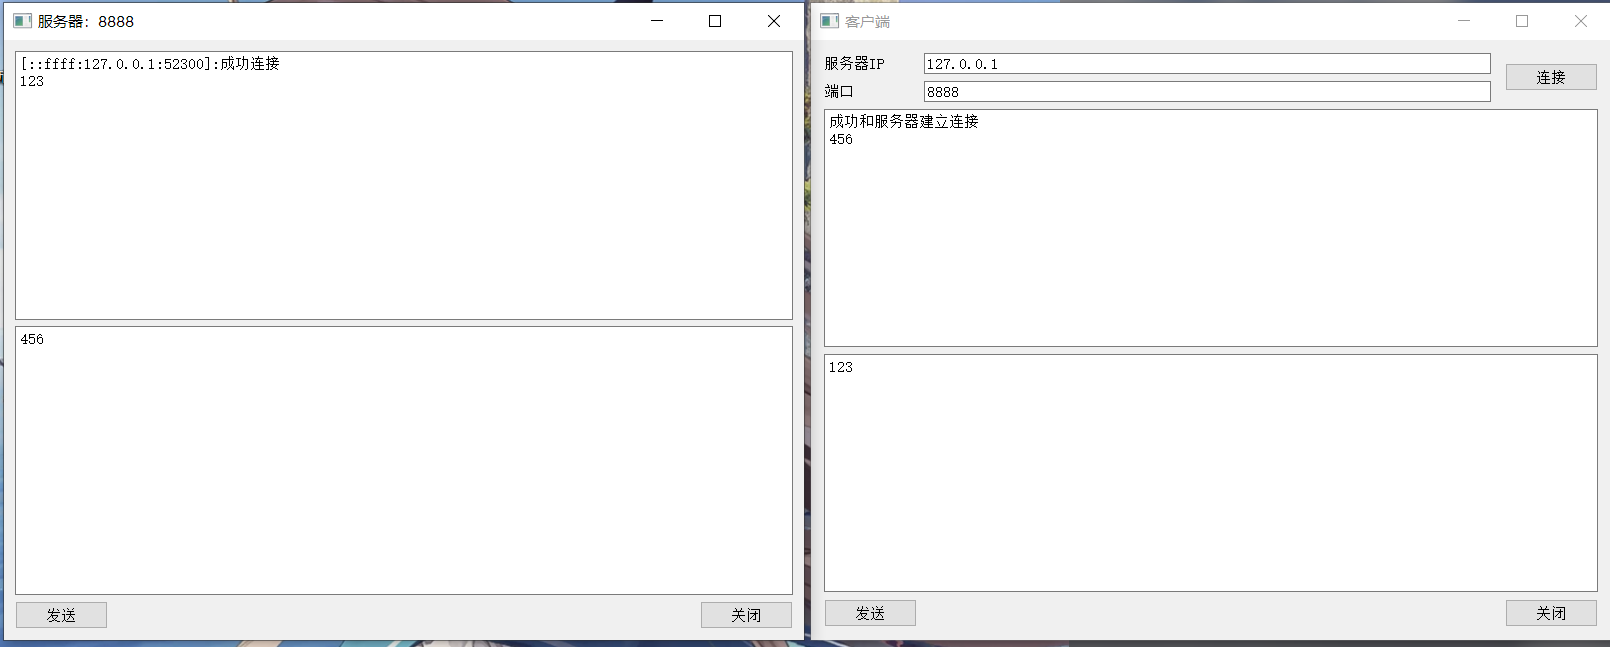
3.1 服务器端口
serverwidget.h
#ifndef SERVERWIDGET_H#define SERVERWIDGET_H#include <QWidget>#include <QTcpServer>#include <QTcpSocket>#include <QDebug>namespace Ui {class ServerWidget;}class ServerWidget : public QWidget{Q_OBJECTpublic:explicit ServerWidget(QWidget *parent = 0);~ServerWidget();private slots:void on_btnSend_clicked();void on_btnColse_clicked();private:Ui::ServerWidget *ui;QTcpServer *myTcpserver;QTcpSocket *myTcpsocket;};#endif // SERVERWIDGET_H
serverwidget.cpp
#include "serverwidget.h"#include "ui_serverwidget.h"ServerWidget::ServerWidget(QWidget *parent) :QWidget(parent),ui(new Ui::ServerWidget){ui->setupUi(this);qDebug() << myTcpsocket;//指定父对象,让其自动回收myTcpserver = new QTcpServer(this);myTcpsocket = NULL;//监听myTcpserver->listen(QHostAddress::Any, 8888);setWindowTitle("服务器:8888");connect(myTcpserver, &QTcpServer::newConnection, [=](){//取出建立好连接的套接字myTcpsocket = myTcpserver->nextPendingConnection();//获取对方的ip和端口QString ip = myTcpsocket->peerAddress().toString();qint64 port = myTcpsocket->peerPort();QString temp = QString("[%1:%2]:成功连接").arg(ip).arg(port);ui->textEditRead->setText(temp);//注意这里有了才可以连接connect(myTcpsocket, &QTcpSocket::readyRead, [=](){//同通信套接字取出内容QByteArray array = myTcpsocket->readAll();ui->textEditRead->append(QString(array));});});}ServerWidget::~ServerWidget(){delete ui;}void ServerWidget::on_btnSend_clicked(){if (NULL == myTcpsocket) {ui->textEditRead->append("客户端未连接");return;}//获取编辑区内容QString str = ui->textEditSend->toPlainText();//给对方发送数据,使用套接字是tcpscoketmyTcpsocket->write(str.toUtf8().data());}void ServerWidget::on_btnColse_clicked(){if (NULL == myTcpsocket) {ui->textEditRead->append("客户端未连接");return;}//主动和客户端断开连接myTcpsocket->disconnectFromHost();myTcpsocket->close();myTcpsocket = NULL;}
3.2 客户端端口
clientwidget.h
#ifndef CLIENTWIDGET_H#define CLIENTWIDGET_H#include <QWidget>#include <QTcpSocket>namespace Ui {class clientWidget;}class clientWidget : public QWidget{Q_OBJECTpublic:explicit clientWidget(QWidget *parent = 0);~clientWidget();private slots:void on_btnConnect_clicked();void on_btnSend_clicked();void on_btnColse_clicked();private:Ui::clientWidget *ui;QTcpSocket *myTcpScoket;bool connectwith;};#endif // CLIENTWIDGET_H
clientwidget.cpp
#include "clientwidget.h"#include "ui_clientwidget.h"#include <QHostAddress>clientWidget::clientWidget(QWidget *parent) :QWidget(parent),ui(new Ui::clientWidget){ui->setupUi(this);setWindowTitle("客户端");connectwith = false;//分配空间myTcpScoket = new QTcpSocket(this);connect(myTcpScoket, &QTcpSocket::connected, [=](){connectwith = true;ui->textEditRead->setText("成功和服务器建立连接");connect(myTcpScoket, &QTcpSocket::readyRead, [=](){//获取对方发送的内容QByteArray array = myTcpScoket->readAll();//追加到内容ui->textEditRead->append(QString(array));});});connect(myTcpScoket, &QTcpSocket::disconnected, [=](){connectwith = false;ui->textEditRead->append("已成功与服务器断开连接");});}clientWidget::~clientWidget(){delete ui;}void clientWidget::on_btnConnect_clicked(){//获取服务器IP和端口QString ip = ui->lineEditIP->text();qint16 port = ui->lineEditPort->text().toInt();//主动和服务器建立连接myTcpScoket->connectToHost(QHostAddress(ip), port);}void clientWidget::on_btnSend_clicked(){if (connectwith == false) {ui->textEditRead->append("还未与服务器建立连接");return;}//获取编辑框内容QString str = ui->textEditWrite->toPlainText();//发送数据myTcpScoket->write(str.toUtf8().data());}void clientWidget::on_btnColse_clicked(){if (connectwith == false) {ui->textEditRead->append("还未与服务器建立连接");return;}//主动和对方端断开myTcpScoket->disconnectFromHost();myTcpScoket->close();}
代码:
server.rar
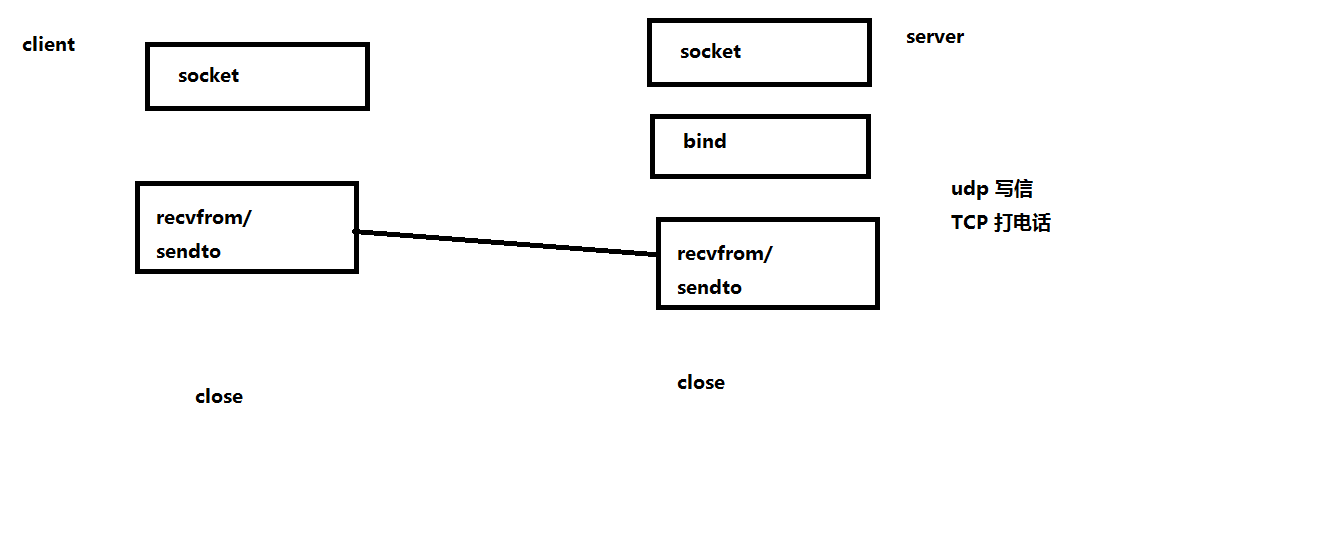
二、UDP通信
1.linux下UDP通信
2.QT下的UDP通信
3.广播和组播
3.1广播
在使用QUdpSocket类的writeDatagram()函数发送数据的时候,其中第二个参数host应该指定为广播地址:QHostAddress::Broadcast此设置相当于QHostAddress(“255.255.255.255”)
使用UDP广播的的特点:
- 使用UDP进行广播,局域网内的其他的UDP用户全部可以收到广播的消息
- UDP广播只能在局域网范围内使用
3.2组播
我们再使用广播发送消息的时候会发送给所有用户,但是有些用户是不想接受消息的,这时候我们就应该使用组播,接收方只有先注册到组播地址中才能收到组播消息,否则则接受不到消息。另外组播是可以在Internet中使用的。
在使用QUdpSocket类的writeDatagram()函数发送数据的时候,其中第二个参数host应该指定为组播地址,关于组播地址的分类: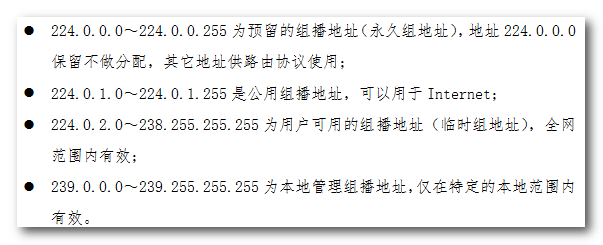
3.代码
udpwidget.h ```cppifndef UDPWIDGET_H
define UDPWIDGET_H
include
include //UDP套接字
include
namespace Ui { class UdpWidget; }
class UdpWidget : public QWidget { Q_OBJECT
public: explicit UdpWidget(QWidget *parent = 0); ~UdpWidget(); private slots: //创建处理信息的槽 void dealMsg();
void on_ptnSend_clicked();
private: Ui::UdpWidget *ui;
QUdpSocket *udpSocket; //UDP套接字
};
endif // UDPWIDGET_H
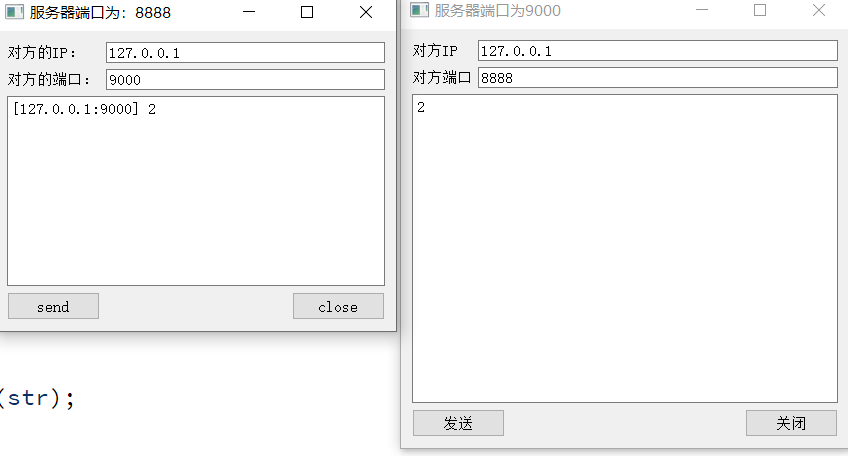
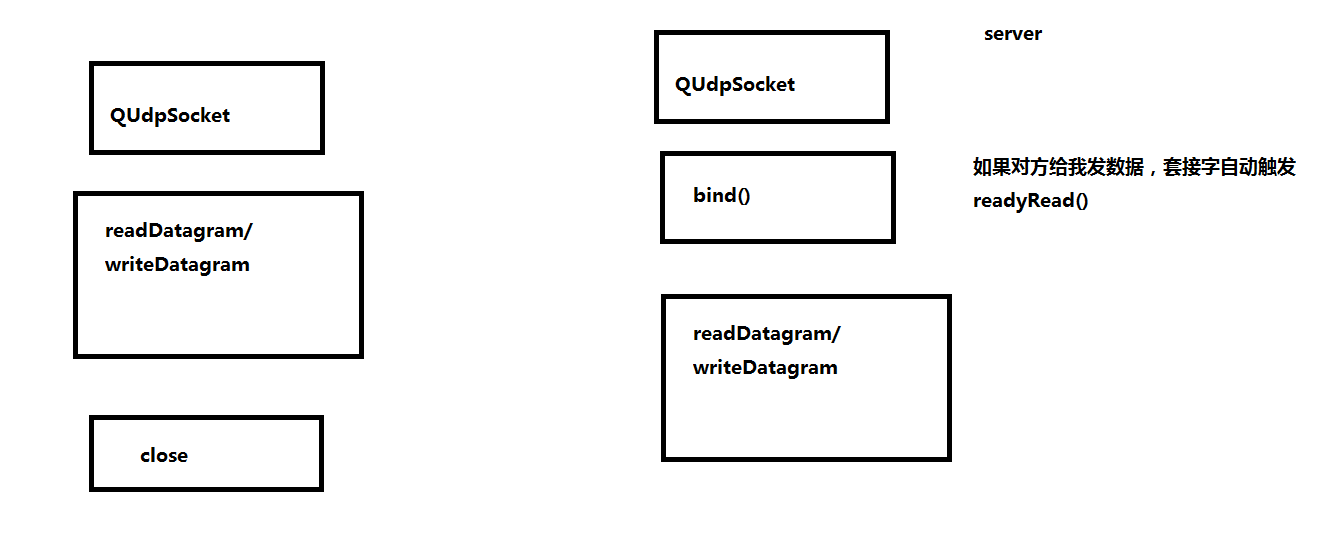
udpwidget.cpp```cpp#include "udpwidget.h"#include "ui_udpwidget.h"UdpWidget::UdpWidget(QWidget *parent) :QWidget(parent),ui(new Ui::UdpWidget){ui->setupUi(this);//分配空间,指定父对象udpSocket = new QUdpSocket(this);//绑定一个端口// udpSocket->bind(9000);//要加入组播udpSocket->bind(QHostAddress::AnyIPv4, 9000);udpSocket->joinMulticastGroup( QHostAddress("224.0.0.2") );//udpSocket->leaveMulticastGroup(); //退出组播//更改窗体名称setWindowTitle("服务器端口为9000");//当对方成功发送数据过来//自动触发 readyRead()connect(udpSocket, &QUdpSocket::readyRead, this, &UdpWidget::dealMsg);}UdpWidget::~UdpWidget(){delete ui;}void UdpWidget::dealMsg(){//读取对方发送的内容char buf[1024] = {0};//对方地址QHostAddress cliAddr;//对方端口quint16 port;qint64 len = udpSocket->readDatagram(buf, sizeof(buf), &cliAddr, &port);if (len > 0) {QString str = QString("[%1:%2] %3").arg(cliAddr.toString()).arg(port).arg(buf);//给编辑区设置内容ui->textEdit->setText(str);}}void UdpWidget::on_ptnSend_clicked(){//先获取对方的IP和端口QString ip = ui->lineEditIP->text();qint16 port = ui->lineEditPort->text().toInt();//获取编辑区内容QString str = ui->textEdit->toPlainText();//给指定的IP发送数据udpSocket->writeDatagram(str.toUtf8(), QHostAddress(ip), port);}
三、webscoket
1.简单使用和添加
在工程文件夹中添加:
QT += websockets
包含该类
#include <QWebSocket>
使用步骤:
使用时先new一个QWebsocket,然后关联其connected(),disconnected(),error(),textFrameReceived()(或者textMessageReceived()信号,两个收到消息的信号都会触发),发送调用sendTextMessage()函数即可。
2.代码
2.1客户端
socketwidget.h
#ifndef SOCKETWIDGET_H#define SOCKETWIDGET_H#include <QWidget>#include <QObject>#include <QWebSocket>namespace Ui {class SocketWidget;}class SocketWidget : public QWidget{Q_OBJECTpublic:explicit SocketWidget(QWidget *parent = 0);~SocketWidget();private slots:void on_btnSend_clicked();void on_btnClose_clicked();void on_btnConnect_clicked();private:Ui::SocketWidget *ui;bool _running;//创建一个websocket对象QWebSocket *mywebsocket;};#endif // SOCKETWIDGET_H
socketwidget.cpp
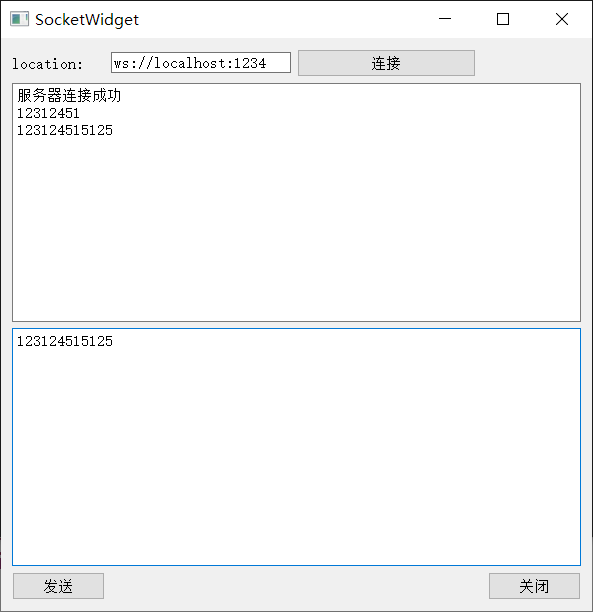
#include "socketwidget.h"#include "ui_socketwidget.h"SocketWidget::SocketWidget(QWidget *parent) :QWidget(parent),ui(new Ui::SocketWidget),_running(false),mywebsocket(NULL){ui->setupUi(this);}SocketWidget::~SocketWidget(){if (mywebsocket != NULL) {mywebsocket->deleteLater();mywebsocket = 0;}delete ui;}void SocketWidget::on_btnConnect_clicked(){if (_running == true) {qDebug() << "websocket正在工作";return;}if (NULL == mywebsocket) {mywebsocket = new QWebSocket;//获取URLQUrl url(ui->lineEdit->text());//连接到URLmywebsocket->open(url);//设置为正在运行connect(mywebsocket, &QWebSocket::connected, [=](){_running = true;ui->textEditRead->setText("服务器连接成功");});connect(mywebsocket, &QWebSocket::disconnected, [=](){ui->textEditRead->setText("服务器已断开连接");});connect(mywebsocket, &QWebSocket::textMessageReceived, [=](const QString &message){ui->textEditRead->append(message);});}}void SocketWidget::on_btnSend_clicked(){mywebsocket->sendTextMessage(ui->textEditWrite->toPlainText());}void SocketWidget::on_btnClose_clicked(){if (NULL == mywebsocket)return;//关闭websocketmywebsocket->close();mywebsocket = NULL;_running = false;}
代码下载:
上述代码和下载的代码去一些区别
websocket.rar
测试服务器:
qtwebsockets-dev.rar

若有收获,就点个赞吧
0 人点赞
