测试是软件开发工作的重要一环,甚至有一种测试驱动开发(Test-Driven Development)的研发模式,要求整个研发工作是从编写测试用例开始。测试根据不同的维度有多种分类方式,按照测试阶段主要有单元测试、集成测试和系统测试,而单元测试是保障程序基本正确性的重中之重。
单元测试(Unit Tesing)是针对程序的最小部件,检查代码是否会按照预期工作的一种测试手段。在过程式编程中最小就是一个函数,在面向对象编程中最小部件就是对象方法。
下文介绍使用 jest 对 Node.js 程序进行单元测试
为什么选择 jest
单元测试的执行通常需要测试规范、断言、mock、覆盖率工具等支持,上述工具在繁荣的 Node.js 生态中有很多优秀实现,但组合起来使用会带来两个问题
- 多种工具的选择和学习有一定的成本
- 把多个工具组合成特定测试解决方案的配置复杂
而 Jest 是用来创建、执行和构建测试用例的 JavaScript 测试库,自身包含了 驱动、断言库、mock 、代码覆盖率等多种功能,配置使用相当简单
安装与配置
$ npm i --save-dev jest
把 jest 安装到项目的 devDepecencies 后,在 package.json 添加配置
"scripts": {"test": "jest"}
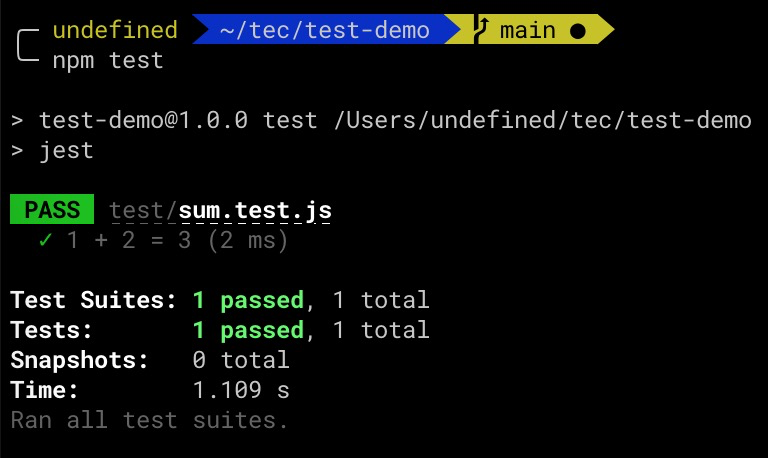
这样就可以使用命令 npm test 执行测试代码了
根目录下的 jest.config.js 文件可以自定义 jest 的详细配置,虽然 jest 相关配置也可以在 package.json 内,但为了可读性推荐在独立文件配置
小试牛刀
1.创建项目目录
.├── src│ └── sum.js├── test│ └── sum.test.js├── .gitignore├── jest.config.js├── README.md└── package.json
2. 创建 src/sum.js
function sum(a, b) {return a + b;}module.exports = sum;
3. 创建 test/sum.test.js
const sum = require('../src/sum');test('1 + 2 = 3', () => {expect(sum(1, 2)).toBe(3);});
在测试用例中使用 expect(x).toBe(y) 的方式表达 x 与 y 相同,类似 Node.js 提供的 assert(x, y) 断言,相对而言 jest 提供的语法有更好的语义性和可读性
执行测试命令
$ npm test

jest 会自动运行 sum.test.js 文件,其默认匹配规则
- 匹配
__test__文件夹下的 .js 文件(.jsx .ts .tsx 也可以) - 匹配所有后缀为
.test.js或.spec.js的文件(.jsx .ts .tsx 也可以)
可以通过根目录下的 jest.config.js 文件自定义测试文件匹配规则
module.exports = {testMatch: [ // glob 格式"**/__tests__/**/*.[jt]s?(x)","**/?(*.)+(spec|test).[jt]s?(x)"],// 正则表达式格式,与 testMatch 互斥,不能同时声明// testRegex: '(/__tests__/.*|(\\.|/)(test|spec))\\.[jt]sx?$',};
断言
jest 提供了 BDD 风格的断言支持,功能十分丰富,介绍几个最常用的
相等
.toBe() 使用 Object.is 来测试两个值精准相等
expect(2 + 2).toBe(4);
如果测试对象可以使用 toEqual() ,递归检查数组或对象的每个字段
const data = {one: 1};data['two'] = 2;expect(data).toEqual({one: 1, two: 2});
添加 not 可以表达相反匹配
expect(a + b).not.toBe(0);
真值
toBeNull只匹配 nulltoBeUndefined只匹配 undefinedtoBeDefined与toBeUndefined相反toBeTruthy匹配任何if语句为真toBeFalsy匹配任何if语句为假
test('null', () => {const n = null;expect(n).toBeNull();expect(n).toBeDefined();expect(n).not.toBeUndefined();expect(n).not.toBeTruthy();expect(n).toBeFalsy();});test('zero', () => {const z = 0;expect(z).not.toBeNull();expect(z).toBeDefined();expect(z).not.toBeUndefined();expect(z).not.toBeTruthy();expect(z).toBeFalsy();});
数字
test('two plus two', () => {const value = 2 + 2;expect(value).toBeGreaterThan(3);expect(value).toBeGreaterThanOrEqual(3.5);expect(value).toBeLessThan(5);expect(value).toBeLessThanOrEqual(4.5);});
对于比较浮点数相等,使用 toBeCloseTo 而不是 toEqual
test('两个浮点数字相加', () => {const value = 0.1 + 0.2;expect(value).toBe(0.3); // 这句会报错,因为浮点数有舍入误差expect(value).toBeCloseTo(0.3); // 这句可以运行});
包含
可以通过 toContain来检查一个数组或可迭代对象是否包含某个特定项
expect(shoppingList).toContain('beer');
测试异步函数
jest 对几种常见的异步方法提供了测试支持
src/async.js
module.exports = {cb: fn => {setTimeout(() => {fn('peanut butter');}, 300);},pm: () => {return new Promise(resolve => {setTimeout(() => {resolve('peanut butter');}, 300);});},aa: async () => {return new Promise(resolve => {setTimeout(() => {resolve('peanut butter');}, 300);});}};
test/async.test.js
const { cb, pm, aa } = require('../src/async');
回调
test 方法的第二个函数传入 done 可以用来标识回调执行完成
test('callback data is peanut butter', done => {function callback(data) {try {expect(data).toBe('peanut butter');done();} catch (error) {done(error);}}cb(callback);});
Promise
test('promise then data is peanut butter', () => {return pm().then(data => {expect(data).toBe('peanut butter');});});
一定要把 Promise 做为返回吃,否则测试用例会在异步方法执行完之前结束,如果希望单独测试 resolve 可以使用另外一种书写方式
test('promise resolve data is peanut butter', () => {return expect(pm()).resolves.toBe('peanut butter');});
async/await
async/await 测试比较简单,只要外层方法声明为 async 即可
test('async/await data is peanut butter', async () => {const data = await aa();expect(data).toBe('peanut butter');});
任务钩子
写测试用例的时候经常需要在运行测试前做一些预执行,和在运行测试后进行一些清理工作,Jest 提供辅助函数来处理这个问题
多次重复
如果在每个测试任务开始前需要执行数据初始化工作、结束后执行数据清理工作,可以使用 beforeEach 和 afterEach
beforeEach(() => {initializeCityDatabase();});afterEach(() => {clearCityDatabase();});test('city database has Vienna', () => {expect(isCity('Vienna')).toBeTruthy();});test('city database has San Juan', () => {expect(isCity('San Juan')).toBeTruthy();});
一次性设置
如果相关任务全局只需要执行一次,可以使用 beforeAll 和 afterAll
beforeAll(() => {return initializeCityDatabase();});afterAll(() => {return clearCityDatabase();});test('city database has Vienna', () => {expect(isCity('Vienna')).toBeTruthy();});test('city database has San Juan', () => {expect(isCity('San Juan')).toBeTruthy();});
作用域
默认情况下,before 和 after 的块可以应用到文件中的每个测试。 此外可以通过 describe 块来将测试分组。 当 before 和 after 的块在 describe 块内部时,则其只适用于该 describe 块内的测试
describe('Scoped / Nested block', () => {beforeAll(() => console.log('2 - beforeAll'));afterAll(() => console.log('2 - afterAll'));beforeEach(() => console.log('2 - beforeEach'));afterEach(() => console.log('2 - afterEach'));test('', () => console.log('2 - test'));});
mock
在很多时候测试用例需要在相关环境下才能正常运行,jest 提供了丰富的环境模拟支持
mock 函数
使用 jest.fn() 就可以 mock 一个函数,mock 函数有 .mock 属性,标识函数被调用及返回值信息
const mockFn = jest.fn();mockFn.mockReturnValueOnce(10).mockReturnValueOnce('x').mockReturnValue(true);console.log(myMock(), myMock(), myMock(), myMock());// > 10, 'x', true, true
mock 模块
使用 jest.mock(模块名) 可以 mock 一个模块,比如某些功能依赖了 axios 发异步请求,在实际测试的时候我们希望直接返回既定结果,不用发请求,就可以 mock axios
// src/user.jsconst axios = require('axios');class Users {static all() {return axios.get('/users.json').then(resp => resp.data);}}module.exports = Users;
// /src/user.test.jsconst axios = require('axios');const Users = require('../src/user');jest.mock('axios'); // mock axiostest('should fetch users', () => {const users = [{ name: 'Bob' }];const resp = { data: users };// 修改其 axios.get 方法,直接返回结果,避免发请求axios.get.mockResolvedValue(resp);// 也可以模拟其实现// axios.get.mockImplementation(() => Promise.resolve(resp));return Users.all().then(data => expect(data).toEqual(users));});
babel & typeScript
现在很多前端代码直接使用了 ES6 和 Typescript,jest 可以通过简单配置支持
安装依赖
$ npm i -D babel-jest @babel/core @babel/preset-env @babel/preset-typescript @types/jest
添加 babel 配置
// babel.config.jsmodule.exports = {presets: [['@babel/preset-env', { targets: { node: 'current' } }],'@babel/preset-typescript',],};
react 测试
安装依赖
$ npm i -S react react-dom$ npm i -D @babel/preset-react enzyme enzyme-adapter-react-16
配置 babel
// babel.config.jsmodule.exports = {presets: [['@babel/preset-env', { targets: { node: 'current' } }],'@babel/preset-typescript','@babel/preset-react',],};
编写组件
// src/checkbox-with-label.jsimport React, { useState } from 'react';export default function CheckboxWithLabel(props) {const [checkStatus, setCheckStatus] = useState(false);const { labelOn, labelOff } = props;function onChange() {setCheckStatus(!checkStatus);}return (<label><inputtype="checkbox"checked={checkStatus}onChange={onChange}/>{checkStatus ? labelOn : labelOff}</label>);}
编写测试用例
react 测试有多种方式,在 demo 中使用最好理解的 enzyme
// test/checkbox-with-label.test.jsimport React from 'react';import Enzyme, { shallow } from 'enzyme';import Adapter from 'enzyme-adapter-react-16';import CheckboxWithLabel from '../src/checkbox-with-label';beforeAll(() => {// enzyme 初始化Enzyme.configure({ adapter: new Adapter() });})test('CheckboxWithLabel changes the text after click', () => {// 渲染组件const checkbox = shallow(<CheckboxWithLabel labelOn="On" labelOff="Off" />);expect(checkbox.text()).toEqual('Off');// 触发事件checkbox.find('input').simulate('change');expect(checkbox.text()).toEqual('On');});
测试覆盖率
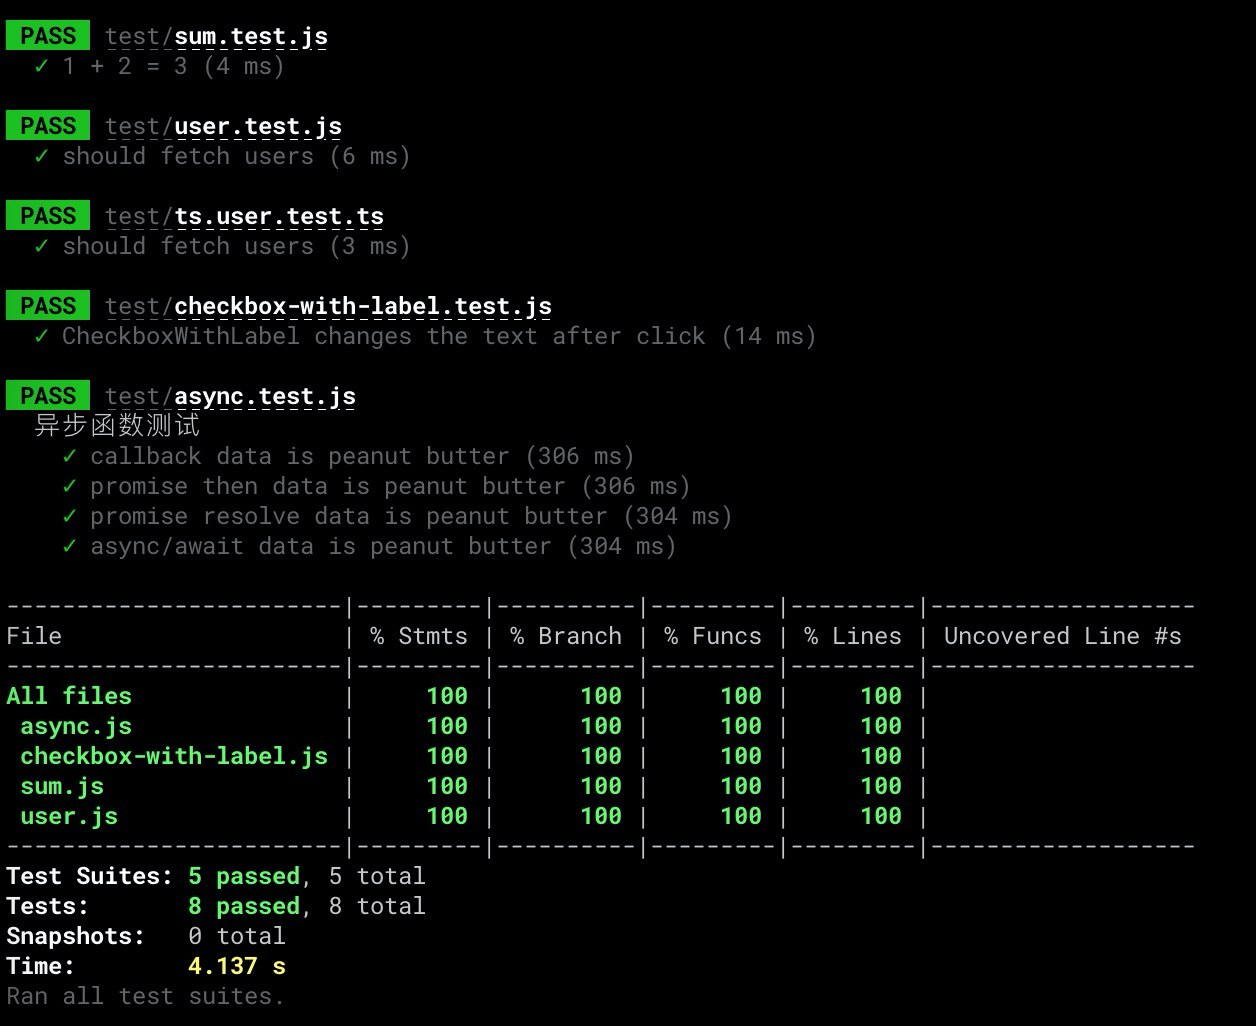
jest 还提供了测试覆盖率的支持,执行命令 npm test -- --coverage 或者配置 package.json
"scripts": {"test": "jest","coverage": "jest --coverage"}
执行命令 npm run coverage 即可
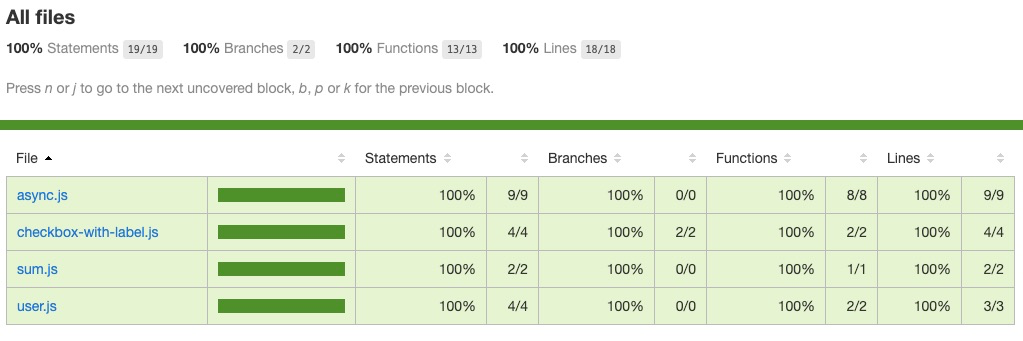
命令执行完成会在项目根目录添加 coverage 文件夹,使用浏览器打开 coverage/lcov-report/index.html 文件,有可视化的测试报告
项目完整代码:https://github.com/Samaritan89/test-demo

