快速入门之无序列表
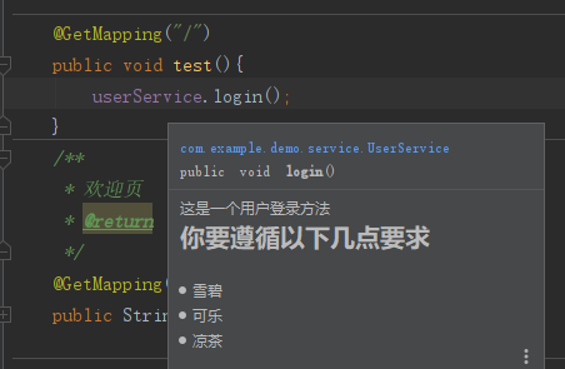
/*** 这是一个用户登录方法* <h1>你要遵循以下几点要求</h1>* <ul>* <li>雪碧</li>* <li>可乐</li>* <li>凉茶</li>* </ul>*/public void login(){System.out.println("jaja ");}@AutowiredUserService userService;@GetMapping("/")public void test(){userService.login();}
pre标签
我们经常会在要保持文本格式的时候使用pre标签,比如当我们要展示源代码的时候,只要放一个pre标签,然后把源代码直接复制,粘贴,然后在页面上就可以保持好格式。不会像放在其它标签里那样,把换行和空格都自动折叠了。这里看一下pre是如何工作的呢?
HTML里的pre元素,可定义预格式化的文本。在pre元素中的文本会保留空格和换行符。文本显现为等宽字体。
下面我们看一个示例,这里我使用的是一段css代码,你也可以换成其它的。如下:
body{background:#fff;font: 12px/24px 1.66;}
当我们用pre包裹它们时
<pre>
body{
    background:#fff;
      font: 12px/24px 1.66;
}
</pre>
会在浏览器上直接得到(注释原理一样)
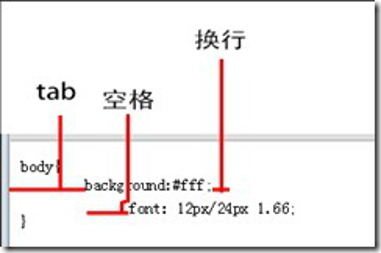
可以看出上面的tab,空格,换行都完整的保留下来了。
lt和gt
lt 是less than的首字母缩写
gt 是greater than的首字母缩写
在 HTML 中,某些字符是预留的。
在 HTML 中不能使用小于号(<)和大于号(>),这是因为浏览器会误认为它们是标签。
如果希望正确地显示预留字符,我们必须在 HTML 源代码中使用字符实体
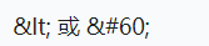
如需显示小于号,我们必须这样写:
/*
*
<pre>
* <c:url value="/login" var="loginProcessingUrl"/>
* <form action="${loginProcessingUrl}" method="post">
* <fieldset>
* <legend>Please Login</legend>
* <c:if test="${SPRING_SECURITY_LAST_EXCEPTION != null}">
* Reason: <c:out value="${SPRING_SECURITY_LAST_EXCEPTION.message}" />
* </c:if>
* </div>
* </c:if>
* <c:if test="${param.logout != null}">
* <div>
* You have been logged out.
* </div>
* </c:if>
* <p>
* <label for="username">Username</label>
* <input type="text" id="username" name="username"/>
* </p>
* <p>
* <label for="password">Password</label>
* <input type="password" id="password" name="password"/>
* </p>
* <p>
* <label for="remember-me">Remember Me?</label>
* <input type="checkbox" id="remember-me" name="remember-me"/>
* </p>
* <div>
* <button type="submit" class="btn">Log in</button>
* </div>
* </fieldset>
* </form>
* </pre>
*
* <h2>Impact on other defaults</h2>
*
* Updating this value, also impacts a number of other default values. For example,
* the following are the default values when only formLogin() was specified.
*
* <ul>
* <li>/login GET - the login form</li>
* <li>/login POST - process the credentials and if valid authenticate the user</li>
* <li>/login?error GET - redirect here for failed authentication attempts</li>
* <li>/login?logout GET - redirect here after successfully logging out</li>
* </ul>
*
* If "/authenticate" was passed to this method it update the defaults as shown below:
*
* <ul>
* <li>/authenticate GET - the login form</li>
* <li>/authenticate POST - process the credentials and if valid authenticate the user
* </li>
* <li>/authenticate?error GET - redirect here for failed authentication attempts</li>
* <li>/authenticate?logout GET - redirect here after successfully logging out</li>
* </ul>
*/
{@link}与@see
写代码的时候,有时候,你需要写一些注释,把内容相互关联起来,方便自己或别人看的时候,可以直接找到你关联的代码类或者啥的。
这个时候,{@link}与@see,这2个javadoc注解就派上用场了,
不管他具体有什么功能,咱就只管一个,他可以链接代码,让注释看的更清楚易懂。方便你我他。
@see 标签允许用户引用其他类的文档。具体使用方式如下:
@see classname
@see fully-qualified-classname
@see fully-qualified-classname#方法名称
@see fully-qualified-classname#属性名称
我在使用的时候,发现这个只能单独一行顶头写,如果不顶头写就不管用了,没了链接的效果。
但是,{@link}这个却可以随便放。
具体使用方法和上面那个@see是一样的。
实际效果,看下面的图吧。


若有收获,就点个赞吧
0 人点赞
