Harbor介绍
Harbor,是一个英文单词,意思是港湾,港湾是干什么的呢,就是停放货物的,而货物呢,是装在集装箱中的,说到集装箱,就不得不提到Docker容器,因为docker容器的技术正是借鉴了集装箱的原理。所以,Harbor正是一个用于存储Docker镜像的企业级Registry服务。
Docker容器应用的开发和运行离不开可靠的镜像管理,虽然Docker官方也提供了公共的镜像仓库,但是从安全和效率等方面考虑,部署我们私有环境内的Registry也是非常必要的。Harbor是由VMware公司开源的企业级的Docker Registry管理项目,它包括权限管理(RBAC)、LDAP、日志审核、管理界面、自我注册、镜像复制和中文支持等功能。
SSL证书创建
如果要使用https访问Harbor。那么请按照如下生成SSL证书。
创建根证书
## 创建CA私钥openssl genrsa -out ca.key 2048## 制作CA公钥openssl req -new -x509 -days 36500 -key ca.key -out ca.crt -subj "/C=CN/ST=BJ/L=BeiJing/O=BTC/OU=MOST/CN=zhang/emailAddress=ca@test.com"
选项参数说明:
- genrsa 生成私
- -out filename 标准输出到filename文件
- req 生成证书请求
- -new 生成新证书签署请求
- -x509 专用于CA生成自签证书;不自签的时候不要加该选项
- -days num 证书的有效期限
- -key file 生成请求时用到的私钥文件
- -out filename 标准输出到filename文件
subj内容详解:
C             = 国家
ST            = 省/州
L             = 城市
O             = Organization Name
OU            = Organizational Unit Name
CN            = Common Name
emailAddress  = test@email.address
证书签发
## 创建私钥
openssl genrsa -out httpd.key 1024
## 生成签发请求
openssl req -new -key httpd.key -out httpd.csr -subj "/C=CN/ST=BJ/L=BeiJing/O=BTC/OU=OPS/CN=zhang/emailAddress=zhang@test.com"
## 使用CA证书进行签发
openssl x509 -req -sha256 -in httpd.csr -CA ca.crt -CAkey ca.key -CAcreateserial -days 36500 -out httpd.crt
## 验证签发证书是否有效
openssl verify -CAfile ca.crt httpd.crt
生成结果如下图: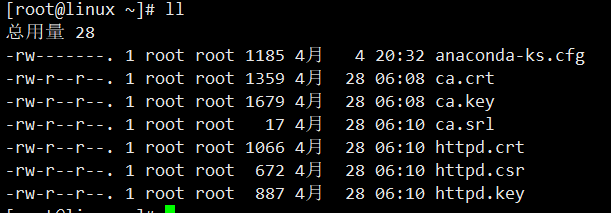
然后将httpd.key和httpd.crt,放到/etc/harbor/cert/目录下,后面会用到。
[root@linux ~]# mkdir -p /etc/harbor/cert/
[root@linux ~]# cp httpd.key /etc/harbor/cert/
[root@linux ~]# cp httpd.crt /etc/harbor/cert/
安装docker-ce
[root@linux ~]# cat install_docker-ce.sh
#!/bin/sh

# 加载环境变量
. /etc/profile
. /etc/bashrc

## 设置 docker yum repository
yum install -y yum-utils device-mapper-persistent-data lvm2
yum-config-manager --add-repo http://mirrors.aliyun.com/docker-ce/linux/centos/docker-ce.repo

## 安装docker
yum install -y docker-ce
# yum install -y docker-ce-19.03.8

## 启动docker服务,这样可以创建/etc/docker目录
systemctl start docker

## 配置daemon
## 1、修改docker Cgroup Driver为systemd;2、日志格式设定
## 如果不修改,可能会碰到如下错误
## [WARNING IsDockerSystemdCheck]: detected "cgroupfs" as the Docker cgroup driver. The recommended driver is "systemd".
## Please follow the guide at https://kubernetes.io/docs/setup/cri/
cat > /etc/docker/daemon.json << EOF
{
  "exec-opts": ["native.cgroupdriver=systemd"],
  "log-driver": "json-file",
  "log-opts": {
    "max-size": "100m"
  }
}
EOF

## 开机自启动
systemctl stop docker && systemctl daemon-reload && systemctl enable docker && systemctl start docker
安装docker-compose
下载地址: https://github.com/docker/compose
此次,我们使用的是 1.25.5 版本。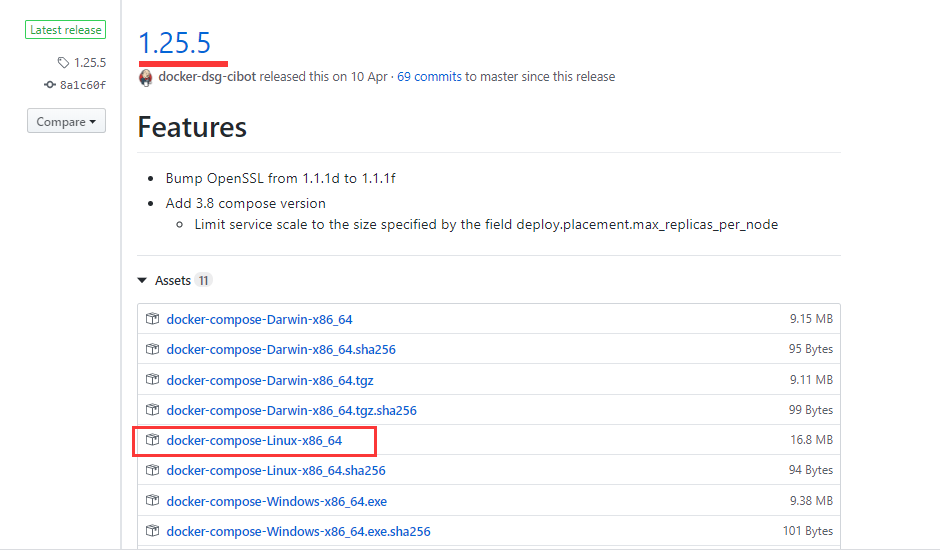
这里我使用脚本进行安装
[root@linux harbor]# cat install_docker_compose.sh
#! /bin/bash


# 开始安装docker-compose
install()
{
    echo "=================>>> 安装docker-compose"
    curl -L https://get.daocloud.io/docker/compose/releases/download/v1.25.2/docker-compose-`uname -s`-`uname -m` > /usr/local/bin/docker-compose
    sudo chmod +x /usr/local/bin/docker-compose

    systemctl restart docker

    echo "====> 建立 docker 组:"
    sudo groupadd docker

    echo "====> 将当前用户加入 docker 组:"
    sudo usermod -aG docker $USER

    echo "====> 安装成功,版本号:"
    /usr/local/bin/docker-compose --version

}

main()
{
    install
}

main
[root@linux harbor]# sh install_docker_compose.sh
安装Harbor私有仓库
官网下载地址
此次,我们使用的是 v2.2.1 版本。
[root@linux harbor]# ls
harbor-offline-installer-v2.2.1.tgz
[root@linux harbor]# tar xf harbor-offline-installer-v2.2.1.tgz
[root@linux harbor]# cd harbor
[root@linux harbor]# ll
总用量 493156
-rw-r--r--. 1 root root      3361 3月  26 13:32 common.sh
-rw-r--r--. 1 root root 504956561 3月  26 13:33 harbor.v2.2.1.tar.gz
-rw-r--r--. 1 root root      7840 3月  26 13:32 harbor.yml.tmpl
-rwxr-xr-x. 1 root root      2500 3月  26 13:32 install.sh
-rw-r--r--. 1 root root     11347 3月  26 13:32 LICENSE
-rwxr-xr-x. 1 root root      1881 3月  26 13:32 prepare
harbor.yml配置文件修改内容【http访问】
[root@linux harbor]# cp harbor.yml.tmpl harbor.yml.tmpl.bak
[root@linux harbor]# mv harbor.yml.tmpl harbor.yml
放开了https配置,证书是自签发的。
# 这里的hostname怎么配置
# 1、如果所有机器都在一个局域网,那么配置内网IP
# 2、如果机器跨网络,只能通过公网访问,那么配置本机外网IP或域名
hostname: 192.168.18.131

# http端口改为了5000,默认80端口
http:
  # port for http, default is 80. If https enabled, this port will redirect to https port
  port: 5000

# https related config
https:
  # https port for harbor, default is 443
  port: 443
  # The path of cert and key files for nginx
  certificate: /etc/harbor/cert/httpd.crt
  private_key: /etc/harbor/cert/httpd.key

# admin用户的免密
harbor_admin_password: Harbor12345

# 数据存储路径
data_volume: /data
如果使用了https协议且端口是443,那么当使用http访问时,会自动跳转到https。
harbor.yml配置文件修改内容【https访问】
放开了https配置,证书是自签发的。
# 这里的hostname怎么配置
# 1、如果所有机器都在一个局域网,那么配置内网IP
# 2、如果机器跨网络,只能通过公网访问,那么配置本机外网IP或域名
hostname: 192.168.18.131

# http端口改为了5000,默认80端口
http:
  # port for http, default is 80. If https enabled, this port will redirect to https port
  port: 5000

# https related config
https:
  # https port for harbor, default is 443
  port: 443
  # The path of cert and key files for nginx
  certificate: /etc/harbor/cert/httpd.crt
  private_key: /etc/harbor/cert/httpd.key

# admin用户的免密
harbor_admin_password: Harbor12345

# 数据存储路径
data_volume: /data
如果使用了https协议且端口是443,那么当使用http访问时,会自动跳转到https。
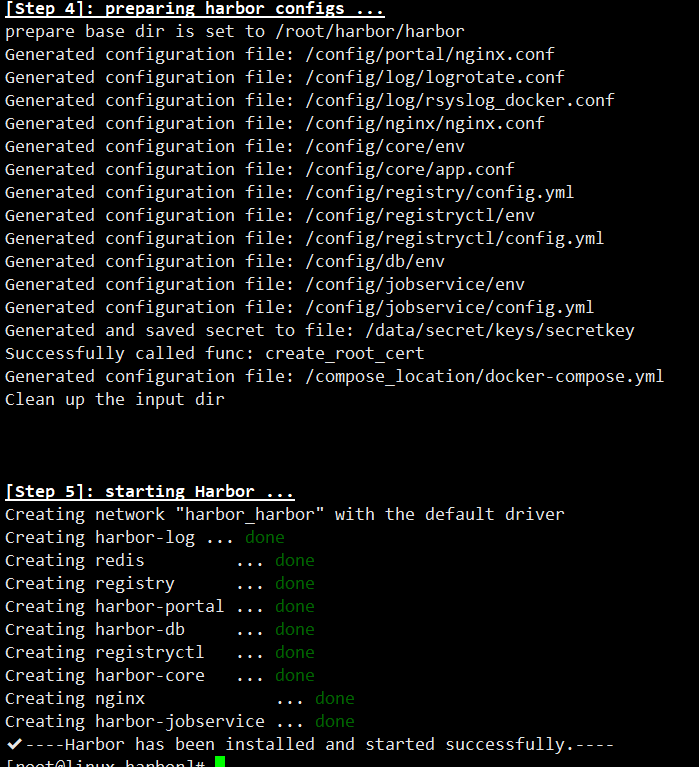
部署Harbor
修改完配置文件后,在的当前目录执行./install.sh,Harbor服务就会根据当前目录下的docker-compose.yml开始下载依赖的镜像,检测并按照顺序依次启动。
[root@linux harbor]# ll
总用量 493164
-rw-r--r--. 1 root root      3361 3月  26 13:32 common.sh
-rw-r--r--. 1 root root 504956561 3月  26 13:33 harbor.v2.2.1.tar.gz
-rw-r--r--. 1 root root      7861 4月  28 06:32 harbor.yml
-rw-r--r--. 1 root root      7840 4月  28 06:26 harbor.yml.tmpl.bak
-rwxr-xr-x. 1 root root      2500 3月  26 13:32 install.sh
-rw-r--r--. 1 root root     11347 3月  26 13:32 LICENSE
-rwxr-xr-x. 1 root root      1881 3月  26 13:32 prepare
[root@linux harbor]# ./install.sh # 启动harbor
停止与启动Harbor
如果修改了Harbor的配置文件harbor.yml,因为Harbor是基于docker-compose服务编排的,我们可以使用docker-compose命令重启Harbor。
未修改配置文件,重启Harbor命令:docker-compose start | stop | restart
当然个人建议:如果修改了harbor.yml文件,那么停止使用docker-compose down,启动使用 ./install.sh 。
[root@linux harbor]# docker-compose down
Stopping harbor-jobservice ... done
Stopping nginx             ... done
Stopping harbor-core       ... done
Stopping harbor-db         ... done
Stopping registryctl       ... done
Stopping harbor-portal     ... done
Stopping registry          ... done
Stopping redis             ... done
Stopping harbor-log        ... done
Removing harbor-jobservice ... done
Removing nginx             ... done
Removing harbor-core       ... done
Removing harbor-db         ... done
Removing registryctl       ... done
Removing harbor-portal     ... done
Removing registry          ... done
Removing redis             ... done
Removing harbor-log        ... done
Removing network harbor_harbor

[root@linux harbor]# docker-compose up -d
Creating network "harbor_harbor" with the default driver
Creating harbor-log ... done
Creating harbor-db     ... done
Creating registry      ... done
Creating redis         ... done
Creating registryctl   ... done
Creating harbor-portal ... done
Creating harbor-core   ... done
Creating harbor-jobservice ... done
Creating nginx             ... done
镜像信息和容器信息
镜像信息和容器信息如下
[root@linux harbor]# docker images
REPOSITORY                      TAG       IMAGE ID       CREATED       SIZE
goharbor/harbor-exporter        v2.2.1    ed0b493a25d2   4 weeks ago   76.3MB
goharbor/chartmuseum-photon     v2.2.1    8b7a663618c2   4 weeks ago   165MB
goharbor/redis-photon           v2.2.1    49fea9bb2a5d   4 weeks ago   68.9MB
goharbor/trivy-adapter-photon   v2.2.1    0920de43b566   4 weeks ago   120MB
goharbor/notary-server-photon   v2.2.1    064dc2dd56ab   4 weeks ago   101MB
goharbor/notary-signer-photon   v2.2.1    77c58e1edabc   4 weeks ago   98.4MB
goharbor/harbor-registryctl     v2.2.1    9919335faca4   4 weeks ago   128MB
goharbor/registry-photon        v2.2.1    0605103e28cb   4 weeks ago   77.2MB
goharbor/nginx-photon           v2.2.1    76e8d0b2257c   4 weeks ago   40.3MB
goharbor/harbor-log             v2.2.1    fefe96dbd38a   4 weeks ago   108MB
goharbor/harbor-jobservice      v2.2.1    b2018c3eee49   4 weeks ago   163MB
goharbor/harbor-core            v2.2.1    8e0ab19b402b   4 weeks ago   148MB
goharbor/harbor-portal          v2.2.1    c2b528ddbd1e   4 weeks ago   51MB
goharbor/harbor-db              v2.2.1    bb52019ada75   4 weeks ago   175MB
goharbor/prepare                v2.2.1    cc1c8af914f9   4 weeks ago   165MB
[root@linux harbor]# docker ps
CONTAINER ID   IMAGE                                COMMAND                  CREATED          STATUS                    PORTS                                                                                NAMES
def15b2853e8   goharbor/nginx-photon:v2.2.1         "nginx -g 'daemon of…"   52 seconds ago   Up 50 seconds (healthy)   0.0.0.0:5000->8080/tcp, :::5000->8080/tcp, 0.0.0.0:443->8443/tcp, :::443->8443/tcp   nginx
96e1f7c6b243   goharbor/harbor-jobservice:v2.2.1    "/harbor/entrypoint.…"   52 seconds ago   Up 51 seconds (healthy)                                                                                        harbor-jobservice
401e12333dd0   goharbor/harbor-core:v2.2.1          "/harbor/entrypoint.…"   53 seconds ago   Up 52 seconds (healthy)                                                                                        harbor-core
b017f298cdb3   goharbor/harbor-portal:v2.2.1        "nginx -g 'daemon of…"   55 seconds ago   Up 52 seconds (healthy)                                                                                        harbor-portal
4eada7f393a5   goharbor/harbor-registryctl:v2.2.1   "/home/harbor/start.…"   55 seconds ago   Up 52 seconds (healthy)                                                                                        registryctl
2c18d2823069   goharbor/redis-photon:v2.2.1         "redis-server /etc/r…"   55 seconds ago   Up 52 seconds (healthy)                                                                                        redis
07ebc42948c6   goharbor/registry-photon:v2.2.1      "/home/harbor/entryp…"   55 seconds ago   Up 53 seconds (healthy)                                                                                        registry
26011301a9e1   goharbor/harbor-db:v2.2.1            "/docker-entrypoint.…"   55 seconds ago   Up 53 seconds (healthy)                                                                                        harbor-db
fc0e77dfcbd5   goharbor/harbor-log:v2.2.1           "/bin/sh -c /usr/loc…"   55 seconds ago   Up 54 seconds (healthy)   127.0.0.1:1514->10514/tcp
浏览器访问
访问地址如下:
http 访问:http://10.0.0.31:5000/   或则  http://192.168.18.131:5000/
https访问:https://10.0.0.31/       或者  https://192.168.18.131/
备注:
1、由于我使用的Vmware虚拟机,因此10.0.0.0/24网段【模拟外网】和192.168.18.131网络【内网】都可以访问。生产环境是访问内网还是外网,视具体情况而定。
2、这里的访问地址和harbor.yml中配置的hostname值无关。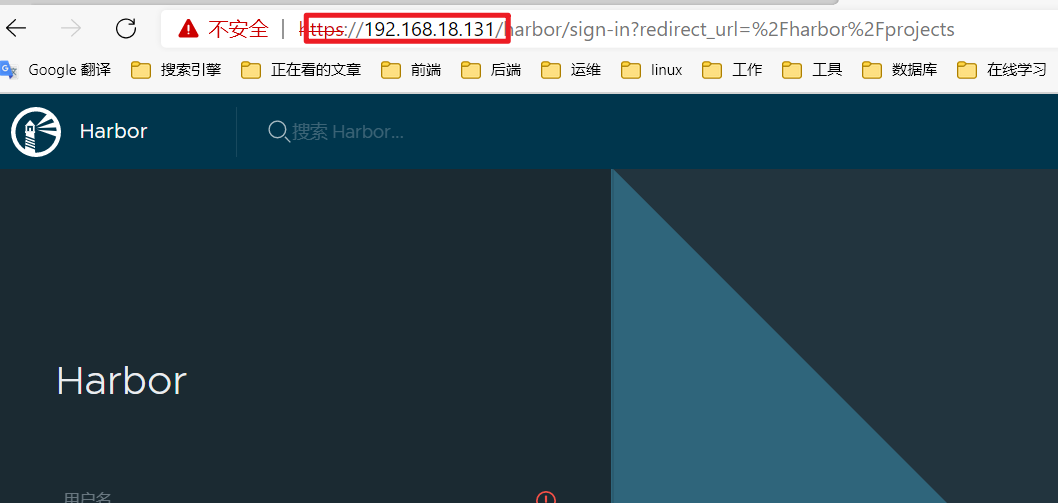
登录后页面
Harbor实现Docker镜像上传与下载
新建项目
根据你的项目名新建项目,这样才能将镜像推动到harbor镜像中心。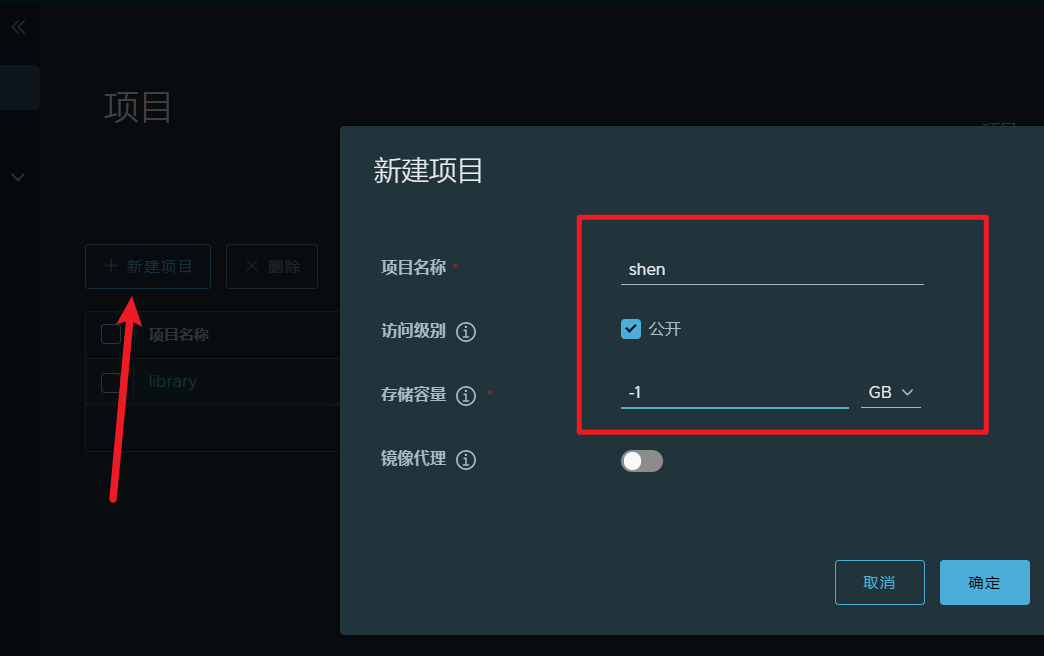

客户端http设置
Docker 默认不允许非 HTTPS 方式推送镜像。我们可以通过 Docker 的配置选项来取消这个限制。
如果直接【上传】或【拉取】镜像会失败,因为默认为https方式。
所有客户端都需要添加这个配置,然后重启 docker 服务。
[root@k8s-master01 ~]# vim /etc/docker/daemon.json
{
    "exec-opts": ["native.cgroupdriver=systemd"],
    "log-driver": "json-file",
    "log-opts": {
    "max-size": "100m"
    },
    "storage-driver": "overlay2",
    "registry-mirrors":[
        "https://kfwkfulq.mirror.aliyuncs.com",
        "https://2lqq34jg.mirror.aliyuncs.com",
        "https://pee6w651.mirror.aliyuncs.com",
        "http://hub-mirror.c.163.com",
        "https://docker.mirrors.ustc.edu.cn",
        "https://registry.docker-cn.com"
    ],
    "insecure-registries": ["192.168.18.131:5000"]
}
添加了 “insecure-registries”: [“192.168.18.131:5000”] 这行,其中192.168.18.131为内网IP地址。该文件必须符合 json 规范,否则 Docker 将不能启动。
systemctl daemon-reload
systemctl restart docker
如果在Harbor所在的机器重启了docker服务,记得要重新启动Harbor。
客户端登录Harbor
客户端登录Harbor。
[root@k8s-master01 ~]# docker login 192.168.18.131:5000 -u admin -p Harbor12345
WARNING! Using --password via the CLI is insecure. Use --password-stdin.
WARNING! Your password will be stored unencrypted in /root/.docker/config.json.
Configure a credential helper to remove this warning. See
https://docs.docker.com/engine/reference/commandline/login/#credentials-store

Login Succeeded
Docker push镜像上传
制作nginx镜像
[root@k8s-master01 ~]# docker build -f Dockerfile -t 192.168.18.131:5000/shen/my-nginx:v18 .

FROM centos:7
#更新yum环境
RUN yum -y update
#安装编译工具
RUN yum install -y pcre* zlib-devel gcc gcc-c++ make
#添加一个无家目录和无法登陆的nginx用户
RUN useradd -M -s /sbin/nologin nginx
#将源码包解压复制到容器中的/opt目录下
ADD nginx-1.18.tar.gz /opt
#指定工作目录
WORKDIR /opt/nginx-1.18.0
#开始编译和make
RUN ./configure --prefix=/usr/local/nginx \
--user=nginx \
--group=nginx \
--with-http_stub_status_module \
--with-http_gzip_static_module \
--with-http_flv_module

RUN make && make install
#nginx对外提供80和443端口
EXPOSE 80
EXPOSE 443
#关闭以守护进程的形式启动nginx,不加这句话到配置文件中容器无法正常运行!!!
RUN echo "daemon off;">>/usr/local/nginx/conf/nginx.conf
#添加启动脚本
ADD run.sh /run.sh
RUN chmod +x /run.sh
#开启容器时运行启动脚本
CMD ["/run.sh"]

[root@k8s-master01 ~]# docker images
REPOSITORY                                                                    TAG                 IMAGE ID            CREATED             SIZE
192.168.18.131:5000/shen/my-nginx                                             v18                 0deb61b973a8        3 seconds ago       629MB
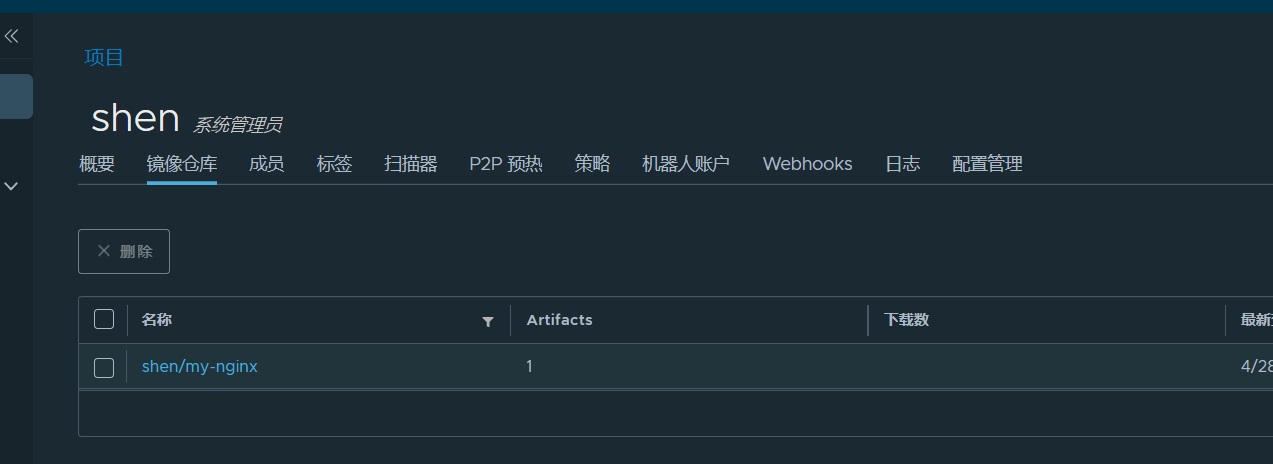
推送镜像,注意镜像名格式
[root@k8s-master01 ~]# docker push 192.168.18.131:5000/shen/my-nginx:v18
The push refers to repository [192.168.18.131:5000/shen/my-nginx]
425841fa12ea: Pushed
457197a5b8ba: Pushed
42ef14abd45f: Pushed
b033c9d95f6d: Pushed
ade60565ef28: Pushed
afca7e053081: Pushed
fa54cd6f0f48: Pushed
fbe3bb2c3698: Pushed
ed33f000cce9: Pushed
174f56854903: Pushed
v18: digest: sha256:210bed74fcfca0256b912fa73f989cf60a56a0156d6c188b81e4f6c0c89ee6a7 size: 2413
Docker pull镜像拉取
删除镜像
[root@k8s-master01 ~]# docker images
REPOSITORY                                                                    TAG                 IMAGE ID            CREATED             SIZE
192.168.18.131:5000/shen/my-nginx                                             v18                 0deb61b973a8        2 minutes ago       629MB
[root@k8s-master01 ~]# docker rmi 0deb61b973a8
Untagged: 192.168.18.131:5000/shen/my-nginx:v18
Untagged: 192.168.18.131:5000/shen/my-nginx@sha256:210bed74fcfca0256b912fa73f989cf60a56a0156d6c188b81e4f6c0c89ee6a7
Deleted: sha256:0deb61b973a8b8532ec80a2388c56609f495e206846713420438e958be6e5c61
Deleted: sha256:2473a04f7899b0209d716e26dbb0174f93af0bf2c73a63dbb757faed1bbfa88d
Deleted: sha256:014f6e642beb43c5d393ac38692faf8bbf72ab8ee27dc2207614eb75838a8a59
...

[root@k8s-master01 ~]# docker images
REPOSITORY                                                                    TAG                 IMAGE ID            CREATED             SIZE
重新拉取镜像
[root@k8s-master01 ~]# docker pull 192.168.18.131:5000/shen/my-nginx:v18
v18: Pulling from shen/my-nginx
2d473b07cdd5: Already exists
aec655e233b5: Pull complete
85f1db69876c: Pull complete
2931a16790f6: Pull complete
2fd6e525c608: Pull complete
7bc7dbc03007: Pull complete
d48a8ce79845: Pull complete
cfb2d1b3bffd: Pull complete
14e6f787b760: Pull complete
fcab7c0d9ce1: Pull complete
Digest: sha256:210bed74fcfca0256b912fa73f989cf60a56a0156d6c188b81e4f6c0c89ee6a7
Status: Downloaded newer image for 192.168.18.131:5000/shen/my-nginx:v18
192.168.18.131:5000/shen/my-nginx:v18

[root@k8s-master01 ~]# docker images
REPOSITORY                                                                    TAG                 IMAGE ID            CREATED             SIZE
192.168.18.131:5000/shen/my-nginx                                             v18                 0deb61b973a8        5 minutes ago       629MB
页面信息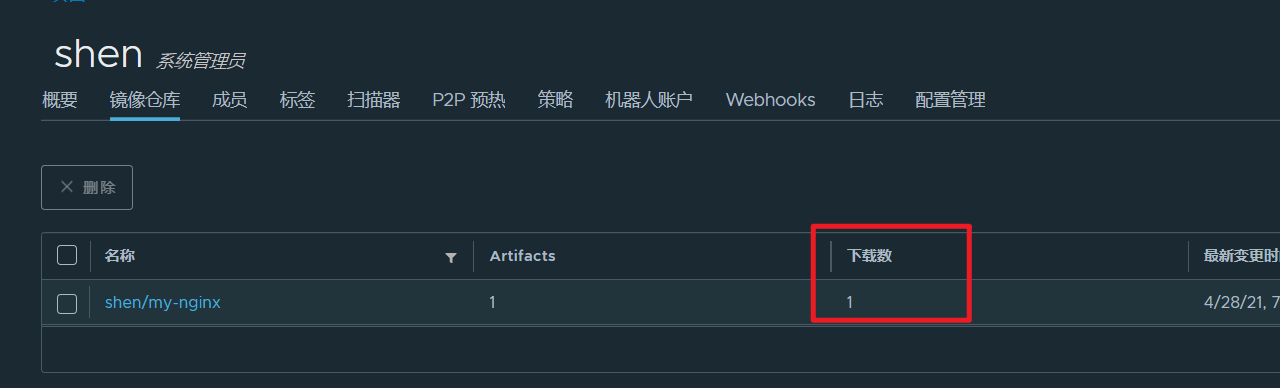
完毕!

若有收获,就点个赞吧
0 人点赞
