一、准备工作
- 环境要求:
操作系统: CentOS 6.X 64位
关闭SELinux 和 iptables 防火墙
此次试验环境使用网络 yum源,保证系统能正常连接互联网
- 网络yum源:
先将系统自带的yum配置文件移除或者删除,然后下载以下两个配置文件
官方基础:http://mirrors.163.com/.help/CentOS6-Base-163.repo
centos6(centos6官方源已下线,建议切换centos-vault源) https://mirrors.aliyun.com/repo/Centos-vault-6.10.repo
epel拓展:http://mirrors.aliyun.com/repo/epel-6.repo
epel(RHEL 6) (epel6官方源已下线,建议切换epel-archive源) http://mirrors.aliyun.com/repo/epel-archive-6.repo
mkdir /etc/yum.repos.d/repobakmv /etc/yum.repos.d/*.repo /etc/yum.repos.d/repobak#CentOS 6系统#curl -o /etc/yum.repos.d/CentOS6-Base-163.repo http://mirrors.163.com/.help/CentOS6-Base-163.repo#curl -o /etc/yum.repos.d/epel-6.repo http://mirrors.aliyun.com/repo/epel-6.repocurl -o /etc/yum.repos.d/CentOS-Base.repo https://mirrors.aliyun.com/repo/Centos-vault-6.10.repocurl -o /etc/yum.repos.d/epel.repo http://mirrors.aliyun.com/repo/epel-archive-6.repo#CentOS 7系统curl -o /etc/yum.repos.d/CentOS-Base.repo https://mirrors.aliyun.com/repo/Centos-7.repocurl -o /etc/yum.repos.d/epel.repo http://mirrors.aliyun.com/repo/epel-7.repo
下载完成后,需要使用命令清除掉原有的yum缓存,使用新的配置文件建立缓存
#清除掉原有缓存列表yum clean all#建立新的缓存列表yum makecache#将所有能更新的软件更新(非必须)yum update
安装编译工具和依赖软件包
yum -y install gcc* pcre-devel openssl openssl-devel \zlib-devel ncurses-devel cmake bison \libxml2-devel libpng-devel
Nginx、MySQL、PHP 三大软件的源码包下载地址:
Nginx: http://nginx.org/en/download.html
MySQL: https://dev.mysql.com/downloads/mysql/
PHP: http://www.php.net/
版本选用: Nginx: 1.12. #选用软件的稳定版即可 MySQL: 5.5. #5.5以上版本需要1G以上的内存,否则无法安装 PHP: 5.6.* #LAMP中我们使用的是php7,此次使用php5
注意:每次安装LNMP时,软件包的小版本都不一样,官方会对其大版本下的小版本进行覆盖式更新,本文内部分链接会失效,切记按照下载版本进行安装。
二、CentOS 6 源码软件包安装
1 Nginx
Nginx是一款轻量级的Web服务器/反向代理服务器及电子邮件(IMAP/POP3)代理服务器,在BSD-like协议下发行。其特点是占有内存少,并发能力强。
1.1 下载Nginx源码包
wget http://nginx.org/download/nginx-1.12.2.tar.gz -O /usr/local/src/nginx-1.12.2.tar.gz
tar -xvf /usr/local/src/nginx-1.12.2.tar.gz -C /usr/local/src/
1.2 创建用于运行 Nginx 的用户
useradd -r -s /sbin/nologin -c "Nginx User" nginx
1.3 解压缩Nginx并安装
cd /usr/local/src/nginx-1.12.2
./configure --prefix=/usr/local/nginx --user=nginx --group=nginx \
--with-http_stub_status_module --with-http_ssl_module

make -j 2 && make install
1.4 上传编写好的nginx启动管理脚本
/usr/local/nginx/sbin/nginx

netstat -ntlp | grep 80
curl localhost

#使用附件脚本内容
2 MySQL
下载: https://dev.mysql.com/downloads/mysql/
选择:MysQL Community Server 5.5
选择: Select Version:按照自己要求选择
Select Operating System: Source Code
Select os Version: Generic Linux
格式: mysql-N.N.NN.tar.gz
wget https://cdn.mysql.com//Downloads/MySQL-5.5/mysql-5.5.62.tar.gz -O /usr/local/src/mysql-5.5.62.tar.gz

tar -xvf /usr/local/src/mysql-5.5.62.tar.gz -C /usr/local/src/
2.1 创建用于运行MySQL的用户
useradd -r -s /sbin/nologin -c "MySQL User" mysql
2.2 解压缩MySQL并安装
cd /usr/local/src/mysql-5.5.62
cmake -DCMAKE_INSTALL_PREFIX=/usr/local/mysql -DMYSQL_UNIX_ADDR=/tmp/mysql.sock \
-DEXTRA_CHARSETS=all -DDEFAULT_CHARSET=utf8 \
-DDEFAULT_COLLATION=utf8_general_ci -DWITH_MYISAM_STORAGE_ENGINE=1 \
-DWITH_INNOBASE_STORAGE_ENGINE=1 -DWITH_MEMORY_STORAGE_ENGINE=1 \
-DWITH_READLINE=1 -DENABLED_LOCAL_INFILE=1 \
-DMYSQL_USER=mysql -DMYSQL_TCP_PORT=3306

make -j 2 && make install
echo $?
2.3 修改安装后的目录权限
cd /usr/local/mysql
chown -R root .
chown -R mysql data
ln -s /usr/local/mysql/bin/* /usr/local/bin
2.4 生成MySQL配置文件
cp -a /usr/local/mysql/support-files/my-medium.cnf /etc/my.cnf
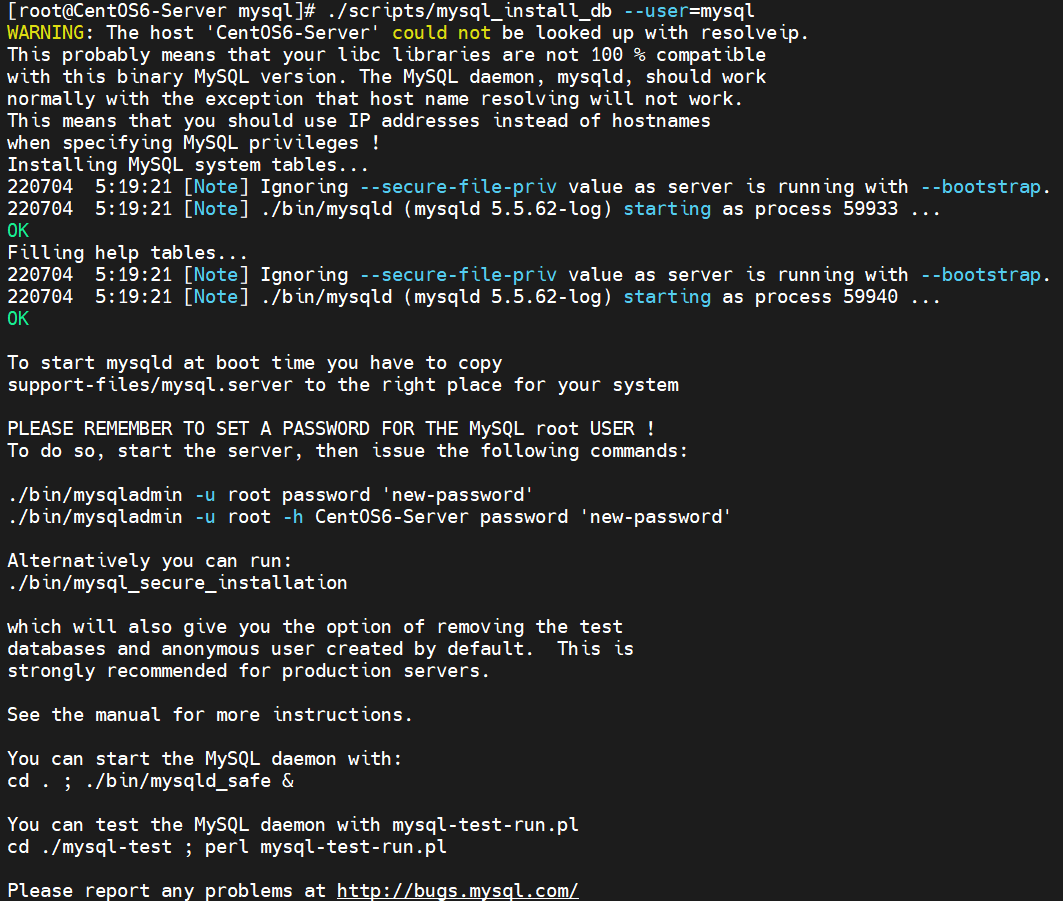
2.5 初始化,生成授权表
#一定要先切换到此目录下,然后再执行下一步
cd /usr/local/mysql/
#初始化成功标志:两个OK
./scripts/mysql_install_db --user=mysql
2.6 生成MySQL的启动和自启动管理脚本
cd /usr/local/mysql/support-files
#切换到mysql的源码解压缩目录下的support-files

cp -a mysql.server /etc/init.d/mysqld
chmod +x /etc/init.d/mysqld

chkconfig --add mysqld
chkconfig mysqld on ; chkconfig --list mysqld
service mysqld start
#service mysqld start|stop|restart
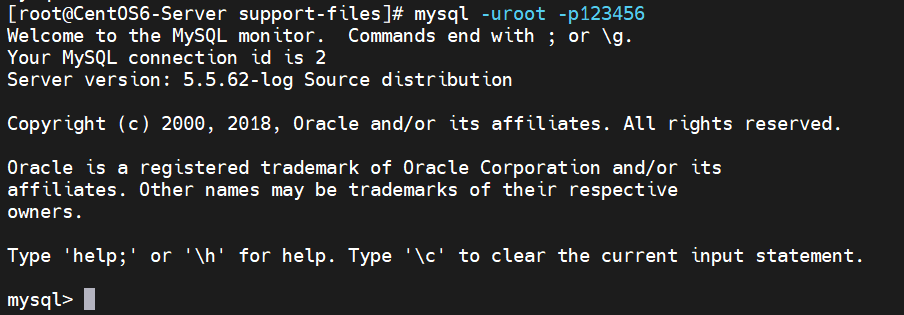
2.7 给MySQL的root用户设置密码
mysqladmin -uroot password 123456
3 PHP
wget -O /usr/local/src/php-5.6.38.tar.gz http://tw2.php.net/distributions/php-5.6.38.tar.gz

tar -xvf /usr/local/src/php-5.6.38.tar.gz -C /usr/local/src/
3.1 解压缩PHP并安装
cd /usr/local/src/php-5.6.38

./configure --prefix=/usr/local/php/ --with-config-file-path=/usr/local/php/etc/ \
--with-mysqli=/usr/local/mysql/bin/mysql_config \
--enable-soap --enable-mbstring=all --enable-sockets \
--with-pdo-mysql=/usr/local/mysql --with-gd --without-pear --enable-fpm

make -j 2 && make install
echo $?
报错提示:若遇到libpng.so not found. 报错(老版本的PHP会出现此问题)
解决方案:
ln -s /usr/lib64/libpng.so /usr/lib
3.2 生成PHP配置文件
cp -a /usr/local/src/php-5.6.38/php.ini-production /usr/local/php/etc/php.ini
#赋值源码包内的配置文件到安装目录下
3.3 创建软链接,使用 php 相关命令是更方便
ln -s /usr/local/php/bin* /usr/local/bin
ln -s /usr/local/php/sbin* /usr/local/sbin
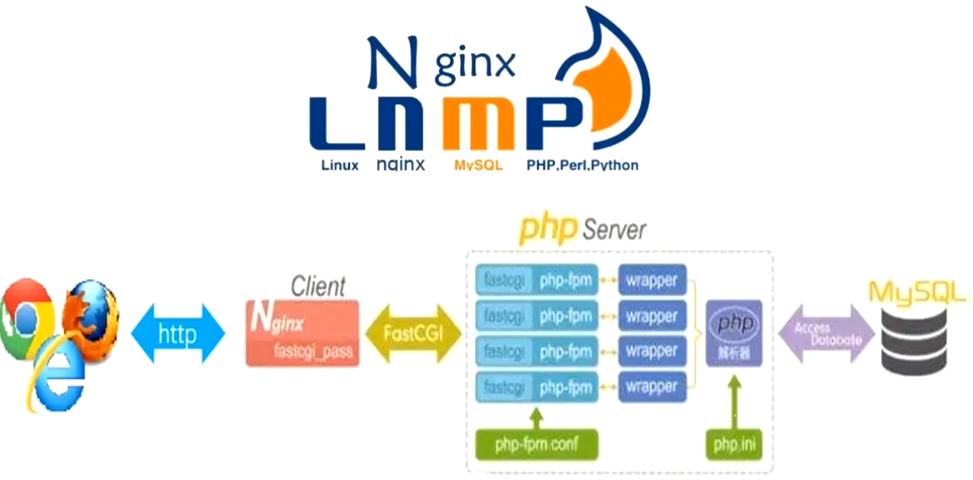
4 配置Nginx连接PHP(重难点)
4.1 nginx连接php需要启动 php-fpm服务


~ cd /usr/local/php/etc/
~ cp -a php-fpm.conf.default php-fpm.conf
#生成php-fpm的配置文件,并修改指定参数
~ vim php-fpm.conf
#修改指定条目的参数:
pid=run/php-fpm.pid
user=nginx
group=nginx
pm.start_servers=2
pm.min_spare_servers=1
pm.max_spare_servers=3
#启动时开启的进程数、最少空闲进程数、最多空闲进程数(默认值,未修改)
#修改Nginx启动管理脚本:将php-fpm的注释取消掉即可
4.2 修改nginx的配置文件,使其识别 .php后缀的文件
~ cp -a /usr/local/nginx/conf/nginx.conf{,.bak}
~ vim /usr/local/nginx/conf/nginx.conf
#取消下列行的注释,并修改include选项的后缀为 fastcgi.conf,并注意每一行结尾的分号和大括号
#location ~ \.php${
#root                        html;
#fastcgi_pass        127.0.0.1:9000;
#fastcgi_index    index.php;
#fastcgi_param    SCRIPT_FILENAME        /scripts$fastcgi_script_name;
#include                fastcgi.params;     #修改位fastcgi.conf
#}
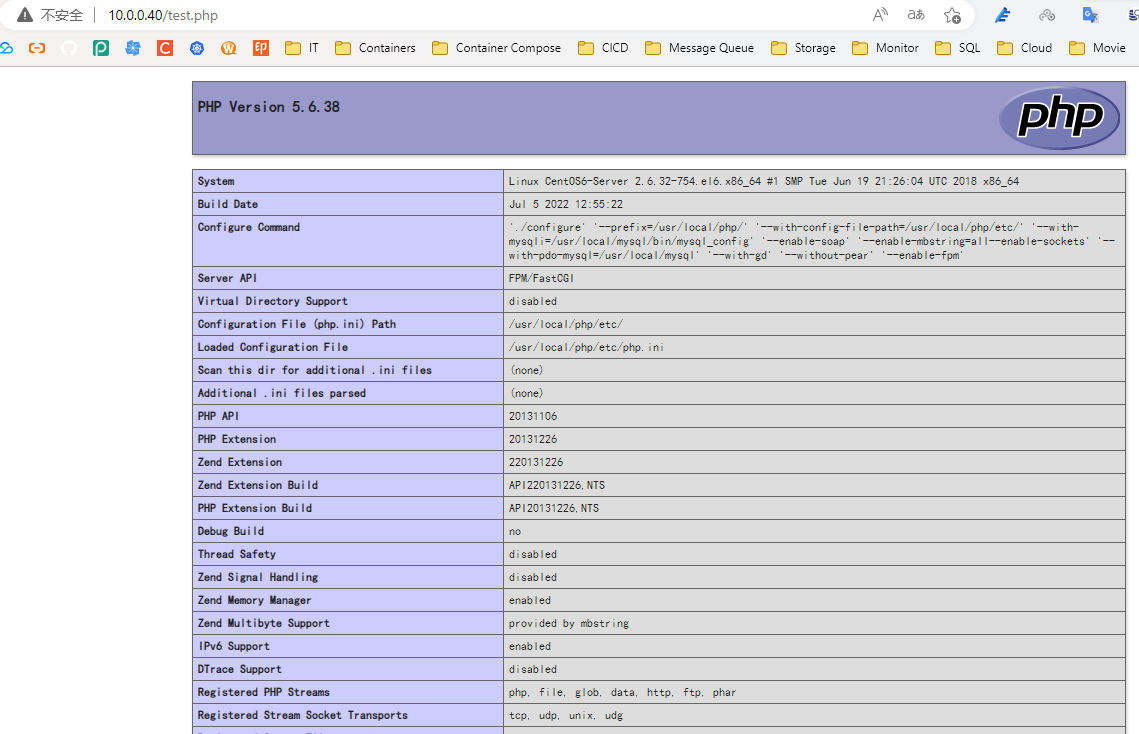
测试:
重启Nginx服务,创建php测试文件,访问并查看是否解析
service nginx restart

cd /usr/local/src/nginx-1.12.2/html/
cat > test.php <<EOF
<?php
  phpinfo();
?>
EOF
4.3 修改Nginx配置文件,使其默认自动加载php文件
location / {
  root html;
  #Nginx的默认网页路径:RREFIX/html
  index index.php index.html;
  #设置默认加载的页面,以及优先级
}
附件:建议使用时先复制到文本文件查看下是否有字符集的问题
~ vim /etc/init.d/nginx
#!/bin/bash
#Description: nginx server control tools
ngxc="/usr/local/nginx/sbin/nginx"
pidf="usr/local/nginx/logs/nginx.pid"
ngxc_fpm="/usr/local/php/sbin/php-fpm"
pidf_fpm="/usr/local/php/var/run/php-fpm.pid"
case "$1" in
start)
 $ngxc -t &> /dev/null
  if [ $? -eq 0 ];then
    $ngxc
    $ngxc_fpm
    echo "nginx service start success!"
  else
    $ngxc -t
  fi
;;
stop)
  kill -s QUIT $(cat $pidf)
  kill -s QUIT $(cat $pidf_fpm)
  echo "nginx service stop success!"
;;
restart)
  $0 stop
  $0 start
;;
reload)
  $ngxc -t &> /dev/null
  if [ $? -eq 0 ];then
    kill -s HUP $(cat $pidf)
    kill -s HUP $(cat $pidf_fpm)
    echo "nginx service config success!"
  else
    $ngxc -t
  fi
;;
*)
  echo "please input stop|start|restart|reload."
  exit 1
;;
esac

~ chmod +x /etc/init.d/nginx
三、CentOS 7 源码软件包安装
四、准备工作
- 环境要求:
操作系统: CentOS 7.X 64位
关闭SELinux和iptables防火墙。
此次试验环境使用网络 yum源,保证系统能正常连接互联网。
- 网络 yum源:
先将系统自带的yum配置文件移除或者删除,然后下载以下两个配置文件
官方基础: http:.//mirrors.163.com/.help/CentOS7-Base-163.repo
http://mirrors.aliyun.com/repo/Centos-7.repo
epel拓展:http://mirrors.aliyun.com/repo/epel-7.repo
下载完成后,需要使用命令清除掉原有的yum缓存,使用新的配置文件建立缓存
mkdir /etc/yum.repos.d/repobak
mv /etc/yum.repos.d/*.repo /etc/yum.repos.d/repobak

#CentOS 7系统
curl -o /etc/yum.repos.d/CentOS-Base.repo https://mirrors.aliyun.com/repo/Centos-7.repo
curl -o /etc/yum.repos.d/epel.repo http://mirrors.aliyun.com/repo/epel-7.repo
下载完成后,需要使用命令清除掉原有的yum缓存,使用新的配置文件建立缓存
#清除掉原有缓存列表
yum clean all
#建立新的缓存列表
yum makecache
#将所有能更新的软件更新(非必须)
yum update
安装编译工具和依赖软件包
yum -y install gcc* pcre-devel openssl openssl-devel \
zlib-devel ncurses-devel cmake bison \
libxml2-devel libpng-devel tree
Nginx、MySQL、PHP 三大软件的源码包下载地址:
Nginx: http://nginx.org/en/download.html
MySQL: https://dev.mysql.com/downloads/mysql/
PHP: http://www.php.net/
版本选用: Nginx: 1.12. #选用软件的稳定版即可 MySQL: 5.5. #5.5以上版本需要1G以上的内存,否则无法安装 PHP: 5.6.* #LAMP中我们使用的是php7,此次使用php5
注意:每次安装LNMP时,软件包的小版本都不一样,官方会对其大版本下的小版本进行覆盖式更新,本文内部分链接会失效,切记按照下载版本进行安装。
mkdir /lnmp
cd /lnmp
1 Nginx
Nginx是一款轻量级的Web服务器/反向代理服务器及电子邮件(IMAP/POP3)代理服务器,在BSD-like协议下发行。其特点是占有内存少,并发能力强。
1.1 下载Nginx源码包
wget http://nginx.org/download/nginx-1.12.2.tar.gz -O /usr/local/src/nginx-1.12.2.tar.gz
tar -xvf /usr/local/src/nginx-1.12.2.tar.gz -C /lnmp/
1.2 创建用于运行 Nginx 的用户
useradd -r -s /sbin/nologin -c "Nginx User" nginx
1.3 解压缩Nginx并安装
cd /lnmp/nginx-1.12.2
./configure --prefix=/usr/local/nginx --user=nginx --group=nginx \
--with-http_stub_status_module --with-http_ssl_module

make -j 2 && make install
1.4 上传编写好的nginx启动管理脚本
/usr/local/nginx/sbin/nginx
cp -av /usr/local/nginx/sbin/nginx /usr/bin/
netstat -ntlp | grep 80
curl localhost

#使用附件脚本内容
2 MySQL
下载: https://dev.mysql.com/downloads/mysql/
选择:MysQL Community Server 5.5
选择: Select Version:按照自己要求选择
Select Operating System: Source Code
Select os Version: Generic Linux
格式: mysql-N.N.NN.tar.gz
wget https://cdn.mysql.com//Downloads/MySQL-5.5/mysql-5.5.62.tar.gz -O /usr/local/src/mysql-5.5.62.tar.gz
tar -xvf /usr/local/src/mysql-5.5.62.tar.gz -C /lnmp/
2.1 创建用于运行MySQL的用户
useradd -r -s /sbin/nologin -c "MySQL User" mysql
2.2 解压缩MySQL并安装
cd /lnmp/mysql-5.5.62
cmake -DCMAKE_INSTALL_PREFIX=/usr/local/mysql -DMYSQL_UNIX_ADDR=/tmp/mysql.sock \
-DEXTRA_CHARSETS=all -DDEFAULT_CHARSET=utf8 \
-DDEFAULT_COLLATION=utf8_general_ci -DWITH_MYISAM_STORAGE_ENGINE=1 \
-DWITH_INNOBASE_STORAGE_ENGINE=1 -DWITH_MEMORY_STORAGE_ENGINE=1 \
-DWITH_READLINE=1 -DENABLED_LOCAL_INFILE=1 \
-DMYSQL_USER=mysql -DMYSQL_TCP_PORT=3306

make -j 2 && make install
echo $?
2.3 修改安装后的目录权限
cd /usr/local/mysql
chown -R root .
chown -R mysql data
ln -s /usr/local/mysql/bin/* /usr/local/bin
2.4 生成MySQL配置文件
\cp -a /usr/local/mysql/support-files/my-medium.cnf /etc/my.cnf
2.5 初始化,生成授权表
#一定要先切换到此目录下,然后再执行下一步
cd /usr/local/mysql/
#初始化成功标志:两个OK
./scripts/mysql_install_db --user=mysql

2.6 生成MySQL的启动和自启动管理脚本
cd /usr/local/mysql/support-files
#切换到mysql的源码解压缩目录下的support-files

cp -a mysql.server /etc/init.d/mysqld
chmod +x /etc/init.d/mysqld

chkconfig --add mysqld
chkconfig mysqld on ; chkconfig --list mysqld
service mysqld start
#service mysqld start|stop|restart
ss -ntlp | grep 3306
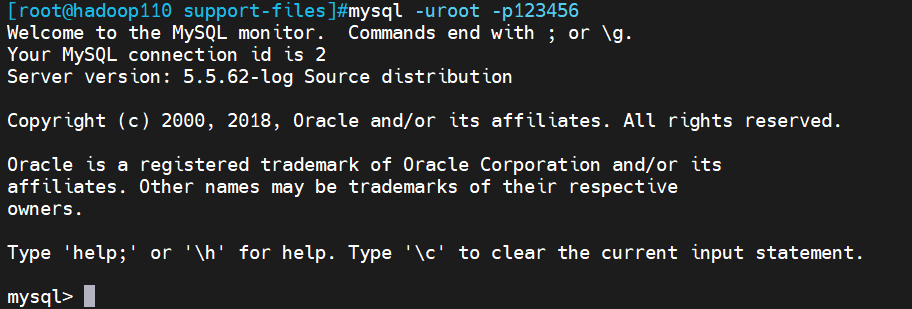
2.7 给MySQL的root用户设置密码
mysqladmin -uroot password 123456
3 PHP
wget -O /usr/local/src/php-7.1.16.tar.gz https://www.php.net/distributions/php-7.1.16.tar.gz

tar -xvf /usr/local/src/php-7.1.16.tar.gz -C /lnmp
3.1 解压缩PHP并安装
cd /lnmp/php-7.1.16

./configure --prefix=/usr/local/php/ --with-config-file-path=/usr/local/php/etc/ \
--with-mysqli=/usr/local/mysql/bin/mysql_config \
--enable-soap --enable-mbstring=all --enable-sockets \
--with-pdo-mysql=/usr/local/mysql --with-gd --without-pear --enable-fpm

make -j 2 && make install
echo $?
报错提示:若遇到libpng.so not found. 报错(老版本的PHP会出现此问题)
解决方案:
ln -s /usr/lib64/libpng.so /usr/lib
3.2 生成PHP配置文件
cp -a /lnmp/php-7.1.16/php.ini-production /usr/local/php/etc/php.ini
#赋值源码包内的配置文件到安装目录下
3.3 创建软链接,使用 php 相关命令是更方便
ln -s /usr/local/php/bin/* /usr/local/bin
ln -s /usr/local/php/sbin/* /usr/local/sbin
4 配置Nginx连接PHP(重难点)
4.1 nginx连接php需要启动 php-fpm服务
cd /usr/local/php/etc/
cp -a php-fpm.conf.default php-fpm.conf
#生成php-fpm的配置文件,并修改指定参数
vim php-fpm.conf
#修改指定条目的参数:
pid=run/php-fpm.pid
pm.start_servers=2
pm.min_spare_servers=1
pm.max_spare_servers=3
#启动时开启的进程数、最少空闲进程数、最多空闲进程数(默认值,未修改)
#修改Nginx启动管理脚本:将php-fpm的注释取消掉即可

cd /usr/local/php/etc/php-fpm.d/
cp www.conf.default www.conf
vim www.conf
#修改用户和组的指定用户
user=nginx
group=nginx
#修改Nginx启动管理脚本:将php-fpm的注释取消掉即可
4.2 修改nginx的配置文件,使其识别 .php后缀的文件
cp -a /usr/local/nginx/conf/nginx.conf{,.bak}
vim /usr/local/nginx/conf/nginx.conf
#取消下列行的注释,并修改include选项的后缀为 fastcgi.conf,并注意每一行结尾的分号和大括号
#location ~ \.php${
#root                        html;
#fastcgi_pass        127.0.0.1:9000;
#fastcgi_index    index.php;
#fastcgi_param    SCRIPT_FILENAME        /scripts$fastcgi_script_name;
#include                fastcgi.conf;     #修改为fastcgi.conf
#}
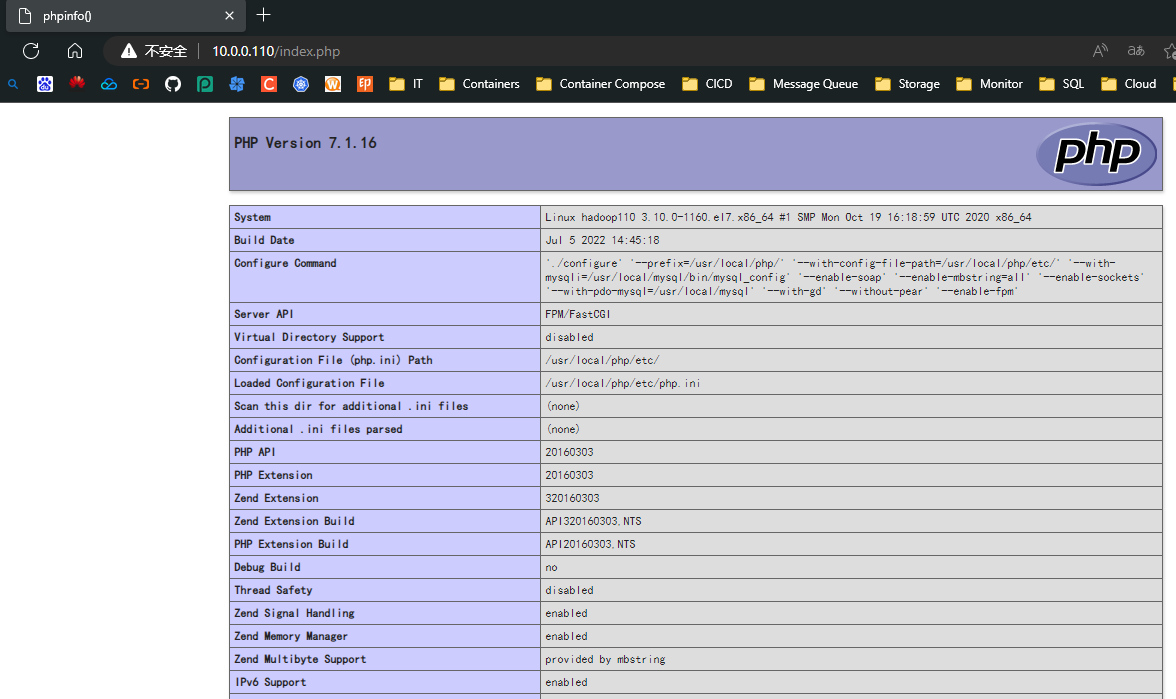
测试:
重启Nginx服务,创建php测试文件,访问并查看是否解析
service nginx restart

cd /usr/local/nginx/html/
cat > index.php <<EOF
<?php
  phpinfo();
?>
EOF
4.3 修改Nginx配置文件,使其默认自动加载php文件
~  vim /usr/local/nginx/conf/nginx.conf
location / {
  root html;
  #Nginx的默认网页路径:RREFIX/html
  index index.php index.html;
  #设置默认加载的页面,以及优先级
}
附件:建议使用时先复制到文本文件查看下是否有字符集的问题
~ vim /etc/init.d/nginx
#!/bin/bash
#Description: nginx server control tools
ngxc="/usr/local/nginx/sbin/nginx"
pidf="usr/local/nginx/logs/nginx.pid"
ngxc_fpm="/usr/local/php/sbin/php-fpm"
pidf_fpm="/usr/local/php/var/run/php-fpm.pid"
case "$1" in
start)
 $ngxc -t &> /dev/null
  if [ $? -eq 0 ];then
    $ngxc
    $ngxc_fpm
    echo "nginx service start success!"
  else
    $ngxc -t
  fi
;;
stop)
  kill -s QUIT $(cat $pidf)
  kill -s QUIT $(cat $pidf_fpm)
  echo "nginx service stop success!"
;;
restart)
  $0 stop
  $0 start
;;
reload)
  $ngxc -t &> /dev/null
  if [ $? -eq 0 ];then
    kill -s HUP $(cat $pidf)
    kill -s HUP $(cat $pidf_fpm)
    echo "nginx service config success!"
  else
    $ngxc -t
  fi
;;
*)
  echo "please input stop|start|restart|reload."
  exit 1
;;
esac

~ chmod +x /etc/init.d/nginx
~ vim /lib/systemd/system/nginx.service
[Unit]
Description=The nginx HTTP and reverse proxy server
After=network-online.target remote-fs.target nss-lookup.target
Wants=network-online.target

[Service]
Type=forking
PIDFile=/run/nginx.pid
# Nginx will fail to start if /run/nginx.pid already exists but has the wrong
# SELinux context. This might happen when running `nginx -t` from the cmdline.
# https://bugzilla.redhat.com/show_bug.cgi?id=1268621
ExecStartPre=/usr/bin/rm -f /usr/local/nginx/logs/nginx.pid
ExecStartPre=/usr/local/nginx/sbin/nginx -t
ExecStart=/usr/local/nginx/sbin/nginx
ExecReload=/usr/local/nginx/sbin/nginx -s reload
KillSignal=SIGQUIT
TimeoutStopSec=5
KillMode=process
PrivateTmp=true

[Install]
WantedBy=multi-user.target

若有收获,就点个赞吧
0 人点赞
