- 两大法宝函数
- 加载数据初认识
- TensorBoard的使用
- Transforms的使用
- torchvision的数据集使用
- DataLoader的使用
- 神经网络基础
- 加载数据
- 修改已有模型
- 模型参数的保存与读取
- 模型保存方式1 保留全部模型
- torch.save(vgg16, “./model_load/vgg16.pth”)
- 模型提取方式1
- vgg16_load1 = torch.load(“./model_load/vgg16.pth”)
- 模型保存方式2 只保存网络模型参数
- torch.save(vgg16.state_dict(), “./model_load/vgg16_2.pth”)
- 模型提取方式2
- print(vgg16_load2)
- 模型参数还原
两大法宝函数
dir()
help()
加载数据初认识
Dataset&Dataloader
- Dataset:将数据进行整理并编号,同时提供一种方式去获取数据及其label;
- 如何获取每一个数据及其label;
- 总共有多少的数据;
- Dataloader:为后面的网络提供不同的数据形式;
示例代码
目录结构
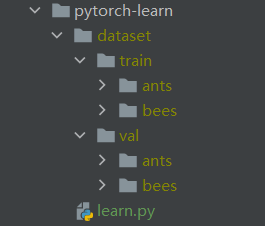
learn.py代码
```java from torch.utils.data import Dataset
import os
from PIL import Image
root_train_dir = “./dataset/train” root_val_dir = “./dataset/val”
label_bees = “bees” label_ants = “ants”
class MyData(Dataset):
def __init__(self, root_dir, label_dir):self.root_dir = root_dirself.label_dir = label_dirself.path = os.path.join(self.root_dir, self.label_dir)self.img_path_list = os.listdir(self.path)def __getitem__(self, item):img_name = self.img_path_list[item]img_path = os.path.join(self.path, img_name)image = Image.open(img_path)label = self.label_dirreturn image, labeldef __len__(self):return len(self.img_path_list)
if name == “main“: myBees = MyData(root_dir=root_train_dir, label_dir=label_bees)
<a name="G4DoM"></a>##### 数据集E:\项目文件\多模态情感识别\ccnu-deep-learning-code\python-restart\pytorch-learn\dataset<a name="OyTiB"></a>#### os.path.join的坑对于下面的代码:```pythonimport ospath1 = "D://python-learn"path2 = "/train"print(os.path.join(path1, path2))path3 = "train"print(os.path.join(path1, path3))
最终打印的结果为如下:
/train D://python-learn/train
原因:
- 如果各组件名开头不包含/,函数会自动加上
- 如果后面的组件开头为/,则函数会自动忽略该组件前面的所有组件
- 如果最后一个组件为空,则函数会自动以/结尾
TensorBoard的使用
Transforms的使用
所在包
处于torchvision包下,引入方式:from torchvision import transforms
常用transforms
Totensor
将PIL Image或者numpy.ndarray类型的image转换成为tensor image:
"""
Convert a ``PIL Image`` or ``numpy.ndarray`` to tensor. This transform does not support torchscript.

Converts a PIL Image or numpy.ndarray (H x W x C) in the range
[0, 255] to a torch.FloatTensor of shape (C x H x W) in the range [0.0, 1.0]
if the PIL Image belongs to one of the modes (L, LA, P, I, F, RGB, YCbCr, RGBA, CMYK, 1)
    or if the numpy.ndarray has dtype = np.uint8
"""
def __call__(self, pic):
    ...
使用示例:
def transforms_toTensor(image):

    """
    transform PIL Image to Tensor Image
    :param image: PIL Image type
    :return: Tensor Image
    """

    # 将image转换成一个tensor类型的图片
    tensor_trans = transforms.ToTensor()
    tensor_image = tensor_trans(image)
    return tensor_image

if __name__ == "__main__":

    myBees = MyData(root_dir=root_train_dir, label_dir=label_bees)
    image, _ = myBees[0]
    tensor_image = transforms_toTensor(image)
Normalize
将图片按照指定的均值和方差进行标准化:
"""
Normalize a tensor image with mean and standard deviation.
    This transform does not support PIL Image.
    Given mean: ``(mean[1],...,mean[n])`` and std: ``(std[1],..,std[n])`` for ``n``
    channels, this transform will normalize each channel of the input
    ``torch.*Tensor`` i.e.,
    ``output[channel] = (input[channel] - mean[channel]) / std[channel]``
"""
def __init__(self, mean, std, inplace=False):
    ...
使用示例:
def transform_normalize(image):

    """
    transforms.Normalize()
    output[channel] = (input[channel] - mean[channel]) / std[channel]
    :param image: tensor image
    :return: tensor image
    """

    tensor_norm = transforms.Normalize([0.5, 0.5, 0.5], [0.5, 0.5, 0.5])
    norm_image = tensor_norm(image)
    return norm_image

if __name__ == "__main__":

    myBees = MyData(root_dir=root_train_dir, label_dir=label_bees)
    image, _ = myBees[0]
    tensor_image = transforms_toTensor(image)
    norm_image = transform_normalize(tensor_image)
Resize
修改图片的尺寸大小,如果size参数为元组,则将图片修改至指定的尺寸;如果size参数是一个整数,则将短边缩放至size,宽高比保持不变:
"""
    Resize the input image to the given size.
    If the image is torch Tensor, it is expected
    to have [..., H, W] shape, where ... means an arbitrary number of leading dimensions

    .. warning::
        The output image might be different depending on its type: when downsampling, the interpolation of PIL images
        and tensors is slightly different, because PIL applies antialiasing. This may lead to significant differences
        in the performance of a network. Therefore, it is preferable to train and serve a model with the same input
        types.

    Args:
        size (sequence or int): Desired output size. If size is a sequence like
            (h, w), output size will be matched to this. If size is an int,
            smaller edge of the image will be matched to this number.
            i.e, if height > width, then image will be rescaled to
            (size * height / width, size).

            .. note::
                In torchscript mode size as single int is not supported, use a sequence of length 1: ``[size, ]``.
        interpolation (InterpolationMode): Desired interpolation enum defined by
            :class:`torchvision.transforms.InterpolationMode`. Default is ``InterpolationMode.BILINEAR``.
            If input is Tensor, only ``InterpolationMode.NEAREST``, ``InterpolationMode.BILINEAR`` and
            ``InterpolationMode.BICUBIC`` are supported.
            For backward compatibility integer values (e.g. ``PIL.Image.NEAREST``) are still acceptable.
        max_size (int, optional): The maximum allowed for the longer edge of
            the resized image: if the longer edge of the image is greater
            than ``max_size`` after being resized according to ``size``, then
            the image is resized again so that the longer edge is equal to
            ``max_size``. As a result, ``size`` might be overruled, i.e the
            smaller edge may be shorter than ``size``. This is only supported
            if ``size`` is an int (or a sequence of length 1 in torchscript
            mode).
        antialias (bool, optional): antialias flag. If ``img`` is PIL Image, the flag is ignored and anti-alias
            is always used. If ``img`` is Tensor, the flag is False by default and can be set True for
            ``InterpolationMode.BILINEAR`` only mode.

            .. warning::
                There is no autodiff support for ``antialias=True`` option with input ``img`` as Tensor.

"""
def __init__(self, size, interpolation=InterpolationMode.BILINEAR, max_size=None, antialias=None):
使用示例:
def transform_resize(image):

    """
    resize the PIL Image
    :param image: PIL Image
    :return:
    """

    print("origin size: ", image.size)
    image_resize = transforms.Resize((512, 512))
    resize_image = image_resize(image)
    print("resize: ", resize_image.size)
    return resize_image

if __name__ == "__main__":

    myBees = MyData(root_dir=root_train_dir, label_dir=label_bees)
    image, _ = myBees[0]

    resize_image = transform_resize(image)
Compose
组合多个transforms
"""
    Composes several transforms together. This transform does not support torchscript.
    Please, see the note below.

    Args:
        transforms (list of ``Transform`` objects): list of transforms to compose.

    Example:
        >>> transforms.Compose([
        >>>     transforms.CenterCrop(10),
        >>>     transforms.ToTensor(),
        >>> ])

    .. note::
        In order to script the transformations, please use ``torch.nn.Sequential`` as below.

        >>> transforms = torch.nn.Sequential(
        >>>     transforms.CenterCrop(10),
        >>>     transforms.Normalize((0.485, 0.456, 0.406), (0.229, 0.224, 0.225)),
        >>> )
        >>> scripted_transforms = torch.jit.script(transforms)

        Make sure to use only scriptable transformations, i.e. that work with ``torch.Tensor``, does not require
        `lambda` functions or ``PIL.Image``.

"""
def __init__(self, transforms):
    ...
使用示例:
def transform_compose(image):

    """
    compose include variable transforms
    :param image:  PIL Image
    :return:
    """

    trans_resize = transforms.Resize(512)
    trans_totensor = transforms.ToTensor()

    trans_compose = transforms.Compose([trans_resize, trans_totensor])
    return trans_compose(image)

if __name__ == "__main__":

    myBees = MyData(root_dir=root_train_dir, label_dir=label_bees)
    image, _ = myBees[0]

    trans_image = transform_compose(image)
torchvision的数据集使用
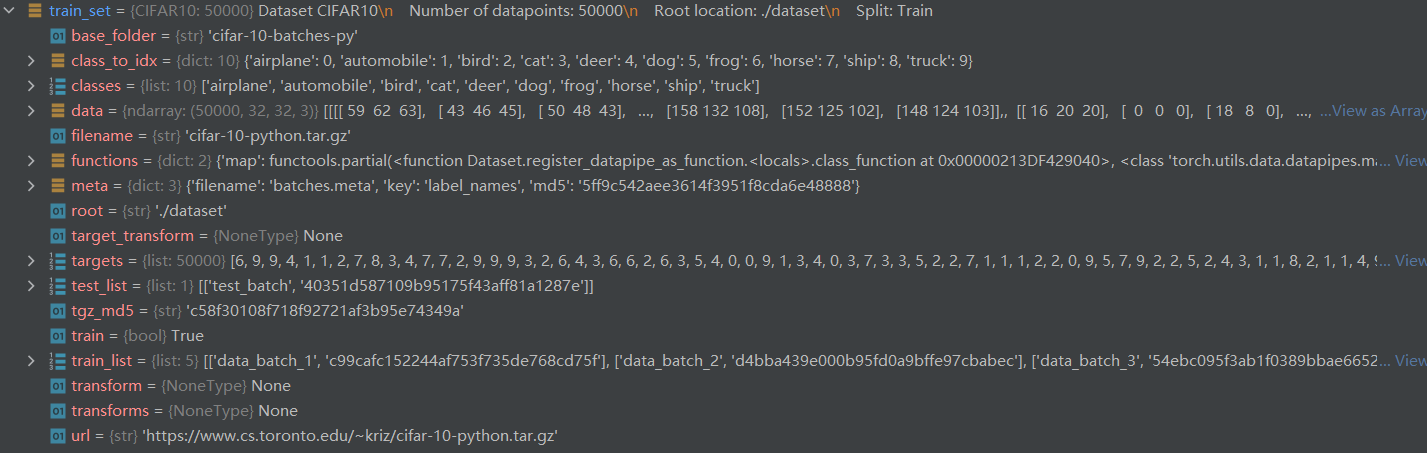
CIFAR10
示例代码
import torchvision


def cifar10_data():
    """
    十分类数据集,包含了:飞机、汽车、鸟类、猫、鹿、狗、蛙类、马 、船和卡车
    :return:
    """

    train_set = torchvision.datasets.CIFAR10(root="./dataset", train=True, download=True)
    test_set = torchvision.datasets.CIFAR10(root="./dataset", train=True, download=True)

    '''
        Dataset CIFAR10
            Number of datapoints: 50000
            Root location: ./dataset
            Split: Train
    '''
    print(test_set)

    image, label = test_set[0]  # (<PIL.Image.Image image mode=RGB size=32x32 at 0x24799CC6F70>, 6)

    image.show()


if __name__ == "__main__":
    cifar10_data()
test_set结构
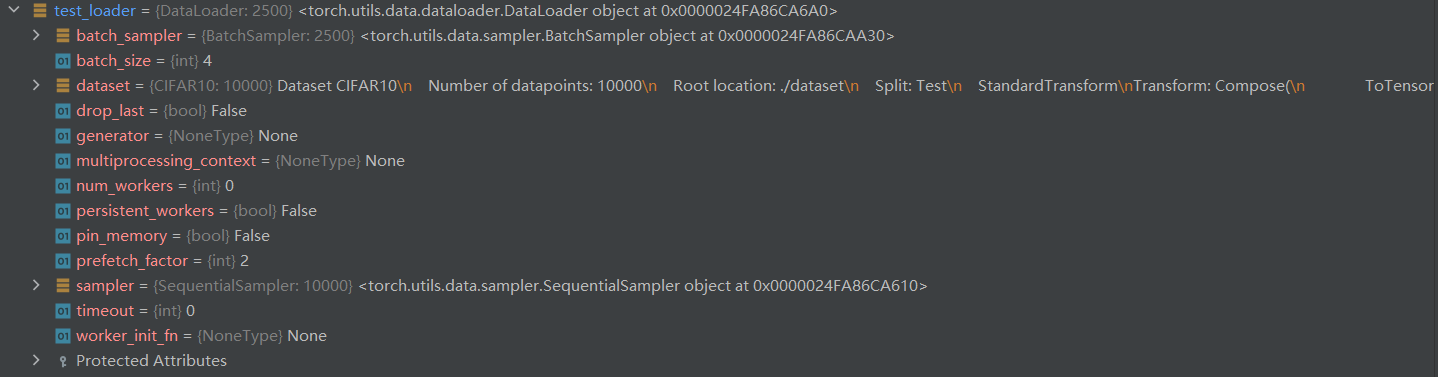
DataLoader的使用
示例代码
import torchvision
from torch.utils.data import DataLoader


def cifar10_data():
    """
    十分类数据集,包含了:飞机、汽车、鸟类、猫、鹿、狗、蛙类、马 、船和卡车
    :return:
    """

    dataset_transforms = torchvision.transforms.Compose([
        torchvision.transforms.ToTensor()
    ])

    test_set = torchvision.datasets.CIFAR10(root="./dataset", train=False, download=True, transform=dataset_transforms)

    test_loader = DataLoader(dataset=test_set, batch_size=4, shuffle=False, num_workers=0)

    # 传统取法
    # image, target = test_set[0]
    # print(image.shape)  # torch.Size([3, 32, 32])
    # print(target)  # 3

    # dataloader取法
    for data in test_loader:
        image, target = data
        print(image.shape)  # torch.Size([4, 3, 32, 32])
        print(target)  # tensor([3, 8, 8, 0]) 四张图片的target组成一个一维数组
        break


if __name__ == "__main__":
    cifar10_data()
test_loader结构
神经网络基础
nn.Module
定义一个神经网络模型
官方文档示例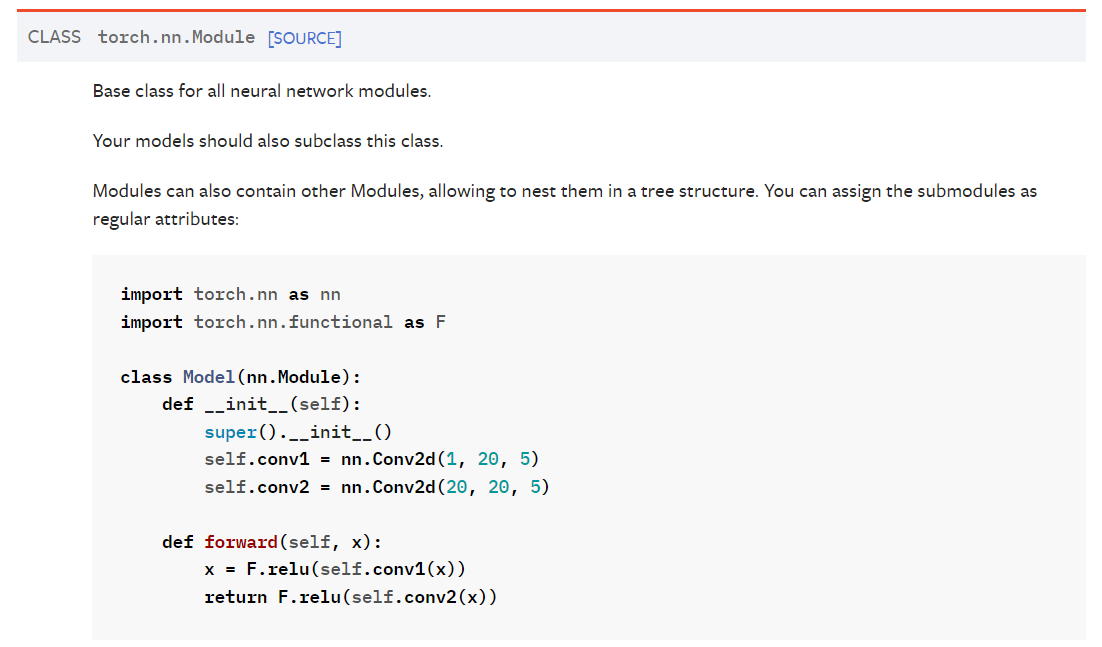
简单测试用例
class TestModule(nn.Module):

    def __init__(self):
        super(TestModule, self).__init__()

    def forward(self, input):
        return input ** input


if __name__ == "__main__":
    cifar10_data()

    module = TestModule()
    input = torch.tensor(4.0)
    output = module(input)
    print(output)
nn.functional.conv2d
API定义
torch.nn.functional.conv2d(input, weight, bias=None, stride=1, padding=0, dilation=1, groups=1) → Tensor
用于二维图像卷积操作,参数介绍:
- input:需要做卷积操作的输入数据
- weight:卷积核
- bias:偏置,通常不用
- stride:每次移动步长,默认移动1,可以为元组(sH, sW)或者整数
padding:长宽位置填充的长度,默认不填充,可以为元组(pH, pW)或者整数或者一个字符串(“same” | “valid”)
示例代码
```python def conv2d_test(): input = torch.tensor([[1, 2, 0, 3, 1],
                   [0, 1, 2, 3, 1],
                   [1, 2, 1, 0, 0],
                   [5, 2, 3, 1, 1],
                   [2, 1, 0, 1, 1]])
kernel = torch.tensor([[1, 2, 1],
                    [0, 1, 0],
                    [2, 1, 0]])
input = torch.reshape(input, (1, 1, 5, 5)) kernel = torch.reshape(kernel, (1, 1, 3, 3))
return F.conv2d(input=input, weight=kernel, stride=1), \
    F.conv2d(input=input, weight=kernel, stride=2), \
    F.conv2d(input=input, weight=kernel, stride=1, padding=1)
if name == “main“:
'''
    (
    tensor(
    [[[[10, 12, 12],
      [18, 16, 16],
      [13,  9,  3]]]]
    ),
    tensor(
    [[[[10, 12],
      [13,  3]]]]
    ),
    tensor(
    [[[[ 1,  3,  4, 10,  8],
      [ 5, 10, 12, 12,  6],
      [ 7, 18, 16, 16,  8],
      [11, 13,  9,  3,  4],
      [14, 13,  9,  7,  4]]]]
    )
    )
'''
print(conv2d_test())
<a name="KNf6L"></a>
### nn.Conv2d
<a name="ML5Zt"></a>
#### API定义
```python
torch.nn.Conv2d(in_channels, out_channels, kernel_size, stride=1, padding=0, dilation=1, groups=1, bias=True, padding_mode='zeros', device=None, dtype=None)
参数介绍:
- in_channels:输入数据通道数
- out_channel:输出数据通道数,卷积层会生成对应数量的卷积核
- kernel_size:卷积核大小
- stride:卷积过程中移动步长
- padding:填充
- dilation:卷积核对应位的距离(不懂)默认1
- group:基本用不到
- bias:常年设置为true
-
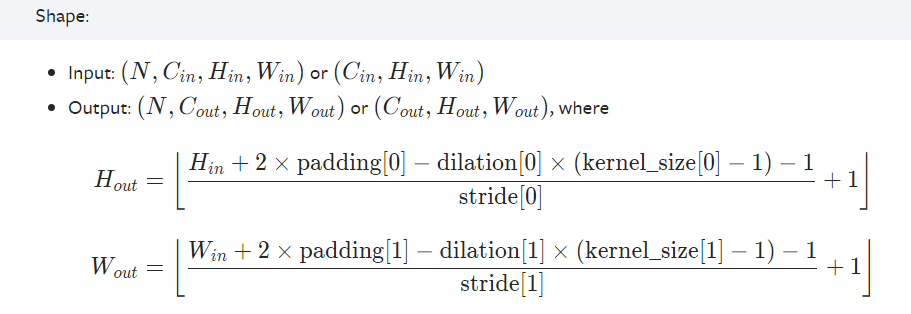
尺寸变换
示例代码
```python def nn_conv2d_test():
加载数据
test_data = torchvision.datasets.CIFAR10(root=”./dataset”, train=False, transform=torchvision.transforms.ToTensor(),
download=True)test_loader = DataLoader(dataset=test_data, batch_size=64, shuffle=False)
class module2(nn.Module):
 def __init__(self):
     super(module2, self).__init__()
     self.conv1 = nn.Conv2d(in_channels=3, out_channels=6, kernel_size=3, stride=1, padding=0)

 def forward(self, input):
     return self.conv1(input)
m = module2() step = 0 for data in test_loader:
 imgs, _ = data

 # torch.Size([64, 3, 32, 32])
 # print(imgs.shape)
 output_image = m(imgs)
 # torch.Size([64, 6, 30, 30])
 # print(output_image.shape)

 writer = SummaryWriter(log_dir="logs")

 writer.add_images("input_image", imgs, step)

 # 因为输出的图像通道数为6,writer不知道该如何显示,所以需要变换通道
 output_image = torch.reshape(output_image, (-1, 3, 30, 30))
 writer.add_images("output_image", output_image, step)

 step += 1

 writer.close()

 break
if name == “main“: nn_conv2d_test()
<a name="mgFPN"></a>
###   nn.MaxPool2d
<a name="fC9Df"></a>
#### API定义
```python
torch.nn.MaxPool2d(kernel_size, stride=None, padding=0, dilation=1, return_indices=False, ceil_mode=False)
参数介绍:
- kernel_size:卷积核大小
- stride:移动步长,通常不需要设置
- padding:填充大小
- dilation:…
- return_indices: …
ceil_mode:当卷积核覆盖的位置不足时,是否需要进行最大值池化计算,默认为False
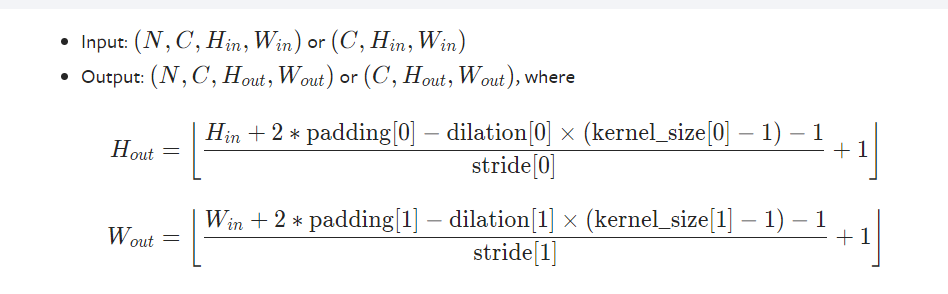
尺寸变换
示例代码
```python def nn_maxpool2d_test():
input = torch.tensor([[1, 2, 0, 3, 1],
                   [0, 1, 2, 3, 1],
                   [1, 2, 1, 0, 0],
                   [5, 2, 3, 1, 1],
                   [2, 1, 0, 1, 1]], dtype=torch.float32)
input = torch.reshape(input, (-1, 1, 5, 5))
class module(nn.Module):
 def __init__(self):
     super(module, self).__init__()
     # ceil_mode:不能完全覆盖的区域是否也会进行maxpool
     self.maxpool1 = nn.MaxPool2d(kernel_size=3, ceil_mode=True)
     self.maxpool2 = nn.MaxPool2d(kernel_size=3, ceil_mode=False)

 def forward(self, input):
     return self.maxpool1(input), self.maxpool2(input)
m = module() output1, output2 = m(input) print(output1) print(output2)
if name == “main“:
'''
    tensor([[[[2., 3.],
      [5., 1.]]]])
    tensor([[[[2.]]]])
'''
nn_maxpool2d_test()
<a name="rNgHb"></a>
### nn.Sequential
<a name="lNfsF"></a>
#### CIFAR10数据集分类的模型实例
<a name="gkpWz"></a>
##### 网络图
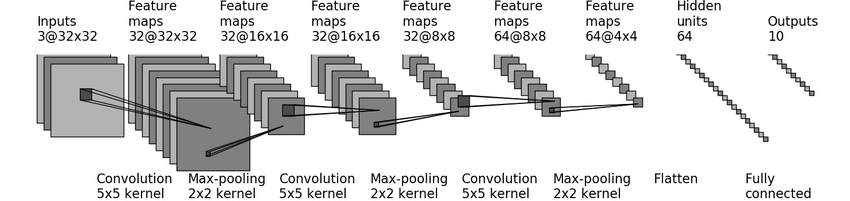
<a name="YWEmD"></a>
##### 网络搭建
```python
def cifar10_model_test():
class module(nn.Module):
def __init__(self):
super(module, self).__init__()
self.conv1 = nn.Conv2d(in_channels=3, out_channels=32, kernel_size=5, stride=1, padding=2)
self.maxpool1 = nn.MaxPool2d(kernel_size=2)
self.conv2 = nn.Conv2d(in_channels=32, out_channels=32, kernel_size=5, stride=1, padding=2)
self.maxpool2 = nn.MaxPool2d(kernel_size=2)
self.conv3 = nn.Conv2d(in_channels=32, out_channels=64, kernel_size=5, stride=1, padding=2)
self.maxpool3 = nn.MaxPool2d(kernel_size=2)
self.flatten = nn.Flatten() # 64 * 4 * 4
self.line1 = nn.Linear(in_features=64*4*4, out_features=64)
self.line2 = nn.Linear(in_features=64, out_features=10)
self.softmax = nn.Softmax()
def forward(self, input):
input = self.maxpool1(self.conv1(input))
input = self.maxpool2(self.conv2(input))
input = self.maxpool3(self.conv3(input))
input = self.flatten(input)
input = self.line2(self.line1(input))
return self.softmax(input)
m = module()
input = torch.ones((3, 3, 32, 32))
output = m(input)
print(output.shape)
if __name__ == "__main__":
cifar10_model_test()
使用Sequential
def cifar10_model_test():

    # trans_tensor = torchvision.transforms.ToTensor()

    # 加载数据集
    # train_data = torchvision.datasets.CIFAR10(root="./dataset", train=True, transform=trans_tensor, download=True)

    class module(nn.Module):

        def __init__(self):

            super(module, self).__init__()

            self.sequential = nn.Sequential(
                nn.Conv2d(in_channels=3, out_channels=32, kernel_size=5, stride=1, padding=2),
                nn.MaxPool2d(kernel_size=2),
                nn.Conv2d(in_channels=32, out_channels=32, kernel_size=5, stride=1, padding=2),
                nn.MaxPool2d(kernel_size=2),
                nn.Conv2d(in_channels=32, out_channels=64, kernel_size=5, stride=1, padding=2),
                nn.MaxPool2d(kernel_size=2),
                nn.Flatten(),
                nn.Linear(in_features=64 * 4 * 4, out_features=64),
                nn.Linear(in_features=64, out_features=10)
            )

            self.softmax = nn.Softmax()

        def forward(self, input):
            return self.softmax(self.sequential(input))

    m = module()

    input = torch.ones((3, 3, 32, 32))

    output = m(input)

    print(output.shape)

    print(output)


if __name__ == "__main__":

    cifar10_model_test()
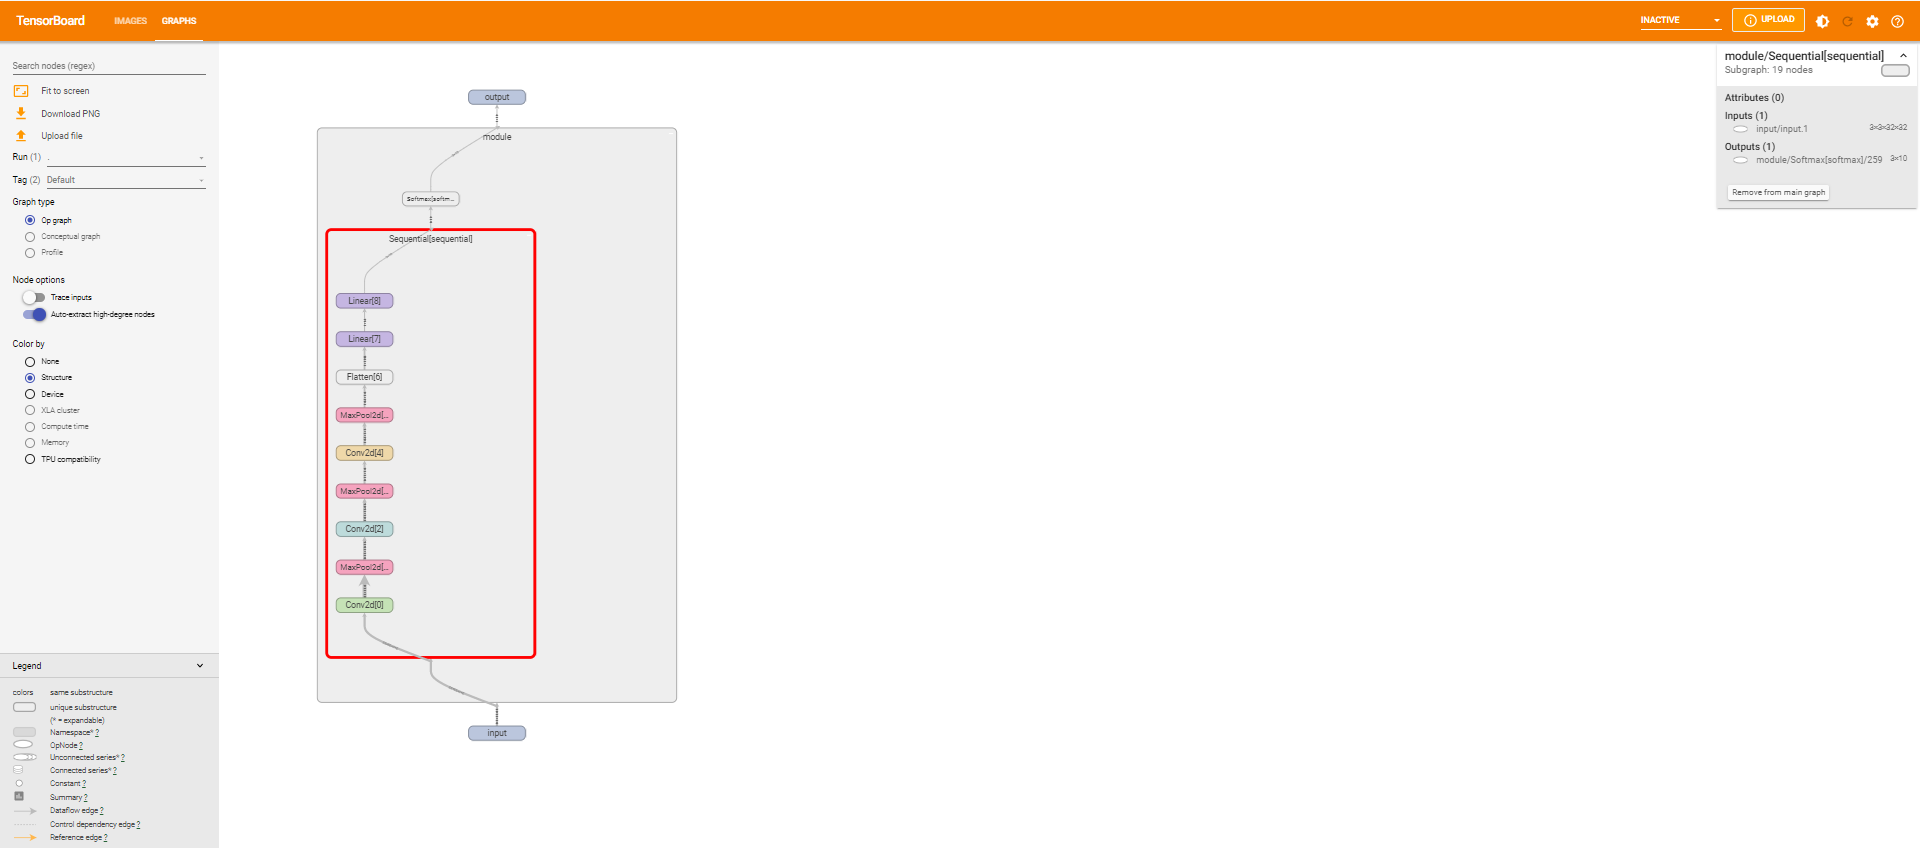
可视化模型结构
    m = module()

    input = torch.ones((3, 3, 32, 32))

    writer = SummaryWriter(log_dir="./logs")

    writer.add_graph(m, input)

    writer.close()
修改已有模型
torchvision.models
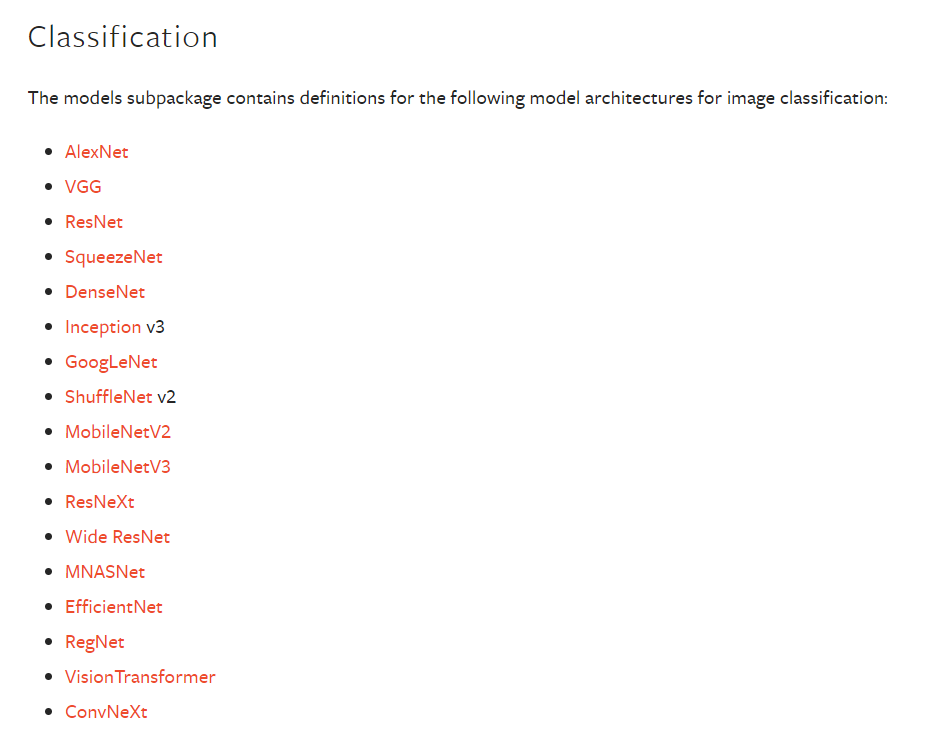
修改VGG16
因为vgg16是在ImageNet数据集上使用的,而该数据集是千分类数据集,其网络模型结构如下
VGG(
  (features): Sequential(
    (0): Conv2d(3, 64, kernel_size=(3, 3), stride=(1, 1), padding=(1, 1))
    (1): ReLU(inplace=True)
    (2): Conv2d(64, 64, kernel_size=(3, 3), stride=(1, 1), padding=(1, 1))
    (3): ReLU(inplace=True)
    (4): MaxPool2d(kernel_size=2, stride=2, padding=0, dilation=1, ceil_mode=False)
    (5): Conv2d(64, 128, kernel_size=(3, 3), stride=(1, 1), padding=(1, 1))
    (6): ReLU(inplace=True)
    (7): Conv2d(128, 128, kernel_size=(3, 3), stride=(1, 1), padding=(1, 1))
    (8): ReLU(inplace=True)
    (9): MaxPool2d(kernel_size=2, stride=2, padding=0, dilation=1, ceil_mode=False)
    (10): Conv2d(128, 256, kernel_size=(3, 3), stride=(1, 1), padding=(1, 1))
    (11): ReLU(inplace=True)
    (12): Conv2d(256, 256, kernel_size=(3, 3), stride=(1, 1), padding=(1, 1))
    (13): ReLU(inplace=True)
    (14): Conv2d(256, 256, kernel_size=(3, 3), stride=(1, 1), padding=(1, 1))
    (15): ReLU(inplace=True)
    (16): MaxPool2d(kernel_size=2, stride=2, padding=0, dilation=1, ceil_mode=False)
    (17): Conv2d(256, 512, kernel_size=(3, 3), stride=(1, 1), padding=(1, 1))
    (18): ReLU(inplace=True)
    (19): Conv2d(512, 512, kernel_size=(3, 3), stride=(1, 1), padding=(1, 1))
    (20): ReLU(inplace=True)
    (21): Conv2d(512, 512, kernel_size=(3, 3), stride=(1, 1), padding=(1, 1))
    (22): ReLU(inplace=True)
    (23): MaxPool2d(kernel_size=2, stride=2, padding=0, dilation=1, ceil_mode=False)
    (24): Conv2d(512, 512, kernel_size=(3, 3), stride=(1, 1), padding=(1, 1))
    (25): ReLU(inplace=True)
    (26): Conv2d(512, 512, kernel_size=(3, 3), stride=(1, 1), padding=(1, 1))
    (27): ReLU(inplace=True)
    (28): Conv2d(512, 512, kernel_size=(3, 3), stride=(1, 1), padding=(1, 1))
    (29): ReLU(inplace=True)
    (30): MaxPool2d(kernel_size=2, stride=2, padding=0, dilation=1, ceil_mode=False)
  )
  (avgpool): AdaptiveAvgPool2d(output_size=(7, 7))
  (classifier): Sequential(
    (0): Linear(in_features=25088, out_features=4096, bias=True)
    (1): ReLU(inplace=True)
    (2): Dropout(p=0.5, inplace=False)
    (3): Linear(in_features=4096, out_features=4096, bias=True)
    (4): ReLU(inplace=True)
    (5): Dropout(p=0.5, inplace=False)
    (6): Linear(in_features=4096, out_features=1000, bias=True)
  )
)
可以通过如下几种方式对VGG16模型进行修改,使其能够用于CIFAR10
def vgg_modify_test():

    vgg16 = torchvision.models.vgg16(pretrained=False)
    # vgg16_pretrain = torchvision.models.vgg16(pretrained=True)
    # print(vgg16)

    # 单独作为一个Sequential
    # vgg16.add_module(name="satisfy_cifar10", module=nn.Linear(in_features=1000, out_features=10))
    # print(vgg16)

    # 添加到指定的层次中,如classifier
    # vgg16.classifier.add_module(name="7", module=nn.Linear(in_features=1000, out_features=10))
    # print(vgg16)

    # 修改指定层中的指定位置的线性/非线性层
    vgg16.classifier[6] = nn.Linear(in_features=4096, out_features=10)
    print(vgg16)
模型参数的保存与读取
示例代码
两种方式:
- 保存整个模型,加载的时候也是直接加载成一个模型对象
只保留模型的参数,加载的时候需要将自己将参数载入到模型中 ```python def model_save_and_load():
vgg16 = torchvision.models.vgg16(pretrained=False)
模型保存方式1 保留全部模型
torch.save(vgg16, “./model_load/vgg16.pth”)
模型提取方式1
vgg16_load1 = torch.load(“./model_load/vgg16.pth”)
模型保存方式2 只保存网络模型参数
torch.save(vgg16.state_dict(), “./model_load/vgg16_2.pth”)
模型提取方式2
vgg16_load2 = torch.load(“./model_load/vgg16_2.pth”)
print(vgg16_load2)
模型参数还原
vgg16.load_state_dict(vgg16_load2)
if name == “main“:
model_save_and_load()
推荐使用方式2,因为对于模型而言,有用的信息就是其参数
<a name="X2aHI"></a>
### 陷阱
当保存模型的时候,导入模型的类中一定要有对应模型的定义,或者引入对应模型的定义的模块也可以,否则会报错
<a name="ZT5ck"></a>
## 计算测试结果的准确率
<a name="trthZ"></a>
### 示例代码
```python
def accuracy_calculate_test():

    pred = torch.tensor([[0.1,0.2],[0.3, 0.4], [0.6, 0.5]])
    target = torch.tensor([1, 0, 1])
    # print(pred.argmax(1))  # 横向比较找到最大的位置  tensor([1, 1])
    # print(pred.argmax(0))  # 纵向比较找到最大的位置  tensor([1, 1])
    pred = pred.argmax(1)
    print(pred == target)  # tensor([ True, False, False])
    print(pred.eq(target)) # tensor([ True, False, False])
    print(pred.eq(target).sum())  # True为1,False为0  结果为1,即正确预测的个数


if __name__ == "__main__":

    accuracy_calculate_test()
GPU训练
简介
需要修改三个地方:
- 模型对象
- 数据集(包括传入模型的输入数据 和 标签)
- 损失函数
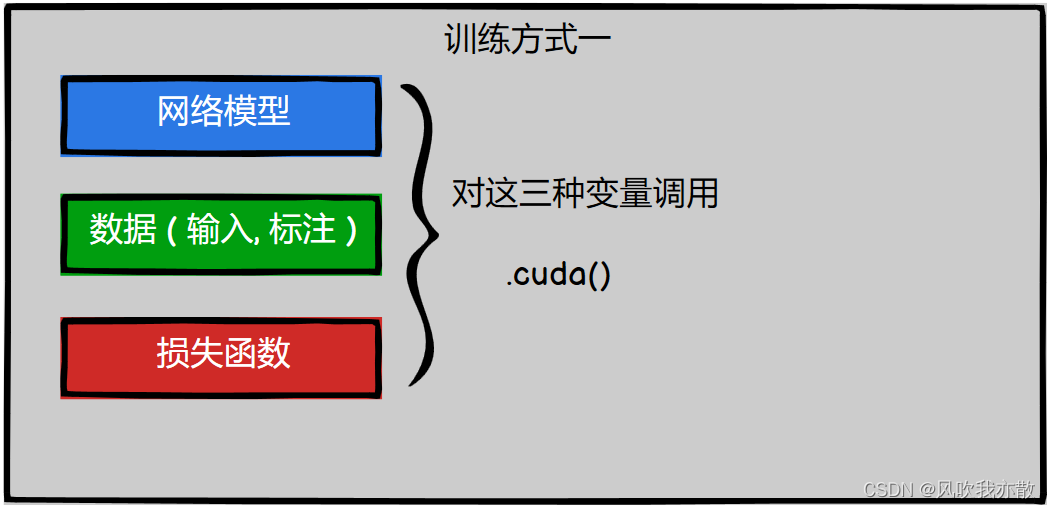
示例代码
方式一
# 将网络模型在gpu上训练
model = Model()
if torch.cuda.is_available():
    model = model.cuda()

# 损失函数在gpu上训练
loss_fn = nn.CrossEntropyLoss()
if torch.cuda.is_available():
    loss_fn = loss_fn.cuda()

# 数据在gpu上训练
for data in dataloader:
    imgs, targets = data
    if torch.cuda.is_available():
        imgs = imgs.cuda()
        targets = targets.cuda()
方式二
device = torch.device("cpu")    # 使用cpu训练
device = torch.device("cuda")    # 使用gpu训练
device = torch.device("cuda:0")    # 当电脑中有多张显卡时,使用第一张显卡
device = torch.device("cuda:1")    # 当电脑中有多张显卡时,使用第二张显卡

device = torch.device("cuda" if torch.cuda.is_available() else "cpu")

model = model.to(device)

loss_fn = loss_fn.to(device)

for data in train_dataloader:
    imgs, targets = data
    imgs = imgs.to(device)
    targets = targets.to(device)

若有收获,就点个赞吧
0 人点赞
