启动服务
docker stop influxdb && docker rm influxdb### 1.8docker run -d -p 8086:8086 \--name influxdb \--restart unless-stopped \-v /opt/docker/influxdb-data:/var/lib/influxd \-v /etc/localtime:/etc/localtime \-e INFLUXDB_DB=test \-e INFLUXDB_ADMIN_USER=admin \-e INFLUXDB_ADMIN_PASSWORD=supersecretpassword \-e INFLUXDB_USER=root \-e INFLUXDB_USER_PASSWORD=newpwd \-d influxdb:1.8### 2.xdocker run -d -p 8086:8086 \--name influxdb \--restart unless-stopped \-v /opt/docker/influxdb2-data:/var/lib/influxd2 \-v /etc/localtime:/etc/localtime \-d influxdbcat > /etc/influxdb/influxdb.conf <<EOF[meta]dir = "/var/lib/influxdb/meta"[data]dir = "/var/lib/influxdb/data"engine = "tsm1"wal-dir = "/var/lib/influxdb/wal"EOF# -v /opt/docker/influxdb-config/influxdb.conf:/etc/influxdb/influxdb.conf \# --restart unless-stopped
influxdb2.1初始化
图形界面初始化
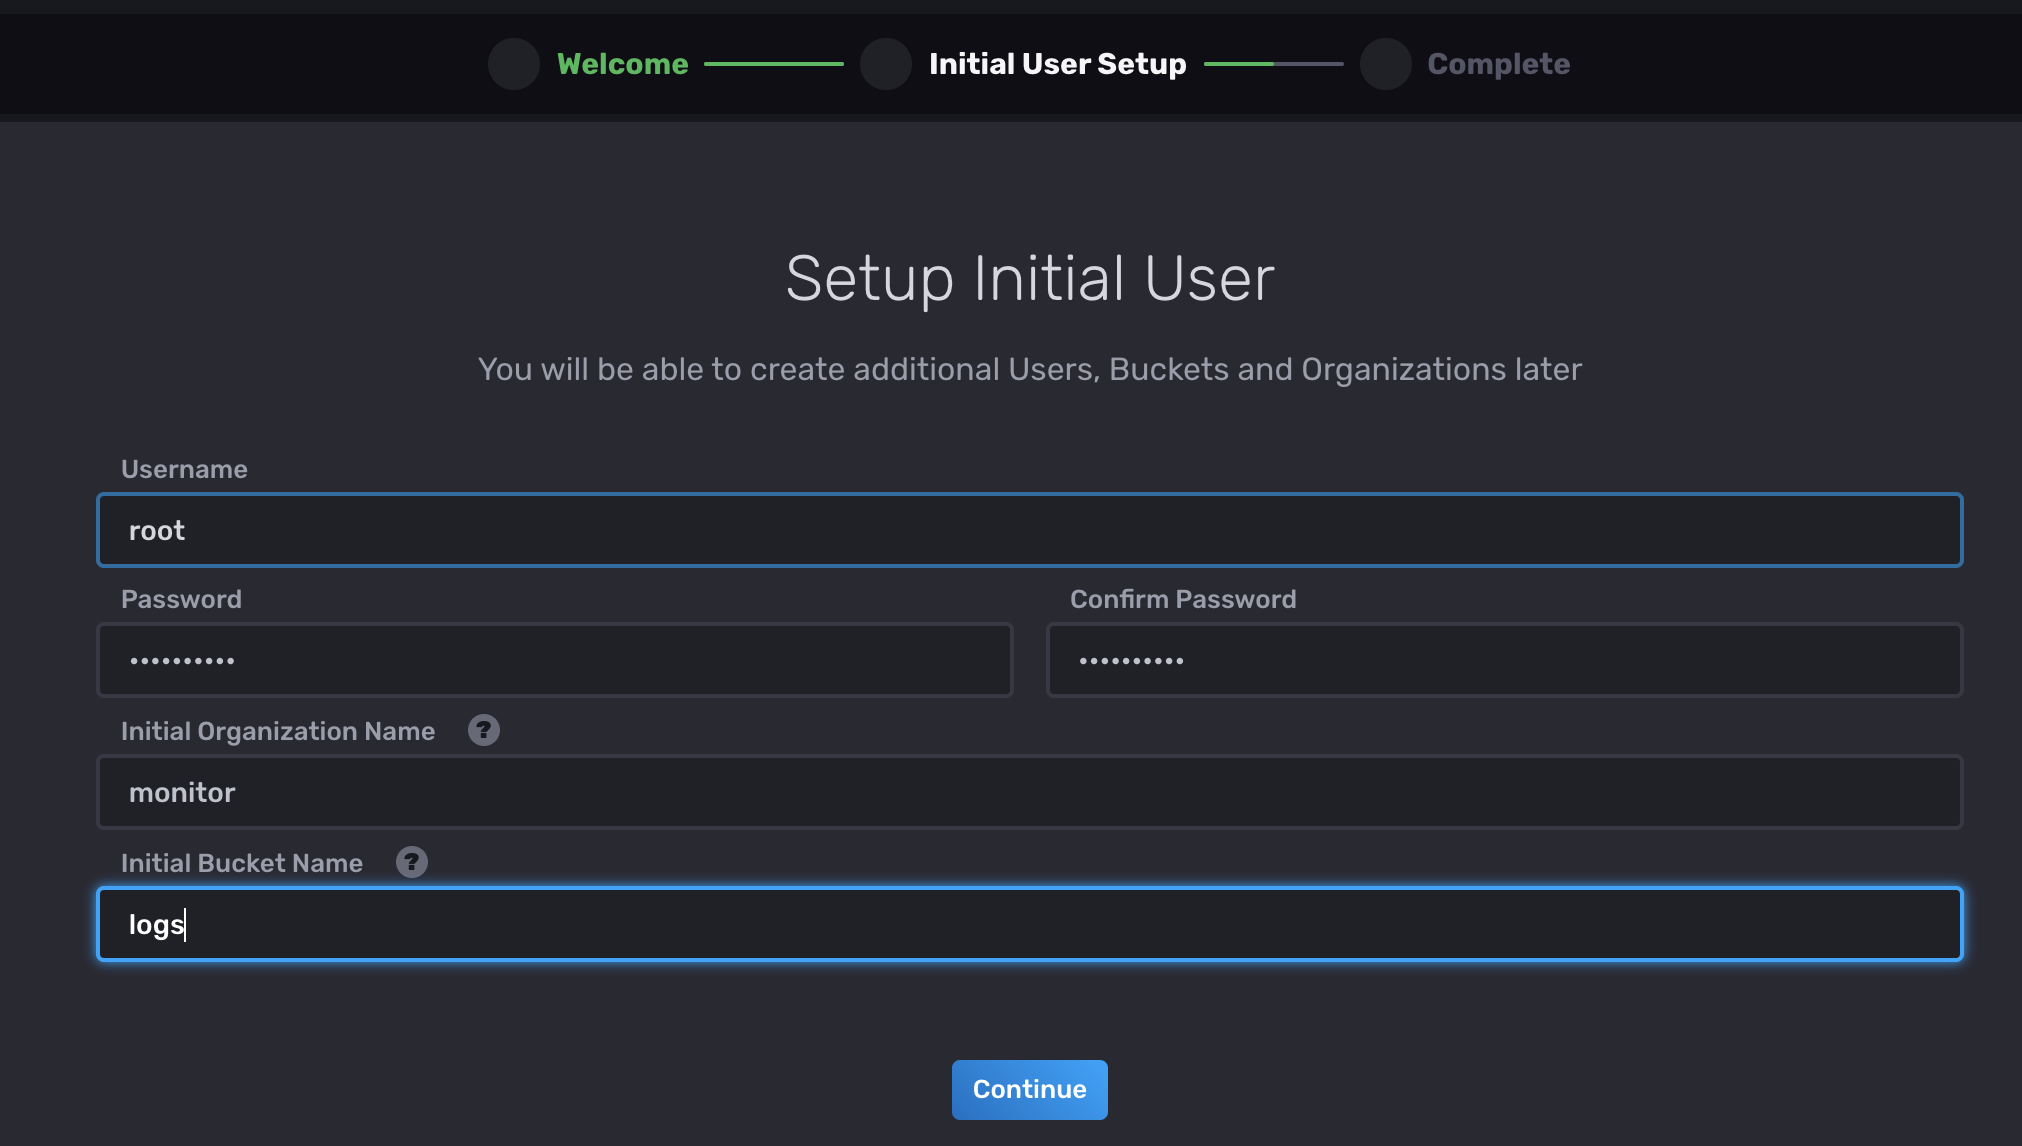
通过influx命令行初始化
influx setup \--username root \--password 88888888 \--host http://localhost:8086 \--org monitor \--bucket logs \--retention 30d \--force
数据结构
知识点
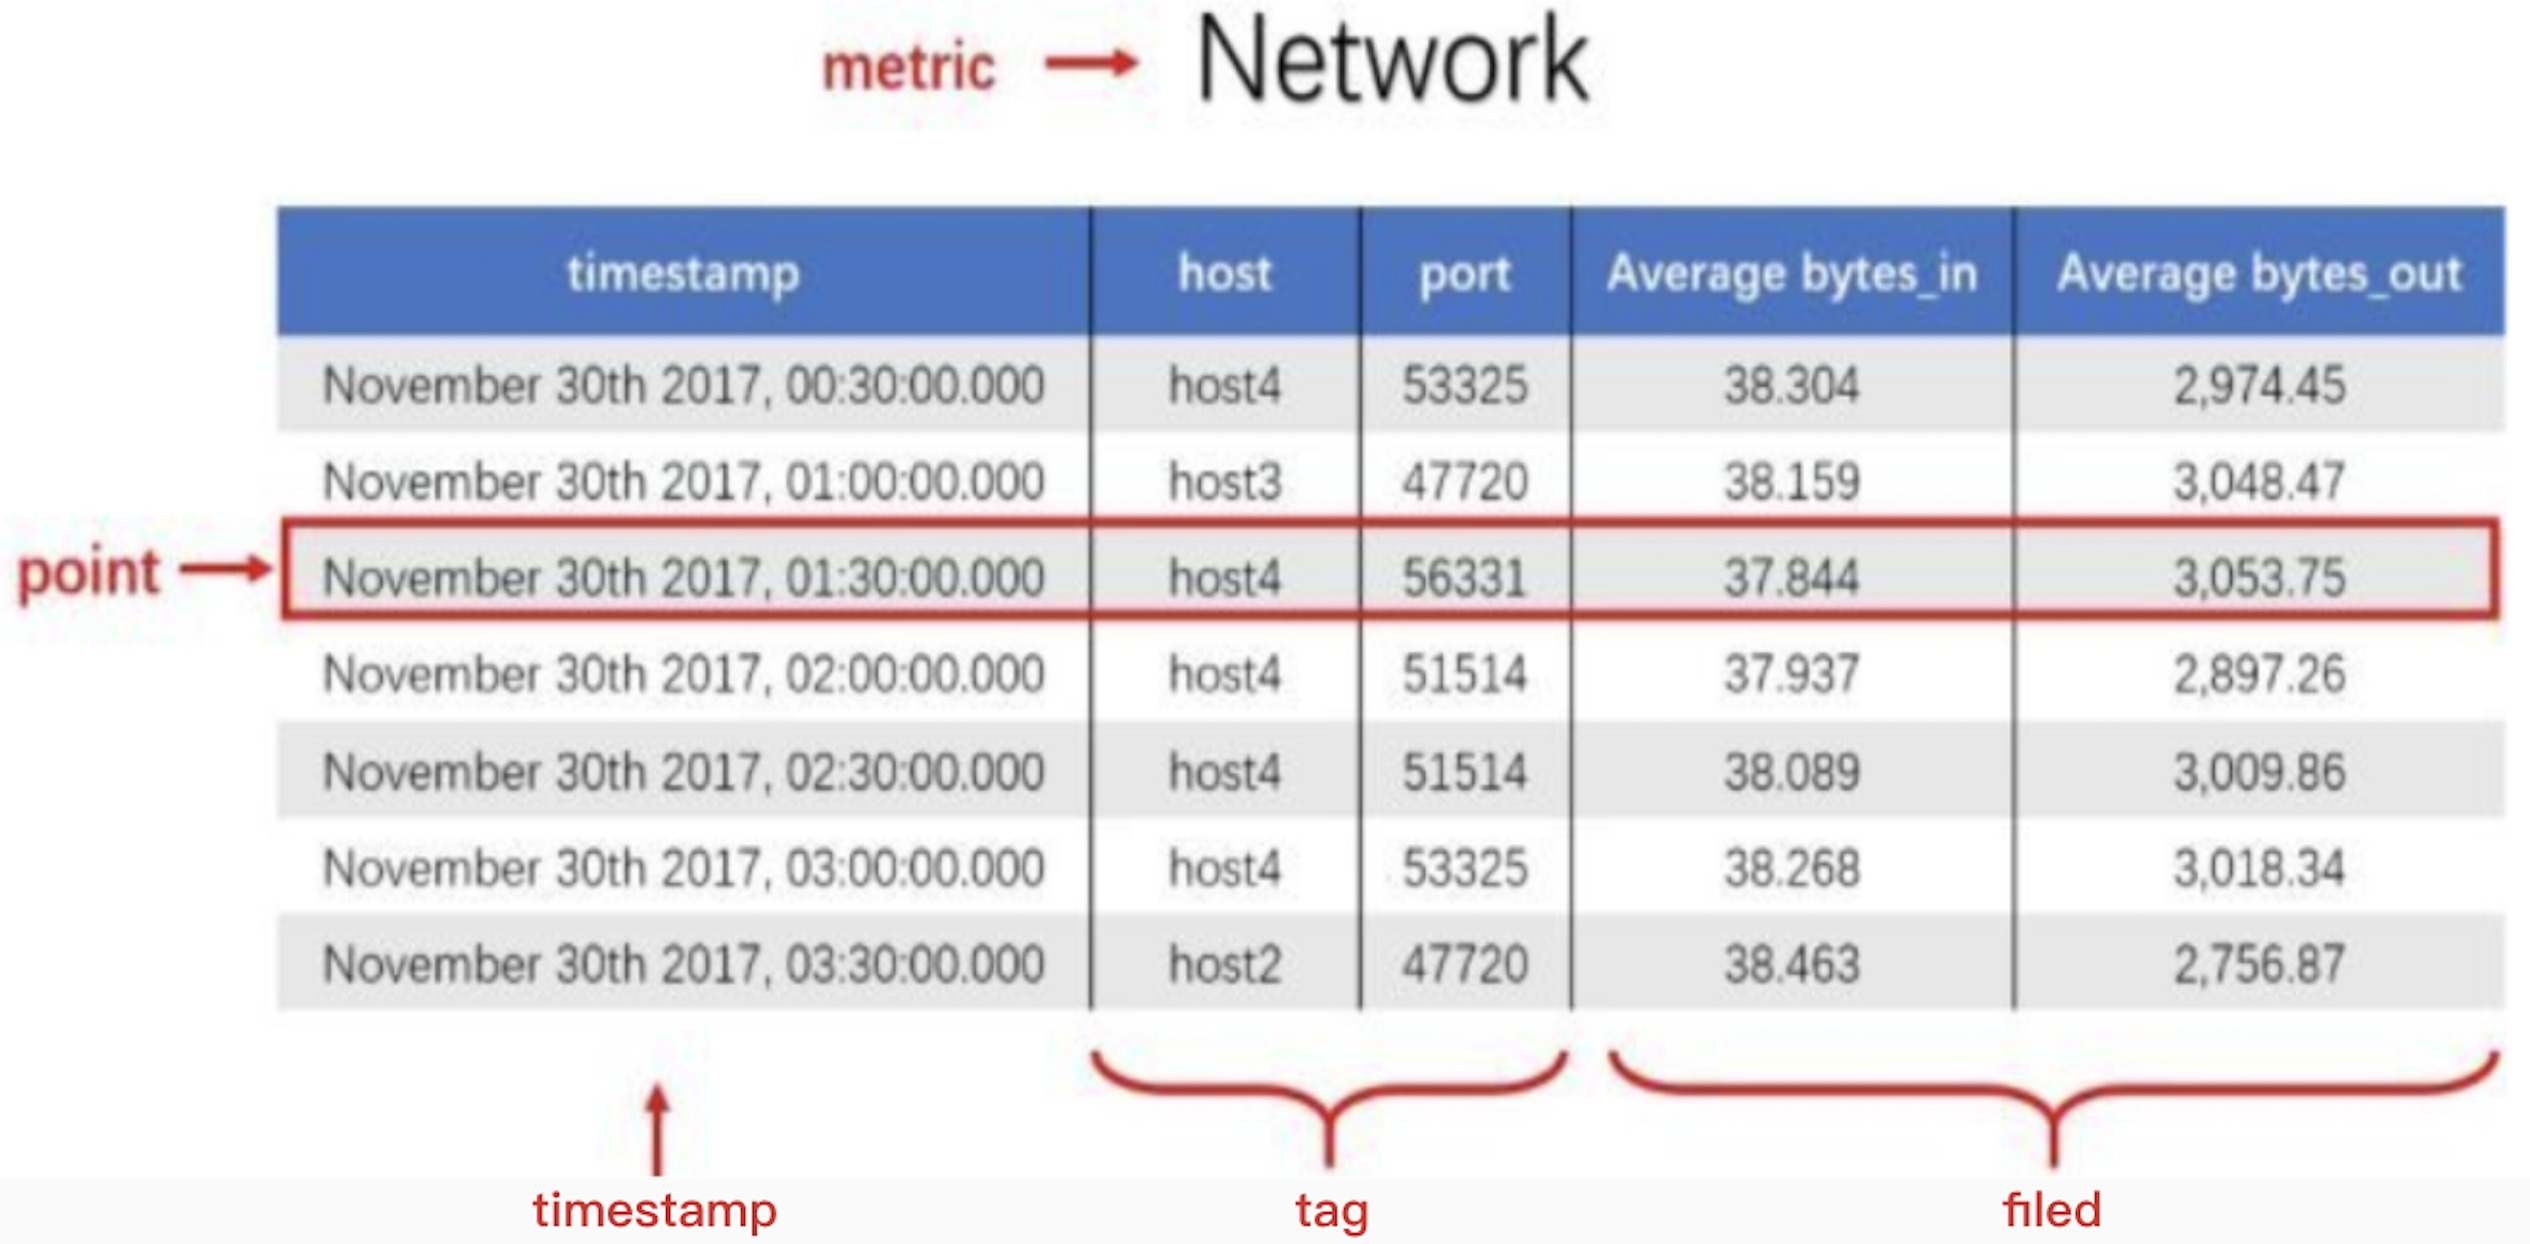
measurement: 度量的数据集,类似于关系型数据库中的 table
point: 一个数据点,类似于关系型数据库中的 row
timestamp: 时间戳;主索引,表征采集到数据的时间点
tag: 维度列,代表数据的归属、属性,表明是哪个设备/模块产生的,一般不随着时间变化,会被索引供查询使用
field: 指标列,代表数据的测量值,随时间平滑波动,不需要查询
influxdb 2.0
organization(组织),简称org
和influxdb 1.0版本中的database概念一致,也和关系型数据库的database概念一致.
bucket(桶)
和influxdb 1.0版本中measurement的概念一致,类似于关系型数据库中的表的概念.
token(令牌)
token是influxdb OSS 2.0版本新增的概念,可以理解为客户端agent向influxdb 2.0读写数据必须提供的凭证,该token由influxdb服务端自动生成.
influxdb OSS 2.0初始化
初始化的意思就是在influxdb安装好后创建默认的用户(超级用户),org,bucket.类似于我们在关系型数据库安装好后新建用户,默认操作的数据库和默认操作的表.
操作命令
policies 保留策略
show retention policiesalter retention policy autogen on mydb duration 30d REPLICATION 1 SHARD DURATION 1d default# 更新
SQL
INSERT cpu,host=serverA,region=us_west value=0.64SELECT "host", "region", "value" FROM "cpu"
influxdb2.0 python sdk操作数据
安装pip包
pip install -i http://mirrors.aliyun.com/pypi/simple --trusted-host mirrors.aliyun.com
from datetime import datetimefrom influxdb_client import InfluxDBClient, Point, WritePrecisionfrom influxdb_client.client.write_api import SYNCHRONOUS# You can generate an API token from the "API Tokens Tab" in the UItoken = "CXN1p0iOPkysZk5BIagm-W87mH2Gd3XWtA4N81dSAQoICAuvjKpW41WlQxrAc6pnwxUZde_85gJDb41BEwoakA=="org = "monitor"bucket = "logs"with InfluxDBClient(url="http://192.168.0.119:8086", token=token, org=org) as client:
方案一:使用 InfluxDB Line Protocol 写入数据
write_api = client.write_api(write_options=SYNCHRONOUS)data = "mem,host=host1 used_percent=23.43234543"write_api.write(bucket, org, data)
方案二:使用数据点写入数据
sequence = ["mem,host=host1 used_percent=23.43234543","mem,host=host1 available_percent=15.856523"]write_api.write(bucket, org, sequence)
方案三:使用批处理序列写入数据
sequence = ["mem,host=host1 used_percent=23.43234543","mem,host=host1 available_percent=15.856523"]write_api.write(bucket, org, sequence)
执行Flux query
query = 'from(bucket: "logs") |> range(start: -1h)'tables = client.query_api().query(query, org=org)for table in tables:for record in table.records:print(record)
结束客户端
client.close()

若有收获,就点个赞吧
0 人点赞
