一、中文文档及库的安装
Requests 是一个 Python 的 HTTP 客户端库。
开源地址:https://github.com/psf/requests
英文文档:https://requests.readthedocs.io/en/master/
中文文档:http://2.python-requests.org/zh_CN/latest/
安装Requests库
pip install -i https://pypi.tuna.tsinghua.edu.cn/simple/ requests
使用Requests库
import requests
二、发送请求
Get
r.get('https://httpbin.org/get')
Post
r = requests.post(' http://httpbin.org/post', data = {' key':' value'})
Put
r = requests.put(' http://httpbin.org/put', data = {'key':' value'})
三、传递URL参数
常用参数
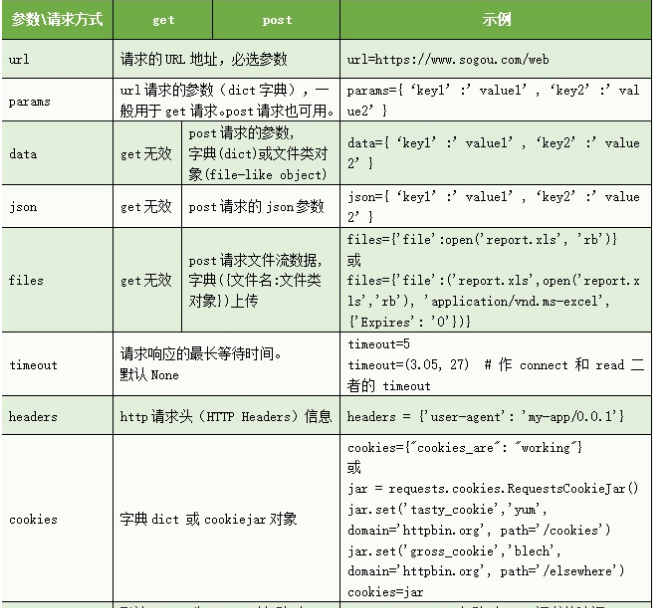
params
使用params访问 “httpbin.org/get?key=value”
payload={"key":"value"}r = requests.get("httpbin.org/get", params=payload)print(r.url)# httpbin.org/get?key=value
value为None,key不会加到参数里面,如果一个key需要使用多次,对应key的 value可以使用列表
payload = {'key1': 'value1', 'key2': [' value2', 'value3']}
data
import requests# 字典类型data = {'key1': 'value1', 'key2': 'value2'}# 元组或列表(('key1', 'value1'), ('key1', 'value2'))# Jsonimport jsondata = {'key1': 'value1', 'key2': 'value2'}# 将字典转换Jsondata=json.dumps(data)# 发送POST请求r = requests.post("https://www.baidu.com/", data=data)print(r.text)
为 data 参数传入一个元组列表,在表单中多个元素使用同一 key的时 候,这种方式尤其有效:
payload = (('key1', 'value1'), ('key1', 'value2'))r = requests.post(' http://httpbin.org/post', data= payload)print(r.text)"""{..."form": {"key1": ["value1","value2"]},...}"""
文件上传
import requestsurl = 'https://weibo.cn/mblog/sendmblog?rl=0&st=bd6702'cookies = {'xxx': 'xxx'}files = {'content': (None, 'Python爬虫'),'pic': ('pic', open('test.png', 'rb'), 'image/png'),'visible': (None, '0')}r = requests.post(url, files=files, cookies=cookies)print(r.status_code)
cookie
url = 'http://httpbin.org/cookies'cookies = dict(cookies_are=' working')r = requests.get(url, cookies= cookies)print( r.text)# '{"cookies": {"cookies_are": "working"}}'
timeout 超时
requests.get("https://www.baidu.com", timeout = 0.001)requests.post("https://www.baidu.com", timeout = 0.001)
headers
import requestsheaders = {'content-type': 'application/json','User-Agent': 'Mozilla/5.0 (Windows NT 6.3; WOW64; rv:41.0) Gecko/20100101 Firefox/41.0'}requests.get("https://www.baidu.com/", headers=headers)
proxies 代理
def get_random_proxy():proxies = {}proxy = requests.get(proxypool_url).json()['proxy']proxies['http'] = proxyreturn proxies
import requestsproxies = {"http": "http://10.10.1.10:3128","https": "http://10.10.1.10:1080",}requests.get("https://www.baidu.com/", proxies=proxies)
西刺免费代理IP:http://www.xicidaili.com/快代理:http://www.kuaidaili.com/代理云:http://www.dailiyun.com/
verify 证书验证
import requestsurl = 'https://kyfw.12306.cn/otn/leftTicket/init'# 关闭证书验证r = requests.get(url, verify=False)print(r.status_code)# 开启证书验证# r = requests.get(url, verify=True)# 设置证书所在路径# r = requests.get(url, verify= '/path/to/certfile')
Session 会话保持
s = requests.Session()
s.headers = {'key':'value'}
r = s.get('url')
s.close()
# 推荐使用
with requests.Session() as s:
    s.get(' http://httpbin.org/cookies/set/sessioncookie/123456789')
保存 cookie
import requests
from http import cookiejar

session = requests.session()
url ="http://httpbin.org/ip"
# 2. 处理 headers
header = {'User-Agent':'Mozilla/5.0 (Windows NT 6.1; Win64; x64) AppleWebKit/537.36 (KHTML, like Gecko) Chrome/60.0.3112.101 Safari/537.36'}
proxie = {"http": "http://117.69.170.254:4216","https": "http://60.179.231.109:3000",}

# 3. 需要登录的用户名和密码
data = {"email":"15947503365", "password":"Wu150702"}

# 4. 发送附带用户名和密码的请求,并获取登录后的Cookie值,保存在session里
session.cookies = cookiejar.LWPCookieJar(filename='cook.txt')
session.post("http://www.renren.com/PLogin.do", data = data,headers=header,proxies=proxie)
session.cookies.save(ignore_discard=True, ignore_expires=True)

# 5. session包含用户登录后的Cookie值,可以直接访问那些登录后才可以访问的页面
session.cookies = cookiejar.MozillaCookieJar(filename="my_cookies.txt")
response = session.get("http://www.renren.com/897586509/profile?portal=homeFootprint&ref=home_footprint")
session.cookies.save(ignore_discard=True,ignore_expires=True)
状态异常处理
import requests

URL = 'http://ip.taobao.com/service/getIpInfo.php' # 淘宝IP地址库API
try:
    r = requests.get(URL, params={'ip': '8.8.8.8'}, timeout=1)
    r.raise_for_status() # 如果响应状态码不是 200,就主动抛出异常
except requests.RequestException as e:
    print(e)
else:
    result = r.json()
    print(type(result), result, sep='\n')
四、响应内容
| Response.url Response.status_code Response.text Response.json() Response.headers Response.cookies Response.elapsed Response.content Response.encoding |
请求url 响应状态码 获取响应内容 获取响应的JSON内容 响应header信息 响应的cookie 请求响应的时间 HTTP响应内容的二进制形式 从HTTP header中猜测的响应内容编码方式 |
|---|---|
五、Requests-Cache爬虫缓存
Requests-Cache-是 Requests模块的一个扩展功能,它是根据 Requests的发送请求来生成相应的缓存数据。当 Requests重复向同一个UR发送请求的时候, Requests-Cache会判断当前请求是否已产生缓存,若已有缓存,则从缓存里读取数据作为响应内容;若没有缓存,则向网站服务器发送请求,并将得到的响应内容写入相应的数据库里。 Requests-Cache-的作用非常重要,它可以减少网络资源重复请求的次数,不仅减轻了本地的网络负载,而且还减少了爬虫对网站服务器的请求次数,这也是解决反爬虫机制的一个重要手段。
使用缓存
import requests
import requests_cache
# 使用install_cache()方法
requests_cache.install_cache()
# 清除已有的缓存
requests_cache.clear()
# 访问自定义的Web系统
url = 'http://127.0.0.1:5000/'
# 创建Session会话
session = requests.session()
# 执行两次访问
for t in range(2):
    r = session.get(url)
    # from_cache是requests_cache的函数
    # 若输出True,说明生成缓存。
    print(r.from_cache)
定义钩子函数,判断是否有缓存设置等待时间
import time
import requests_cache

# 定义钩子函数
def make_throttle_hook(delay=1.0):
    def hook(response, *args, **kwargs):
        # 如果没有缓存,则添加延时
        if not getattr(response, 'from_cache', False):
            print('delayTime')
            time.sleep(delay)
        return response
    return hook

if __name__ == '__main__':
    requests_cache.install_cache()
    requests_cache.clear()
    # 钩子函数的使用
    s = requests_cache.CachedSession()
    s.hooks = {'response': make_throttle_hook(2)}
    s.get('http://127.0.0.1:5000/')
    s.get('http://127.0.0.1:5000/')
六、Requests-HTML
简介
Requests-HtmL是在 Requests的基础上进一步封装,两者都是由同一个开发者开发,Requests-Requests-html除了包含的所有功能之外,还新增了数据清洗和Ajax数据动态渲染。 数据清洗是由xml和 PyQuery模块实现,两个模块分别支持 XPath Selectors和 CSS Selectors定位,通过 XPath或CSS定位,可以精准地提取网页里的数据。 Ajax数据动态渲染是将网页的动态数据加载到网页上再抓取。网页数据可以使用Ajax向服务器发送HTTP请求,再由 javascript完成数据渲染,如果直接向网页的URL地址发送HTTP请求,并且网页的部分数据是来自Ajax,那么,得到的网页信息就会有所缺失。而 Requests—HTML可以将Ajax动态数据加载到网页信息,无需爬虫开发者分析Ajax的请求信息。
请求
Requests—html向网站发送请求的方法是来自 Requests模块,但是 Requests—hTML只能使用 Requests的 Session模式,该模式是将请求会话实现持久化,使这个请求保持连接状态。 Session模式好比我们在打电话的时候,只要双方没有挂断电话,就会一直保持一种会话(连接)状态Session模式对HTTP的GET和POST请求也是由get和post方法实现,具体的使用方法如下:
from requests_html import HTMLSession
# 定义会话Session
session = HTMLSession()
url = 'https://movie.douban.com/'
# 发送GET请求
r = session.get(url)
# 发送POST请求
r = session.post(url, data={})
# 输出网页的URL地址
print(r.html)
数据清洗
提供了各种各样的数据清洗方法
from requests_html import HTMLSession
# 定义会话Session
session = HTMLSession()
url = 'https://movie.douban.com/'
# 发送GET请求
r = session.get(url)
# 输出网页的URL地址
print(r.html)
# 输出网页里全部URL地址
print(r.html.links)
# 输出网页里精准的URL地址
print(r.html.absolute_links)
# 输出网页的HTML信息
print(r.text)
# 输出网页的全部文本信息,即去除HTML代码
print(r.html.text)
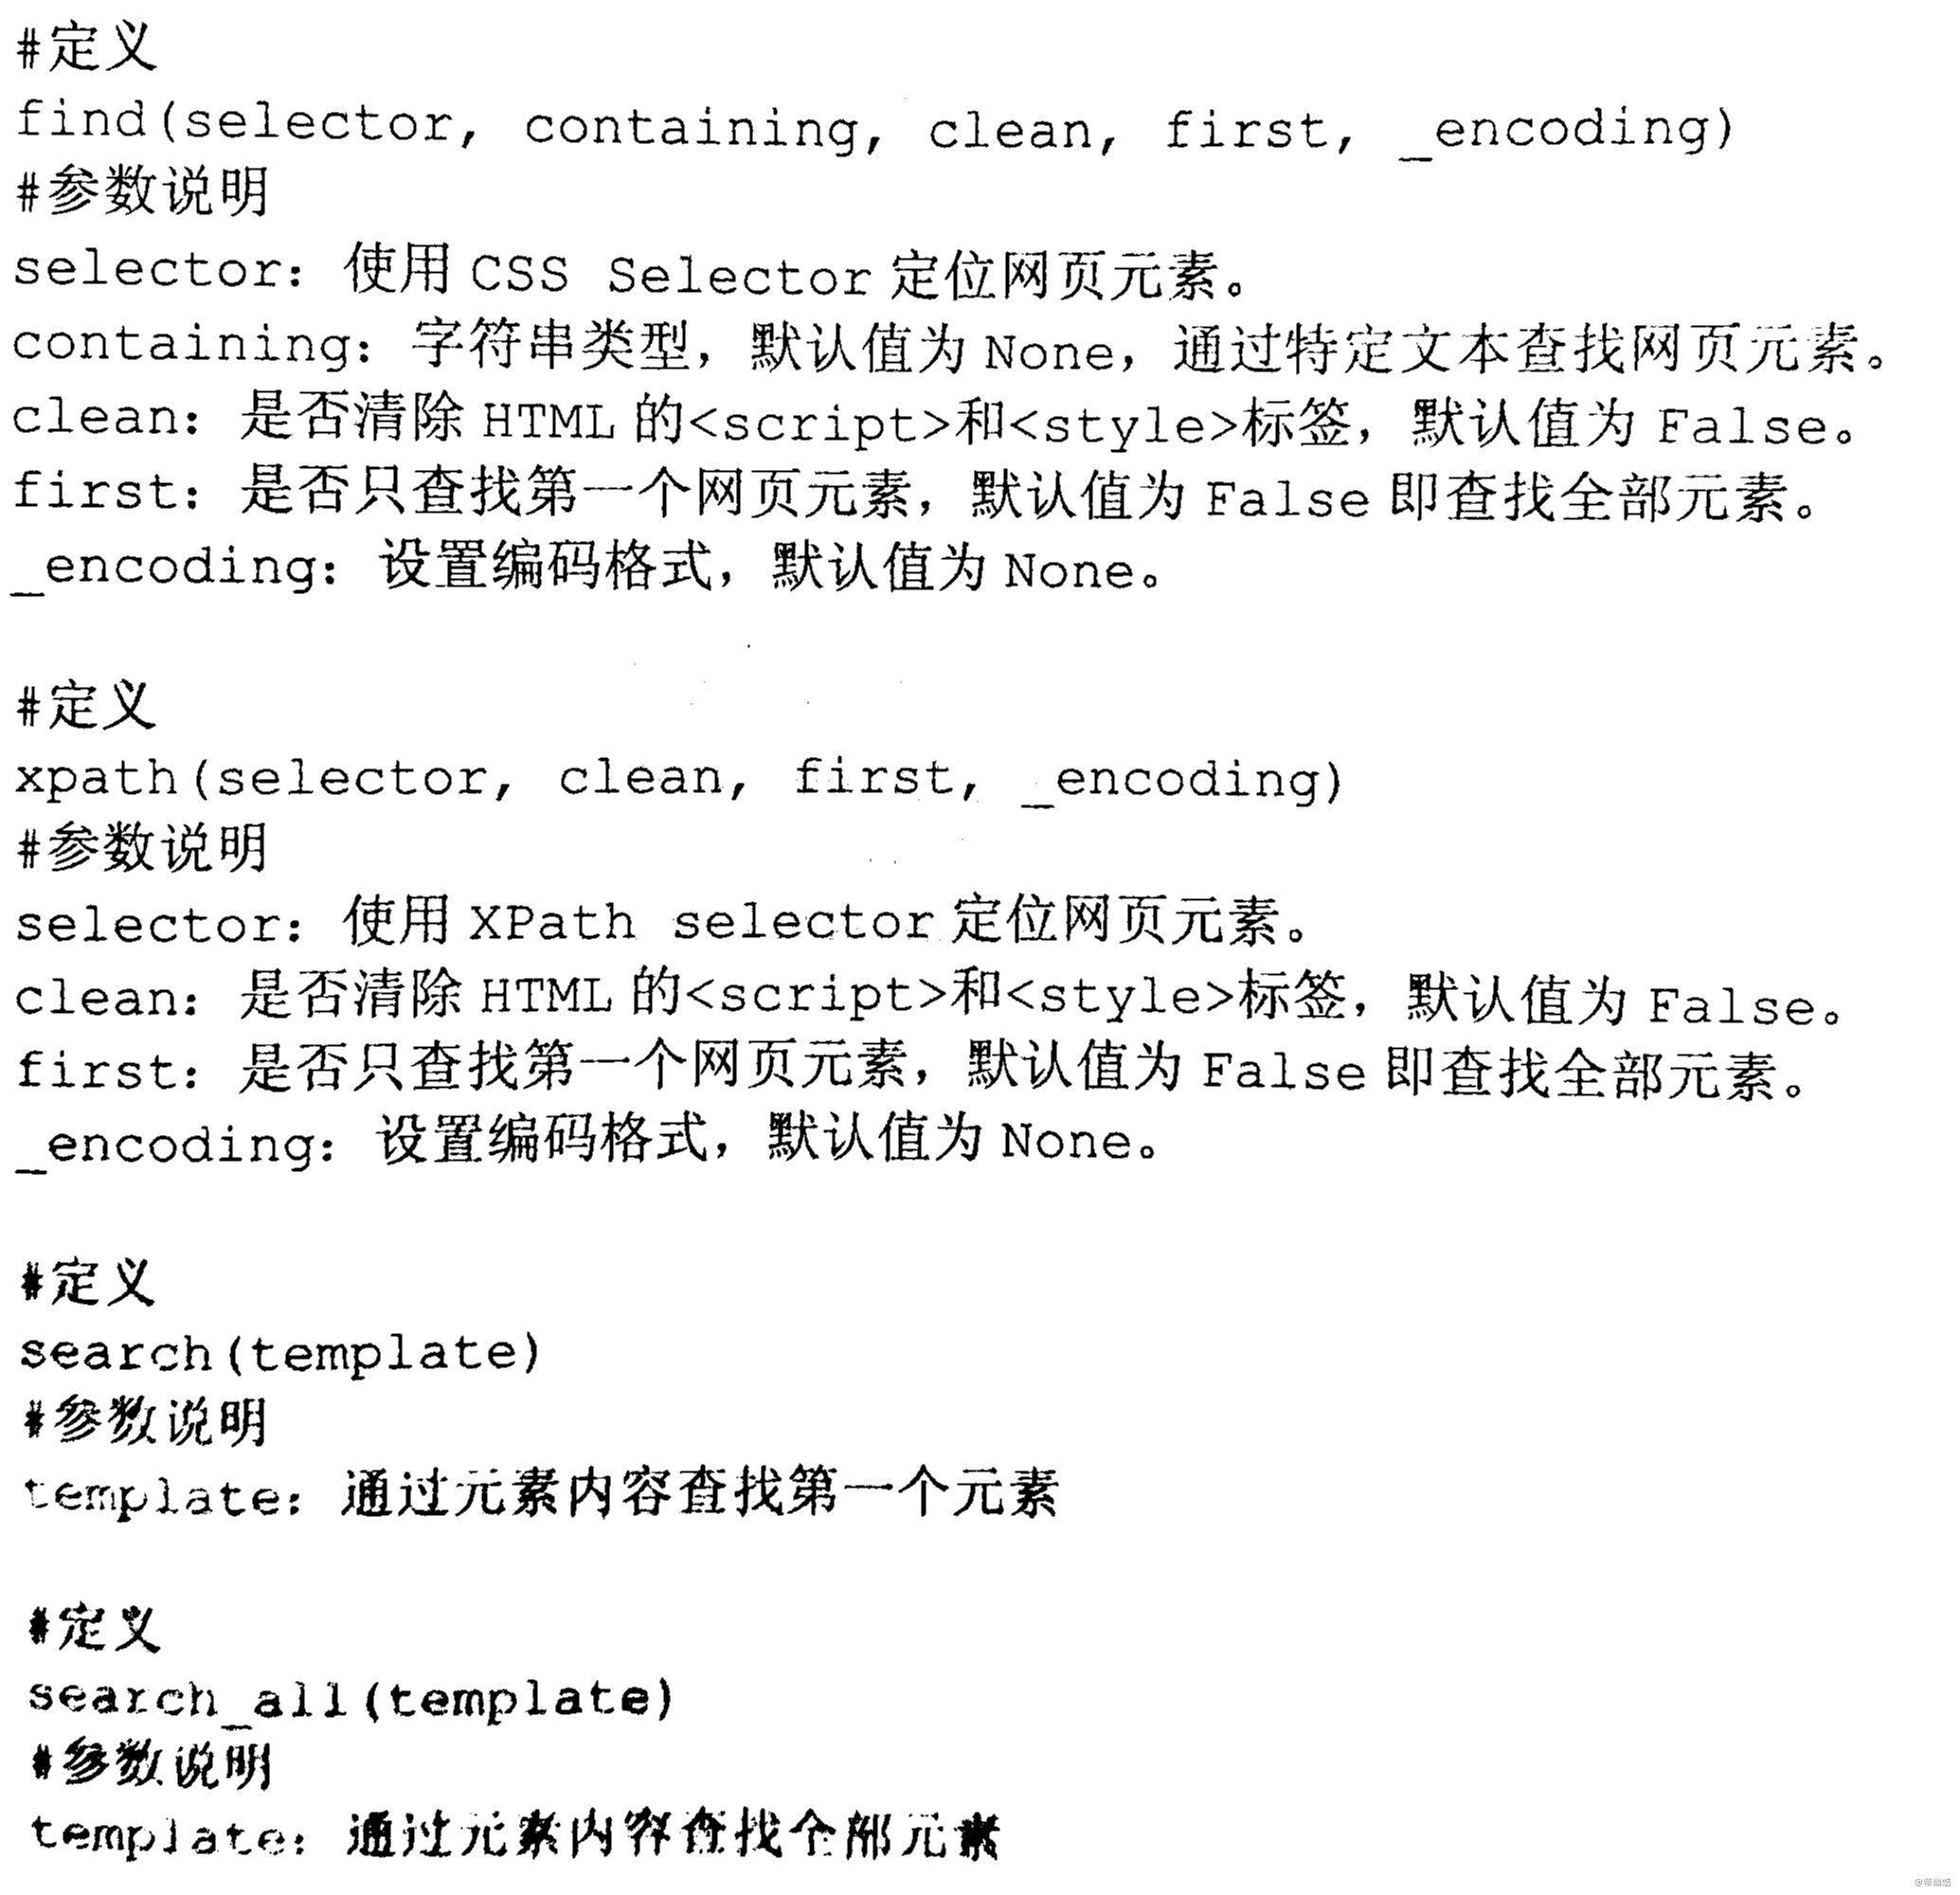
精确提取某个数据
豆瓣实例
from requests_html import HTMLSession
# 定义会话Session
session = HTMLSession()
url = 'https://movie.douban.com/'
# 发送GET请求
r = session.get(url)

# 通过CSS Selector定位li标签,“.title”代表class属性
# first=True代表获取第一个元素
print(r.html.find('li.title', first=True).text)
# 输出当前标签的属性值
print(r.html.find('li.title', first=True).attrs)
print('______分割线______')

# 查找特定文本的元素
# 如果元素所在的HTML里含有containing的属性值即可抓取
for name in r.html.find('li', containing='超能'):
    # 输出电影名
    print(name.text)
print('______分割线______')

# 查找全部电影名
for name in r.html.find('li.title'):
    # 输出电影名
    print(name.text)
    # 输出电影名所在标签的属性值
    print(name.attrs)
print('______分割线______')

# 通过XPath Selector定位ul标签
x = r.html.xpath('//*[@id="screening"]/div[2]/ul')
for name in x:
    print(name.text)
print('______分割线______')

# search()通过关键字查找内容
# 一个{}代表一个内容,内容可为中文或英文等
print(r.html.search('古剑奇谭{}{}'))
print('______分割线______')

# search_all()通过关键字查找整个网页符合的内容
# 一个{}代表一个内容,内容可为中文或英文等
print(r.html.search_all('古剑奇谭{}{}'))
Ajax动态数据抓取
from requests_html import HTMLSession
url = 'https://y.qq.com/portal/singer_list.html'
session = HTMLSession()
r = session.get(url)
# 使用Chromium浏览器加载网页
r.html.render()
# 定位歌手姓名
singer = r.html.find('h3.singer_list__title')
# 输出歌手姓名
for i in singer:
    print(i.text)

若有收获,就点个赞吧
0 人点赞
