通则
单元测试
单元是指工作单元,它可以是那些在公共API中调用的多个方法和类且满足:
- 返回值或者抛出异常
- 改变系统的状态
- 进行第三方调用(API、数据库等)
单元测试应该测试一个单元的行为:给定一个输入,最终的期望结果可以使上面的任何一种。
单元测试之间应该是相互隔离且彼此独立的。**
- 每个给定的行为都应该对应一个单独的测试。
- 一个测试的执行与执行顺序不应该影响其他测试。
单元测试属于轻量测试。
- 可重复
- 快速
- 一致性
- 方便读写
单元测试也是代码。它们应该与正在测试的代码具有相同的质量级别。它们也能通过重构来增强代码自身的可维护性与可读性。
设计原则
良好单元测试的关键在于编写可测试的代码。下面是一些有用的设计原则:
- 使用良好的命名规范并注释代码(“为什么”而不是怎么做),要记住注释不能代替糟糕的命名和设计。
- 不要重复自己,避免重复代码。
- 单一职责:每个对象/函数只应该关注一个任务。
- 在同一组件中保持单一抽象级别(例如,不要将业务逻辑与同一方法中的低层实现细节混合在一起)。
- 最小化组件间依赖:通过封装组件,减少组件之间的信息交换。
- 支持可配置性而不是硬编码,这避免了在测试时复制完全相同的环境。
- 适当地引用设计模型,尤其是依赖注入,因为它能将对象的创建职责与业务逻辑分离。
- 避免全局状态。
指南
这些指南的目的在于让你的测试具有:
- 可读性
- 可维护性
- 可靠性
这是良好单元测试的三大支柱。
尽可能地使用TDD
TDD(测试驱动开发)是一个设计过程,而不是测试过程。TDD是一种以交互式设计软件组件(单元)的强大方式,在单元测试中我们就能够制定相关的行为。
测试优先周期
- 首先编写测试能够让代码设计本身变得易于测试。
- 只需编写实现功能的所需代码量,就可以让生成的代码库最小化,从而使得代码更易于维护。
- 代码库能够通过重构机制进行增强,因为测试能够保证新的代码并不会改变当前已有的功能。
- 在每个周期中清理代码能够让代码库更易于维护,频繁且少量地修改代码往往更不容易出错。
- 对开发者来说是一种快速反馈,你知道你没有破坏任何东西,并且在让系统往好的方向发展。
-
正确地组织测试
通过嵌套测试套件让子集中的测试更有逻辑性。 ```javascript // 修改前 describe(‘A set of functionalities’, () => { it(‘a set of functionalities should do something nice’, () => { });
it(‘a subset of functionalities should do something great’, () => { });
it(‘a subset of functionalities should do something awesome’, () => { });
it(‘another subset of functionalities should also do something great’, () => { }); });
// 修改后 describe(‘A set of functionalities’, () => { it(‘should do something nice’, () => { });
describe(‘A subset of functionalities’, () => { it(‘should do something great’, () => { });
it('should do something awesome', () => {});
});
describe(‘Another subset of functionalities’, () => { it(‘should also do something great’, () => { }); }); });
<a name="RuR6r"></a>
## 正确地为测试命名
测试名应简介、明确、描述性强且使用正确的英语,通过查看spec runner的输出来验证该测试名称是可理解的。要记住测试代码也会被他人阅读,它也可以是代码的实时文档。
```javascript
// 修改前
describe('MyGallery', () => {
  it('init set correct property when called (thumb size, thumbs count)', () => {
  });

  // ...
});

// 修改后
describe('The Gallery instance', () => {
  it('should properly calculate the thumb size when initialized', () => {
  });

  it('should properly calculate the thumbs count when initialized', () => {
  });

  // ...
});
为了让测试名称更加合理,你可以使用“工作单元-场景/上下文-期望行为”模式来命名:
describe('[unit of work]', () => {
  it('should [expected behaviour] when [scenario/context]', () => {
  });
});
或者当许多测试都在同一场景/上下文时:
describe('[unit of work]', () => {
  describe('when [scenario/context]', () => {
    it('should [expected behaviour]', () => {
    });
  });
});
例子:
describe('The Gallery instance', () => {
  describe('when initialized', () => {
    it('should properly calculate the thumb size', () => {
    });

    it('should properly calculate the thumbs count', () => {
    });
  });

  // ...
});
不要注释测试
测试总有它存在或者不存在的理由。
不要因为测试太慢、太复杂或者会失败就把它们注释掉,相反的我们应该让其变得快速、简单且值得信赖。如果实在不行,就将它完全移除。
在测试中要避免逻辑
总是使用简单语句,不要使用条件或者循环语句。如果这样做了,在测试代码中就可能产生bug:
- 条件语句:你不知道在测试时会执行哪条语句
循环语句:你可能在多个测试之间共享状态 ```javascript // 修改前 it(‘should properly sanitize strings’, () => { let result; const testValues = { ‘Avion’ : ‘Avi’ + String.fromCharCode(243) + ‘n’, ‘The-space’ : ‘The space’, ‘Weird-chars-‘ : ‘Weird chars!!’, ‘file-name.zip’ : ‘file name.zip’, ‘my-name.zip’ : ‘my.name.zip’ };
for (result in testValues) { expect(sanitizeString(testValues[result])).toBe(result); } });
// 修改后 it(‘should properly sanitize strings’, () => { expect(sanitizeString(‘Avi’+String.fromCharCode(243)+’n’)).toBe(‘Avion’); expect(sanitizeString(‘The space’)).toBe(‘The-space’); expect(sanitizeString(‘Weird chars!!’)).toBe(‘Weird-chars-‘); expect(sanitizeString(‘file name.zip’)).toBe(‘file-name.zip’); expect(sanitizeString(‘my.name.zip’)).toBe(‘my-name.zip’); });
更好的方式:为每种类型编写单独的测试。这样就可以输出所有可能的情况,进而增强代码的可维护性。
```javascript
it('should sanitize a string containing non-ASCII chars', () => {
  expect(sanitizeString('Avi'+String.fromCharCode(243)+'n')).toBe('Avion');
});

it('should sanitize a string containing spaces', () => {
  expect(sanitizeString('The space')).toBe('The-space');
});

it('should sanitize a string containing exclamation signs', () => {
  expect(sanitizeString('Weird chars!!')).toBe('Weird-chars-');
});

it('should sanitize a filename containing spaces', () => {
  expect(sanitizeString('file name.zip')).toBe('file-name.zip');
});

it('should sanitize a filename containing more than one dot', () => {
  expect(sanitizeString('my.name.zip')).toBe('my-name.zip');
});
不要写不必要的断言
请记住,单元测试是特定行为应该如何工作的设计规范,而不是对代码执行的所有操作的观察队列。
// 修改前
it('should multiply the number passed as parameter and subtract one', () => {
  const multiplySpy = spyOn(Calculator, 'multiple').and.callThrough();
  const subtractSpy = spyOn(Calculator, 'subtract').and.callThrough();

  const result = Calculator.compute(21.5);

  expect(multiplySpy).toHaveBeenCalledWith(21.5, 2);
  expect(subtractSpy).toHaveBeenCalledWith(43, 1);
  expect(result).toBe(42);
});

// 修改后
it('should multiply the number passed as parameter and subtract one', () => {
  const result = Calculator.compute(21.5);
  expect(result).toBe(42);
});
这样做能够提高代码的可维护性,因为你的测试不再与代码的实现细节相关。
正确地初始化应用于所有相关测试的操作
// 修改前
describe('Saving the user profile', () => {
  let profileModule;
  let notifyUserSpy;
  let onCompleteSpy;

  beforeEach(() => {
    profileModule = new ProfileModule();
    notifyUserSpy = spyOn(profileModule, 'notifyUser');
    onCompleteSpy = jasmine.createSpy();
  });

  it('should send the updated profile data to the server', () => {
    jasmine.Ajax.install();

    profileModule.save();

    const request = jasmine.Ajax.requests.mostRecent();

    expect(request.url).toBe('/profiles/1');
    expect(request.method).toBe('POST');
    expect(request.data()).toEqual({ username: 'mawrkus' });

    jasmine.Ajax.uninstall();
  });

  it('should notify the user', () => {
    jasmine.Ajax.install();

    profileModule.save();

    expect(notifyUserSpy).toHaveBeenCalled();

    jasmine.Ajax.uninstall();
  });

  it('should properly execute the callback passed as parameter', () => {
    jasmine.Ajax.install();

    profileModule.save(onCompleteSpy);

    jasmine.Ajax.uninstall();

    expect(onCompleteSpy).toHaveBeenCalled();
  });
});

// 修改后
describe('Saving the user profile', () => {
  let profileModule;

  beforeEach(() => {
    jasmine.Ajax.install();
    profileModule = new ProfileModule();
  });

  afterEach( () => {
    jasmine.Ajax.uninstall();
  });

  it('should send the updated profile data to the server', () => {
    profileModule.save();

    const request = jasmine.Ajax.requests.mostRecent();

    expect(request.url).toBe('/profiles/1');
    expect(request.method).toBe('POST');

  });

  it('should notify the user', () => {
    spyOn(profileModule, 'notifyUser');

    profileModule.save();

    expect(profileModule.notifyUser).toHaveBeenCalled();
  });

  it('should properly execute the callback passed as parameter', () => {
    const onCompleteSpy = jasmine.createSpy();

    profileModule.save(onCompleteSpy);

    expect(onCompleteSpy).toHaveBeenCalled();
  });
});
考虑将初始化代码限制在最小的相关上下文中,以保持代码的可读性与可维护性。
考虑在测试中使用工厂函数
工厂函数能够:
- 帮助你减少初始化代码,特别是当你使用依赖注入时。
- 让每个测试更具有可读性,因为创建仅仅是一个函数调用,所以可以将其应用在测试本身而不是测试夹具中。
- 在创建新的实例时更具有灵活性(例如设置初始状态)。
我们需要在DRY原则与可读性之间寻找平衡点。
// 修改前
describe('User profile module', () => {
  let profileModule;
  let pubSub;

  beforeEach(() => {
    const element = document.getElementById('my-profile');
    pubSub = new PubSub({ sync: true });

    profileModule = new ProfileModule({
      element,
      pubSub,
      likes: 0
    });
  });

  it('should publish a topic when a new "like" is given', () => {
    spyOn(pubSub, 'notify');
    profileModule.incLikes();
    expect(pubSub.notify).toHaveBeenCalledWith('likes:inc', { count: 1 });
  });

  it('should retrieve the correct number of likes', () => {
    profileModule.incLikes();
    profileModule.incLikes();
    expect(profileModule.getLikes()).toBe(2);
  });
});

// 修改后
describe('User profile module', () => {
  function createProfileModule({
    element = document.getElementById('my-profile'),
    likes = 0,
    pubSub = new PubSub({ sync: true })
  }) {
    return new ProfileModule({ element, likes, pubSub });
  }

  it('should publish a topic when a new "like" is given', () => {
    const pubSub = jasmine.createSpyObj('pubSub', ['notify']);
    const profileModule = createProfileModule({ pubSub });

    profileModule.incLikes();

    expect(pubSub.notify).toHaveBeenCalledWith('likes:inc');
  });

  it('should retrieve the correct number of likes', () => {
    const profileModule = createProfileModule({ likes: 40 });

    profileModule.incLikes();
    profileModule.incLikes();

    expect(profileModule.getLikes()).toBe(42);
  });
});
在处理与DOM相关的事务时,工厂函数尤其有用:
// 修改前
describe('The search component', () => {
  describe('when the search button is clicked', () => {
    let container;
    let form;
    let searchInput;
    let submitInput;

    beforeEach(() => {
      fixtures.inject(`<div id="container">
        <form class="js-form" action="/search">
          <input type="search">
          <input type="submit" value="Search">
        </form>
      </div>`);

      container = document.getElementById('container');
      form = container.getElementsByClassName('js-form')[0];
      searchInput = form.querySelector('input[type=search]');
      submitInput = form.querySelector('input[type=submith]');
    });

    it('should validate the text entered', () => {
      const search = new Search({ container });
      spyOn(search, 'validate');

      search.init();

      input(searchInput, 'peace');
      click(submitInput);

      expect(search.validate).toHaveBeenCalledWith('peace');
    });

    // ...
  });
});

// 修改后
function createHTMLFixture() {
  fixtures.inject(`<div id="container">
    <form class="js-form" action="/search">
      <input type="search">
      <input type="submit" value="Search">
    </form>
  </div>`);

  const container = document.getElementById('container');
  const form = container.getElementsByClassName('js-form')[0];
  const searchInput = form.querySelector('input[type=search]');
  const submitInput = form.querySelector('input[type=submith]');

  return {
    container,
    form,
    searchInput,
    submitInput
  };
}

describe('The search component', () => {
  describe('when the search button is clicked', () => {
    it('should validate the text entered', () => {
      const { container, form, searchInput, submitInput } = createHTMLFixture();
      const search = new Search({ container });
      spyOn(search, 'validate');

      search.init();

      input(searchInput, 'peace');
      click(submitInput);

      expect(search.validate).toHaveBeenCalledWith('peace');
    });

    // ...
  });
});
熟悉你的测试框架API
你应该十分熟悉测试框架/库的API文档。
熟悉API能够减少测试代码的大小/复杂度,并且能在开发过程中为你提供帮助。
// 修改前
it('should call a method with the proper arguments', () => {
  const foo = {
    bar: jasmine.createSpy(),
    baz: jasmine.createSpy()
  };

  foo.bar('qux');

  expect(foo.bar).toHaveBeenCalled();
  expect(foo.bar.calls.argsFor(0)).toEqual(['qux']);
});

/*it('should do more but not now', () => {
});

it('should do much more but not now', () => {
});*/


// 修改后
//fit 函数允许你只执行一个测试,而不必注释掉下面所有的测试。这可以帮助你在开发时节省大量的时间。
fit('should call once a method with the proper arguments', () => {
  const foo = jasmine.createSpyObj('foo', ['bar', 'baz']);

  foo.bar('baz');

  expect(foo.bar).toHaveBeenCalledWith('baz');
});

it('should do something else but not now', () => {
});

it('should do something else but not now', () => {
});
不要在同一测试中测试多个关注点
如果一个方法中有多个期望结果,那么应该分别测试每个结果。这样当bug出现时,便能更快地定位到问题的源头。
// 修改前
it('should send the profile data to the server and update the profile view properly', () => {
  // expect(...)to(...);
  // expect(...)to(...);
});

// 修改后
it('should send the profile data to the server', () => {
  // expect(...)to(...);
});

it('should update the profile view properly', () => {
  // expect(...)to(...);
});
当你的测试命名中含有 “and” 或 “or” 时,就意味着产生了代码的坏味道。
要覆盖一般情况与边缘情况
“奇怪的行为”总是在边缘情况下发生 …… 要记住你的测试应该作为代码的实时文档。
// 修改前
it('should properly calculate a RPN expression', () => {
  const result = RPN('5 1 2 + 4 * - 10 /');
  expect(result).toBe(-0.7);
});

// 修改后
describe('The RPN expression evaluator', () => {
  it('should return null when the expression is an empty string', () => {
    const result = RPN('');
    expect(result).toBeNull();
  });

  it('should return the same value when the expression holds a single value', () => {
    const result = RPN('42');
    expect(result).toBe(42);
  });

  it('should properly calculate an expression', () => {
    const result = RPN('5 1 2 + 4 * - 10 /');
    expect(result).toBe(-0.7);
  });

  it('should throw an error whenever an invalid expression is passed', () => {
    const compute = () => RPN('1 + - 1');
    expect(compute).toThrow();
  });
});
在应用 TDD 时, 总是从编写最简单的失败测试开始
// 修改前
it('should suppress all chars that appear multiple times', () => {
  expect(keepUniqueChars('Hello Fostonic !!')).toBe('HeFstnic');
});

// 修改后
it('should return an empty string when passed an empty string', () => {
  expect(keepUniqueChars('')).toBe('');
});
在应用 TDD 时, 总是在每个测试优先周期中小步前进
构建你的测试套件,从简单到复杂。请记住增量设计,快速、增量、短迭代地交付软件。
// 修改前
it('should return null when the expression is an empty string', () => {
  const result = RPN('');
  expect(result).toBeNull();
});

it('should properly calculate a RPN expression', () => {
  const result = RPN('5 1 2 + 4 * - 10 /');
  expect(result).toBe(-0.7);
});

// 修改后
describe('The RPN expression evaluator', () => {
  it('should return null when the expression is an empty string', () => {
    const result = RPN('');
    expect(result).toBeNull();
  });

  it('should return the same value when the expression holds a single value', () => {
    const result = RPN('42');
    expect(result).toBe(42);
  });

  describe('Additions-only expressions', () => {
    it('should properly calculate a simple addition', () => {
      const result = RPN('41 1 +');
      expect(result).toBe(42);
    });

    it('should properly calculate a complex addition', () => {
      const result = RPN('2 9 + 15 3 + + 7 6 + +');
      expect(result).toBe(42);
    });
  });

  // ...

  describe('Complex expressions', () => {
    it('should properly calculate an expression containing all 4 operators', () => {
      const result = RPN('5 1 2 + 4 * - 10 /');
      expect(result).toBe(-0.7);
    });
  });
});
测试行为,而不是内部实现
// 修改前
it('should add a user in memory', () => {
  userManager.addUser('Dr. Falker', 'Joshua');

  expect(userManager._users[0].name).toBe('Dr. Falker');
  expect(userManager._users[0].password).toBe('Joshua');
});

// 更好的方式是在相同级别的 API 上进行测试。

// 修改后
it('should add a user in memory', () => {
  userManager.addUser('Dr. Falker', 'Joshua');

  expect(userManager.loginUser('Dr. Falker', 'Joshua')).toBe(true);
});
优点:改变内部类/对象的实现不一定会强制你去重构相关的测试代码
缺点:如果某个测试失败,我们就得通过调试来定位哪段代码需要被修复
在这里我们需要找到一个平衡点,但单元测试中的关键部分是有益的。
不要mock所有数据
describe('when the user has already visited the page', () => {
  // storage.getItem('page-visited', '1') === '1'
  describe('when the survey is not disabled', () => {
    // storage.getItem('survey-disabled') === null
    it('should display the survey', () => {
      const storage = jasmine.createSpyObj('storage', ['setItem', 'getItem']);
      storage.getItem.and.returnValue('1'); // ouch.

      const surveyManager = new SurveyManager(storage);
      spyOn(surveyManager, 'display');

      surveyManager.start();

      expect(surveyManager.display).toHaveBeenCalled();
    });
  });

  // ...
});
上面的测试其实是失败的,因为 survey 一定是 disabled 。让我们来修复这个问题:
describe('when the user has already visited the page', () => {
  // storage.getItem('page-visited', '1') === '1'
  describe('when the survey is not disabled', () => {
    // storage.getItem('survey-disabled') === null
    it('should display the survey', () => {
      const storage = jasmine.createSpyObj('storage', ['setItem', 'getItem']);
      storage.getItem.and.callFake(key => {
        switch (key) {
          case 'page-visited':
            return '1';

          case 'survey-disabled':
            return null;
        }

        return null;
      }); // ouch.

      const surveyManager = new SurveyManager(storage);
      spyOn(surveyManager, 'display');

      surveyManager.start();

      expect(surveyManager.display).toHaveBeenCalled();
    });
  });

  // ...
});
现在这个测试能够正常工作 …… 但这需要不少的代码。让我们来尝试更简单的方法:
describe('when the user has already visited the page', () => {
  // storage.getItem('page-visited', '1') === '1'
  describe('when the survey is not disabled', () => {
    // storage.getItem('survey-disabled') === null
    it('should display the survey', () => {
      const storage = window.localStorage; // ouch.
      storage.setItem('page-visited', '1');

      const surveyManager = new SurveyManager();
      spyOn(surveyManager, 'display');

      surveyManager.start();

      expect(surveyManager.display).toHaveBeenCalled();
    });
  });

  // ...
});
我们创建了一个永久性的数据存储。如果我们没有正确地将其清除,可能就会影响到其他的测试。让我们来修复这个问题:
describe('when the user has already visited the page', () => {
  // storage.getItem('page-visited', '1') === '1'
  describe('when the survey is not disabled', () => {
    // storage.getItem('survey-disabled') === null
    it('should display the survey', () => {
      const storage = new MemoryStorage(); // see https://github.com/tatsuyaoiw/webstorage
      storage.setItem('page-visited', '1');

      const surveyManager = new SurveyManager(storage);
      spyOn(surveyManager, 'display');

      surveyManager.start();

      expect(surveyManager.display).toHaveBeenCalled();
    });
  });
});
//MemoryStorage 并不会持久化数据,因此也不会产生副作用。
需要记住的是依赖关系仍可以是“真实”的对象。不要 mock 所有的数据。特别地,在下面的场景中我们应该使用“真实”的对象:
- 在测试中能够简单、轻松地初始化
- 不会在多个测试之间创建共享状态,从而导致意外的副作用
- 被测试的代码不会执行 AJAX 请求、第三方 API 调用或者浏览器页面刷新操作
-
为每个bug创建新的测试
每当发现一个 bug ,我们就应该在修改任何代码之前创建新的测试来重现问题,然后再采用 TDD 来修复问题。
不要为复杂的用户交互编写单元测试
复杂用户操作示例:
填写表单,拖拽某个元素然后再提交表单
- 点击选项卡,点击图像缩略图然后再浏览之前从数据库中加载的图像库
- ( …… )
这些交互可能会涉及大量的工作单元,在这种情况下我们应该采用更高级的功能测试。它们可能会花费更多的时间来完成。它们可能是片状的,并且在报告失败时需要进行调试。
对于功能测试,考虑使用自动化测试框架 ( Selenium ) 或者进行手动的 QA 测试。
测试简单的用户操作
简单的用户操作实例:
- 通过点击链接来切换 DOM 元素的可见性
- 提交表单进而触发相关的表单验证
- ( …… )
我们可以通过模拟 DOM 事件轻松地测试这些操作,例如:
describe('clicking on the "Preview profile" link', () => {
  it('should show the profile preview if it is hidden', () => {
    const previewLink = document.createElement('a');
    const profileModule = createProfileModule({ previewLink, previewIsVisible: false });

    spyOn(profileModule, 'showPreview');

    click(previewLink);

    expect(profileModule.showPreview).toHaveBeenCalled();
  });

  it('should hide the profile preview if it is displayed', () => {
    const previewLink = document.createElement('a');
    const profileModule = createProfileModule({ previewLink, previewIsVisible: true });

    spyOn(profileModule, 'hidePreview');

    click(previewLink);

    expect(profileModule.hidePreview).toHaveBeenCalled();
  });
});
可以看到上面的测试是多么的简单,这是因为 UI ( DOM ) 层并没有与逻辑层耦合:
- “点击”事件被触发
- 公共方法被调用
下一步就应该测试 “showPreview()” 或 “hidePreview()” 方法中实现的业务逻辑。
首先审查测试代码
总是以审查测试代码为先。测试是能够让你深入研究代码的迷你示例。
它可以帮助你快速了解开发者的意图(通过查看测试名称就可以实现)。
在编码中实践, 通过结对编程学习
经验就是老师。毕竟,实践出真知。反复地应用理论,并通过反馈得到更好的结果。
框架
Mocha
Mocha 是一个灵活的测试框架,但它只是一个结构,你需要引入其他插件来实现一些测试功能,比如断言库、覆盖统计等。
Mocha安装
npm i mocha --save-dev
脚本语法
简要示例:
// 引入需测试的模块或类
const add = require("./add");
const assert = require("assert");

// describe:定义一组测试
describe("加法函数测试", function() {
    before(function() {
        // runs before all tests in this block
    });

    // it: 定义一个测试用例
    it("1 加 1 应该等于 2", function() {
        // assert: nodejs内置断言模块
        assert.equal(add(1, 1), 2);
    });

    after(function() {
        // runs after all test in this block
    });
});
使用方法
为测试脚本创建目录test-mocha,测试脚本命名应遵循[模块名].test.js的风格,然后在package.json中配置测试命令:
"scripts": {
    "test-mocha": "mocha test-mocha/"
}
执行npm run test-mocha即可,将输出测试结果如下图: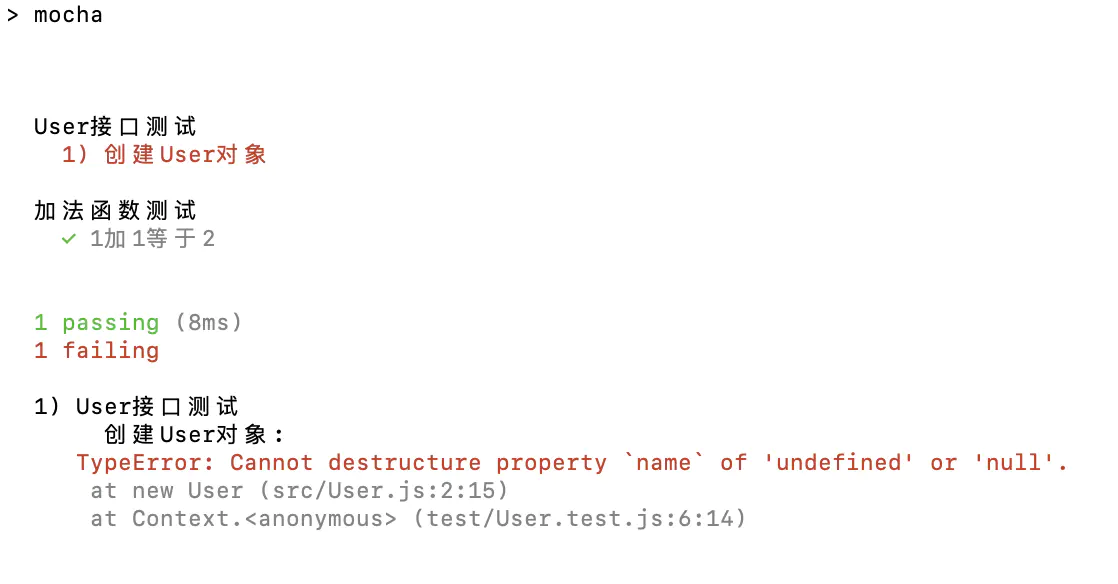
断言库
Mocha 支持should.js, chai, expect.js, better-assert, unexpected等断言库。以上一个示例,可以对比一下各个断言库的差别:
assert
assert.ok(add(1, 1));
assert.equal(add(1, 1), 2);
should.js
(add(1, 1)).should.be.a.Number();
(add(1, 1)).should.equal(2);
expect.js
expect(add(1, 1)).to.be.a("number"); expect(add(1, 1)).to.equal(2);chai:支持should, expect, assert三种语法
综上,should.js和expect.js相较于assert语义性更强,且支持类型检测,而should.js在语法上更加简明,同时支持链式语法.and。
Hooks
Mocha 支持4种 hook,包括before / after / beforeEach / afterEach。
异步测试
Mocha 默认每个测试用例执行2000ms,超出时长则报错,所以在测试代码中如果有异步操作,则需要通过done函数来明确测试用例结束。done接受Error参数。
BOM/DOM
Mocha 在node环境下运行时,不支持 BOM 和 DOM 接口,需要引入jsdom和jsdom-global库。
Jasmine
Jasmine 是一个功能全面的测试框架,内置断言expect;但是有全局声明,且需要配置,相对来说使用更复杂、不够灵活。
Jasmine安装
npm install jasmine --save-dev
脚本语法
const add = require("../src/add");
describe("加法函数测试", function () {
    it("1加1等于2", function() {
        expect(add(1, 1)).toEqual(2);
    });
    it("输出数字", function() {
        expect(add(1, 1)).toEqual(jasmine.any(Number));
    });
});
Jasmine 的语法与 Mocha 非常相似,不过断言采用内置的expect()。
使用方法
新建配置文件jasmine.json:
{
    // 测试脚本相对路径
    "spec_dir": "test-jasmine",
    // 测试脚本
    "spec_files": [
        "*.test.js"
        "!*.notest.js"
    ],
    // 测试前需要引入的脚本
    "helpers": [],
    // 是否在遇到第一个报错后停止测试
    "stopSpecOnExpectationFailure": false,
    // 是否以半随机顺序执行测试
    "random": false
}
创建测试脚本目录test-jasmine,脚本文件命名为[模块名].test.js,在package.json中配置测试命令:
"scripts": {
    "test-jasmine": "jasmine --config=jasmine.json"
}
然后执行npm run test-jasmine即可,将输出测试结果如下图: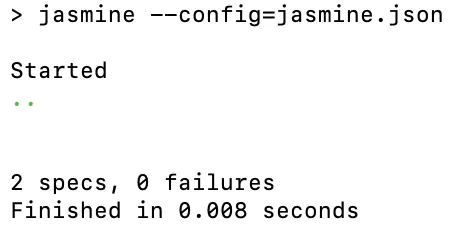
hook 和异步
Jest
Jest 是一个功能全面的“零配置”测试框架,既集成了各种工具,且无需配置即可使用。
Jest安装
npm install --save-dev jest
脚本语法
Jest 语法与以上两个框架不太相同:
const add = require("../src/add");
describe("加法函数测试", () => {
    test("1加1等于2", () => {
        expect(add(1, 1)).toBe(2);
    });
});
Jest 中以test定义一个测试用例,且自带断言expect,断言库功能强大,但语法相较于should.js来说更复杂。
断言语法:
- 普通匹配:
toBe,not.toBe - 空匹配:
toBeNull,toBeUndefined,toBeDefine,toBeTruthy,toBeFalsy - 数字大小:
toBeGreaterThan,toBeGreaterThanOrEqual,toBeLessThan,toEqual,toBeCloseTo(用于浮点数) - 正则匹配:
toMatch - 数组查询:
toContain - 构造匹配:
toEqual(expect.any(constructor))使用方法
创建测试脚本目录test-jest,脚本文件命名为[模块名].test.js,在package.json中配置测试命令:
然后执行"scripts": { "test-jest": "jest test-jest/" }npm run test-jest即可,将输出测试结果如下图: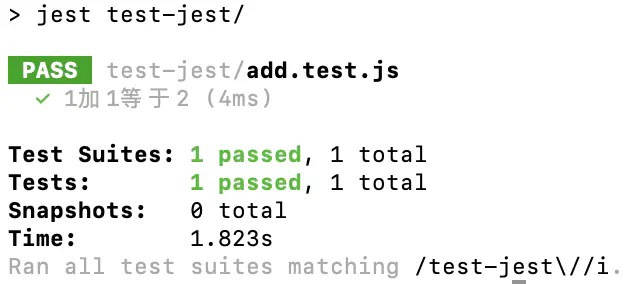
hook
Jest 同样有四个hook,beforeAll/beforeEach/afterAll/afterEach。BOM/DOM
Jest 内置对 DOM 和 BOM 接口的支持。覆盖统计
Jest 内置覆盖统计,为了更方便地进行相关配置,我们可以创建一个配置文件jest.config.js:
然后将module.exports = { // 开启覆盖统计功能 collectCoverage: true, // 指定需要覆盖的文件 collectCoverageFrom: [ "src/*.js" ], // 指定输出覆盖统计结果的目录 coverageDirectory: "test-jest/coverage/", // 指定测试脚本 testMatch: [ "**/test-jest/*.test.js" ] };package.json中的命名修改一下:"test-jest": "jest",再运行后可得如下结果: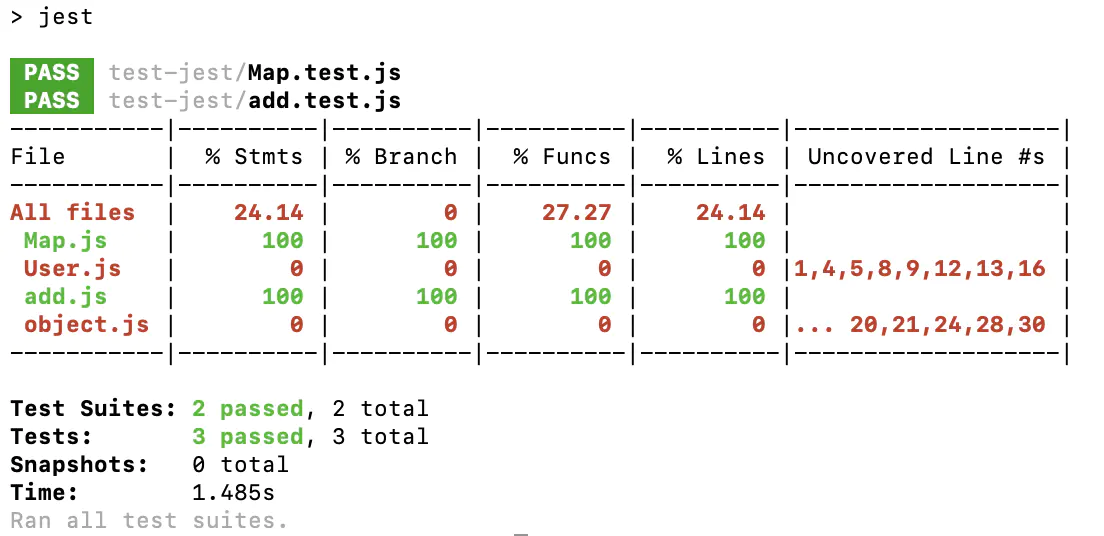

若有收获,就点个赞吧
0 人点赞
