前言
时光匆匆,转眼清明已过。但是杭州还是有一丝丝寒冷,风力没有春天的味道。年前积压的一些需求已经全部完成上线,这星期学了点东西,同通过文章的形式记录一下,防止以后自己忘记。
正文开始
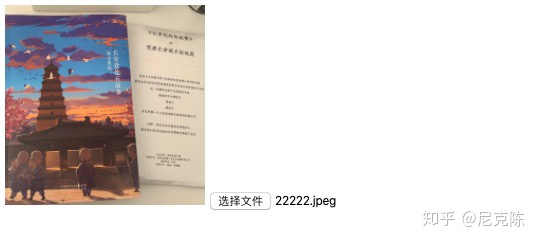
事情是这样的,产品经理来问我,为什么图片上传之后,变成横向的了。如下图所示:
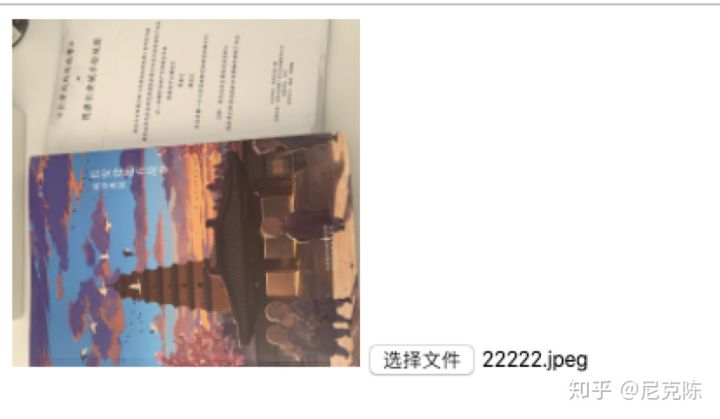
根据情景分析,这张图片是由手机拍摄的,并且上传到网站上的时候,默认就是逆时针旋转了 90 度。现在需要解决的问题是将其顺时针旋转 90 度,变成正常显示。
主角登场
本篇文章的主角便是——EXIF。简单的说,它是读取图片元数据的一个工具包,Exif.js 提供了 JavaScript 读取图像的原始数据的功能扩展,例如:拍照方向、相机设备型号、拍摄时间、ISO 感光度、GPS 地理位置等数据。
使用方法
1、通过 npm 安装。 2、通过静态资源 CDN 的形式,标签引入。
下面介绍的例子就是通过标签引入的方式:
<!DOCTYPE html><html lang="en"><head><meta charset="UTF-8"><meta name="viewport" content="width=device-width, initial-scale=1.0"><link rel="stylesheet/less" type="text/css" href="./styles.less" /><title>EXIF</title></head><body><div class="box"><img width="200px" id="img" src="" alt="图片" /><input id="input" type="file" onchange="upLoad()" /></div><script>function upLoad() {var fileInput = document.getElementById('input')var file = fileInput.files[0] // 获取上传图片的信息console.log('file', file)EXIF.getData(file, function() {let exifTags = EXIF.getAllTags(this); // 获取上传图片的元数据console.log('exifTags', exifTags)let reader = new FileReader();reader.readAsDataURL(file);reader.onload = e => {let imgData = e.target.result;// 8 表示 顺时针转了90; 3 表示 转了 180; 6 表示 逆时针转了90if (exifTags.Orientation == 8 ||exifTags.Orientation == 3 ||exifTags.Orientation == 6) {const img = new Image();img.src = imgData;img.onload = function () {let cvs = document.createElement('canvas');let ctx = cvs.getContext('2d');//如果旋转90if (exifTags.Orientation == 8 ||exifTags.Orientation == 6) {cvs.width = img.height;cvs.height = img.width;} else {cvs.width = img.width;cvs.height = img.height;}if (exifTags.Orientation == 6) {//原图逆时针转了90, 所以要顺时针旋转90ctx.rotate(Math.PI / 180 * 90);ctx.drawImage(img,0,0,img.width,img.height,0,-img.height,img.width,img.height);}if (exifTags.Orientation == 3) {//原图逆时针转了180, 所以顺时针旋转180ctx.rotate(Math.PI / 180 * 180);ctx.drawImage(img,0,0,img.width,img.height,-img.width,-img.height,img.width,img.height);}if (exifTags.Orientation == 8) {//原图顺时针旋转了90, 所以要你时针旋转90ctx.rotate(Math.PI / 180 * -90);ctx.drawImage(img,0,0,img.width,img.height,-img.width,0,img.width,img.height);}const url = cvs.toDataURL('image/png')let imgNode = document.getElementById('img')imgNode.setAttribute('src', url)}} else {let imgNode = document.getElementById('img')imgNode.setAttribute('src', imgData)}}})}</script><script src="https://cdn.bootcss.com/exif-js/2.3.0/exif.min.js"></script></body></html>
上述代码获取到图片的数据之后,关键是 Orientation 参数,它表示拍摄方向。通过返回的数字判断这张图片旋转的方向,然后通过 canvas 画布再重新绘制一张图片,最后输出到 DOM 节点。
总结
exif 还有很多值得研究的地方,本篇文章只是需要针对旋转方向去做重绘,顾之研究了片面,需要对图像做深度研究的同学,可以深究。

若有收获,就点个赞吧
0 人点赞
