相关资料
- vue-cli脚手架: https://cli.vuejs.org/zh/
- vue官网: https://cn.vuejs.org/v2/guide/index.html
(一) 创建和配置项目
(1) 安装vue-cli脚手架
npm install -g @vue/cli
(2) 查看vue脚手架版本
vue --version
(3) 创建一个新项目
vue create hello-world // 1.创建项目
cd hello-world // 2.进入项目文件夹npm run serve // 3.运行项目
若出现一下问题: 安装10.0版本的nodejs可以解决问题
nodejs下载地址: https://npm.taobao.org/mirrors/node
(4) hello-world项目目录结构
- 单页应用single-page application,简称 SPA, hello-world项目中在public文件夹有一个index.html也是项目中唯一一个html文件
- src文件夹: 源码文件夹, 我们将在这个文件去编写代码
- .gitignore: 记录哪些文件不提交
babel.config.js: babel是用来将es6转成js5的工具, 这个文件是这个工具的配置
(5) vue组件
父组件 ```javascript

2. 子组件```javascript<template><div class="footer"><span>{{tab}}</span><span>影院</span><span>我的</span></div></template><script>export default {data() {return {tab: '首页'}},created() {console.log('footer组件')}}</script><style>.footer{position: fixed;bottom: 0;height: 50px;width: 100%;display: flex;justify-content: space-around;}</style>
(6) 禁用eslint
// 根目录新增vue.config.jsmodule.exports = {lintOnSave: false}
(7) devtool
vue开发调试工具
- 下载 http://soft.huruqing.cn
-
(8) 查看webpack配置
(二) 添加less支持
npm install less less-loader@6.0.0 —save-dev
在vue文件这样写即可, scoped表示样式只在当前文件有效, 不会影响其他组件
<style lang="less" scoped>#app {a {margin-left: 15px;}}</style>

出现这个问题是因为less-loader版本太高, 执行这两步操作即可npm uninstall less-loader
-
(三) vue路由配置
(1)一个简单路由配置
npm i vue-router
- 在src内创建router文件夹, 新建index.js(代码如下)
- 在src创建views文件夹, 存放各个模块的组件, components文件夹存放的公共的组件
- 在main.js里, 把router挂载到vue的实例
- 配置路由出口, 详见下方第(2)点router-view
- 使用router-link进行跳转, 详见下方第(3)点路由跳转
// router/index.jsimport Vue from "vue";import Router from "vue-router";Vue.use(Router);export default new Router({routes: [{path: "/",redirect: "/index"},{path: "/cart",component: () => import("@/views/cart/index")},{path: "*",component: () => import("@/views/components/NotFound")},]})
// main.js 代码import Vue from 'vue'import App from './App.vue'import router from './router/index'Vue.config.productionTip = falsenew Vue({// 把router挂载到vue实例router,render: h => h(App),}).$mount('#app')
(2) router-view
- 路由出口
- 路由匹配到的组件将渲染在这里
在app.vue配置
<template><div id="app"><img alt="Vue logo" src="./assets/logo.png" /><!-- 路由出口 --><!-- 路由匹配到的组件将渲染在这里 --><router-view></router-view><!-- 在页面显示子组件 --><Footer></Footer></div></template><script>// 导入子组件import Footer from "@/components/Footer";export default {name: "App",// 注册组件components: {Footer}};</script><style>#app {text-align: center;margin-top: 60px;}</style>
(3) 路由跳转
```javascript // 方式一
cart
// 方式二 this.$router.push(‘/cart’);
<a name="cI4Wm"></a>### (4) 子路由配置使用子路由进行模块路由配置,结构比较分明<br />比如我们的网站有商品模块,有列表页面和详情页面, 路由如下<br />/product 商品模块总路由<br />/prodcut/list 子路由<br />/product/detail 子路由```javascript{path: '/product',component: () => import('@/views/product/index'),children: [{path: 'list',component: ()=>import('@/views/product/children/list')},{path: 'detail',component: ()=>import('@/views/product/children/detail')}]}
(5) active-class
active-class是vue-router模块的router-link组件中的属性,用来做选中样式的切换;
- 只要路由中包含to里面的路由, 就能匹配到, 就会高亮, 比如: /product, /product/list, /product/detail都会使下面的第二个router-link高亮
- exact 表示精确匹配, 只有路由完全一样才能被匹配
<router-link to="/" active-class="on" exact>首页</router-link><router-link to="/product" active-class="on">product</router-link><router-link to="/cart" active-class="on">cart</router-link><router-link to="/my" active-class="on">my</router-link><router-link to="/order" active-class="on">order</router-link>
(6) history模式
- vue-router 默认 hash 模式 —— 使用 URL 的 hash 来模拟一个完整的 URL,于是当 URL 改变时,页面不会重新加载。
- 如果不想要很丑的 hash,我们可以用路由的 history 模式,这种模式充分利用 history.pushState API 来完成 URL 跳转而无须重新加载页面
以前使用history需要后端支持, 现在不需要了
const router = new VueRouter({mode: 'history', // 默认hashroutes: [...]})
(7) 默认跳转(redirect重定向)
当访问 ‘/‘, 我们使用redirect使它默认跳到 ‘/product’
{path: '/',redirect: '/product'},
(8) 404配置
假如用户访问了一个没有的路由, 我们让它跳转到404页面
{path: '*',component:()=>import('@/components/NotFound')}
(四) vant有赞ui库
npm i vant -S 安装vant
导入所有组件(按需导入请看文档)
// 在main.js添加以下内容import Vue from 'vue';import Vant from 'vant';import 'vant/lib/index.css';Vue.use(Vant);
(五) 封装axios
封装axios让我们请求数据更happy
npm i axios -s
- 在src下新建utils文件夹
- 新建request.js文件 ```javascript import axios from ‘axios’; import { Dialog } from ‘vant’;
const get = (url, data) => { return new Promise((resolve, reject) => { axios.get(url,{params: data}).then(res=> { if(res.data.code == 666) { resolve(res.data); } else { Dialog({ message: res.data.msg }); } }).catch(err=>{ Dialog({ message:’网络请求失败, 请稍后再试’ }); }); }) }
const post = (url, data) => { return new Promise((resolve, reject) => { axios.post(url, data).then(res=> { if(res.data.code == 666) { resolve(res.data); } else { Dialog({ message: res.data.msg }); } }).catch(err=>{ Dialog({ message:’网络请求失败, 请稍后再试’ }); }); }) }
export default { get, post }
<a name="V8FY9"></a>## (六) 集中管理所有请求1. 在src下新建api文件夹1. 新建index.js```javascriptimport axios from '@/utils/request'let baseUrl = 'http://huruqing.cn:3000/api';// 电影模块export const fetchFilmList =(data={}) => axios.get(baseUrl+'/film/getList', data);export const fetchFilmDetail = (data={}) => axios.get(baseUrl+'/film/getDetail', data);// 影院模块export const fetchCinemalList =(data={}) => axios.get(baseUrl+'/film/getList', data);// 其他模块
(七) vue路由跳转和传参
(1) 路由跳转的两种方式
// 方式一<router-link to="xxxx"></router-link>// 方式二this.$router.push();
(2) 三种路由传参方式
传参
- 通过params传参
- 动态路由传参
- 通过query传参
获取参数
- this.$route.params
- this.$route.query
1.通过name+params传参
// 1.配置路由的时候添加name{path: '/product',name: 'product'component: ()=>import('@/views/product/index')},// 2.跳转this.$router.push({ name: 'product', params: { productId: '123' }})// 3.接收参数this.$route.params.productId
2.动态路由传参
// 1.路由配置{path: '/detail/:productId,name: 'detail',component: Detail}// 2.页面,参数接在路由后面<router-link to="/detail/19"></router-link>// 获取参数this.$route.params.productId(上面配置是id,这里就用id来接收参数)
3.通过path+query传参
// 带查询参数,query传参会把参数拼接到地址栏,变成 /register?plan=aaa, 使用了path,参数不能通过params传递this.$router.push({ path: '/register', query: { plan: 'aaa' }})// 获取参数this.$route.query.plan;
(八) 导入重置样式和公共样式
// main.jsimport Vue from 'vue'import App from './App.vue'import router from './router/index'import Vant from 'vant';import 'vant/lib/index.css';// 导入重置样式和公共样式import '@/assets/style/reset.less'import '@/assets/style/common.less'Vue.use(Vant);Vue.config.productionTip = falsenew Vue({router,render: h => h(App),}).$mount('#app')
(九) 模拟数据
- 文档地址: https://www.npmjs.com/package/json-server
- npm i json-server -g //全局安装
- 创建db.json
启动json-server
json-server --watch db.json
// db.json{"posts": [{ "id": 1, "title": "json-server", "author": "typicode" }],"comments": [{ "id": 1, "body": "some comment", "postId": 1 }],"profile": { "name": "typicode" }}
访问接口
http://localhost:3000/posts/1
将命令添加到package.json, 可以使用 npm run json 启动项目
"scripts": {"json": "json-server --watch db.json"},
(十) 父子组件通信
1.父传子
- 父组件给子组件绑定属性, 属性的值是需要传递的信息
- 子组件通过props接收父组件的信息
```javascript
// 父组件
父组件
// 子组件
子组件
来自父亲的话: {{msg1}}
来自父亲的话: {{msg2}}
Expected Number with value NaN, got String …. 预期得到的数字, 但是得到是字符串
<a name="wV3Gp"></a>#### 2. 子传父1. 父组件在子组件上绑定一个自定义事件(事件名称我们自己定义的, vue本身是没有这个事件的)1. 父组件给自定义事件绑定一个函数, 这个函数可以接受来自子组件的数据1. 子组件使用$emit触发(调用)该事件, 并把数据以参数形式传给父组件```javascript// 父组件<template><div class="father"><h3>父组件</h3><hr><!-- @getMsg是自定义事件,它绑定了一个叫getMsg的函数,当事件被触发,函数就会被调用 --><child @getMsg="getMsg"></child></div></template><script>import Child from './Child.vue';export default {components: {Child},methods: {// data是子组件传回来的信息getMsg(data) {console.log(data);}}};</script>// 子组件<template><div class="Falterh"><h4>子组件</h4><button @click="send">发信息</button></div></template><script>export default {methods: {// 给父组件发送信息send() {/*** 使用$emit触发父组件的自定义事件* @param getMsg-父组件自定义事件,* @param data-传递给父组件的数据*/let data = {msg1: '父亲大人安好',msg2: '老爸,我没有生活费了'}this.$emit('getMsg',data);}}};</script>// 综合例子练习: 定义父组件和子组件, 实现需求: 父=>子:儿子,好好努力; 子=>父:父亲,保重身体// 父组件<template><div><h3>父组件</h3><p>来自儿子的信息: {{info}}</p><hr><Son msg="儿子,好好努力" @getMsg="test"></Son></div></template><script>import Son from './Son'export default {data() {return {info: ''}},// 注册组件components: {Son,},methods: {test(data) {this.info = data;}}};</script>// 子组件<template><div><h4>子组件</h4><p>来自父亲的信息: {{msg}}</p><br><button @click="send">给父亲发消息</button></div></template><script>export default {props: ['msg'],methods: {send() {// 触发父组件绑定在子组件上的自定义事件let str = '父亲,保重身体';this.$emit('getMsg',str);}}};</script>
// 有赞的导航栏
// 父组件<Nav-Bartitle="标题"left-text="返回"right-text="按钮"@click-left="onClickLeft"@click-right="onClickRight"/>// 子组件<template><div class="nav-bar"><span class="blue" @click="click1">{{ leftText }}</span><span>{{ title }}</span><span class="blue" @click="click2">{{ rightText }}</span></div></template><script>export default {props: ["left-text", "title", "right-text"],methods: {// 点击左边click1() {this.$emit("click-left");},// 点击右边click2() {this.$emit("click-right");},},};</script><style>body{background: #ebebeb;margin: 0;}.blue{color: #1989fa;}.nav-bar {background: #fff;padding:0 10px;display: flex;justify-content: space-between;align-items: center;height: 50px;}</style>
(十一) slot插槽
一个内存插槽, 当内存插上之后,插槽就可以接收来自内存的信息, slot取名插槽含义也贴切, 在子组件配置插槽slot, 当父组件”插”信息进来的时候, 插槽slot就能接收到这个信息. slot插槽大大的扩展子组件的功能。

1. vant有赞ui库中slot的例子
<van-nav-bar title="标题" left-text="返回" left-arrow><p slot="right"><van-icon name="search" size="18" /></p></van-nav-bar>
2. 普通插槽
// 子组件Child.vue代码<template><div style="margin-top: 30px;background: gray;height: 200px;"><h5>这是子组件</h5><slot></slot></div></template>// 父组件father.vue代码<template><div><h3>这是父组件</h3><Child><button>提交</button></Child></div></template><script>import Child from '@/components/Child'export default {components: {Child}};</script>
3. 具名插槽
// father.vue代码<template><div><h3>这是父组件</h3><Child><header slot="header" style="background: yellow">这是头部</header><footer slot="footer" style="background: green;">这是底部</footer><div style="border:1px solid;"><button>a</button><button>b</button><button>c</button><button>d</button></div></Child></div></template><script>import Child from "@/components/Child";export default {components: {Child}};</script>接收父组件带 slot="footer" 的内容接收不带slot="xxx" 的内容// Child.vue代码<template><div style="margin-top: 30px;background: gray;height: 200px;"><h5>这是子组件</h5><!--接收父组件带 slot="header" 的内容--><slot name="header"></slot><!--接收父组件带 slot="footer" 的内容--><slot name="footer"></slot><!--接收剩余内容--><slot></slot></div></template>
(十二) 混入mixin
mixin 其实是一个对象,里面的结构大致跟普通组件的 script 里面的一样,有 data 属性,钩子函数和方法等 混入 (mixins) 是一种分发 Vue 组件中可复用功能的非常灵活的方式。混入对象可以包含任意组件选项。当组件使用混入对象时,所有混入对象的选项将被混入该组件本身的选项。
1.组件内混入
// mixin.jsexport default {data: function() {return {username: "huruqing",age: 100};},created() {console.log('这是混入对象')},methods: {say() {console.log('hahahhahahha');}}};// demo.vue<template><div><p>{{username}}</p><p>{{msg}}</p><p>{{age}}</p></div></template><script>import mixin from './mixin'export default {mixins:[mixin],data() {return {username: '张三',msg: 'hahahahahahha'}},created() {console.log('组件的created');this.say();}}</script>
2.全局混入
// mixin.jsexport default {methods: {showLoading() {this.$toast.loading({message: '加载中...',forbidClick: true,duration:0});},closeLoading() {this.$toast.clear();}}}// main.js,这个代码放在Vue.use(Vant)之后import mixin from './mixin/index';Vue.mixin(mixin);// 其他组件就可以直接使用下面代码来显示loadingthis.showLoading();
(十三) 跨组件通信vuex
相关资料
vuex 官网文档地址: https://vuex.vuejs.org/zh/
修改年龄接口: /changeAge.json?newAge=xxx
(1) vuex 是什么
Vuex 是一个专为 Vue.js 应用程序开发的状态管理模式。它采用集中式存储管理应用的所有组件的状态,并以相应的规则保证状态以一种可预测的方式发生变化。学习vuex掌握以下几点就差不多了.
- 普通对象: 创建对象, 定义对象属性, 读取属性, 修改属性
- vuex: 创建仓库, 定义状态, 读取状态, 修改状态(核心关键点)
- 响应式
- vuex的5个核心概念
- state 状态
- getters 获取
- mutations 修改状态
- actions 修改状态
- modules 模块
(2) 在项目中使用配置 vuex
- 创建仓库 ```javascript
- 安装vuex: npm i vuex -S
- /sotre/index.js 代码如下:
import Vuex from ‘vuex’; import Vue from ‘vue’; Vue.use(Vuex);
export default new Vuex.Store({ });
2. 挂载到根节点```javascriptimport Vue from 'vue'import App from './App.vue'import router from './router/index'import store from './store/index'Vue.config.productionTip = falsenew Vue({router,store,render: h => h(App),}).$mount('#app')
(3) 在项目中使用 vuex 进行跨组件通信
- 定义状态 ```javascript import Vuex from ‘vuex’; import Vue from ‘vue’; Vue.use(Vuex);
export default new Vuex.Store({ // 定义状态 state: { name: ‘王美丽’, age: 20 } });
2. **读取状态**- 使用mapState辅助函数来读取```javascript//写法1computed: mapState(['name','age','date'])// 写法2computed: {...mapState(['name','age','date'])}
- 直接读取
// this.$store.state.xxx;<template><div class="page"><p>新娘姓名: {{$store.state.name}}</p><p>新娘年龄: {{$store.state.age}}</p></div></template>
- 修改状态 mutation
- 定义mutation ```javascript // 定义mutation import Vuex from ‘vuex’; import Vue from ‘vue’; Vue.use(Vuex);
export default new Vuex.Store({ // 定义状态 state: { name: ‘王美丽’, age: 20, date: ‘2021-10-01’ }, // 定义mutation,用来修改状态 mutations: { /**
* 定义一个用来修改日期的mutation* @param {*} state 状态* @param {*} payload 传入来的数据*/updateDate(state,newDate) {state.date = newDate;}}
});
1. 提交mutation```javascript// this.$store.commit('updateDate', this.newDate);<template><div class="page"><header>张三组件</header><p><input type="text" v-model="newDate"><button @click="changeDate">修改结婚日期</button></p></div></template><script>export default {data() {return {newDate: ''}},methods: {changeDate() {// 提交mutationthis.$store.commit('updateDate',this.newDate);}}}</script>
注意:
- 修改状态必须通过mutation
- mutation必须是同步函数
(4) 异步改状态 action
- 定义mutation
- 定义action, 在action提交mutation
派发action
this.$store.dispatch('updateAgeAction', this.newAge);
使用action修改状态流程:
用户修改数据 => 派发action => action提交mutation => 修改状态 => 用户界面更新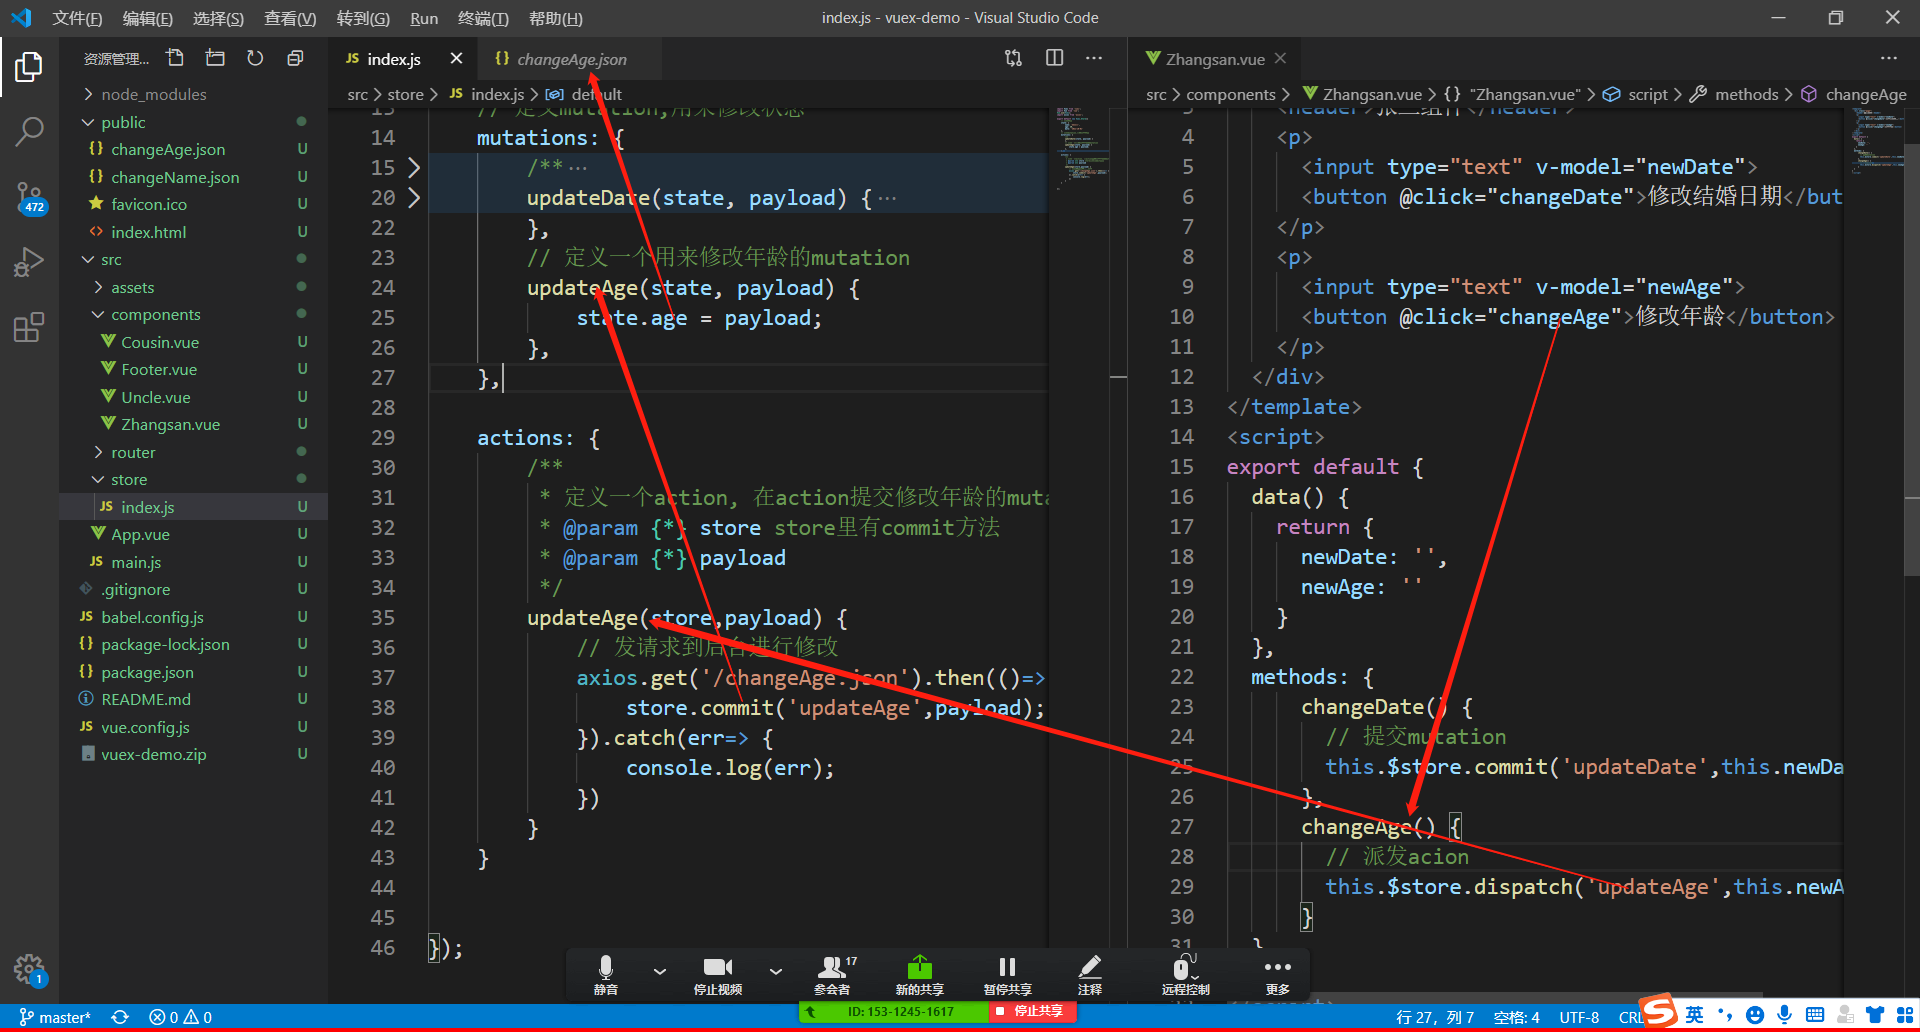
(5) 派生(扩展)状态 getters
定义getter (getter有的像计算属性computed)
// store/index.jsgetters: {// 根据身份证扩展出一个新的状态:生日birthday(state) {return state.cardId.replace(/\d{6}(\d{4})(\d{2})(\d{2}).*/,'$1年$2月$3日');}},
获取getter的值(用法跟state类似)
- 直接获取
this.$store.getters.xxx - 通过mapState进行获取
```javascript
// 直接获取
新娘生日: {{$store.getters.birthday}}
- 直接获取
// 使用mapGetter是获取
新娘生日: {{birthday}}
ps: getter非必须, 我们完全可以通过computed来定义一个新的属性(依赖仓库的state), 但如果很多个组件都要用到这个属性, 放在computed里来定义就显得冗余了, 最好定义一个getter来扩展新的状态(属性)<a name="594b0307"></a>### (6) 模块化 modules1. 导出模块, 模块的代码如下:```javascript// cart模块 /store/modules/cart.jsexport default {state: {cartNum: 0},getters: {},mutations: {},actions: {}}
在仓库中加入modules
// /store/index.jsimport cart from './modules/cart'export default new Vuex.Store({state: {},getters: {},mutations: {},actions: {},modules: {cart}})
获取模块中的状态
this.$store.state.cart.cartNum;
(7) vuex持久化
npm install vuex-persistedstate —save
- 在 /store/index.js中导入并挂载 ```javascript import createPersistedState from “vuex-persistedstate”
conststore =new Vuex.Store({ plugins: [createPersistedState()] }
<a name="MaRQ5"></a>#### (8) html5本地存储1. localStorage```javascript(1) 存数据 localStorage.setItem('name','王美丽');(2) 取数据 localStorage.getItem('name');(3) 清除数据 localStorage.clear();
- sessionStorage
(1) 存数据 sessionStorage.setItem('name','王美丽');(2) 取数据 sessionStorage.getItem('name');(3) 清除数据 sessionStorage.clear();
localStorage和sessionStorage的区别
为什么要有 session 的出现?
答:是由于网络中 http 协议造成的,因为 http 本身是无状态协议,这样,无法确定你的本次请求和上次请求是不是你发送的。如果要进行类似论坛登陆相关的操作,就实现不了了。
- session 生成方式?
答:浏览器第一次访问服务器,服务器会创建一个 session,然后同时为该 session 生成一个唯一的会话的 key,也就是 sessionid,然后,将 sessionid 及对应的 session 分别作为 key 和 value 保存到缓存中,也可以持久化到数据库中,然后服务器再把 sessionid,以 cookie 的形式发送给客户端。这样浏览器下次再访问时,会直接带着 cookie 中的 sessionid。然后服务器根据 sessionid 找到对应的 session 进行匹配; 还有一种是浏览器禁用了 cookie 或不支持 cookie,这种可以通过 URL 重写的方式发到服务器;
简单来讲,用户访问的时候说他自己是张三,他骗你怎么办? 那就在服务器端保存张三的信息,给他一个 id,让他下次用 id 访问。
(2) token
为什么会有 token 的出现?
- 答:首先,session 的存储是需要空间的,其次,session 的传递一般都是通过 cookie 来传递的,或者 url 重写的方式;而 token 在服务器是可以不需要存储用户的信息的,而 token 的传递方式也不限于 cookie 传递,当然,token 也是可以保存起来的;
- token 的生成方式?
答:浏览器第一次访问服务器,根据传过来的唯一标识 userId,服务端会通过一些算法,如常用的 HMAC-SHA256 算法,然后加一个密钥,生成一个 token,然后通过 BASE64 编码一下之后将这个 token 发送给客户端;客户端将 token 保存起来,下次请求时,带着 token,服务器收到请求后,然后会用相同的算法和密钥去验证 token,如果通过,执行业务操作,不通过,返回不通过信息;
(3) token 和 session 的区别?
token 和 session 其实都是为了身份验证,session 一般翻译为会话,而 token 更多的时候是翻译为令牌; session 服务器会保存一份,可能保存到缓存,文件,数据库;同样,session 和 token 都是有过期时间一说,都需要去管理过期时间; 其实 token 与 session 的问题是一种时间与空间的博弈问题,session 是空间换时间,而 token 是时间换空间。两者的选择要看具体情况而定。
- 方案 A :我发给你一张身份证,但只是一张写着身份证号码的纸片。你每次来办事,我去后台查一下你的 id 是不是有效。
- 方案 B :我发给你一张加密的身份证,以后你只要出示这张卡片,我就知道你一定是自己人。 就这么个差别。
(4) axios请求每次都带上token
axios.get(url,{headers:{'user-token':token}, params: data})

若有收获,就点个赞吧
0 人点赞
