一、动画过程分析
1、拆分动画
完整动画效果如下:
| 操作 | 现象 | 结论 |
|---|---|---|
| 放慢动画 | 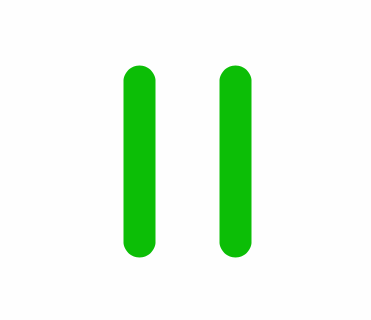 |
这个效果可以反复多看几次,观察一下这个动画是由那几部分组成的,然后再往下看 |
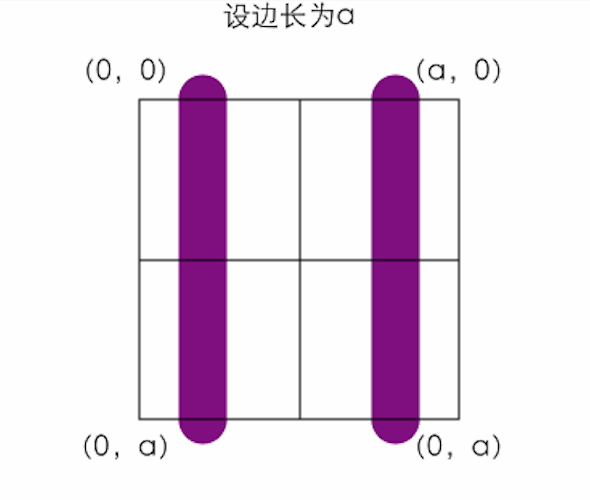
| 添加辅助颜色 |  |
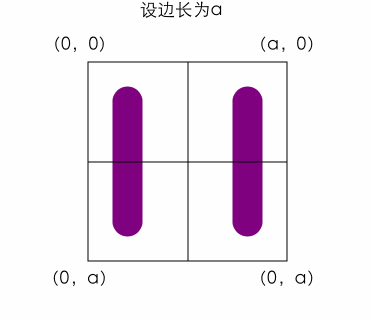
可以看出,整个动画有四部分组成:1、左侧竖线 2、右侧竖线 3、三角形 4、底部过渡圆弧 |
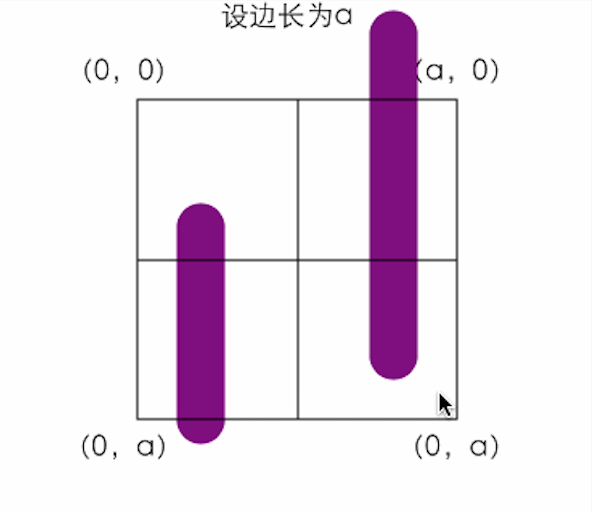
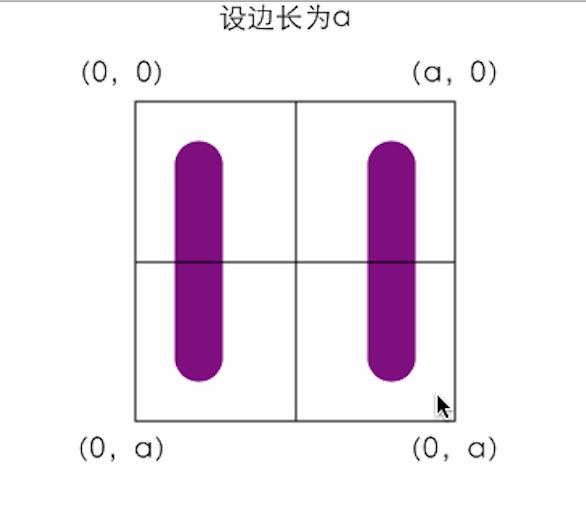
| 只保留竖线 | 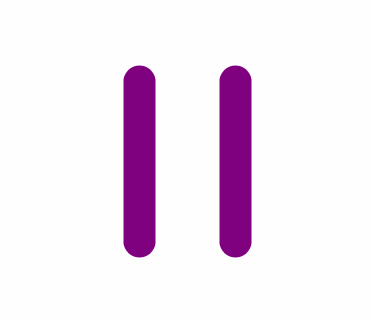 |
竖线的动画包括两部分,一部分是开始的“预备”动画和结束时的“惯性”动画;第二步分是在动画过程中和圆弧、三角的“衔接”动画 |
| 只保留三角动画 |  |
三角动画正向过程是从左侧竖线头部,顺时针绘制一个三角形;逆向过程就是这个动画的逆向 |
| 只保留弧线 |  |
弧线动画主要的作用就是在正向和逆向过程中桥接左右竖线 |
2、总结
动画是由两部分组成:
1、竖线在开始时的预备动画和结束时的惯性动画
2、竖线、三角形和弧线的衔接动画
二、动画开发
设:暂停—->播放的状态为正向,播放—->暂停为逆向。
创建一个坐标系,这里设整个容器的边长是a,坐标系的原点为容器的左上角。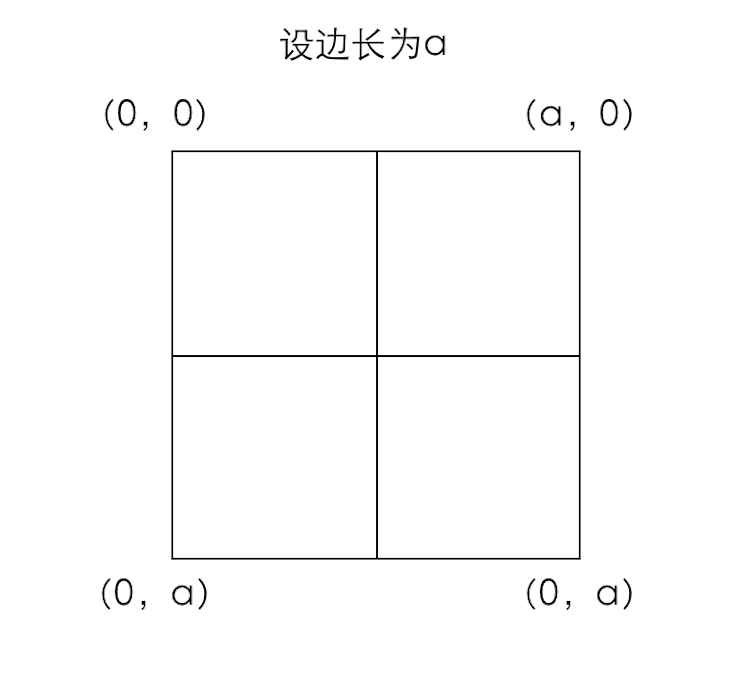
1、竖线的准备和惯性动画
为了更清晰的观察,预备动画和其他动画间做了1s的延时: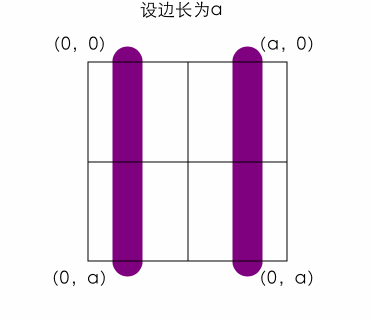
这个需要多看几遍。可以看出来:
左侧竖线是经历了两个过程:
第一个动画:底部不变,上部分变短;第二个动画:整体向上位移。
右侧竖线也有两个过程:
第一个动画:整体向上位移;第二个动画:底部不变,顶部缩短。
| 起始状态 | 第一个过程结束状态 | 第二个过程结束状态 |
|---|---|---|
 |
 |
 |
根据上图,设左侧竖线为L1,方向由上至下,右侧竖线为L2方向由下至上,通过贝塞尔曲线绘制竖线,需要确定竖线的起点和终点。
L1 起始位置起点为:(0.2a,0)终点为:(0.2a,a)
L1 第二个位置起点为:(0.2a,0.4a)终点为:(0.2a,a)
L1 第三个位置起点为:(0.2a,0.2a)终点为:(0.2a,0.8a)
L2 起始状态起点为:(0.8a,a)终点为:(0.8a,0)
L2 第二个位置起点为:(0.8a,0.8a)终点为:(0.8a,-0.2a)
L2 第三个位置起点为:(0.8a,0.8a)终点为:(0.8a,0.2a)
准备动画就是将竖线居中变短的过程,设竖线动画总时长为:positionDuration
代码如下:
// 暂停-》播放竖线动画- (void)linePositiveAnimation {CGFloat a = self.bounds.size.width;// 左侧缩放动画UIBezierPath *leftPath1 = [UIBezierPath bezierPath];[leftPath1 moveToPoint:CGPointMake(0.2*a,0.4*a)];[leftPath1 addLineToPoint:CGPointMake(0.2*a,a)];_leftLineLayer.path = leftPath1.CGPath;[_leftLineLayer addAnimation:[self pathAnimationWithDuration:positionDuration/2] forKey:nil];// 右侧竖线位移动画UIBezierPath *rightPath1 = [UIBezierPath bezierPath];[rightPath1 moveToPoint:CGPointMake(0.8*a, 0.8*a)];[rightPath1 addLineToPoint:CGPointMake(0.8*a,-0.2*a)];_rightLineLayer.path = rightPath1.CGPath;[_rightLineLayer addAnimation:[self pathAnimationWithDuration:positionDuration/2] forKey:nil];dispatch_after(dispatch_time(DISPATCH_TIME_NOW, positionDuration/2 * NSEC_PER_SEC), dispatch_get_main_queue(), ^(void){// 左侧位移动画UIBezierPath *leftPath2 = [UIBezierPath bezierPath];[leftPath2 moveToPoint:CGPointMake(a*0.2,a*0.2)];[leftPath2 addLineToPoint:CGPointMake(a*0.2,a*0.8)];_leftLineLayer.path = leftPath2.CGPath;[_leftLineLayer addAnimation:[self pathAnimationWithDuration:positionDuration/2] forKey:nil];// 右侧竖线缩放动画UIBezierPath *rightPath2 = [UIBezierPath bezierPath];[rightPath2 moveToPoint:CGPointMake(a*0.8,a*0.8)];[rightPath2 addLineToPoint:CGPointMake(a*0.8,a*0.2)];_rightLineLayer.path = rightPath2.CGPath;[_rightLineLayer addAnimation:[self pathAnimationWithDuration:positionDuration/2] forKey:nil];});}
而结束时的惯性动画,无非就是竖线由短边长的过程,和预备动画大同小异。
代码如下:
// 播放-》暂停竖线动画- (void)lineInverseAnimation {CGFloat a = self.bounds.size.width;// 左侧位移动画UIBezierPath *leftPath1 = [UIBezierPath bezierPath];[leftPath1 moveToPoint:CGPointMake(0.2*a,0.4*a)];[leftPath1 addLineToPoint:CGPointMake(0.2*a,a)];_leftLineLayer.path = leftPath1.CGPath;[_leftLineLayer addAnimation:[self pathAnimationWithDuration:positionDuration/2] forKey:nil];// 右侧竖线位移动画UIBezierPath *rightPath1 = [UIBezierPath bezierPath];[rightPath1 moveToPoint:CGPointMake(0.8*a, 0.8*a)];[rightPath1 addLineToPoint:CGPointMake(0.8*a,-0.2*a)];_rightLineLayer.path = rightPath1.CGPath;[_rightLineLayer addAnimation:[self pathAnimationWithDuration:positionDuration/2] forKey:nil];dispatch_after(dispatch_time(DISPATCH_TIME_NOW, positionDuration/2 * NSEC_PER_SEC), dispatch_get_main_queue(), ^(void){// 左侧竖线缩放动画UIBezierPath *leftPath2 = [UIBezierPath bezierPath];[leftPath2 moveToPoint:CGPointMake(a*0.2,0)];[leftPath2 addLineToPoint:CGPointMake(a*0.2,a)];_leftLineLayer.path = leftPath2.CGPath;[_leftLineLayer addAnimation:[self pathAnimationWithDuration:positionDuration/2] forKey:nil];// 右侧竖线缩放动画UIBezierPath *rightPath2 = [UIBezierPath bezierPath];[rightPath2 moveToPoint:CGPointMake(a*0.8,a)];[rightPath2 addLineToPoint:CGPointMake(a*0.8,0)];_rightLineLayer.path = rightPath2.CGPath;[_rightLineLayer addAnimation:[self pathAnimationWithDuration:positionDuration/2] forKey:nil];});}
2、衔接动画
2-1、 原理分析
为了方便观察,衔接动画时长再放慢一倍
分析:在衔接动画中,左侧竖线是连接着弧线和三角形的,右侧竖线连接着是底部的弧线。而且在整个过程中,只有三角形的动画时贯穿全程的,时长最长,所以设整个衔接动画总时长为animationDuration,也就是三角动画的时长。
正向动画过程:
1、三角形的动画时全程执行的,从开始一直到结束;
2、开始时同时变化的是右侧的竖线,缩短到起点;
3、弧线是连接右侧竖线和左侧竖线的桥梁,当右侧竖线长度缩短为零时,弧线运动到左侧竖线的底部;这时开始缩短弧线,至左侧竖线的底部;
4、左侧竖线在弧线缩短至其底部时也开始缩短,最终长度缩短为零,同时三角形绘制完成。
逆向过程:
仔细观察可知,逆向动画起始就是正向动画的逆过程。无论在绘制直线还是曲线的时候,都是利用CAShapeLayer+UIBezierPath来实现的,而合理的利用strokeEnd属性就可以实现正向和逆向动画的互相转换。
动画时长:
通过三角形的动画时长可以来确定其他部分的时长:
右侧竖线缩短时长:animationDuration/4
弧线缩放时长(两次):animationDuration/4
左侧竖线缩放时长:animationDuration/4
这样四次动画的时长加起来正好为三角动画的时长。
2-2、绘制三角形
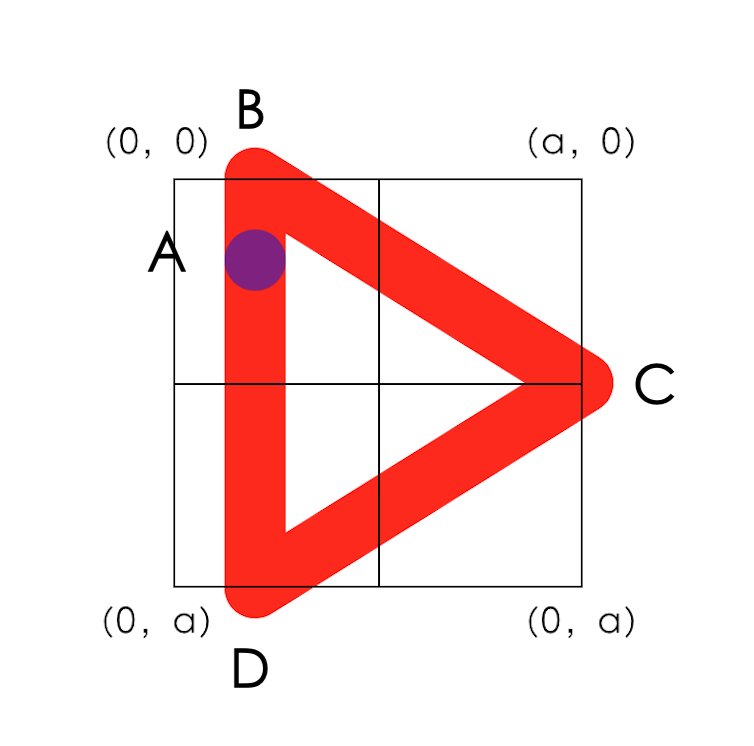
通过图可以看出来,三角形是顺时针拐了三次弯回到的原点。经过了 A->B->C->D->A 五个点完成首尾相接的三角形。
这几个点的坐标分别为:(0.2a,0.2a)、(0.2a,0)、(a,0.5a)、(0.2a,a)、(0.2a,0.2a)
绘制三角形代码如下:
- (void)addTriangleLayer {CGFloat a = self.bounds.size.width;UIBezierPath *path = [UIBezierPath bezierPath];[path moveToPoint:CGPointMake(a*0.2,a*0.2)];[path addLineToPoint:CGPointMake(a*0.2,0)];[path addLineToPoint:CGPointMake(a,a*0.5)];[path addLineToPoint:CGPointMake(a*0.2,a)];[path addLineToPoint:CGPointMake(a*0.2,a*0.2)];_triangleLayer = [CAShapeLayer layer];_triangleLayer.path = path.CGPath;_triangleLayer.fillColor = [UIColor clearColor].CGColor;_triangleLayer.strokeColor = [UIColor redColor].CGColor;_triangleLayer.lineWidth = [self lineWidth];_triangleLayer.lineCap = kCALineCapButt;_triangleLayer.lineJoin = kCALineJoinRound;_triangleLayer.strokeEnd = 0;[self.layer addSublayer:_triangleLayer];}
2-3、 绘制弧线
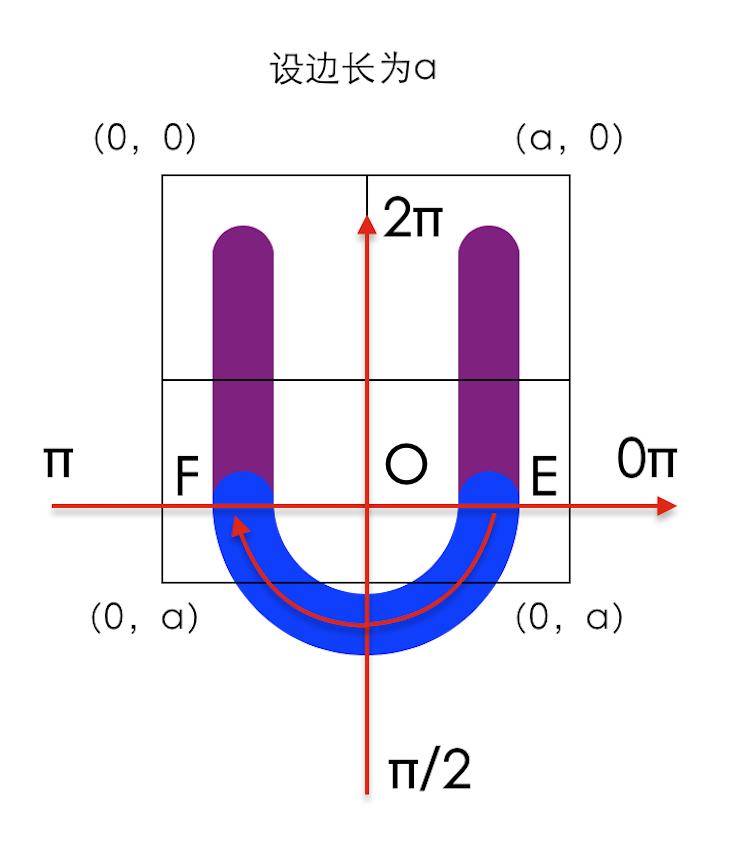
由图可知,弧线是从右侧竖线的底部,连接到左侧竖线的底部;即从E点绕圆心O顺时针到F点,角度为π。
代码如下:
- (void)addCircleLayer {CGFloat a = self.bounds.size.width;UIBezierPath *path = [UIBezierPath bezierPath];[path moveToPoint:CGPointMake(a*0.8,a*0.8)];[path addArcWithCenter:CGPointMake(a*0.5, a*0.8) radius:0.3*a startAngle:0 endAngle:M_PI clockwise:true];_circleLayer = [CAShapeLayer layer];_circleLayer.path = path.CGPath;_circleLayer.fillColor = [UIColor clearColor].CGColor;_circleLayer.strokeColor = [UIColor blueColor].CGColor;_circleLayer.lineWidth = [self lineWidth];_circleLayer.lineCap = kCALineCapRound;_circleLayer.lineJoin = kCALineJoinRound;_circleLayer.strokeEnd = 0;[self.layer addSublayer:_circleLayer];}
2-4、 执行动画
在这个过程中动画都是通过改变strokeEnd属性实现的动画,为了方便,写了一个通用的方法:
- (CABasicAnimation *)strokeEndAnimationFrom:(CGFloat)fromValue to:(CGFloat)toValue onLayer:(CALayer *)layer name:(NSString*)animationName duration:(CGFloat)duration delegate:(id)delegate {CABasicAnimation *strokeEndAnimation = [CABasicAnimation animationWithKeyPath:@"strokeEnd"];strokeEndAnimation.duration = duration;strokeEndAnimation.fromValue = @(fromValue);strokeEndAnimation.toValue = @(toValue);strokeEndAnimation.fillMode = kCAFillModeForwards;strokeEndAnimation.removedOnCompletion = NO;[strokeEndAnimation setValue:animationName forKey:@"animationName"];strokeEndAnimation.delegate = delegate;[layer addAnimation:strokeEndAnimation forKey:nil];return strokeEndAnimation;}
执行正向动画代码如下:
(弧线动画一部分是通过改变strokeStart属性实现的)
- (void)actionPositiveAnimation {//开始三角动画[self strokeEndAnimationFrom:0 to:1 onLayer:_triangleLayer name:TriangleAnimation duration:animationDuration delegate:self];//开始右侧线条动画[self strokeEndAnimationFrom:1 to:0 onLayer:_rightLineLayer name:RightLineAnimation duration:animationDuration/4 delegate:self];//开始画弧动画[self strokeEndAnimationFrom:0 to:1 onLayer:_circleLayer name:nil duration:animationDuration/4 delegate:nil];//开始逆向画弧动画dispatch_after(dispatch_time(DISPATCH_TIME_NOW, animationDuration*0.25 * NSEC_PER_SEC), dispatch_get_main_queue(), ^(void){[self circleStartAnimationFrom:0 to:1];});//开始左侧线条缩短动画dispatch_after(dispatch_time(DISPATCH_TIME_NOW, animationDuration*0.5 * NSEC_PER_SEC), dispatch_get_main_queue(), ^(void){[self strokeEndAnimationFrom:1 to:0 onLayer:_leftLineLayer name:nil duration:animationDuration/2 delegate:nil];});}
逆向动画就是正向的逆过程,也就是strokeEnd属性0到1和1到0的关系罢了,只是执行时间不太一样,就不贴代码了。
衔接动画最终效果如下:
延伸阅读:优酷播放按钮动画解析
Github:https://github.com/mengxianliang/XLPlayButton

若有收获,就点个赞吧
0 人点赞
