一、验证注解
1.1 Java已有注解
常用的一些验证注解:
@Null 被注释的元素必须为 null@NotNull 被注释的元素必须不为 null@AssertTrue 被注释的元素必须为 true@AssertFalse 被注释的元素必须为 false@Min(value) 被注释的元素必须是一个数字,其值必须大于等于指定的最小值@Max(value) 被注释的元素必须是一个数字,其值必须小于等于指定的最大值@DecimalMin(value) 被注释的元素必须是一个数字,其值必须大于等于指定的最小值@DecimalMax(value) 被注释的元素必须是一个数字,其值必须小于等于指定的最大值@Size(max, min) 被注释的元素的大小必须在指定的范围内@Digits (integer, fraction) 被注释的元素必须是一个数字,其值必须在可接受的范围内@Past 被注释的元素必须是一个过去的日期@Future 被注释的元素必须是一个将来的日期@Pattern(value) 被注释的元素必须符合指定的正则表达式
1.2 自定义验证注解
我们可以根据项目实际需求,自定义合适的验证注解来帮助我们对数据进行校验。实现自定义注解做验证需要借助Java官方提供的@Constraint注解,使用此注解来引入验证注解所需要的验证逻辑。
1.2.1 创建自定义注解
自定义注解的处理逻辑,可以指定一个,也可以指定多个,多个时使用逗号分隔。
/*** 自定义验证注解** @author maomaochong* @date 2021/11/19 10:56**/@Documented@Target({ElementType.FIELD, ElementType.PARAMETER})@Retention(RUNTIME)// 指定验证处理逻辑所在类,可以指定多个,用逗号分隔@Constraint(validatedBy = RequiredValidator.class)public @interface Required {int min() default 0;int max() default 0;// 提示消息String message() default "参数校验不通过,请重新输入";// 分组Class<?>[] groups() default {};Class<? extends Payload>[] payload() default {};}
1.2.2 创建验证处理逻辑
验证逻辑处理类可以直接使用内部类的形式定义在注解内部,也可以定义在外部。
此处理类需要实现接口ConstraintValidator<A extends Annotation, T>,它有两个泛型,第一个是自定义的注解类,第二个就是要验证的数据的类型(例如写了String类型的数据,那么这个注解就要放在String类型的字段上才会起作用,也可以直接写两个,自动识别String和Long, 最简便的写成Object,那么它可以接收任何数据类型的数据)。
而且在类里面需要实现接口的两个方法,initialize和isValid,第一个是初始化方法,第二个是验证的逻辑方法,返回true,则验证通过,否则则不通过。
参考:https://www.jianshu.com/p/4688c55e0d64
/*** 验证注解逻辑** @author maomaochong* @date 2021/11/19 11:06**/public class RequiredValidator implements ConstraintValidator<Required, Object> {private Integer min;private Integer max;/*** 初始化方法* @param constraintAnnotation*/@Overridepublic void initialize(Required constraintAnnotation) {this.min = constraintAnnotation.min();this.max = constraintAnnotation.max();}/*** 验证处理逻辑:* 返回true,则验证通过,否则则不通过** @param value* @param context* @return*/@Overridepublic boolean isValid(Object value, ConstraintValidatorContext context) {if (value == null) {return false;}if (value.toString().trim().length() < min || value.toString().trim().length() > max) {return false;}return true;}}
自定义注解逻辑处理类由于实现了ConstraintValidator接口,所以它默认被spring管理成bean,所以可以在这个逻辑处理类里面用@Autowiredu或者@Resources注入别的服务,而且不用在类上面用@Compent注解成spring的bean.<br />自定义验证类型注解类里面由于是用于验证数据,一般在里面加上:
String message() default "参数校验不通过,请重新输入";Class<?>[] groups() default {};Class<? extends Payload>[] payload() default {};
二、Bean生命周期
对于bean来说,其大致的生命周期如下:

2.1 注册bean时指定初始化和销毁方法
在Spring中,通过IOC容器来管理bean的生命周期,我们可以自定义初始化和销毁方法,容器在bean进行到当前生命周期的时候来调用我们自定义的初始化和销毁方法。
构造bean对象的时机:
- 单实例:在容器启动的时候创建对象
- 多实例:在每次获取的时候创建对象
我们可以在注册bean的时候,指定该bean对象的自定义初始化方法和销毁方法:
/*** @author maomaochong* @date 2022/06/07 22:48**/public class Car {public Car() {System.out.println("car constructor...");}public void init() {System.out.println("car...init...");}public void destroy() {System.out.println("car...destroy...");}}
/*** bean生命周期 配置类** @author maomaochong* @date 2022/06/07 22:51**/@Configurationpublic class MainConfigOfLifeCycle {@Bean(initMethod = "init", destroyMethod = "destroy")public Car car() {return new Car();}}
可以看到,在创建及关闭容器时,bean的初始化及销毁方法被调用,即:
- 初始化:在对象创建完成,并赋好值后调用初始化方法,
销毁:
- 单实例:在容器关闭时调用销毁方法
多实例:容器不负责bean的销毁,所以不会调用销毁方法
/*** 测试** @author maomaochong* @date 2022/06/07 22:54**/public class BeanLifeCycleTest {@Testpublic void test01() {// 创建ioc容器AnnotationConfigApplicationContext applicationContext = new AnnotationConfigApplicationContext(MainConfigOfLifeCycle.class);System.out.println("容器创建完成。。");// 关闭容器applicationContext.close();}}
car constructor...car...init...容器创建完成。。car...destroy...
2.2 通过让Bean实现指定接口
对于InitializingBean接口,其中只定义了一个afterPropertiesSet()方法,其是在BeanFactory设置所有属性后做出反应的 bean 实现的接口,相应的Bean可以实现此接口,重写其中方法,可以在方法内部执行整体配置和最终初始化的验证,可以在配置错误的情况下(例如未能设置基本属性)或由于任何其他原因初始化失败,抛出异常。
对于DisposableBean接口,其中只定义了一个destroy()方法,由想要在销毁时释放资源的 bean 实现的接口。 BeanFactory将在单独销毁作用域 bean 时调用 destroy 方法,在spring容器销毁前执行。我们可以让 bean 实现此接口并重启其方法,在方法内部做自定义的销毁操作。在关闭错误的情况下。 异常将被记录但不会重新抛出以允许其他 bean 也释放它们的资源。
通过让bean实现InitializingBean(定义初始化逻辑)及DisposableBean(定义销毁逻辑)接口,重写其方法,来实现初始化和销毁操作的指定。
/*** @author maomaochong* @date 2022/06/07 23:40**/@Componentpublic class Cat implements InitializingBean, DisposableBean {public Cat() {System.out.println("cat constructor..");}/*** 销毁方法* 销毁单例时由BeanFactory调用** @throws Exception 在出现终止错误时抛出* 异常将会被记录,但不会允许其他bean继续释放他们的资源*/@Overridepublic void destroy() throws Exception {System.out.println("cat destroy...");}/*** 初始化方法* 在设置了bean所有的属性之后由BeanFactory调用** @throws Exception 配置错误(如未能设置基本属性),或初始化失败时抛出异常*/@Overridepublic void afterPropertiesSet() throws Exception {System.out.println("cat afterPropertiesSet...");}}
/*** bean生命周期 配置类** @author maomaochong* @date 2022/06/07 22:51**/@ComponentScan("com.moomooyu")@Configurationpublic class MainConfigOfLifeCycle {@Bean(initMethod = "init", destroyMethod = "destroy")public Car car() {return new Car();}}
2.3 使用JSR250注解指定
@PostConstruct:在bean创建完成并且属性赋值完成后,来执行初始化@PreDestroy:在容器销毁bean之前通知我们进行清理工作
/*** @author maomaochong* @date 2022/06/09 23:45**/@Componentpublic class Dog {public Dog() {System.out.println("dog constructor...");}// 对象创建并赋值之后调用@PostConstructpublic void init() {System.out.println("Dog...@PostConstructor...");}// 容器移除对象之前@PreDestroypublic void destroy() {System.out.println("Dog...@PreDestroy....");}}
2.4 bean的后置处理器BeanPostProcessor
在bean的初始化前后做一些操作。
public interface BeanPostProcessor {// 对任意新bean实例,// 在其任何初始化回调之前执行// (如 InitializingBean 的afterPropertiesSet或自定义 init 方法)Object postProcessBeforeInitialization(Object bean, String beanName) throws BeansException;// 对任意新bean实例,// 在其任何初始化回调之后执行// (如 InitializingBean 的afterPropertiesSet或自定义 init 方法)Object postProcessAfterInitialization(Object bean, String beanName) throws BeansException;}
/*** @author maomaochong* @date 2022/06/07 23:40**/@Componentpublic class Cat implements InitializingBean, DisposableBean {public Cat() {System.out.println("cat constructor..");}/*** 销毁方法* 销毁单例时由BeanFactory调用** @throws Exception 在出现终止错误时抛出* 异常将会被记录,但不会允许其他bean继续释放他们的资源*/@Overridepublic void destroy() throws Exception {System.out.println("cat destroy...");}/*** 初始化方法* 在设置了bean所有的属性之后由BeanFactory调用** @throws Exception 配置错误(如未能设置基本属性),或初始化失败时抛出异常*/@Overridepublic void afterPropertiesSet() throws Exception {System.out.println("cat afterPropertiesSet...");}}
/*** @author maomaochong* @date 2022/06/09 23:45**/@Componentpublic class Dog {public Dog() {System.out.println("dog constructor...");}// 对象创建并赋值之后调用@PostConstructpublic void init() {System.out.println("Dog...@PostConstructor...");}// 容器移除对象之前@PreDestroypublic void destroy() {System.out.println("Dog...@PreDestroy....");}}
执行结果如下:
cat constructor..postProcessBeforeInitialization...com.moomooyu.bean.Cat@5824a83dcatcat afterPropertiesSet...postProcessAfterInitialization...com.moomooyu.bean.Cat@5824a83dcatdog constructor...postProcessBeforeInitialization...com.moomooyu.bean.Dog@4686afc2dogDog...@PostConstructor...postProcessAfterInitialization...com.moomooyu.bean.Dog@4686afc2dogDog...@PreDestroy....cat destroy...
可以看到:postProcessBeforeInitialization()方法在bean的构造方法执行后、其他初始化方法之前执行。postProcessAfterInitialization()方法在其他初始化方法完成之后执行。
Spring底层对BeanPostProcessor也有许多应用的地方,如bean的赋值,注入其他组件,@Autowired注解,生命周期注解功能等。
三、配置文件读取
3.1 配置文件提示及校验
3.1.1 依赖引入
<!--在 META-INF/additional-spring-configuration-metadata.json 中配置可以去除 application.yml 中自定义配置的红线警告,并且为自定义配置添加 hint 提醒--><dependency><groupId>org.springframework.boot</groupId><artifactId>spring-boot-configuration-processor</artifactId><optional>true</optional></dependency>
3.1.2 增加辅助配置文件
在resources目录下创建META-INF文件夹,然后在其中创建additional-spring-configuration-metadata.json文件,配置如下内容(示例),重新build项目,即可实现配置文件提示及校验功能:
{"properties": [{"name": "application.name","description": "Default value is artifactId in pom.xml.","type": "java.lang.String"},{"name": "application.version","description": "Default value is version in pom.xml.","type": "java.lang.String"}]}
四、组件注册
4.1 使用包扫描+组件标注注解
4.1.1 扫描指定包
可使用的组件标注注解有@Controller、@Service、@Repository、@Configuration等,通过使用包扫描注解@ComponentScan(value = "要扫描的包路径"),指定好要扫描的包路径,即可将扫描到的符合规则的bean注册到IOC容器中。
/*** 配置类* 等同于配置文件** @author maomaochong* @date 2022/06/05 20:15**/@Configuration // 指定配置类@ComponentScan(value = "com.moomooyu") // 包扫描,指定扫描的包public class MyConfigForComponentScan {}
4.1.2 扫描指定包,指定排除过滤规则
在@ComponentScan注解中,通过配置excludeFilters字段的值,来配置要排除掉的扫描规则。
可以配置多个过滤器Filter,其中:type指定过滤器类型,常用的有:
- `FilterType._ANNOTATION_`:过滤标注有指定注解的选项- `FilterType._ASSIGNABLE_TYPE_`_:过滤掉指定类型的选项_- `FilterType._CUSTOM_`:根据自定义的过滤器来过滤
classes指定对应类型的值。
1. 指定注解类型过滤
FilterType._ANNOTATION_
/*** 配置类* 等同于配置文件** @author maomaochong* @date 2022/06/05 20:15**/@Configuration // 指定配置类@ComponentScan(value = "com.moomooyu", // 包扫描,指定扫描的包// 排除过滤器:根据注解类型过滤掉指定的类型,不加入IOC容器中excludeFilters = {// 过滤器:@ComponentScan.Filter(type = FilterType.ANNOTATION, // 过滤器类型classes = {Controller.class} // 要过滤的类型)})public class MyConfigForComponentScan {}
2. 指定类型过滤
FilterType._ASSIGNABLE_TYPE_
/*** 配置类* 等同于配置文件** @author maomaochong* @date 2022/06/05 20:15**/@Configuration // 指定配置类@ComponentScan(value = "com.moomooyu", // 包扫描,指定扫描的包// 只包含过滤器:根据注解类型过只包含指定的类型,加入IOC容器中includeFilters = {// 过滤器:@ComponentScan.Filter(type = FilterType.ASSIGNABLE_TYPE, // 过滤器类型classes = {Person.class} // 要过滤的类型)}, useDefaultFilters = false)public class MyConfigForComponentScan {}
3. 自定义过滤器
FilterType._CUSTOM_
通过实现org.springframework.core.type.filter.TypeFilter来自定义过滤规则。
/*** 自定义的包扫描过滤器** @author maomaochong* @date 2022/06/05 21:32**/public class MyTypeFilter implements TypeFilter {/*** 确定此过滤器与指定的类是否符合规则** @param metadataReader 目标类的元数据读取器* @param metadataReaderFactory 父类或接口的元数据读取器获取工厂* @return 是否符合过滤规则* @throws IOException 读取元数据时可能出现的io异常*/@Overridepublic boolean match(MetadataReader metadataReader, MetadataReaderFactory metadataReaderFactory) throws IOException {// 获取目标类注解信息AnnotationMetadata annotationMetadata = metadataReader.getAnnotationMetadata();// 获取目标类的类信息ClassMetadata classMetadata = metadataReader.getClassMetadata();// 获取当前类的资源信息Resource resource = metadataReader.getResource();// 获取类名String className = classMetadata.getClassName();System.out.println("className = " + className);// 类名包含“er”的加入IOC容器if (className.contains("er")) {return true;}return false;}}
/*** 配置类* 等同于配置文件** @author maomaochong* @date 2022/06/05 20:15**/@Configuration // 指定配置类@ComponentScan(value = "com.moomooyu", // 包扫描,指定扫描的包// 只包含过滤器:根据注解类型过只包含指定的类型,加入IOC容器中includeFilters = {// 过滤器:@ComponentScan.Filter(type = FilterType.CUSTOM, classes = MyTypeFilter.class)}, useDefaultFilters = false)public class MyConfigForComponentScan {}
4.1.3 扫描指定包,指定只包含过滤规则
通过指定includeFilters只包含过滤器,来限定只包含指定类型的bean注册至IOC容器。
注意:需要配置useDefaultFilters = false来关闭自动检测规则,阻止@Component、@Repository、@Service或@Controller的自动扫描。
/*** 配置类* 等同于配置文件** @author maomaochong* @date 2022/06/05 20:15**/@Configuration // 指定配置类@ComponentScan(value = "com.moomooyu", // 包扫描,指定扫描的包// 只包含过滤器:根据注解类型过只包含指定的类型,加入IOC容器中includeFilters = {// 过滤器:@ComponentScan.Filter(type = FilterType.ANNOTATION, // 过滤器类型classes = {Controller.class} // 要过滤的类型)}, useDefaultFilters = false)public class MyConfigForComponentScan {}
在JDK1.8以后,可以通过使用多个@ComponentScan注解,来同时指定规则,若是以前版本,则可以通过@ComponentScans来指定多个@ComponentScan来实现。
4.2 使用@Bean注解
在配置类中使用@Bean注解即可将bean注册至IOC容器中。
/*** 配置类* 等同于配置文件** @author maomaochong* @date 2022/06/05 20:15**/@Configuration // 指定配置类public class MyConfig {/*** 给容器中注册一个Bean,类型为返回值的类型,id默认使用方法名作为id* 可以通过修改方法名来改变bean的名称* 也可以在@Bean注解中指定bean的名称** @return bean对象*/@Bean("person")public Person person01() {return new Person("lisi", 20);}}
4.2.1 使用@Scope注解配置组件的作用域
1. 默认为单实例
默认情况下,Spring中的组件为单实例。
/*** 配置类* 等同于配置文件** @author maomaochong* @date 2022/06/05 20:15**/@Configuration // 指定配置类public class MyConfigForScope {/**** @return bean对象*/// 默认是单实例的@Bean("person")public Person person() {return new Person("lisi", 20);}}
/*** @author maomaochong* @date 2022/06/05 20:34**/public class IocTest {@Testpublic void test02(){AnnotationConfigApplicationContext applicationContext = new AnnotationConfigApplicationContext(MyConfigForScope.class);String[] beanNamesForType = applicationContext.getBeanDefinitionNames();for (String name : beanNamesForType) {System.out.println(name);}// 获取两个Person类型的bean对象Object person = applicationContext.getBean("person");Object person1 = applicationContext.getBean("person");System.out.println("person = " + person);System.out.println("person1 = " + person1);// 返回结果为trueSystem.out.println(person == person1);}}
2. 指定为多实例
可通过@Scope注解指定为多实例,配置value属性为ConfigurableBeanFactory._SCOPE_PROTOTYPE_。
注意:
ConfigurableBeanFactory.SCOPE_PROTOTYPE:- 多实例
- IOC容器启动时,未创建对象,待获取指定类型对象时,才创建对象,获取几次创建几次
ConfigurableBeanFactory.SCOPE_SINGLETON- 单实例
- IOC容器启动时,就会调用方法创建对象,放入IOC容器中,以后每次获取都是直接从容器获取。
```java
/**
- 配置类
- 等同于配置文件 *
- @author maomaochong
- @date 2022/06/05 20:15 **/ @Configuration // 指定配置类 public class MyConfigForScope {
/**
- 可以通过@Scope注解指定组件的作用域:
- // 常用
- ConfigurableBeanFactory.SCOPE_PROTOTYPE, 多实例
- IOC容器启动时,未创建对象,待获取指定类型对象时,才创建对象,获取几次创建几次
- ConfigurableBeanFactory.SCOPE_SINGLETON, 单实例
- IOC容器启动时,就会调用方法创建对象,放入IOC容器中,以后每次获取都是直接从容器获取。
- // 不常用
- org.springframework.web.context.WebApplicationContext.SCOPE_REQUEST, 同一次请求创建一个实例
- org.springframework.web.context.WebApplicationContext.SCOPE_SESSION 同一次会话(session)创建一个实例 *
- @return bean对象
*/
// 默认是单实例的
@Bean(“person”)
@Scope(value = ConfigurableBeanFactory.SCOPE_PROTOTYPE) // 指定为多实例
public Person person() {
return new Person(“lisi”, 20);
}
}
```
3. 通过
此注解适用于组件的单例作用域,可将指定组件在作用域为单例时,调整为IOC容器启动时不创建对象,当获取指定组件对象时才创建。 ```java /**@Lazy注解配置组件懒加载 - 配置类
- 等同于配置文件 *
- @author maomaochong
- @date 2022/06/05 20:15 **/ @Configuration // 指定配置类 public class MyConfigForScope {
/*
- @return bean对象 */ // 默认是单实例的 @Bean(“person”) @Lazy // 配置为懒加载 public Person person() { return new Person(“lisi”, 20); } } ```
4.2.2 使用@Conditional注解按条件注册组件
可以通过此注解,传入org.springframework.context.annotation.Condition实现类,重写其matches() 方法来根据条件判断是否注册组件。
放在指定方法上,则控制指定bean是否注册,若放在类上,则当满足条件时,这个类中配置的所有bean注册才生效。
/*** 判断是否是linux系统** @author maomaochong* @date 2022/06/05 23:29**/public class LinuxCondition implements Condition {/*** 决定条件是否符合** @param context 判断条件能使用的上下文环境* @param metadata 注解信息* @return {@code true} 条件符合,且组件可以被注册* or {@code false} 否决注册*/@Overridepublic boolean matches(ConditionContext context, AnnotatedTypeMetadata metadata) {// 获取IOC使用的beanfactoryConfigurableListableBeanFactory beanFactory = context.getBeanFactory();// 获取类加载器ClassLoader classLoader = context.getClassLoader();// 获取当前环境信息Environment environment = context.getEnvironment();// 可以判断容器中bean注册情况,也可以给容器中注册beanboolean definition = registry.containsBeanDefinition("person");// 获取到bean定义的注册类BeanDefinitionRegistry registry = context.getRegistry();// 获取操作系统,如果是Linux则注册String property = environment.getProperty("os.name");if (property.contains("linux")) {return true;}return false;}}
/*** 判断是否是windows系统** @author maomaochong* @date 2022/06/05 23:29**/public class WindowsCondition implements Condition {/*** 决定条件是否符合** @param context 判断条件能使用的上下文环境* @param metadata 注解信息* @return {@code true} 条件符合,且组件可以被注册* or {@code false} 否决注册*/@Overridepublic boolean matches(ConditionContext context, AnnotatedTypeMetadata metadata) {// 获取IOC使用的beanfactoryConfigurableListableBeanFactory beanFactory = context.getBeanFactory();// 获取类加载器ClassLoader classLoader = context.getClassLoader();// 获取当前环境信息Environment environment = context.getEnvironment();// 获取到bean定义的注册类BeanDefinitionRegistry registry = context.getRegistry();// 获取操作系统,如果是windows则注册String property = environment.getProperty("os.name");if (property.contains("Windows 10")) {return true;}return false;}}
/*** 配置类* 等同于配置文件** @author maomaochong* @date 2022/06/05 20:15**/@Configuration // 指定配置类public class MyConfigForConditional {/*** 给容器中注册一个Bean,类型为返回值的类型,id默认使用方法名作为id* 可以通过修改方法名来改变bean的名称* 也可以在@Bean注解中指定bean的名称** @return bean对象*/@Bean("person")public Person person() {return new Person("lisi", 20);}/*** @Conditional({Condition}) :按照一定的条件进行判断,满足条件给容器中注册bean* 如果是windows系统,给容器注册“bill”* 如果是linux系统,给容器注册“linus”* @return 返回bill gates*/@Bean("Bill")@Conditional({WindowsCondition.class})public Person person01() {return new Person("Bill Gates", 62);}/**** @return 返回bill gates*/@Bean("Linus")@Conditional(LinuxCondition.class)public Person person02() {return new Person("Linus", 48);}}
4.3 使用@Import注解
@Target(ElementType.TYPE)@Retention(RetentionPolicy.RUNTIME)@Documentedpublic @interface Import {/*** {@link Configuration}, {@link ImportSelector}, {@link ImportBeanDefinitionRegistrar}* or regular component classes to import.*/Class<?>[] value();}
4.3.1 导入指定的组件
可以在配置类上使用此注解,传入要导入的常规组件类,即可快速的导入组件,id默认是组件的全类名。
/*** @author maomaochong* @date 2022/06/06 23:33**/public class Color {}
/*** 配置类 使用import导入bean* 等同于配置文件** @author maomaochong* @date 2022/06/05 20:15**/@Configuration // 指定配置类@Import(Color.class) // 使用此注解快速导入组件,id默认是组件的全类名public class MyConfigForImport {/*** 给容器中注册一个Bean,类型为返回值的类型,id默认使用方法名作为id* 可以通过修改方法名来改变bean的名称* 也可以在@Bean注解中指定bean的名称** @return bean对象*/@Bean("person")public Person person01() {return new Person("lisi", 20);}}
此注解也可传入多个组件的字节码,实现批量导入指定组件。
/*** @author maomaochong* @date 2022/06/06 23:33**/public class Red {}
/*** 配置类 使用import导入bean* 等同于配置文件** @author maomaochong* @date 2022/06/05 20:15**/@Configuration // 指定配置类@Import({Color.class, Red.class}) // 使用此注解快速导入组件,id默认是组件的全类名public class MyConfigForImport {/*** 给容器中注册一个Bean,类型为返回值的类型,id默认使用方法名作为id* 可以通过修改方法名来改变bean的名称* 也可以在@Bean注解中指定bean的名称** @return bean对象*/@Bean("person")public Person person01() {return new Person("lisi", 20);}}
4.3.2 导入符合条件的组件
我们可以通过实现org.springframework.context.annotation.ImportSelector接口,重写其selectImports() 方法,根据自定义的导入逻辑,选择符合规则的组件,返回其全类名字符串。将自定义的实现类传入@Import注解中。
/*** 自定义的导入选择器,自己配置导入组件的逻辑** @author maomaochong* @date 2022/06/06 23:51**/public class MyImportSelector implements ImportSelector {/*** 选择并返回要导入的组件,返回组件的全类名** @param importingClassMetadata 当前标注@Import注解的类的所有注解信息* @return 要导入的组件的全类目*/@Overridepublic String[] selectImports(AnnotationMetadata importingClassMetadata) {// 方法不要返回null值return new String[]{"com.moomooyu.bean.Blue", "com.moomooyu.bean.Yellow"};}}
/*** 配置类 使用import导入bean* 等同于配置文件** @author maomaochong* @date 2022/06/05 20:15**/@Configuration // 指定配置类// 使用此注解快速导入组件,传入自定义的导入选择器,id默认是组件的全类名@Import({Color.class, Red.class, MyImportSelector.class})public class MyConfigForImport {/*** 给容器中注册一个Bean,类型为返回值的类型,id默认使用方法名作为id* 可以通过修改方法名来改变bean的名称* 也可以在@Bean注解中指定bean的名称** @return bean对象*/@Bean("person")public Person person01() {return new Person("lisi", 20);}}
4.3.3 手动导入Bean定义
通过实现org.springframework.context.annotation.ImportBeanDefinitionRegistrar接口,重写其registerBeanDefinitions()方法,根据自定义逻辑,来直接手动创建bean的定义信息,将其添加到bean定义信息注册表中。然后将实现类传入@Import注解中。
/*** 配置类 使用import导入bean* 等同于配置文件** @author maomaochong* @date 2022/06/05 20:15**/@Configuration // 指定配置类//@Import(Color.class) // 使用此注解快速导入组件,id默认是组件的全类名@Import({Color.class, Red.class, MyImportSelector.class, MyImportBeanDefinitionRegistrar.class}) // 使用此注解快速导入组件,id默认是组件的全类名public class MyConfigForImport {/*** 给容器中注册一个Bean,类型为返回值的类型,id默认使用方法名作为id* 可以通过修改方法名来改变bean的名称* 也可以在@Bean注解中指定bean的名称** @return bean对象*/@Bean("person")public Person person01() {return new Person("lisi", 20);}}
/*** @author maomaochong* @date 2022/06/07 00:15**/public class MyImportBeanDefinitionRegistrar implements ImportBeanDefinitionRegistrar {/*** Register bean definitions as necessary based on the given annotation metadata of* the importing {@code @Configuration} class.* <p>Note that {@link BeanDefinitionRegistryPostProcessor} types may <em>not</em> be* registered here, due to lifecycle constraints related to {@code @Configuration}* class processing.** @param importingClassMetadata 当前类的注解信息* @param registry BeanDefinition注册类(注册表)* 把所有需要添加到容器中的bean的定义信息添加到注册表中*/@Overridepublic void registerBeanDefinitions(AnnotationMetadata importingClassMetadata, BeanDefinitionRegistry registry) {boolean red = registry.containsBeanDefinition("com.moomooyu.bean.Red");boolean blue = registry.containsBeanDefinition("com.moomooyu.bean.Blue");if (red && blue) {// 创建bean的定义信息RootBeanDefinition beanDefinition = new RootBeanDefinition(Rainbow.class);// 将bean的定义信息添加到注册表中registry.registerBeanDefinition("rainbow", beanDefinition);}}}
4.4 使用Spring提供的FactoryBean
通过实现org.springframework.beans.factory.FactoryBean接口,重启其方法,来创建对应的工厂bean。
然后在配置类中导入工厂bean组件,默认情况下,我们获取此组件,可获得工厂bean调用getObject()方法创建的所包装的bean对象。如果我们想要获取工厂bean本身,可以在获取bean时,在工厂bean的id前加上&符号,如:&colorFactoryBean。
/*** 工厂bean** @author maomaochong* @date 2022/06/07 00:28**/public class ColorFactoryBean implements FactoryBean<Color> {/*** 返回一个Color对象,此对象会添加到容器中* 获取工厂bean时,此方法会被调用,返回对应的被包装类对象** @return an instance of the bean (can be {@code null})* @throws Exception in case of creation errors* @see FactoryBeanNotInitializedException*/@Overridepublic Color getObject() throws Exception {return new Color();}/*** 返回对象的类型** @return the type of object that this FactoryBean creates,* or {@code null} if not known at the time of the call* @see ListableBeanFactory#getBeansOfType*/@Overridepublic Class<?> getObjectType() {return Color.class;}/*** 是否是单例** @return 返回true:这个bean是单实例,在容器中只保存一份* 返回false,这个bean是多实例,每次获取都会创建一个新的bean* @see #getObject()* @see SmartFactoryBean#isPrototype()*/@Overridepublic boolean isSingleton() {return false;}}
/*** 配置类* 等同于配置文件** @author maomaochong* @date 2022/06/05 20:15**/@Configuration // 指定配置类public class MyConfigForFactoryBean {/*** 给容器中注册一个Bean,类型为返回值的类型,id默认使用方法名作为id* 可以通过修改方法名来改变bean的名称* 也可以在@Bean注解中指定bean的名称** @return bean对象*/@Bean("person")public Person person01() {return new Person("lisi", 20);}/*** 导入工程bean组件** @return*/@Beanpublic ColorFactoryBean colorFactoryBean() {return new ColorFactoryBean();}}
@Testpublic void test05(){AnnotationConfigApplicationContext applicationContext = new AnnotationConfigApplicationContext(MyConfigForFactoryBean.class);// 获取当前环境ConfigurableEnvironment environment = applicationContext.getEnvironment();String property = environment.getProperty("os.name");System.out.println("property = " + property);// 获取所有bean定义名称printBeans(applicationContext);Object bean = applicationContext.getBean("colorFactoryBean");Object bean2 = applicationContext.getBean("colorFactoryBean");System.out.println("bean = " + bean.getClass()); // bean = class com.moomooyu.bean.ColorSystem.out.println(bean == bean2); // false// 通过&符号前缀,可以指明我们要获取的是工厂bean本身Object bean3 = applicationContext.getBean("&colorFactoryBean");System.out.println("bean3 = " + bean3); // bean3 = com.moomooyu.bean.ColorFactoryBean@6574a52c}
五、AOP
aop基于动态代理实现,是指在程序运行期间动态地将某段代码切入到指定位置进行运行的编程方式。
5.1 一个简单aop示例
5.1.1 导入aop模块
<!--aop 4.3.12.RELEASE--><dependency><groupId>org.springframework</groupId><artifactId>spring-aspects</artifactId><version>${aspects.version}</version></dependency>
5.1.2 定义一个业务逻辑类
在业务逻辑类MyCalculator中,当业务逻辑运行的时候将日志进行打印。
/*** 业务逻辑** @author maomaochong* @date 2022/06/17 10:29**/public class MathCalculator {public int div(int num1, int num2) {System.out.println("com.moomooyu.aop.business.MathCalculator.div 执行。。");return num1/num2;}}
5.1.3 定义一个日志切面类
定义一个日志切面类LogAspects,切面类中的方法需要动态感知MathCalculator.div方法运行到什么状态。
对于切面,有以下几种通知方法:
- 前置通知(
@Before):在目标方法运行之前运行 - 后置通知(
@After):在目标方法运行结束之后运行,无论是方法正常结束还是异常结束 - 返回通知(
@AfterReturning):在目标方法正常返回之后运行 - 异常通知(
@AfterThrowing):在目标方法出现异常之后运行 环绕通知(
@Around):动态代理,手动推进目标方法运行(joinPoint.procced())/*** 切面类** @author maomaochong* @date 2022/06/17 10:29**/public class LogAspects {/*** 抽取公共的切入点表达式* 1、本类引用* 2、其他切面引用*/@Pointcut("execution(public int com.moomooyu.aop.business.MathCalculator.div(int, int))")public void pointCut(){}/*** 前置通知** @Before在目标方法之前切入,切入点表达式(指定在哪个方法切入)*/public void logStart() {System.out.println("除法运行。。。参数列表是:{}");}/*** 后置通知*/public void logEnd() {System.out.println("除法结束。。。");}/*** 返回通知*/public void logReturn() {System.out.println("除法正常返回。。。运行结果是:{}");}/*** 异常通知*/public void logException() {System.out.println("除法异常。。。异常信息:{}");}}
5.1.4 给切面类的目标方法标注何时何地运行(通知注解)
通过使用通知注解,来给切面类中的通知方法指定运行时机及运行目标位置。
/*** 切面类** @author maomaochong* @date 2022/06/17 10:29**/public class LogAspects {/*** 抽取公共的切入点表达式* 1、本类引用* 2、其他切面引用*/@Pointcut("execution(public int com.moomooyu.aop.business.MathCalculator.div(int, int))")public void pointCut(){}/*** 前置通知** @Before在目标方法之前切入,切入点表达式(指定在哪个方法切入)*/@Before("com.moomooyu.aop.aspects.LogAspects.pointCut")public void logStart() {System.out.println("除法运行。。。参数列表是:{}");}/*** 后置通知*/@After("pointCut()")public void logEnd() {System.out.println("除法结束。。。");}/*** 返回通知*/@AfterReturning("pointCut()")public void logReturn() {System.out.println("除法正常返回。。。运行结果是:{}");}/*** 异常通知*/@AfterThrowing("pointCut()")public void logException() {System.out.println("除法异常。。。异常信息:{}");}}
5.1.5 将切面类和业务逻辑类(目标方法所在类)都加入容器
将切面类和业务逻辑类都注册到ioc容器中。
/*** aop配置类** @author maomaochong* @date 2022/06/17 10:27**/@Configurationpublic class MyConfigOfAop {/*** 业务逻辑类* @return*/@Beanpublic MathCalculator mathCalculator() {return new MathCalculator();}/*** 切面类* @return*/@Beanpublic LogAspects logAspects() {return new LogAspects();}}
5.1.6 指明切面类
使用注解
@Aspect指明切面类。/*** 切面类** @author maomaochong* @date 2022/06/17 10:29**/@Aspect // 指明切面类public class LogAspects {/*** 抽取公共的切入点表达式* 1、本类引用* 2、其他切面引用*/@Pointcut("execution(public int com.moomooyu.aop.business.MathCalculator.div(int, int))")public void pointCut(){}/*** 前置通知** @Before在目标方法之前切入,切入点表达式(指定在哪个方法切入)*/@Before("com.moomooyu.aop.aspects.LogAspects.pointCut()")public void logStart(JoinPoint joinPoint) {Object[] args = joinPoint.getArgs();System.out.println(joinPoint.getSignature().getName() + "除法运行。。。参数列表是:{" + Arrays.asList(args) + "}");}/*** 后置通知*/@After("pointCut()")public void logEnd(JoinPoint joinPoint) {System.out.println(joinPoint.getSignature().getName() + "除法结束。。。");}/*** 返回通知*/@AfterReturning(value = "pointCut()", returning = "result")public void logReturn(Object result) {System.out.println("除法正常返回。。。运行结果是:{" + result + "}");}/*** 异常通知*/@AfterThrowing(value = "pointCut()", throwing = "exception")public void logException(Exception exception) {System.out.println("除法异常。。。异常信息:{" + exception + "}");}}
5.1.7 启用aop注解支持
在配置类中使用注解
@EnableAspectAutoProxy,开启基于注解的aop支持。/*** aop配置类** @author maomaochong* @date 2022/06/17 10:27**/@EnableAspectJAutoProxy // 开启aop的注解支持@Configurationpublic class MyConfigOfAop {/*** 业务逻辑类* @return*/@Beanpublic MathCalculator mathCalculator() {return new MathCalculator();}/*** 切面类* @return*/@Beanpublic LogAspects logAspects() {return new LogAspects();}}
5.1.8 测试类
/*** @author maomaochong* @date 2022/06/17 11:11**/public class AopTest {@Testpublic void test01() {AnnotationConfigApplicationContext applicationContext = new AnnotationConfigApplicationContext(MyConfigOfAop.class);// 此种方式无法被aop拦截// MathCalculator mathCalculator = new MathCalculator();// mathCalculator.div(1, 1);// 从容器中获取业务逻辑类bean对象MathCalculator mathCalculator = applicationContext.getBean(MathCalculator.class);mathCalculator.div(1, 1);applicationContext.close();}}
运行结果:
div除法运行。。。参数列表是:{[1, 1]}
com.moomooyu.aop.business.MathCalculator.div 执行。。
div除法结束。。。
除法正常返回。。。运行结果是:{1}
5.2 规则
5.2.1 多个切面类的执行顺序
如果应用中包含多个切面类,则他们的执行顺序如下:
- 默认是按照切面类的名称的字典排序,按照顺序执行的。
- 如果需要自定义执行顺序,使用
@Order注解来指定执行的顺序,给注解传入值,值越小越优先执行。
5.2.2 各通知方法执行顺序
5.3 aop源码及原理分析
六、声明式事务
6.1 一个简单的声明式事务示例
6.1.1 环境搭建
1. 导入相关依赖
导入数据源、数据库驱动、Spring-jdbc模块
<!--jdbc--><dependency><groupId>org.springframework</groupId><artifactId>spring-jdbc</artifactId><version>${spring.jdbc.version}</version></dependency><!--mysql-connector--><dependency><groupId>mysql</groupId><artifactId>mysql-connector-java</artifactId><version>${mysql.connector.version}</version></dependency><!--c3p0--><dependency><groupId>c3p0</groupId><artifactId>c3p0</artifactId><version>${c3p0.version}</version></dependency>
2. 配置数据源,使用JdbcTemplate操作数据
/*** 事务配置类** @author maomaochong* @date 2022/06/18 17:12**/@ComponentScan("com.moomooyu.tx")@Configurationpublic class TxConfig {/*** 数据源配置* @return*/@Beanpublic DataSource dataSource() throws Exception {ComboPooledDataSource dataSource = new ComboPooledDataSource();dataSource.setUser("root");dataSource.setPassword("root");dataSource.setDriverClass("com.mysql.jdbc.Driver");dataSource.setJdbcUrl("jdbc:mysql://192.168.222.88:3306/test");return dataSource;}/*** jdbcTemplate** @return* @throws Exception*/@Beanpublic JdbcTemplate jdbcTemplate() throws Exception {// Spring对@Configuration类会特殊处理,给容器中加组件的方法,多次调用都只是从容器中找组件JdbcTemplate jdbcTemplate = new JdbcTemplate(dataSource());return jdbcTemplate;}}
3. 方法标注@Transactional注解
/*** @author maomaochong* @date 2022/06/18 17:05**/@Repositorypublic class UserDao {@Autowiredprivate JdbcTemplate jdbcTemplate;public void insert() {String sql = "INSERT INTO tb_user(username, age) VALUES(?, ?)";String username = UUID.randomUUID().toString().substring(0, 5);jdbcTemplate.update(sql, username, 19);}}
/*** @author maomaochong* @date 2022/06/18 17:36**/@Servicepublic class UserService {@Autowiredprivate UserDao userDao;public void insert() {userDao.insert();System.out.println("数据插入完成。。。");}@Transactional // 使用事务注解,声明事务方法public void insert02() {userDao.insert();System.out.println("数据插入完成。。。");int i = 10/0;}}
4. 使用@EnableTransactionManagement开启基于注解的事务管理功能
/*** 事务配置类** @author maomaochong* @date 2022/06/18 17:12**/@EnableTransactionManagement // 使用此注解开启基于注解的事务管理功能@ComponentScan("com.moomooyu.tx")@Configurationpublic class TxConfig {/*** 数据源配置* @return*/@Beanpublic DataSource dataSource() throws Exception {ComboPooledDataSource dataSource = new ComboPooledDataSource();dataSource.setUser("root");dataSource.setPassword("root");dataSource.setDriverClass("com.mysql.jdbc.Driver");dataSource.setJdbcUrl("jdbc:mysql://192.168.222.88:3306/test");return dataSource;}/*** jdbcTemplate** @return* @throws Exception*/@Beanpublic JdbcTemplate jdbcTemplate() throws Exception {// Spring对@Configuration类会特殊处理,给容器中加组件的方法,多次调用都只是从容器中找组件JdbcTemplate jdbcTemplate = new JdbcTemplate(dataSource());return jdbcTemplate;}}
5. 配置事务管理器来控制事务
/*** 事务配置类** @author maomaochong* @date 2022/06/18 17:12**/@EnableTransactionManagement@ComponentScan("com.moomooyu.tx")@Configurationpublic class TxConfig {/*** 数据源配置* @return*/@Beanpublic DataSource dataSource() throws Exception {ComboPooledDataSource dataSource = new ComboPooledDataSource();dataSource.setUser("root");dataSource.setPassword("root");dataSource.setDriverClass("com.mysql.jdbc.Driver");dataSource.setJdbcUrl("jdbc:mysql://192.168.222.88:3306/test");return dataSource;}/*** jdbcTemplate** @return* @throws Exception*/@Beanpublic JdbcTemplate jdbcTemplate() throws Exception {// Spring对@Configuration类会特殊处理,给容器中加组件的方法,多次调用都只是从容器中找组件JdbcTemplate jdbcTemplate = new JdbcTemplate(dataSource());return jdbcTemplate;}/*** 将事务管理器注册到容器中** @return* @throws Exception*/@Beanpublic PlatformTransactionManager transactionManager() throws Exception {return new DataSourceTransactionManager(dataSource());}}
6.1.2 测试
/*** @author maomaochong* @date 2022/06/18 20:29**/public class TxTest {/*** 数据可以正确插入*/@Testpublic void test01() {AnnotationConfigApplicationContext applicationContext = new AnnotationConfigApplicationContext(TxConfig.class);UserService userService = applicationContext.getBean(UserService.class);userService.insert();}/*** 出现异常时,数据仍可以插入数据库*/@Testpublic void test02() {AnnotationConfigApplicationContext applicationContext = new AnnotationConfigApplicationContext(TxConfig.class);UserService userService = applicationContext.getBean(UserService.class);userService.insert();int i = 10/0;}/*** 配置事务管理器,使用声明式事务注解** 出现异常时,可以回滚操作*/@Testpublic void test03() {AnnotationConfigApplicationContext applicationContext = new AnnotationConfigApplicationContext(TxConfig.class);UserService userService = applicationContext.getBean(UserService.class);userService.insert02();}}
6.2 事务的传播特性
| 类型 | 描述 |
|---|---|
| PROPAGATION_REQUIRED | 默认。支持当前事务,如果不存在则创建一个新事务。 |
| PROPAGATION_SUPPORTS | 支持当前事务,如果不存在则以非事务方式执行。 |
| PROPAGATION_MANDATORY | 支持当前事务,如果不存在则抛出异常。 |
| PROPAGATION_REQUIRES_NEW | 创建一个新事务,如果存在则暂停当前事务。 |
| PROPAGATION_NOT_SUPPORTED | 以非事务方式执行,如果存在则暂停当前事务。 |
| PROPAGATION_NEVER | 以非事务方式执行,如果存在事务则抛出异常。 |
| PROPAGATION_NESTED | 如果当前事务存在,则在嵌套事务中执行,否则行为类似于REQUIRED 。 |
6.3.1 PROPAGATION_REQUIRED
可以看到下图中,如果将B、C的事务注解上的传播特性改为@Transactional(propagation = Propagation._REQUIRED_),A上也加事务注解@Transactional,则B、C的事务由A的事务控制, B、C中任一出现异常,则两者中的事务都进行回滚操作。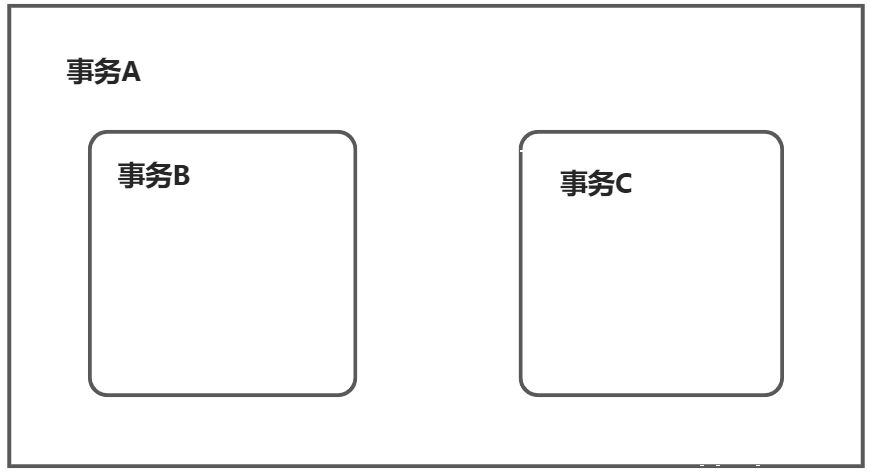
6.3 原理及源码分析
6.3.1 @EnableTransactionManagement注解
通过@EnableTransactionManagement开启基于注解的事务管理功能。在此注解内部,使用了@Import(TransactionManagementConfigurationSelector.class)来给容器中导入组件。
@Import(TransactionManagementConfigurationSelector.class)public @interface EnableTransactionManagement {/*** Indicate whether subclass-based (CGLIB) proxies are to be created ({@code true}) as* opposed to standard Java interface-based proxies ({@code false}). The default is* {@code false}. <strong>Applicable only if {@link #mode()} is set to* {@link AdviceMode#PROXY}</strong>.* <p>Note that setting this attribute to {@code true} will affect <em>all</em>* Spring-managed beans requiring proxying, not just those marked with* {@code @Transactional}. For example, other beans marked with Spring's* {@code @Async} annotation will be upgraded to subclass proxying at the same* time. This approach has no negative impact in practice unless one is explicitly* expecting one type of proxy vs another, e.g. in tests.*/boolean proxyTargetClass() default false;/*** Indicate how transactional advice should be applied. The default is* {@link AdviceMode#PROXY}.* @see AdviceMode*/AdviceMode mode() default AdviceMode.PROXY;/*** Indicate the ordering of the execution of the transaction advisor* when multiple advices are applied at a specific joinpoint.* The default is {@link Ordered#LOWEST_PRECEDENCE}.*/int order() default Ordered.LOWEST_PRECEDENCE;}
对于TransactionManagementConfigurationSelector类,顶层是ImportSelector接口,由于上述注解的默认配置,最终会向容器导入两个组件:
AutoProxyRegistrarProxyTransactionManagementConfigurationprotected String[] selectImports(AdviceMode adviceMode) {switch (adviceMode) {case PROXY:return new String[] {AutoProxyRegistrar.class.getName(), ProxyTransactionManagementConfiguration.class.getName()};case ASPECTJ:return new String[] {TransactionManagementConfigUtils.TRANSACTION_ASPECT_CONFIGURATION_CLASS_NAME};default:return null;}}
6.3.2
是AutoProxyRegistrar组件ImportBeanDefinitionRegistrar接口的实现类,其内部向bean注册表注册一个自动代理创建者。
public void registerBeanDefinitions(AnnotationMetadata importingClassMetadata, BeanDefinitionRegistry registry) {boolean candidateFound = false;Set<String> annoTypes = importingClassMetadata.getAnnotationTypes();for (String annoType : annoTypes) {AnnotationAttributes candidate = AnnotationConfigUtils.attributesFor(importingClassMetadata, annoType);if (candidate == null) {continue;}Object mode = candidate.get("mode");Object proxyTargetClass = candidate.get("proxyTargetClass");if (mode != null && proxyTargetClass != null && AdviceMode.class == mode.getClass() &&Boolean.class == proxyTargetClass.getClass()) {candidateFound = true;if (mode == AdviceMode.PROXY) {// 主要在此处,注册自动代理创建者组件AopConfigUtils.registerAutoProxyCreatorIfNecessary(registry);if ((Boolean) proxyTargetClass) {AopConfigUtils.forceAutoProxyCreatorToUseClassProxying(registry);return;}}}}}
上步骤方法内容如下:
public static BeanDefinition registerAutoProxyCreatorIfNecessary(BeanDefinitionRegistry registry) {return registerAutoProxyCreatorIfNecessary(registry, null);}public static BeanDefinition registerAutoProxyCreatorIfNecessary(BeanDefinitionRegistry registry, Object source) {return registerOrEscalateApcAsRequired(InfrastructureAdvisorAutoProxyCreator.class, registry, source);}
通过上一步骤传来的InfrastructureAdvisorAutoProxyCreator字节码,其即是自动代理创建者,注册其bean的定义信息到注册表中。
private static BeanDefinition registerOrEscalateApcAsRequired(Class<?> cls, BeanDefinitionRegistry registry, Object source) {Assert.notNull(registry, "BeanDefinitionRegistry must not be null");if (registry.containsBeanDefinition(AUTO_PROXY_CREATOR_BEAN_NAME)) {BeanDefinition apcDefinition = registry.getBeanDefinition(AUTO_PROXY_CREATOR_BEAN_NAME);if (!cls.getName().equals(apcDefinition.getBeanClassName())) {int currentPriority = findPriorityForClass(apcDefinition.getBeanClassName());int requiredPriority = findPriorityForClass(cls);if (currentPriority < requiredPriority) {apcDefinition.setBeanClassName(cls.getName());}}return null;}// 主要在此,创建InfrastructureAdvisorAutoProxyCreator的bean定义信息// 将其添加到注册表中RootBeanDefinition beanDefinition = new RootBeanDefinition(cls);beanDefinition.setSource(source);beanDefinition.getPropertyValues().add("order", Ordered.HIGHEST_PRECEDENCE);beanDefinition.setRole(BeanDefinition.ROLE_INFRASTRUCTURE);registry.registerBeanDefinition(AUTO_PROXY_CREATOR_BEAN_NAME, beanDefinition);return beanDefinition;}
1. InfrastructureAdvisorAutoProxyCreator组件
其本质上也是一个BeanPostProcessor后置处理器。利用此机制在对象创建以后,对bean对象进行包装,返回一个代理对象(增强器),代理对象执行方法利用拦截器链进行调用。
public class InfrastructureAdvisorAutoProxyCreator extends AbstractAdvisorAutoProxyCreator {private ConfigurableListableBeanFactory beanFactory;@Overrideprotected void initBeanFactory(ConfigurableListableBeanFactory beanFactory) {super.initBeanFactory(beanFactory);this.beanFactory = beanFactory;}@Overrideprotected boolean isEligibleAdvisorBean(String beanName) {return (this.beanFactory.containsBeanDefinition(beanName) &&this.beanFactory.getBeanDefinition(beanName).getRole() == BeanDefinition.ROLE_INFRASTRUCTURE);}}
6.3.3 ProxyTransactionManagementConfiguration组件
此组件,它注册启用基于代理的注释驱动的事务管理所需的 Spring 基础 bean信息。
1. 向容器中注册事务增强器
@Configurationpublic class ProxyTransactionManagementConfiguration extends AbstractTransactionManagementConfiguration {@Bean(name = TransactionManagementConfigUtils.TRANSACTION_ADVISOR_BEAN_NAME)@Role(BeanDefinition.ROLE_INFRASTRUCTURE)public BeanFactoryTransactionAttributeSourceAdvisor transactionAdvisor() {BeanFactoryTransactionAttributeSourceAdvisor advisor = new BeanFactoryTransactionAttributeSourceAdvisor();// 配置事务属性源,事务注解信息advisor.setTransactionAttributeSource(transactionAttributeSource());// 配置事务的拦截器advisor.setAdvice(transactionInterceptor());advisor.setOrder(this.enableTx.<Integer>getNumber("order"));return advisor;}//@Bean@Role(BeanDefinition.ROLE_INFRASTRUCTURE)public TransactionAttributeSource transactionAttributeSource() {return new AnnotationTransactionAttributeSource();}@Bean@Role(BeanDefinition.ROLE_INFRASTRUCTURE)public TransactionInterceptor transactionInterceptor() {TransactionInterceptor interceptor = new TransactionInterceptor();interceptor.setTransactionAttributeSource(transactionAttributeSource());if (this.txManager != null) {interceptor.setTransactionManager(this.txManager);}return interceptor;}}
1)事务注解属性信息解析
事务增强器要用的事务注解的信息,AnnotationTransactionAttributeSource解析事务注解。
/*** 创建一个默认的AnnotationTransactionAttributeSource,** 支持带有{@code Transactional} 注解* 或者 EJB3 {@link javax.ejb.TransactionAttribute} 注解公共方法.*/public AnnotationTransactionAttributeSource() {this(true);}
/*** 创建自定义 AnnotationTransactionAttributeSource,* 支持带有Transactional注释或 EJB3 javax.ejb.TransactionAttribute注释的公共方法。* 参数:* publicMethodsOnly – 是否支持仅带有Transactional注释的公共方法(通常用于基于代理的 AOP),* 或者也支持受保护/私有方法(通常用于 AspectJ 类编织)**/public AnnotationTransactionAttributeSource(boolean publicMethodsOnly) {this.publicMethodsOnly = publicMethodsOnly;this.annotationParsers = new LinkedHashSet<TransactionAnnotationParser>(2);// 解析Spring的Transactional注解的解析器this.annotationParsers.add(new SpringTransactionAnnotationParser());if (jta12Present) {this.annotationParsers.add(new JtaTransactionAnnotationParser());}if (ejb3Present) {this.annotationParsers.add(new Ejb3TransactionAnnotationParser());}}
public class SpringTransactionAnnotationParser implements TransactionAnnotationParser, Serializable {@Overridepublic TransactionAttribute parseTransactionAnnotation(AnnotatedElement ae) {AnnotationAttributes attributes = AnnotatedElementUtils.getMergedAnnotationAttributes(ae, Transactional.class);if (attributes != null) {return parseTransactionAnnotation(attributes);}else {return null;}}public TransactionAttribute parseTransactionAnnotation(Transactional ann) {return parseTransactionAnnotation(AnnotationUtils.getAnnotationAttributes(ann, false, false));}// 解析注解信息protected TransactionAttribute parseTransactionAnnotation(AnnotationAttributes attributes) {RuleBasedTransactionAttribute rbta = new RuleBasedTransactionAttribute();Propagation propagation = attributes.getEnum("propagation");rbta.setPropagationBehavior(propagation.value());Isolation isolation = attributes.getEnum("isolation");rbta.setIsolationLevel(isolation.value());rbta.setTimeout(attributes.getNumber("timeout").intValue());rbta.setReadOnly(attributes.getBoolean("readOnly"));rbta.setQualifier(attributes.getString("value"));ArrayList<RollbackRuleAttribute> rollBackRules = new ArrayList<RollbackRuleAttribute>();Class<?>[] rbf = attributes.getClassArray("rollbackFor");for (Class<?> rbRule : rbf) {RollbackRuleAttribute rule = new RollbackRuleAttribute(rbRule);rollBackRules.add(rule);}String[] rbfc = attributes.getStringArray("rollbackForClassName");for (String rbRule : rbfc) {RollbackRuleAttribute rule = new RollbackRuleAttribute(rbRule);rollBackRules.add(rule);}Class<?>[] nrbf = attributes.getClassArray("noRollbackFor");for (Class<?> rbRule : nrbf) {NoRollbackRuleAttribute rule = new NoRollbackRuleAttribute(rbRule);rollBackRules.add(rule);}String[] nrbfc = attributes.getStringArray("noRollbackForClassName");for (String rbRule : nrbfc) {NoRollbackRuleAttribute rule = new NoRollbackRuleAttribute(rbRule);rollBackRules.add(rule);}rbta.getRollbackRules().addAll(rollBackRules);return rbta;}@Overridepublic boolean equals(Object other) {return (this == other || other instanceof SpringTransactionAnnotationParser);}@Overridepublic int hashCode() {return SpringTransactionAnnotationParser.class.hashCode();}}
2)事务拦截器
创建TransactionInterceptor对象,给其配置事务注解属性信息、事务管理器,并注册到容器中。TransactionInterceptor是MethodInterceptor接口的实现类,当代理对象要执行目标方法时,方法拦截器就会工作。
在其内部:
1. 先获取事务相关的属性1. 再获取`PlatformTransactionManager`,如果没有事先添加任何指定的transactionManager,则最终会从容器中按照类型获取一个`PlatformTransactionManager`1. 执行目标方法1. 如果异常,获取到事务管理器,利用事务管理回滚操作1. 如果正常,利用事务管理器,提交事务
@Overridepublic Object invoke(final MethodInvocation invocation) throws Throwable {// Work out the target class: may be {@code null}.// The TransactionAttributeSource should be passed the target class// as well as the method, which may be from an interface.Class<?> targetClass = (invocation.getThis() != null ? AopUtils.getTargetClass(invocation.getThis()) : null);// 在事务中执行return invokeWithinTransaction(invocation.getMethod(), targetClass, new InvocationCallback() {@Overridepublic Object proceedWithInvocation() throws Throwable {return invocation.proceed();}});}
protected Object invokeWithinTransaction(Method method, Class<?> targetClass, final InvocationCallback invocation)throws Throwable {// 获取事务属性,如果事务属性为null,那么方法就是非事务的final TransactionAttribute txAttr = getTransactionAttributeSource().getTransactionAttribute(method, targetClass);// 获取事务管理器final PlatformTransactionManager tm = determineTransactionManager(txAttr);final String joinpointIdentification = methodIdentification(method, targetClass, txAttr);if (txAttr == null || !(tm instanceof CallbackPreferringPlatformTransactionManager)) {// Standard transaction demarcation with getTransaction and commit/rollback calls.TransactionInfo txInfo = createTransactionIfNecessary(tm, txAttr, joinpointIdentification);Object retVal = null;try {// This is an around advice: Invoke the next interceptor in the chain.// This will normally result in a target object being invoked.// 事务方法执行retVal = invocation.proceedWithInvocation();}catch (Throwable ex) {// 抛出异常时completeTransactionAfterThrowing(txInfo, ex);throw ex;}finally {// 清除事务cleanupTransactionInfo(txInfo);}// 提交事务commitTransactionAfterReturning(txInfo);return retVal;}
protected PlatformTransactionManager determineTransactionManager(TransactionAttribute txAttr) {// Do not attempt to lookup tx manager if no tx attributes are setif (txAttr == null || this.beanFactory == null) {return getTransactionManager();}String qualifier = txAttr.getQualifier();if (StringUtils.hasText(qualifier)) {return determineQualifiedTransactionManager(qualifier);}else if (StringUtils.hasText(this.transactionManagerBeanName)) {return determineQualifiedTransactionManager(this.transactionManagerBeanName);}else {PlatformTransactionManager defaultTransactionManager = getTransactionManager();if (defaultTransactionManager == null) {defaultTransactionManager = this.transactionManagerCache.get(DEFAULT_TRANSACTION_MANAGER_KEY);// 如果事先没有指定,会根据类型获取事务管理器if (defaultTransactionManager == null) {defaultTransactionManager = this.beanFactory.getBean(PlatformTransactionManager.class);this.transactionManagerCache.putIfAbsent(DEFAULT_TRANSACTION_MANAGER_KEY, defaultTransactionManager);}}return defaultTransactionManager;}}
七、BeanFactoryPostProcessor
BeanFactory的后置处理器,他是在BeanFactory标准初始化之后调用,所有的bean定义已经加载到BeanFactory,但bean的实例还未创建。
应用程序上下文可以在其 bean 定义中自动检测 BeanFactoryPostProcessor bean,并在创建任何其他 bean 之前应用它们。
7.1 一个简单的示例
7.1.1 自定义BeanFactoryPostProcessor
通过实现BeanFactoryPostProcessor接口,重写其postProcessBeanFactory()方法,可以在容器中注册自定义的BeanFactory后置处理器。
/*** 自定义的BeanFactoryPostProcessor** @author maomaochong* @date 2022/06/19 11:07**/@Componentpublic class MyBeanFactoryPostProcessor implements BeanFactoryPostProcessor {/*** Modify the application context's internal bean factory after its standard* initialization. All bean definitions will have been loaded, but no beans* will have been instantiated yet. This allows for overriding or adding* properties even to eager-initializing beans.** @param beanFactory the bean factory used by the application context* @throws BeansException in case of errors*/@Overridepublic void postProcessBeanFactory(ConfigurableListableBeanFactory beanFactory) throws BeansException {System.out.println("MyBeanFactoryPostProcessor ...postProcessBeanFactory...");// 获取bean定义信息数量int beanDefinitionCount = beanFactory.getBeanDefinitionCount();// 获取bean定义信息名称String[] beanDefinitionNames = beanFactory.getBeanDefinitionNames();System.out.println("当前BeanFactory中有" + beanDefinitionCount + "个Bean");System.out.println(Arrays.asList(beanDefinitionNames));}}
7.1.2 一个实体
/*** @author maomaochong* @date 2022/06/06 23:33**/public class Blue {public Blue() {System.out.println("blue... constructor..");}public void init() {System.out.println("blue...init...");}public void destroy() {System.out.println("blue...destroy...");}}
7.1.3 配置类
/*** 配置类** @author maomaochong* @date 2022/06/19 11:06**/@ComponentScan("com.moomooyu.beanFactoryPostProcessor")@Configurationpublic class BeanFactoryPostProcessorConfig {@Bean(initMethod = "init", destroyMethod = "destroy")public Blue blue() {return new Blue();}}
7.1.4 测试类
/*** @author maomaochong* @date 2022/06/19 11:10**/public class BeanFactoryPostProcessorTests {@Testpublic void test01() {AnnotationConfigApplicationContext applicationContext = new AnnotationConfigApplicationContext(BeanFactoryPostProcessorConfig.class);applicationContext.close();}}
运行结果:
MyBeanFactoryPostProcessor ...postProcessBeanFactory...当前BeanFactory中有9个Bean[org.springframework.context.annotation.internalConfigurationAnnotationProcessor, org.springframework.context.annotation.internalAutowiredAnnotationProcessor, org.springframework.context.annotation.internalRequiredAnnotationProcessor, org.springframework.context.annotation.internalCommonAnnotationProcessor, org.springframework.context.event.internalEventListenerProcessor, org.springframework.context.event.internalEventListenerFactory, beanFactoryPostProcessorConfig, myBeanFactoryPostProcessor, blue]blue... constructor..blue...init...六月 19, 2022 11:31:22 上午 org.springframework.context.annotation.AnnotationConfigApplicationContext doClose信息: Closing org.springframework.context.annotation.AnnotationConfigApplicationContext@fad74ee: startup date [Sun Jun 19 11:31:22 CST 2022]; root of context hierarchyblue...destroy...
可以看到BeanFactoryPostProcessor在Bean创建之前就执行了。
7.2 源码及原理分析
7.2.1 容器创建过程中调用
public AnnotationConfigApplicationContext(Class<?>... annotatedClasses) {this();register(annotatedClasses);// 刷新容器refresh();}
刷新容器或配置:
@Overridepublic void refresh() throws BeansException, IllegalStateException {synchronized (this.startupShutdownMonitor) {// Prepare this context for refreshing.prepareRefresh();// Tell the subclass to refresh the internal bean factory.ConfigurableListableBeanFactory beanFactory = obtainFreshBeanFactory();// Prepare the bean factory for use in this context.prepareBeanFactory(beanFactory);try {// Allows post-processing of the bean factory in context subclasses.postProcessBeanFactory(beanFactory);// Invoke factory processors registered as beans in the context.// 可以看到,在此处执行了BeanFactory后置处理器invokeBeanFactoryPostProcessors(beanFactory);// Register bean processors that intercept bean creation.registerBeanPostProcessors(beanFactory);// Initialize message source for this context.initMessageSource();// Initialize event multicaster for this context.initApplicationEventMulticaster();// Initialize other special beans in specific context subclasses.onRefresh();// Check for listener beans and register them.registerListeners();// Instantiate all remaining (non-lazy-init) singletons.finishBeanFactoryInitialization(beanFactory);// Last step: publish corresponding event.finishRefresh();}catch (BeansException ex) {if (logger.isWarnEnabled()) {logger.warn("Exception encountered during context initialization - " +"cancelling refresh attempt: " + ex);}// Destroy already created singletons to avoid dangling resources.destroyBeans();// Reset 'active' flag.cancelRefresh(ex);// Propagate exception to caller.throw ex;}finally {// Reset common introspection caches in Spring's core, since we// might not ever need metadata for singleton beans anymore...resetCommonCaches();}}}
实例化并调用所有已注册的 BeanFactoryPostProcessor bean,如果给定,则尊重显式顺序。
必须在单例实例化之前调用:
protected void invokeBeanFactoryPostProcessors(ConfigurableListableBeanFactory beanFactory) {// 执行BeanFactory的后置处理器PostProcessorRegistrationDelegate.invokeBeanFactoryPostProcessors(beanFactory, getBeanFactoryPostProcessors());// Detect a LoadTimeWeaver and prepare for weaving, if found in the meantime// (e.g. through an @Bean method registered by ConfigurationClassPostProcessor)if (beanFactory.getTempClassLoader() == null && beanFactory.containsBean(LOAD_TIME_WEAVER_BEAN_NAME)) {beanFactory.addBeanPostProcessor(new LoadTimeWeaverAwareProcessor(beanFactory));beanFactory.setTempClassLoader(new ContextTypeMatchClassLoader(beanFactory.getBeanClassLoader()));}}
查找所有的BeanFactoryPostProcessor,按照实现接口不同进行分类,然后按照顺序执行:
public static void invokeBeanFactoryPostProcessors(ConfigurableListableBeanFactory beanFactory, List<BeanFactoryPostProcessor> beanFactoryPostProcessors) {// 如果有的话,首先调用 BeanDefinitionRegistryPostProcessorsSet<String> processedBeans = new HashSet<String>();if (beanFactory instanceof BeanDefinitionRegistry) {BeanDefinitionRegistry registry = (BeanDefinitionRegistry) beanFactory;List<BeanFactoryPostProcessor> regularPostProcessors = new LinkedList<BeanFactoryPostProcessor>();List<BeanDefinitionRegistryPostProcessor> registryProcessors = new LinkedList<BeanDefinitionRegistryPostProcessor>();for (BeanFactoryPostProcessor postProcessor : beanFactoryPostProcessors) {if (postProcessor instanceof BeanDefinitionRegistryPostProcessor) {BeanDefinitionRegistryPostProcessor registryProcessor =(BeanDefinitionRegistryPostProcessor) postProcessor;registryProcessor.postProcessBeanDefinitionRegistry(registry);registryProcessors.add(registryProcessor);}else {regularPostProcessors.add(postProcessor);}}// 不要在此处初始化 FactoryBeans:// 我们需要让所有常规 bean 保持未初始化状态,// 以便 bean 工厂后处理器应用到它们身上!// 将实现 PriorityOrdered、Ordered 和其余部分的 BeanDefinitionRegistryPostProcessor 分开List<BeanDefinitionRegistryPostProcessor> currentRegistryProcessors = new ArrayList<BeanDefinitionRegistryPostProcessor>();// 首先,调用实现 PriorityOrdered 的 BeanDefinitionRegistryPostProcessorString[] postProcessorNames =beanFactory.getBeanNamesForType(BeanDefinitionRegistryPostProcessor.class, true, false);for (String ppName : postProcessorNames) {if (beanFactory.isTypeMatch(ppName, PriorityOrdered.class)) {currentRegistryProcessors.add(beanFactory.getBean(ppName, BeanDefinitionRegistryPostProcessor.class));processedBeans.add(ppName);}}sortPostProcessors(currentRegistryProcessors, beanFactory);registryProcessors.addAll(currentRegistryProcessors);invokeBeanDefinitionRegistryPostProcessors(currentRegistryProcessors, registry);currentRegistryProcessors.clear();// 接下来,调用实现 Ordered 的 BeanDefinitionRegistryPostProcessorspostProcessorNames = beanFactory.getBeanNamesForType(BeanDefinitionRegistryPostProcessor.class, true, false);for (String ppName : postProcessorNames) {if (!processedBeans.contains(ppName) && beanFactory.isTypeMatch(ppName, Ordered.class)) {currentRegistryProcessors.add(beanFactory.getBean(ppName, BeanDefinitionRegistryPostProcessor.class));processedBeans.add(ppName);}}sortPostProcessors(currentRegistryProcessors, beanFactory);registryProcessors.addAll(currentRegistryProcessors);invokeBeanDefinitionRegistryPostProcessors(currentRegistryProcessors, registry);currentRegistryProcessors.clear();// 最后,调用所有其他 BeanDefinitionRegistryPostProcessors 直到不再出现其他后置处理器boolean reiterate = true;while (reiterate) {reiterate = false;postProcessorNames = beanFactory.getBeanNamesForType(BeanDefinitionRegistryPostProcessor.class, true, false);for (String ppName : postProcessorNames) {if (!processedBeans.contains(ppName)) {currentRegistryProcessors.add(beanFactory.getBean(ppName, BeanDefinitionRegistryPostProcessor.class));processedBeans.add(ppName);reiterate = true;}}sortPostProcessors(currentRegistryProcessors, beanFactory);registryProcessors.addAll(currentRegistryProcessors);invokeBeanDefinitionRegistryPostProcessors(currentRegistryProcessors, registry);currentRegistryProcessors.clear();}// 现在,调用到目前为止处理的所有处理器的 postProcessBeanFactory 回调.invokeBeanFactoryPostProcessors(registryProcessors, beanFactory);invokeBeanFactoryPostProcessors(regularPostProcessors, beanFactory);}else {// Invoke factory processors registered with the context instance.invokeBeanFactoryPostProcessors(beanFactoryPostProcessors, beanFactory);}// 不要在此处初始化 FactoryBeans:// 我们需要让所有常规 bean 保持未初始化状态,// 以便 bean 工厂后处理器应用到它们!String[] postProcessorNames =beanFactory.getBeanNamesForType(BeanFactoryPostProcessor.class, true, false);// 将实现 PriorityOrdered、Ordered 和其余部分的 BeanFactoryPostProcessor 分开List<BeanFactoryPostProcessor> priorityOrderedPostProcessors = new ArrayList<BeanFactoryPostProcessor>();List<String> orderedPostProcessorNames = new ArrayList<String>();List<String> nonOrderedPostProcessorNames = new ArrayList<String>();for (String ppName : postProcessorNames) {if (processedBeans.contains(ppName)) {// skip - already processed in first phase above}else if (beanFactory.isTypeMatch(ppName, PriorityOrdered.class)) {priorityOrderedPostProcessors.add(beanFactory.getBean(ppName, BeanFactoryPostProcessor.class));}else if (beanFactory.isTypeMatch(ppName, Ordered.class)) {orderedPostProcessorNames.add(ppName);}else {nonOrderedPostProcessorNames.add(ppName);}}// 首先,调用实现 PriorityOrdered 的 BeanFactoryPostProcessorssortPostProcessors(priorityOrderedPostProcessors, beanFactory);invokeBeanFactoryPostProcessors(priorityOrderedPostProcessors, beanFactory);// 接下来,调用实现 Ordered 的 BeanFactoryPostProcessors。List<BeanFactoryPostProcessor> orderedPostProcessors = new ArrayList<BeanFactoryPostProcessor>();for (String postProcessorName : orderedPostProcessorNames) {orderedPostProcessors.add(beanFactory.getBean(postProcessorName, BeanFactoryPostProcessor.class));}sortPostProcessors(orderedPostProcessors, beanFactory);invokeBeanFactoryPostProcessors(orderedPostProcessors, beanFactory);// 最后,调用所有其他 BeanFactoryPostProcessor。List<BeanFactoryPostProcessor> nonOrderedPostProcessors = new ArrayList<BeanFactoryPostProcessor>();for (String postProcessorName : nonOrderedPostProcessorNames) {nonOrderedPostProcessors.add(beanFactory.getBean(postProcessorName, BeanFactoryPostProcessor.class));}invokeBeanFactoryPostProcessors(nonOrderedPostProcessors, beanFactory);// 清除缓存的合并 bean 定义,因为后处理器可能已经修改了原始元数据,例如替换值中的占位符...beanFactory.clearMetadataCache();}
八、BeanDefinitionRegistryPostProcessor
是BeanFactoryPostProcessor接口的子接口,在标准初始化之后修改应用程序上下文的内部 bean 定义注册表。所有常规 bean 定义都将被加载,但尚未实例化任何 bean。这允许在下一个后处理阶段开始之前添加更多的 bean 定义。
在bean定义信息即将被加载,实例还未创建时调用,优先于BeanFactoryPostProcessor执行,可以利用它来给容器中额外添加组件。
public interface BeanDefinitionRegistryPostProcessor extends BeanFactoryPostProcessor {/*** 修改 Bean定义注册表信息** @param 容器使用的bean定义信息注册表* @throws org.springframework.beans.BeansException in case of errors*/void postProcessBeanDefinitionRegistry(BeanDefinitionRegistry registry) throws BeansException;}
8.1 一个简单示例
8.1.1 配置类
/*** 配置类** @author maomaochong* @date 2022/06/19 17:04**/@ComponentScan("com.moomooyu.beanDefinitionRegistryPostProcessor")@Configurationpublic class BeanDefinitionRegistryPostProcessorConfig {@Beanpublic Blue blue() {return new Blue();}}
8.1.2 实体
/*** @author maomaochong* @date 2022/06/06 23:33**/public class Blue {public Blue() {System.out.println("blue... constructor..");}public void init() {System.out.println("blue...init...");}public void destroy() {System.out.println("blue...destroy...");}}
8.1.3 自定义后置处理器
/*** 自定义BeanDefinitionRegistryPostProcessor** @author maomaochong* @date 2022/06/19 16:52**/@Componentpublic class MyBeanDefinitionRegistryPostProcessor implements BeanDefinitionRegistryPostProcessor {/*** 修改容器中的bean注册表,增删bean定义信息** @param registry 容器中使用的bean注册表* @throws BeansException in case of errors*/@Overridepublic void postProcessBeanDefinitionRegistry(BeanDefinitionRegistry registry) throws BeansException {System.out.println("postProcessBeanDefinitionRegistry...bean的数量:" + registry.getBeanDefinitionCount());}/*** 修改容器中的beanFactory,修改bean的定义信息** @param beanFactory 容器中使用的bean工厂* @throws BeansException in case of errors*/@Overridepublic void postProcessBeanFactory(ConfigurableListableBeanFactory beanFactory) throws BeansException {System.out.println("MyBeanDefinitionRegistryPostProcessor...bean的数量:" + beanFactory.getBeanDefinitionCount());}}
/*** 自定义的BeanFactoryPostProcessor** @author maomaochong* @date 2022/06/19 11:07**/@Componentpublic class MyBeanFactoryPostProcessor implements BeanFactoryPostProcessor {/*** Modify the application context's internal bean factory after its standard* initialization. All bean definitions will have been loaded, but no beans* will have been instantiated yet. This allows for overriding or adding* properties even to eager-initializing beans.** @param beanFactory the bean factory used by the application context* @throws BeansException in case of errors*/@Overridepublic void postProcessBeanFactory(ConfigurableListableBeanFactory beanFactory) throws BeansException {System.out.println("MyBeanFactoryPostProcessor ...postProcessBeanFactory...");// 获取bean定义信息数量int beanDefinitionCount = beanFactory.getBeanDefinitionCount();// 获取bean定义信息名称String[] beanDefinitionNames = beanFactory.getBeanDefinitionNames();System.out.println("当前BeanFactory中有" + beanDefinitionCount + "个Bean");System.out.println(Arrays.asList(beanDefinitionNames));}}
8.1.4 测试类
/*** 测试类** @author maomaochong* @date 2022/06/19 17:07**/public class BeanDefinitionRegistryPostProcessorTests {@Testpublic void test01() {AnnotationConfigApplicationContext applicationContext = new AnnotationConfigApplicationContext(BeanDefinitionRegistryPostProcessorConfig.class);applicationContext.close();}}
运行结果:
postProcessBeanDefinitionRegistry...bean的数量:10MyBeanDefinitionRegistryPostProcessor...bean的数量:10MyBeanFactoryPostProcessor ...postProcessBeanFactory...当前BeanFactory中有10个Bean[org.springframework.context.annotation.internalConfigurationAnnotationProcessor, org.springframework.context.annotation.internalAutowiredAnnotationProcessor, org.springframework.context.annotation.internalRequiredAnnotationProcessor, org.springframework.context.annotation.internalCommonAnnotationProcessor, org.springframework.context.event.internalEventListenerProcessor, org.springframework.context.event.internalEventListenerFactory, beanDefinitionRegistryPostProcessorConfig, myBeanDefinitionRegistryPostProcessor, myBeanFactoryPostProcessor, blue]blue... constructor..
可以看到,BeanDefinitionRegistryPostProcessor实现类优先于BeanFactoryPostProcessor实现类执行,且BeanDefinitionRegistryPostProcessor中的postProcessBeanDefinitionRegistry()方法也优先于postProcessBeanFactory()方法执行。
8.2 源码及原理分析
仍旧是在容器初始化的过程中,先进行BeanDefinitionRegistryPostProcessor相关bean的执行,再进行BeanFactoryPostProcessor相关bean的执行。
执行顺序:
- refresh()
- invokeBeanFactoryPostProcessors(beanFactory);
- 从容器中获取到所有的BeanDefinitionRegistryPostProcessor组件
- 依次触发所有的postProcessorBeanDefinitionRegistry()方法
- 再触发postProcessBeanFactory()方法,来自其继承的BeanFactoryPostProcessor
再从容器中找到BeanFactoryPostProcessor组件,然后依次触发postProcessBeanFactory()方法
class PostProcessorRegistrationDelegate {public static void invokeBeanFactoryPostProcessors(ConfigurableListableBeanFactory beanFactory, List<BeanFactoryPostProcessor> beanFactoryPostProcessors) {// Invoke BeanDefinitionRegistryPostProcessors first, if any.Set<String> processedBeans = new HashSet<String>();if (beanFactory instanceof BeanDefinitionRegistry) {BeanDefinitionRegistry registry = (BeanDefinitionRegistry) beanFactory;List<BeanFactoryPostProcessor> regularPostProcessors = new LinkedList<BeanFactoryPostProcessor>();List<BeanDefinitionRegistryPostProcessor> registryProcessors = new LinkedList<BeanDefinitionRegistryPostProcessor>();for (BeanFactoryPostProcessor postProcessor : beanFactoryPostProcessors) {if (postProcessor instanceof BeanDefinitionRegistryPostProcessor) {BeanDefinitionRegistryPostProcessor registryProcessor =(BeanDefinitionRegistryPostProcessor) postProcessor;registryProcessor.postProcessBeanDefinitionRegistry(registry);registryProcessors.add(registryProcessor);}else {regularPostProcessors.add(postProcessor);}}// Do not initialize FactoryBeans here: We need to leave all regular beans// uninitialized to let the bean factory post-processors apply to them!// Separate between BeanDefinitionRegistryPostProcessors that implement// PriorityOrdered, Ordered, and the rest.List<BeanDefinitionRegistryPostProcessor> currentRegistryProcessors = new ArrayList<BeanDefinitionRegistryPostProcessor>();// First, invoke the BeanDefinitionRegistryPostProcessors that implement PriorityOrdered.String[] postProcessorNames =beanFactory.getBeanNamesForType(BeanDefinitionRegistryPostProcessor.class, true, false);for (String ppName : postProcessorNames) {if (beanFactory.isTypeMatch(ppName, PriorityOrdered.class)) {currentRegistryProcessors.add(beanFactory.getBean(ppName, BeanDefinitionRegistryPostProcessor.class));processedBeans.add(ppName);}}sortPostProcessors(currentRegistryProcessors, beanFactory);registryProcessors.addAll(currentRegistryProcessors);invokeBeanDefinitionRegistryPostProcessors(currentRegistryProcessors, registry);currentRegistryProcessors.clear();// Next, invoke the BeanDefinitionRegistryPostProcessors that implement Ordered.postProcessorNames = beanFactory.getBeanNamesForType(BeanDefinitionRegistryPostProcessor.class, true, false);for (String ppName : postProcessorNames) {if (!processedBeans.contains(ppName) && beanFactory.isTypeMatch(ppName, Ordered.class)) {currentRegistryProcessors.add(beanFactory.getBean(ppName, BeanDefinitionRegistryPostProcessor.class));processedBeans.add(ppName);}}sortPostProcessors(currentRegistryProcessors, beanFactory);registryProcessors.addAll(currentRegistryProcessors);invokeBeanDefinitionRegistryPostProcessors(currentRegistryProcessors, registry);currentRegistryProcessors.clear();// Finally, invoke all other BeanDefinitionRegistryPostProcessors until no further ones appear.boolean reiterate = true;while (reiterate) {reiterate = false;postProcessorNames = beanFactory.getBeanNamesForType(BeanDefinitionRegistryPostProcessor.class, true, false);for (String ppName : postProcessorNames) {if (!processedBeans.contains(ppName)) {currentRegistryProcessors.add(beanFactory.getBean(ppName, BeanDefinitionRegistryPostProcessor.class));processedBeans.add(ppName);reiterate = true;}}sortPostProcessors(currentRegistryProcessors, beanFactory);registryProcessors.addAll(currentRegistryProcessors);invokeBeanDefinitionRegistryPostProcessors(currentRegistryProcessors, registry);currentRegistryProcessors.clear();}// Now, invoke the postProcessBeanFactory callback of all processors handled so far.invokeBeanFactoryPostProcessors(registryProcessors, beanFactory);invokeBeanFactoryPostProcessors(regularPostProcessors, beanFactory);}else {// Invoke factory processors registered with the context instance.invokeBeanFactoryPostProcessors(beanFactoryPostProcessors, beanFactory);}// Do not initialize FactoryBeans here: We need to leave all regular beans// uninitialized to let the bean factory post-processors apply to them!String[] postProcessorNames =beanFactory.getBeanNamesForType(BeanFactoryPostProcessor.class, true, false);// Separate between BeanFactoryPostProcessors that implement PriorityOrdered,// Ordered, and the rest.List<BeanFactoryPostProcessor> priorityOrderedPostProcessors = new ArrayList<BeanFactoryPostProcessor>();List<String> orderedPostProcessorNames = new ArrayList<String>();List<String> nonOrderedPostProcessorNames = new ArrayList<String>();for (String ppName : postProcessorNames) {if (processedBeans.contains(ppName)) {// skip - already processed in first phase above}else if (beanFactory.isTypeMatch(ppName, PriorityOrdered.class)) {priorityOrderedPostProcessors.add(beanFactory.getBean(ppName, BeanFactoryPostProcessor.class));}else if (beanFactory.isTypeMatch(ppName, Ordered.class)) {orderedPostProcessorNames.add(ppName);}else {nonOrderedPostProcessorNames.add(ppName);}}// First, invoke the BeanFactoryPostProcessors that implement PriorityOrdered.sortPostProcessors(priorityOrderedPostProcessors, beanFactory);invokeBeanFactoryPostProcessors(priorityOrderedPostProcessors, beanFactory);// Next, invoke the BeanFactoryPostProcessors that implement Ordered.List<BeanFactoryPostProcessor> orderedPostProcessors = new ArrayList<BeanFactoryPostProcessor>();for (String postProcessorName : orderedPostProcessorNames) {orderedPostProcessors.add(beanFactory.getBean(postProcessorName, BeanFactoryPostProcessor.class));}sortPostProcessors(orderedPostProcessors, beanFactory);invokeBeanFactoryPostProcessors(orderedPostProcessors, beanFactory);// Finally, invoke all other BeanFactoryPostProcessors.List<BeanFactoryPostProcessor> nonOrderedPostProcessors = new ArrayList<BeanFactoryPostProcessor>();for (String postProcessorName : nonOrderedPostProcessorNames) {nonOrderedPostProcessors.add(beanFactory.getBean(postProcessorName, BeanFactoryPostProcessor.class));}invokeBeanFactoryPostProcessors(nonOrderedPostProcessors, beanFactory);// Clear cached merged bean definitions since the post-processors might have// modified the original metadata, e.g. replacing placeholders in values...beanFactory.clearMetadataCache();}
九、ApplicationListener
ApplicationListener监听容器中发布的事件,基于事件驱动模型开发。它可以监听容器中ApplicationEvent及其下面的子事件。
public interface ApplicationListener<E extends ApplicationEvent> extends EventListener {/*** Handle an application event.* @param event the event to respond to*/void onApplicationEvent(E event);}
9.1 一个简单的示例
步骤:
- 写一个监听器来监听某个事件(ApplicationEvent及其子类)
- 把监听器加入到容器中
- 只要容器中有相关的事件发布,我们就可以监听到这个事件
- 如:ContextRefreshedEvent:容器刷新完成(所有bean都完全创建)会发布这个事件
- 如:ContextClosedEvent:关闭容器会发布这个事件
- 发布一个事件
9.1.1 创建一个自定义的监听器
通过实现ApplicationListener接口,并指定监听的事件类型,来自定义一个监听器,然后将其加入到容器中。/*** 自定义容器监听器** @author maomaochong* @date 2022/06/19 21:09**/@Componentpublic class MyApplicationListener implements ApplicationListener<ApplicationEvent> {/*** 处理事件** 当容器中发布此事件以后,方法触发** @param event the event to respond to*/@Overridepublic void onApplicationEvent(ApplicationEvent event) {System.out.println("收到事件:" + event);}}
9.1.2 配置类
```java /**- 配置类 *
- @author maomaochong
- @date 2022/06/19 21:16 **/ @ComponentScan(“com.moomooyu.applicaitonListener”) @Configuration public class ApplicationListenerConfig {
}
<a name="crRFp"></a>### 9.1.3 测试类```java/*** 测试类** @author maomaochong* @date 2022/06/19 21:12**/public class ApplicationListenerTests {@Testpublic void test01() {AnnotationConfigApplicationContext applicationContext = new AnnotationConfigApplicationContext(ApplicationListenerConfig.class);// 发布事件applicationContext.publishEvent(new ApplicationEvent(new String("我是一个事件")) {});applicationContext.close();}}
运行结果:
收到事件:org.springframework.context.event.ContextRefreshedEvent[source=org.springframework.context.annotation.AnnotationConfigApplicationContext@fad74ee: startup date [Sun Jun 19 21:20:10 CST 2022]; root of context hierarchy]收到事件:com.moomooyu.applicationListener.ApplicationListenerTests$1[source=我是一个事件]六月 19, 2022 9:20:10 下午 org.springframework.context.annotation.AnnotationConfigApplicationContext doClose信息: Closing org.springframework.context.annotation.AnnotationConfigApplicationContext@fad74ee: startup date [Sun Jun 19 21:20:10 CST 2022]; root of context hierarchy收到事件:org.springframework.context.event.ContextClosedEvent[source=org.springframework.context.annotation.AnnotationConfigApplicationContext@fad74ee: startup date [Sun Jun 19 21:20:10 CST 2022]; root of context hierarchy]
9.2 源码及原理分析
容器创建时刷新过程中,初始化事件多播器、注册监听器、发布事件。
public AnnotationConfigApplicationContext(Class<?>... annotatedClasses) {this();register(annotatedClasses);refresh();}
例如,对于ContextRefreshedEvent事件:
- 容器刷新 refresh()
- finishRefresh() 容器刷新完成
publishEvent(new ContextRefreshedEvent(this));
事件发布流程:
- 获取事件的多播器(派发器):getApplicationEventMulticaster()
- multicastEvent派发事件
获取到所有的ApplicationListener
- 先判断有Executor的话,可以支持使用Executor来进行异步派发
- 否则,同步的方式直接执行listener方法:invokeListener(listener, event);
- 拿到listener回调onApplicationEvent(event); ```java @Override public void refresh() throws BeansException, IllegalStateException { synchronized (this.startupShutdownMonitor) { // Prepare this context for refreshing. prepareRefresh();
// Tell the subclass to refresh the internal bean factory. ConfigurableListableBeanFactory beanFactory = obtainFreshBeanFactory();
// Prepare the bean factory for use in this context. prepareBeanFactory(beanFactory);
try {
// Allows post-processing of the bean factory in context subclasses.postProcessBeanFactory(beanFactory);// Invoke factory processors registered as beans in the context.invokeBeanFactoryPostProcessors(beanFactory);// Register bean processors that intercept bean creation.registerBeanPostProcessors(beanFactory);// Initialize message source for this context.initMessageSource();// 为此容器初始化事件多播器initApplicationEventMulticaster();// Initialize other special beans in specific context subclasses.onRefresh();// 查找监听器bean,并注册他们registerListeners();// Instantiate all remaining (non-lazy-init) singletons.finishBeanFactoryInitialization(beanFactory);// 最后一步,发布相应的事件finishRefresh();
}
catch (BeansException ex) {
if (logger.isWarnEnabled()) {logger.warn("Exception encountered during context initialization - " +"cancelling refresh attempt: " + ex);}// Destroy already created singletons to avoid dangling resources.destroyBeans();// Reset 'active' flag.cancelRefresh(ex);// Propagate exception to caller.throw ex;
}
finally {
// Reset common introspection caches in Spring's core, since we// might not ever need metadata for singleton beans anymore...resetCommonCaches();
9.2.1 初始化事件多播器
先去容器中找有没有id=applicationEventMulticaster 的组件:
如果没有,创建一个并加入到容器中
this.applicationEventMulticaster = new SimpleApplicationEventMulticaster(beanFactory);<br />beanFactory.registerSingleton(_APPLICATION_EVENT_MULTICASTER_BEAN_NAME_, this.applicationEventMulticaster);```java
/**
- Initialize the ApplicationEventMulticaster.
- Uses SimpleApplicationEventMulticaster if none defined in the context.
- @see org.springframework.context.event.SimpleApplicationEventMulticaster
*/
protected void initApplicationEventMulticaster() {
ConfigurableListableBeanFactory beanFactory = getBeanFactory();
if (beanFactory.containsLocalBean(APPLICATION_EVENT_MULTICASTER_BEAN_NAME)) {
} else {this.applicationEventMulticaster =beanFactory.getBean(APPLICATION_EVENT_MULTICASTER_BEAN_NAME, ApplicationEventMulticaster.class);if (logger.isDebugEnabled()) {logger.debug("Using ApplicationEventMulticaster [" + this.applicationEventMulticaster + "]");}
} } ```this.applicationEventMulticaster = new SimpleApplicationEventMulticaster(beanFactory);beanFactory.registerSingleton(APPLICATION_EVENT_MULTICASTER_BEAN_NAME, this.applicationEventMulticaster);if (logger.isDebugEnabled()) {logger.debug("Unable to locate ApplicationEventMulticaster with name '" +APPLICATION_EVENT_MULTICASTER_BEAN_NAME +"': using default [" + this.applicationEventMulticaster + "]");}
9.2.2 注册监听器
/*** Add beans that implement ApplicationListener as listeners.* Doesn't affect other listeners, which can be added without being beans.*/protected void registerListeners() {// Register statically specified listeners first.for (ApplicationListener<?> listener : getApplicationListeners()) {getApplicationEventMulticaster().addApplicationListener(listener);}// Do not initialize FactoryBeans here: We need to leave all regular beans// uninitialized to let post-processors apply to them!// 获取所有ApplicationListener类型的监听器String[] listenerBeanNames = getBeanNamesForType(ApplicationListener.class, true, false);for (String listenerBeanName : listenerBeanNames) {getApplicationEventMulticaster().addApplicationListenerBean(listenerBeanName);}// Publish early application events now that we finally have a multicaster...Set<ApplicationEvent> earlyEventsToProcess = this.earlyApplicationEvents;this.earlyApplicationEvents = null;if (earlyEventsToProcess != null) {for (ApplicationEvent earlyEvent : earlyEventsToProcess) {getApplicationEventMulticaster().multicastEvent(earlyEvent);}}}
9.2.3 最终刷新-发布事件
/*** Finish the refresh of this context, invoking the LifecycleProcessor's* onRefresh() method and publishing the* {@link org.springframework.context.event.ContextRefreshedEvent}.*/protected void finishRefresh() {// Initialize lifecycle processor for this context.initLifecycleProcessor();// Propagate refresh to lifecycle processor first.getLifecycleProcessor().onRefresh();// Publish the final event.publishEvent(new ContextRefreshedEvent(this));// Participate in LiveBeansView MBean, if active.LiveBeansView.registerApplicationContext(this);}
@Overridepublic void publishEvent(ApplicationEvent event) {publishEvent(event, null);}
protected void publishEvent(Object event, ResolvableType eventType) {Assert.notNull(event, "Event must not be null");if (logger.isTraceEnabled()) {logger.trace("Publishing event in " + getDisplayName() + ": " + event);}// Decorate event as an ApplicationEvent if necessaryApplicationEvent applicationEvent;if (event instanceof ApplicationEvent) {applicationEvent = (ApplicationEvent) event;}else {applicationEvent = new PayloadApplicationEvent<Object>(this, event);if (eventType == null) {eventType = ((PayloadApplicationEvent)applicationEvent).getResolvableType();}}// Multicast right now if possible - or lazily once the multicaster is initializedif (this.earlyApplicationEvents != null) {this.earlyApplicationEvents.add(applicationEvent);}else {// 获取事件多播器,多播事件到合适的监听器getApplicationEventMulticaster().multicastEvent(applicationEvent, eventType);}// Publish event via parent context as well...if (this.parent != null) {if (this.parent instanceof AbstractApplicationContext) {((AbstractApplicationContext) this.parent).publishEvent(event, eventType);}else {this.parent.publishEvent(event);}}}
获取多播器
ApplicationEventMulticaster getApplicationEventMulticaster() throws IllegalStateException {if (this.applicationEventMulticaster == null) {throw new IllegalStateException("ApplicationEventMulticaster not initialized - " +"call 'refresh' before multicasting events via the context: " + this);}return this.applicationEventMulticaster;}
将给定的事件多播到合适的监听器
@Overridepublic void multicastEvent(final ApplicationEvent event, ResolvableType eventType) {ResolvableType type = (eventType != null ? eventType : resolveDefaultEventType(event));// 获取所有的监听器,遍历多播事件for (final ApplicationListener<?> listener : getApplicationListeners(event, type)) {Executor executor = getTaskExecutor();if (executor != null) {executor.execute(new Runnable() {@Overridepublic void run() {invokeListener(listener, event);}});}else {invokeListener(listener, event);}}}
获取监听器
protected Collection<ApplicationListener<?>> getApplicationListeners(ApplicationEvent event, ResolvableType eventType) {Object source = event.getSource();Class<?> sourceType = (source != null ? source.getClass() : null);ListenerCacheKey cacheKey = new ListenerCacheKey(eventType, sourceType);// Quick check for existing entry on ConcurrentHashMap...ListenerRetriever retriever = this.retrieverCache.get(cacheKey);if (retriever != null) {return retriever.getApplicationListeners();}if (this.beanClassLoader == null ||(ClassUtils.isCacheSafe(event.getClass(), this.beanClassLoader) &&(sourceType == null || ClassUtils.isCacheSafe(sourceType, this.beanClassLoader)))) {// Fully synchronized building and caching of a ListenerRetrieversynchronized (this.retrievalMutex) {retriever = this.retrieverCache.get(cacheKey);if (retriever != null) {return retriever.getApplicationListeners();}retriever = new ListenerRetriever(true);Collection<ApplicationListener<?>> listeners =retrieveApplicationListeners(eventType, sourceType, retriever);this.retrieverCache.put(cacheKey, retriever);return listeners;}}else {// No ListenerRetriever caching -> no synchronization necessaryreturn retrieveApplicationListeners(eventType, sourceType, null);}}
执行监听器方法
protected void invokeListener(ApplicationListener<?> listener, ApplicationEvent event) {ErrorHandler errorHandler = getErrorHandler();if (errorHandler != null) {try {// 执行监听器doInvokeListener(listener, event);}catch (Throwable err) {errorHandler.handleError(err);}}else {// 执行监听器doInvokeListener(listener, event);}}
private void doInvokeListener(ApplicationListener listener, ApplicationEvent event) {try {// 调用监听器的响应方法listener.onApplicationEvent(event);}catch (ClassCastException ex) {String msg = ex.getMessage();if (msg == null || msg.startsWith(event.getClass().getName())) {// Possibly a lambda-defined listener which we could not resolve the generic event type forLog logger = LogFactory.getLog(getClass());if (logger.isDebugEnabled()) {logger.debug("Non-matching event type for listener: " + listener, ex);}}else {throw ex;}}}
十、EventListener
通过使用@EventListener注解,来定义监听器,监听事件发生。
10.1 简单示例
import org.springframework.context.ApplicationEvent;import org.springframework.context.event.EventListener;import org.springframework.stereotype.Service;/*** 自定义的 事件监听器,使用注解实现** @author maomaochong* @date 2022/06/20 21:12**/@Servicepublic class UserService {@EventListenerpublic void listen(ApplicationEvent event) {System.out.println("UserService ... 监听到的事件:" + event);}}
运行结果:
UserService ... 监听到的事件:org.springframework.context.event.ContextRefreshedEvent[source=org.springframework.context.annotation.AnnotationConfigApplicationContext@fad74ee: startup date [Mon Jun 20 21:14:27 CST 2022]; root of context hierarchy]收到事件:org.springframework.context.event.ContextRefreshedEvent[source=org.springframework.context.annotation.AnnotationConfigApplicationContext@fad74ee: startup date [Mon Jun 20 21:14:27 CST 2022]; root of context hierarchy]UserService ... 监听到的事件:com.moomooyu.applicationListener.ApplicationListenerTests$1[source=我是一个事件]收到事件:com.moomooyu.applicationListener.ApplicationListenerTests$1[source=我是一个事件]六月 20, 2022 9:14:27 下午 org.springframework.context.annotation.AnnotationConfigApplicationContext doClose信息: Closing org.springframework.context.annotation.AnnotationConfigApplicationContext@fad74ee: startup date [Mon Jun 20 21:14:27 CST 2022]; root of context hierarchyUserService ... 监听到的事件:org.springframework.context.event.ContextClosedEvent[source=org.springframework.context.annotation.AnnotationConfigApplicationContext@fad74ee: startup date [Mon Jun 20 21:14:27 CST 2022]; root of context hierarchy]收到事件:org.springframework.context.event.ContextClosedEvent[source=org.springframework.context.annotation.AnnotationConfigApplicationContext@fad74ee: startup date [Mon Jun 20 21:14:27 CST 2022]; root of context hierarchy]
10.2 源码及原理分析
主要是通过EventListenerMethodProcessor组件,将EventListener注释方法注册为单独的ApplicationListener实例。
在单例预实例化阶段结束时调用SmartInitializingSingleton接口中的afterSingletonsInstantiated()方法,并保证所有常规单例 bean 都已创建。
大致流程:
- ioc容器创建对象并refresh()
finishBeanFactoryInitialization(beanFactory),初始化剩下的单实例bean
- 先创建所有的单实例bean,通过getBean()
- 获取所有创建好的单实例bean,判断是否是SmartInitializingSingleton类型的
- 如果是就调用afterSingletonsInstantiated()
```java public interface SmartInitializingSingleton {public class EventListenerMethodProcessor implements SmartInitializingSingleton, ApplicationContextAware {}
- 如果是就调用afterSingletonsInstantiated()
/**
- Invoked right at the end of the singleton pre-instantiation phase,
- with a guarantee that all regular singleton beans have been created
- already. {@link ListableBeanFactory#getBeansOfType} calls within
- this method won’t trigger accidental side effects during bootstrap.
NOTE: This callback won’t be triggered for singleton beans
- lazily initialized on demand after {@link BeanFactory} bootstrap,
- and not for any other bean scope either. Carefully use it for beans
- with the intended bootstrap semantics only. */ void afterSingletonsInstantiated();
}
<a name="NQjmI"></a>### 10.2.1 容器创建并刷新```javapublic AnnotationConfigApplicationContext(Class<?>... annotatedClasses) {this();register(annotatedClasses);refresh();}
10.2.2 容器刷新
@Overridepublic void refresh() throws BeansException, IllegalStateException {synchronized (this.startupShutdownMonitor) {// Prepare this context for refreshing.prepareRefresh();// Tell the subclass to refresh the internal bean factory.ConfigurableListableBeanFactory beanFactory = obtainFreshBeanFactory();// Prepare the bean factory for use in this context.prepareBeanFactory(beanFactory);try {// Allows post-processing of the bean factory in context subclasses.postProcessBeanFactory(beanFactory);// Invoke factory processors registered as beans in the context.invokeBeanFactoryPostProcessors(beanFactory);// Register bean processors that intercept bean creation.registerBeanPostProcessors(beanFactory);// Initialize message source for this context.initMessageSource();// Initialize event multicaster for this context.initApplicationEventMulticaster();// Initialize other special beans in specific context subclasses.onRefresh();// Check for listener beans and register them.registerListeners();// Instantiate all remaining (non-lazy-init) singletons.// 实例化所有剩余的非懒加载的单例beanfinishBeanFactoryInitialization(beanFactory);// Last step: publish corresponding event.finishRefresh();}catch (BeansException ex) {if (logger.isWarnEnabled()) {logger.warn("Exception encountered during context initialization - " +"cancelling refresh attempt: " + ex);}// Destroy already created singletons to avoid dangling resources.destroyBeans();// Reset 'active' flag.cancelRefresh(ex);// Propagate exception to caller.throw ex;}finally {// Reset common introspection caches in Spring's core, since we// might not ever need metadata for singleton beans anymore...resetCommonCaches();}}}
10.2.3 bean 工厂的初始化
完成此上下文的 bean 工厂的初始化,初始化所有剩余的单例 bean。
protected void finishBeanFactoryInitialization(ConfigurableListableBeanFactory beanFactory) {// Initialize conversion service for this context.if (beanFactory.containsBean(CONVERSION_SERVICE_BEAN_NAME) &&beanFactory.isTypeMatch(CONVERSION_SERVICE_BEAN_NAME, ConversionService.class)) {beanFactory.setConversionService(beanFactory.getBean(CONVERSION_SERVICE_BEAN_NAME, ConversionService.class));}// Register a default embedded value resolver if no bean post-processor// (such as a PropertyPlaceholderConfigurer bean) registered any before:// at this point, primarily for resolution in annotation attribute values.if (!beanFactory.hasEmbeddedValueResolver()) {beanFactory.addEmbeddedValueResolver(new StringValueResolver() {@Overridepublic String resolveStringValue(String strVal) {return getEnvironment().resolvePlaceholders(strVal);}});}// Initialize LoadTimeWeaverAware beans early to allow for registering their transformers early.String[] weaverAwareNames = beanFactory.getBeanNamesForType(LoadTimeWeaverAware.class, false, false);for (String weaverAwareName : weaverAwareNames) {getBean(weaverAwareName);}// Stop using the temporary ClassLoader for type matching.beanFactory.setTempClassLoader(null);// Allow for caching all bean definition metadata, not expecting further changes.beanFactory.freezeConfiguration();// Instantiate all remaining (non-lazy-init) singletons.// 实例化所有剩余的非懒加载的单例beanbeanFactory.preInstantiateSingletons();}
10.2.4 实例化所有非懒加载的单例bean
确保实例化所有非惰性初始化单例,同时考虑FactoryBeans 。如果需要,通常在工厂设置结束时调用。
@Overridepublic void preInstantiateSingletons() throws BeansException {if (this.logger.isDebugEnabled()) {this.logger.debug("Pre-instantiating singletons in " + this);}// Iterate over a copy to allow for init methods which in turn register new bean definitions.// While this may not be part of the regular factory bootstrap, it does otherwise work fine.List<String> beanNames = new ArrayList<String>(this.beanDefinitionNames);// Trigger initialization of all non-lazy singleton beans...for (String beanName : beanNames) {RootBeanDefinition bd = getMergedLocalBeanDefinition(beanName);if (!bd.isAbstract() && bd.isSingleton() && !bd.isLazyInit()) {if (isFactoryBean(beanName)) {final FactoryBean<?> factory = (FactoryBean<?>) getBean(FACTORY_BEAN_PREFIX + beanName);boolean isEagerInit;if (System.getSecurityManager() != null && factory instanceof SmartFactoryBean) {isEagerInit = AccessController.doPrivileged(new PrivilegedAction<Boolean>() {@Overridepublic Boolean run() {return ((SmartFactoryBean<?>) factory).isEagerInit();}}, getAccessControlContext());}else {isEagerInit = (factory instanceof SmartFactoryBean &&((SmartFactoryBean<?>) factory).isEagerInit());}if (isEagerInit) {getBean(beanName);}}else {getBean(beanName);}}}// Trigger post-initialization callback for all applicable beans...for (String beanName : beanNames) {Object singletonInstance = getSingleton(beanName);if (singletonInstance instanceof SmartInitializingSingleton) {final SmartInitializingSingleton smartSingleton = (SmartInitializingSingleton) singletonInstance;if (System.getSecurityManager() != null) {AccessController.doPrivileged(new PrivilegedAction<Object>() {@Overridepublic Object run() {smartSingleton.afterSingletonsInstantiated();return null;}}, getAccessControlContext());}else {// 回调方法smartSingleton.afterSingletonsInstantiated();}}}}
10.2.5 回调方法
@Overridepublic void afterSingletonsInstantiated() {List<EventListenerFactory> factories = getEventListenerFactories();String[] beanNames = this.applicationContext.getBeanNamesForType(Object.class);for (String beanName : beanNames) {if (!ScopedProxyUtils.isScopedTarget(beanName)) {Class<?> type = null;try {type = AutoProxyUtils.determineTargetClass(this.applicationContext.getBeanFactory(), beanName);}catch (Throwable ex) {// An unresolvable bean type, probably from a lazy bean - let's ignore it.if (logger.isDebugEnabled()) {logger.debug("Could not resolve target class for bean with name '" + beanName + "'", ex);}}if (type != null) {if (ScopedObject.class.isAssignableFrom(type)) {try {type = AutoProxyUtils.determineTargetClass(this.applicationContext.getBeanFactory(),ScopedProxyUtils.getTargetBeanName(beanName));}catch (Throwable ex) {// An invalid scoped proxy arrangement - let's ignore it.if (logger.isDebugEnabled()) {logger.debug("Could not resolve target bean for scoped proxy '" + beanName + "'", ex);}}}try {processBean(factories, beanName, type);}catch (Throwable ex) {throw new BeanInitializationException("Failed to process @EventListener " +"annotation on bean with name '" + beanName + "'", ex);}}}}}

若有收获,就点个赞吧
0 人点赞
