一、初始化配置
检查配置信息
git config --list
用户信息配置
git config --global user.name "John Doe"git config --global user.email johndoe@example.com
注:若需要为单个项目指定用户信息,可以在对应项目的
.git文件夹内,使用git bash终端,使用如下命令进行配置。 ```java git config user.name “John Doe”
git config user.email johndoe@example.com
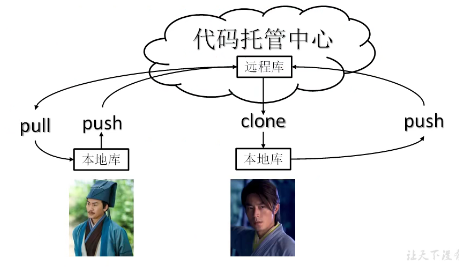
<a name="Ex1dV"></a># 二、获取仓库1. 在已存在目录中初始化仓库
git init
2. 克隆现有的仓库
git clone
<a name="ZjKAA"></a># 三、常用命令<a name="bUYii"></a>## 1. 基础操作1. 检查当前文件状态
git status
1.1 不存在未跟踪文件```shell# 显示了当前所在分支,并告诉你这个分支同远程服务器上对应的分支没有偏离。On branch masterYour branch is up-to-date with 'origin/master'.nothing to commit, working directory clean
1.2 存在未跟踪文件
# 新建的 README 文件出现在 Untracked files 下面。# 未跟踪的文件意味着 Git 在之前的快照(提交)中没有这些文件;# Git 不会自动将之纳入跟踪范围On branch masterYour branch is up-to-date with 'origin/master'.Untracked files:(use "git add <file>..." to include in what will be committed)READMEnothing added to commit but untracked files present (use "git add" to track)
跟踪新文件
git add <文件名>
提交更新到本地仓库
git commit -m "注释" <文件名>
修改文件
# 文件修改后,需要先使用 git add 命令加入暂存区,再使用 git commit 命令提交更新
版本穿梭
git reset --hard <版本号>
推送到远程仓库
git push <远程仓库地址> <分支名称>
2. 分支操作
2.1 创建并切换分支
# 新建一个分支并同时切换到那个分支上git checkout -b iss53# Switched to a new branch "iss53"
2.2 切换分支
git checkout <分支名称>
2.3 合并分支
# 先切换到合并的目标分支上git checkout <目标分支名称># 使用下面命令将指定分支合并到目标分支git merge <指定分支名称>Updating f42c576..3a0874cFast-forward # 快进--没有冲突的合并index.html | 2 ++1 file changed, 2 insertions(+)
2.4 删除分支
git branch -d <分支名称>Deleted branch hotfix (3a0874c).
2.5 遇到冲突时的分支合并
$ git merge iss53Auto-merging index.htmlCONFLICT (content): Merge conflict in index.htmlAutomatic merge failed; fix conflicts and then commit the result.
此时 Git 做了合并,但是没有自动地创建一个新的合并提交。 Git 会暂停下来,等待你去解决合并产生的冲突。 你可以在合并冲突后的任意时刻使用 git status 命令来查看那些因包含合并冲突而处于未合并(unmerged)状态的文件:
$ git statusOn branch masterYou have unmerged paths.(fix conflicts and run "git commit")Unmerged paths:(use "git add <file>..." to mark resolution)both modified: index.htmlno changes added to commit (use "git add" and/or "git commit -a")
任何因包含合并冲突而有待解决的文件,都会以未合并状态标识出来。 Git 会在有冲突的文件中加入标准的冲突解决标记,这样你可以打开这些包含冲突的文件然后手动解决冲突。 出现冲突的文件会包含一些特殊区段,看起来像下面这个样子:
<<<<<<< HEAD:index.html<div id="footer">contact : email.support@github.com</div>=======<div id="footer">please contact us at support@github.com</div>>>>>>>> iss53:index.html
这表示 HEAD 所指示的版本(也就是你的 master 分支所在的位置,因为你在运行 merge 命令的时候已经检出到了这个分支)在这个区段的上半部分(======= 的上半部分),而 iss53 分支所指示的版本在 ======= 的下半部分。 为了解决冲突,你必须选择使用由 ======= 分割的两部分中的一个,或者你也可以自行合并这些内容。 例如,你可以通过把这段内容换成下面的样子来解决冲突:
<div id="footer">please contact us at email.support@github.com</div>
上述的冲突解决方案仅保留了其中一个分支的修改,并且 <<<<<<< , ======= , 和 >>>>>>> 这些行被完全删除了。 在你解决了所有文件里的冲突之后,对每个文件使用 git add 命令来将其标记为冲突已解决。 一旦暂存这些原本有冲突的文件,Git 就会将它们标记为冲突已解决。
你可以再次运行 git status 来确认所有的合并冲突都已被解决:
$ git statusOn branch masterAll conflicts fixed but you are still merging.(use "git commit" to conclude merge)Changes to be committed:modified: index.html
默认情况下提交信息看起来像下面这个样子:
Merge branch 'iss53'Conflicts:index.html## It looks like you may be committing a merge.# If this is not correct, please remove the file# .git/MERGE_HEAD# and try again.# Please enter the commit message for your changes. Lines starting# with '#' will be ignored, and an empty message aborts the commit.# On branch master# All conflicts fixed but you are still merging.## Changes to be committed:# modified: index.html#
如果你觉得上述的信息不够充分,不能完全体现分支合并的过程,你可以修改上述信息, 添加一些细节给未来检视这个合并的读者一些帮助,告诉他们你是如何解决合并冲突的,以及理由是什么。
2.6 拉取分支代码
将其他小伙伴或者服务器上创建的分支引入到本地的方法,会自动在本地创建对应的本地分支,不需要提前创建:
git checkout -b local-branch-name orgin/remote-branch-name
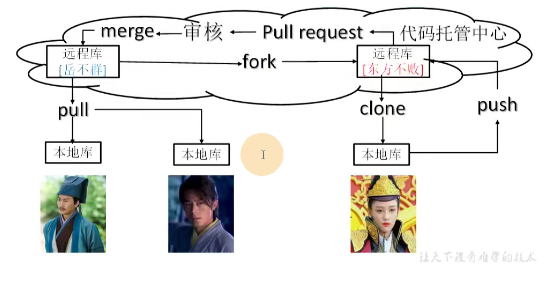
四、团队协作
1. 团队内协作
2. 团队间协作
五、远程仓库链接方式
1. SSH免密登录
ssh-keygen -t ed25519 -C “xxxxx@xxxxx.com”
命令运行完后,在用户目录中会生成.ssh文件夹,其中的
可参考gitee中教程 https://gitee.com/help/articles/4181#article-header0
```
- 在gitee或github中配置公钥信息
六、IDEA中的Git操作
1. 初始化仓库

2. 配置远程仓库
选择管理远程仓库: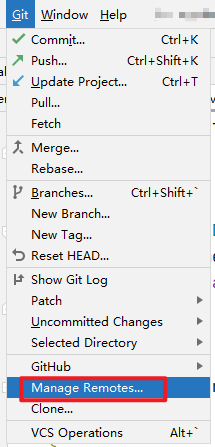
配置远程仓库信息: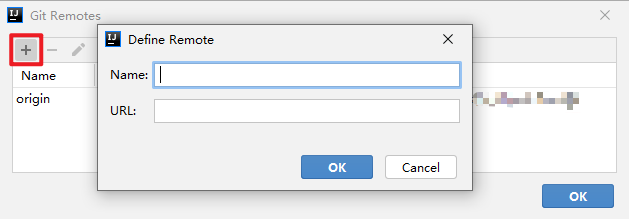
3. 添加到暂存区
选中项目,点击Add添加。
有如下提示时,说明提交的内容中有忽略文件要忽略掉的内容,点击cancel忽略掉对应的文件。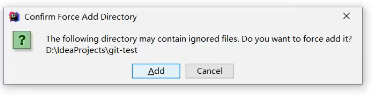
4. 提交到本地仓库

5. 推送到远程仓库

6. 代码版本切换
下方状态栏中可以查看git 历史记录,不同版本idea可能有所不同:
注意右下角,黄色的head代表当前版本,绿色代表最新版本
选择想要切换的版本,点击Checkout Revision切换,切换完成后,黄色的head标签会移动到对应的版本,代码也会随之变化到对应版本:
7. 创建分支
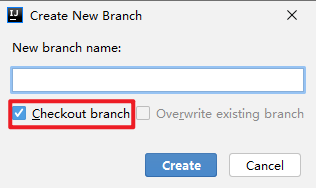
在idea右下角可以找到,点击之后,填写分支名称,即可创建。若勾选了Checkout branch则创建完毕之后直接切换到新分支: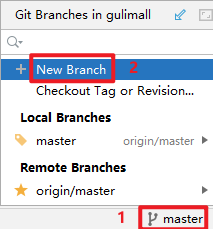
创建完毕后: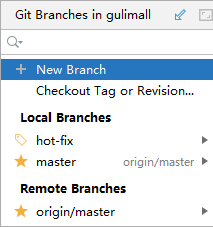
8. 切换分支

9. 分支合并
先切换到目标分支,再选择指定分支,选择Merge into Current来合并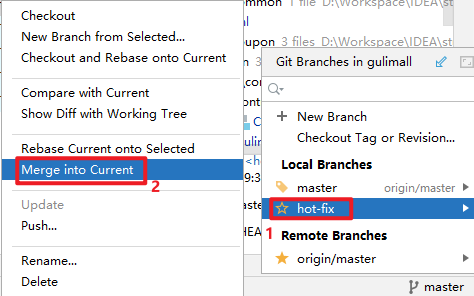
- 无冲突合并
合并前:
合并后:
- 冲突合并
会出现如下界面,通常点击merge做手动合并: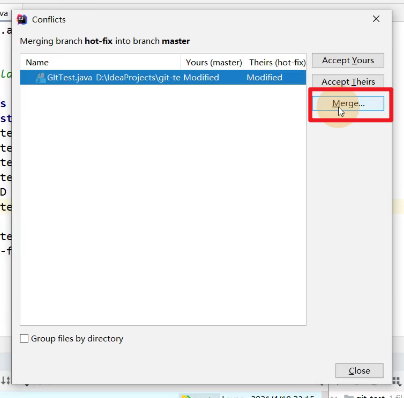
手动合并代码,点击apply: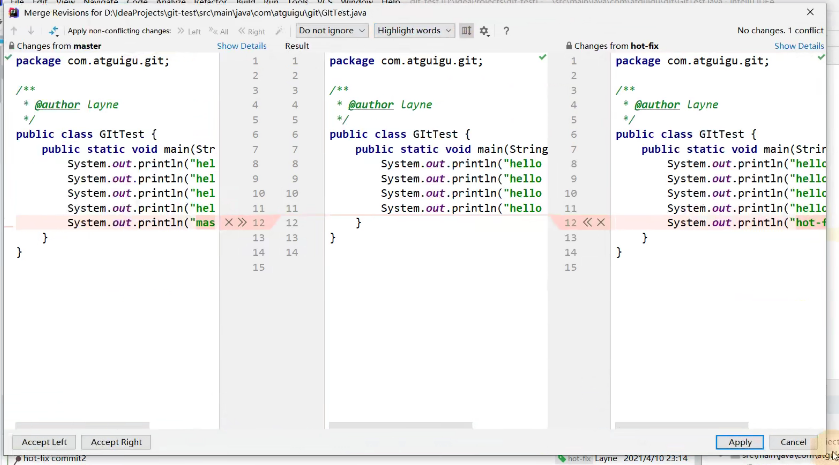
合并前:
合并后: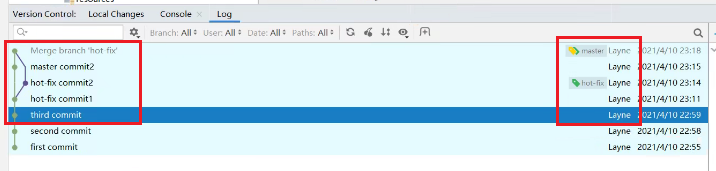

若有收获,就点个赞吧
0 人点赞
