Seata 高可用部署
1 准备工作
需要准备可用的注册中心、配置中心 Nacos 和 MySQL,通常情况下,注册中心、配置中心和数据库都是已有的。这里用注册中心和配置中心都是Nacos。
2 部署 seata-server
2.1 创建seata-server需要的表
具体的 SQL 参考 script/server/db,这里使用的是 MySQL 的脚本,数据库名称为 seata
同时,也需要创建 undo_log 表, 可以参考 script/client/at/db/
创建数据库seata
create database seata CHARACTER SET utf8mb4 COLLATE utf8mb4_unicode_ci;
导入数据库的表
具体的 SQL 参考script/server/db,从官方github 获取最新的sql文件。
2.2 修改seata-server配置
将以下配置添加到 Nacos 配置中心,具体添加方法可以参考 script/config-center
service.vgroupMapping.my_test_tx_group=defaultstore.mode=dbstore.db.datasource=druidstore.db.dbType=mysqlstore.db.driverClassName=com.mysql.jdbc.Driverstore.db.url=jdbc:mysql://192.168.199.2:30060/seata?useUnicode=truestore.db.user=rootstore.db.password=123456
2.3 部署 seata-server 到 Kubernetes
- seata-server.yaml
需要将 ConfigMap 的注册中心和配置中心地址改成相应的地址
apiVersion: v1
kind: Service
metadata:
  name: seata-server
  namespace: common
  labels:
    app.kubernetes.io/name: seata-ha-server
spec:
  type: ClusterIP
  ports:
    - port: 8091
      protocol: TCP
      name: http
  selector:
    app.kubernetes.io/name: seata-ha-server

---

apiVersion: apps/v1
kind: StatefulSet
metadata:
  name: seata-ha-server
  namespace: common
  labels:
    app.kubernetes.io/name: seata-ha-server
spec:
  serviceName: seata-ha-server
  replicas: 3
  selector:
    matchLabels:
      app.kubernetes.io/name: seata-ha-server
  template:
    metadata:
      labels:
        app.kubernetes.io/name: seata-ha-server
    spec:
      containers:
        - name: seata-ha-server
          image: docker.io/seataio/seata-server:latest
          imagePullPolicy: IfNotPresent
          env:
            - name: SEATA_CONFIG_NAME
              value: file:/root/seata-config/registry
          ports:
            - name: http
              containerPort: 8091
              protocol: TCP
          volumeMounts:
            - name: seata-config
              mountPath: /root/seata-config
      volumes:
        - name: seata-config
          configMap:
            name: seata-ha-server-config


---
apiVersion: v1
kind: ConfigMap
metadata:
  name: seata-ha-server-config
  namespace: common
data:
  registry.conf: |
    registry {
        type = "nacos"
        nacos {
          application = "seata-server"
          serverAddr = "nacos-hs.common:8848"
          group = "SEATA_GROUP"
          namespace = "75be5ee8-2e22-458f-afeb-bdc54570c247"
          username = "nacos"
          password = "nacos"
        }
    }
    config {
      type = "nacos"
      nacos {
        serverAddr = "nacos-hs.common:8848"
        group = "SEATA_GROUP"
        namespace = "75be5ee8-2e22-458f-afeb-bdc54570c247"
        username = "nacos"
        password = "nacos"
      }
    }
执行文件
kubectl apply -f seata-ha.yaml
执行成功后
[admin@pd-dev-k8s-master01 ~]$ kubectl get po -n common|grep seata
seata-ha-server-0                        1/1     Running     0          59m
seata-ha-server-1                        1/1     Running     0          59m
seata-ha-server-2                        1/1     Running     0          59m
2.4 导入默认所有配置
从官方的github下载执行文件 nacos-config.sh和需要导入的配置文件 config.txt
sh config-center/nacos/nacos-config.sh -h nacos-hs.common -p 8848 -g SEATA_GROUP -t a5061aba-9628-45f2-b46f-987fd54c4d57 -u nacos -w nacos
上面详细的参数配置,请参考官方文档。https://github.com/seata/seata/tree/develop/script/config-center。
3 图示参考
3.1 服务注册
如果seata服务注册在nacos上,会在nacos seata-server名称空间上看到注册上的服务,如下图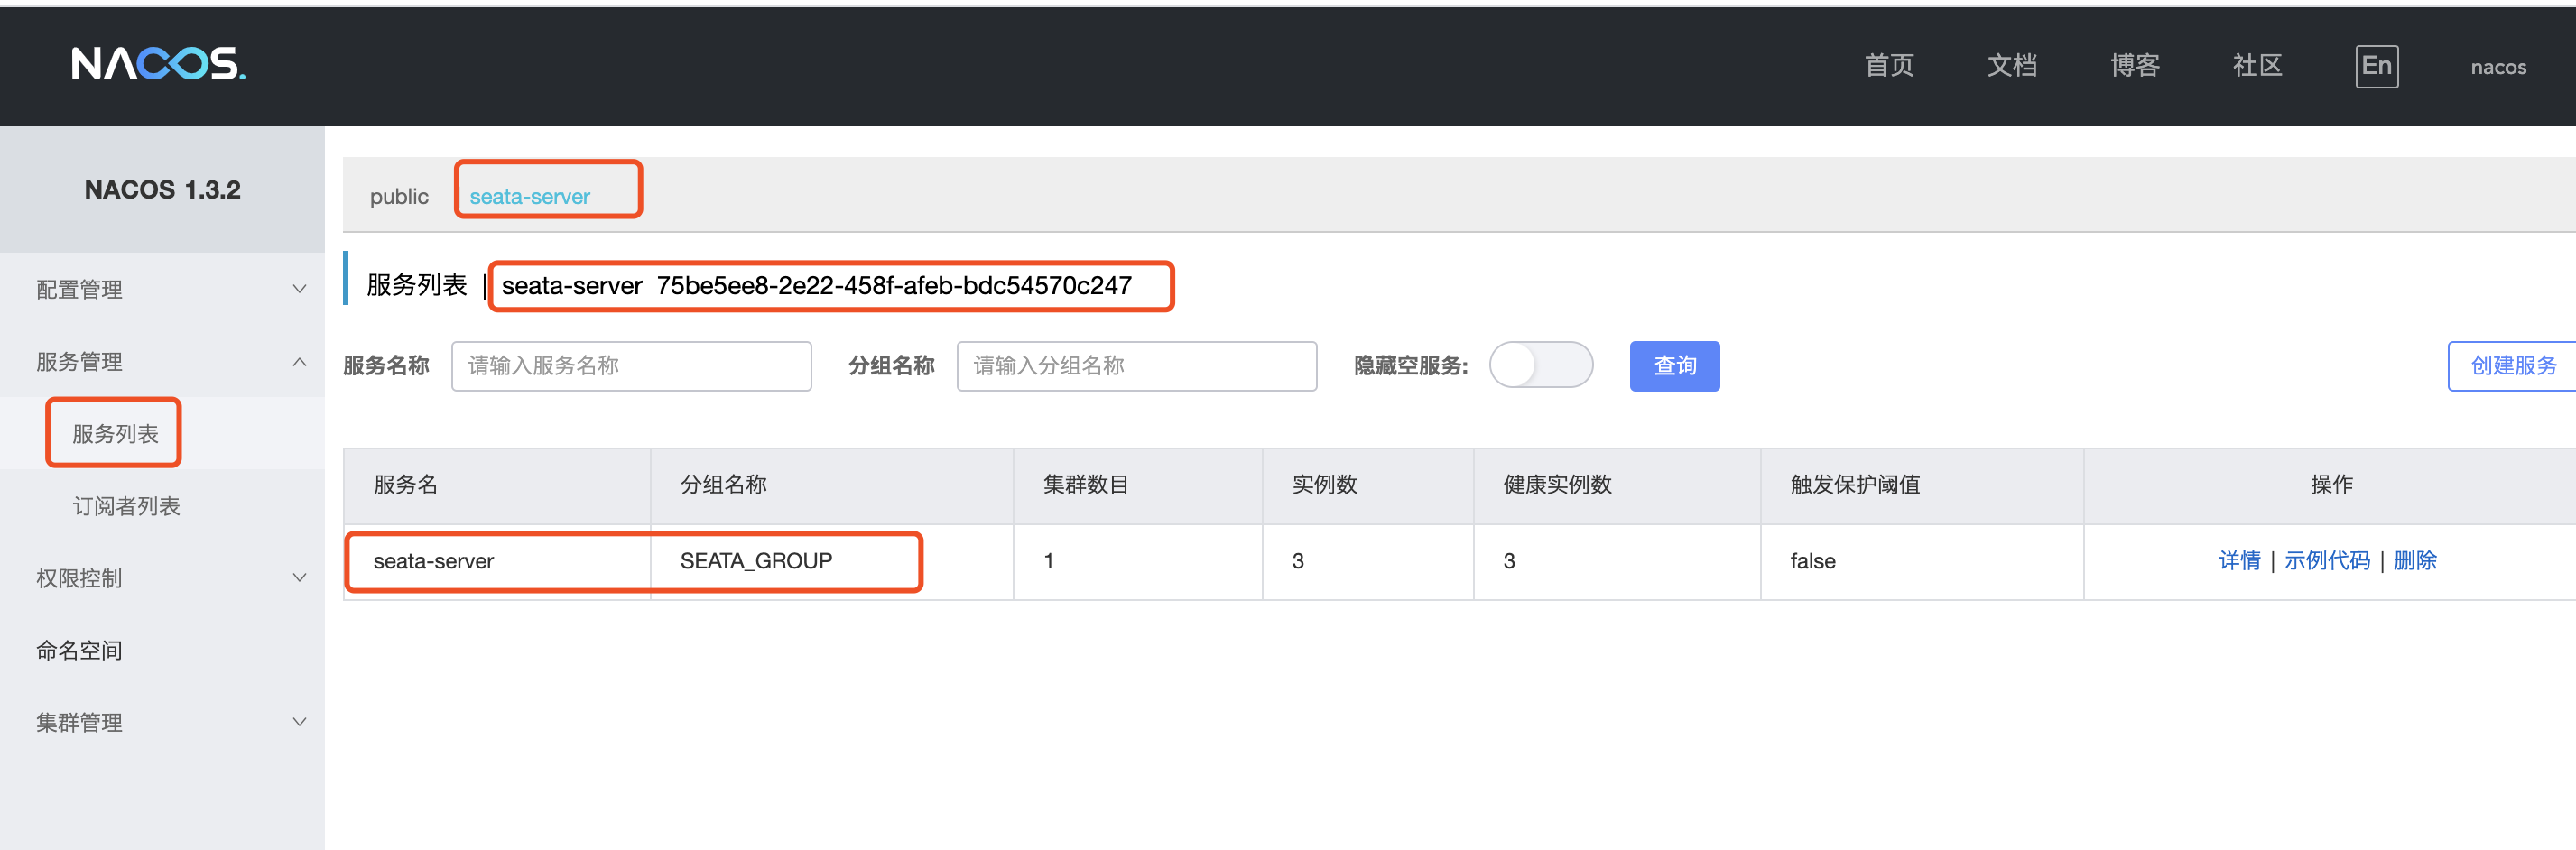
3.2 服务配置
参数导进去后,可以在seata-server的名称空间中看到所有的配置。mysql等配置,都可以在这个配置列表中修改。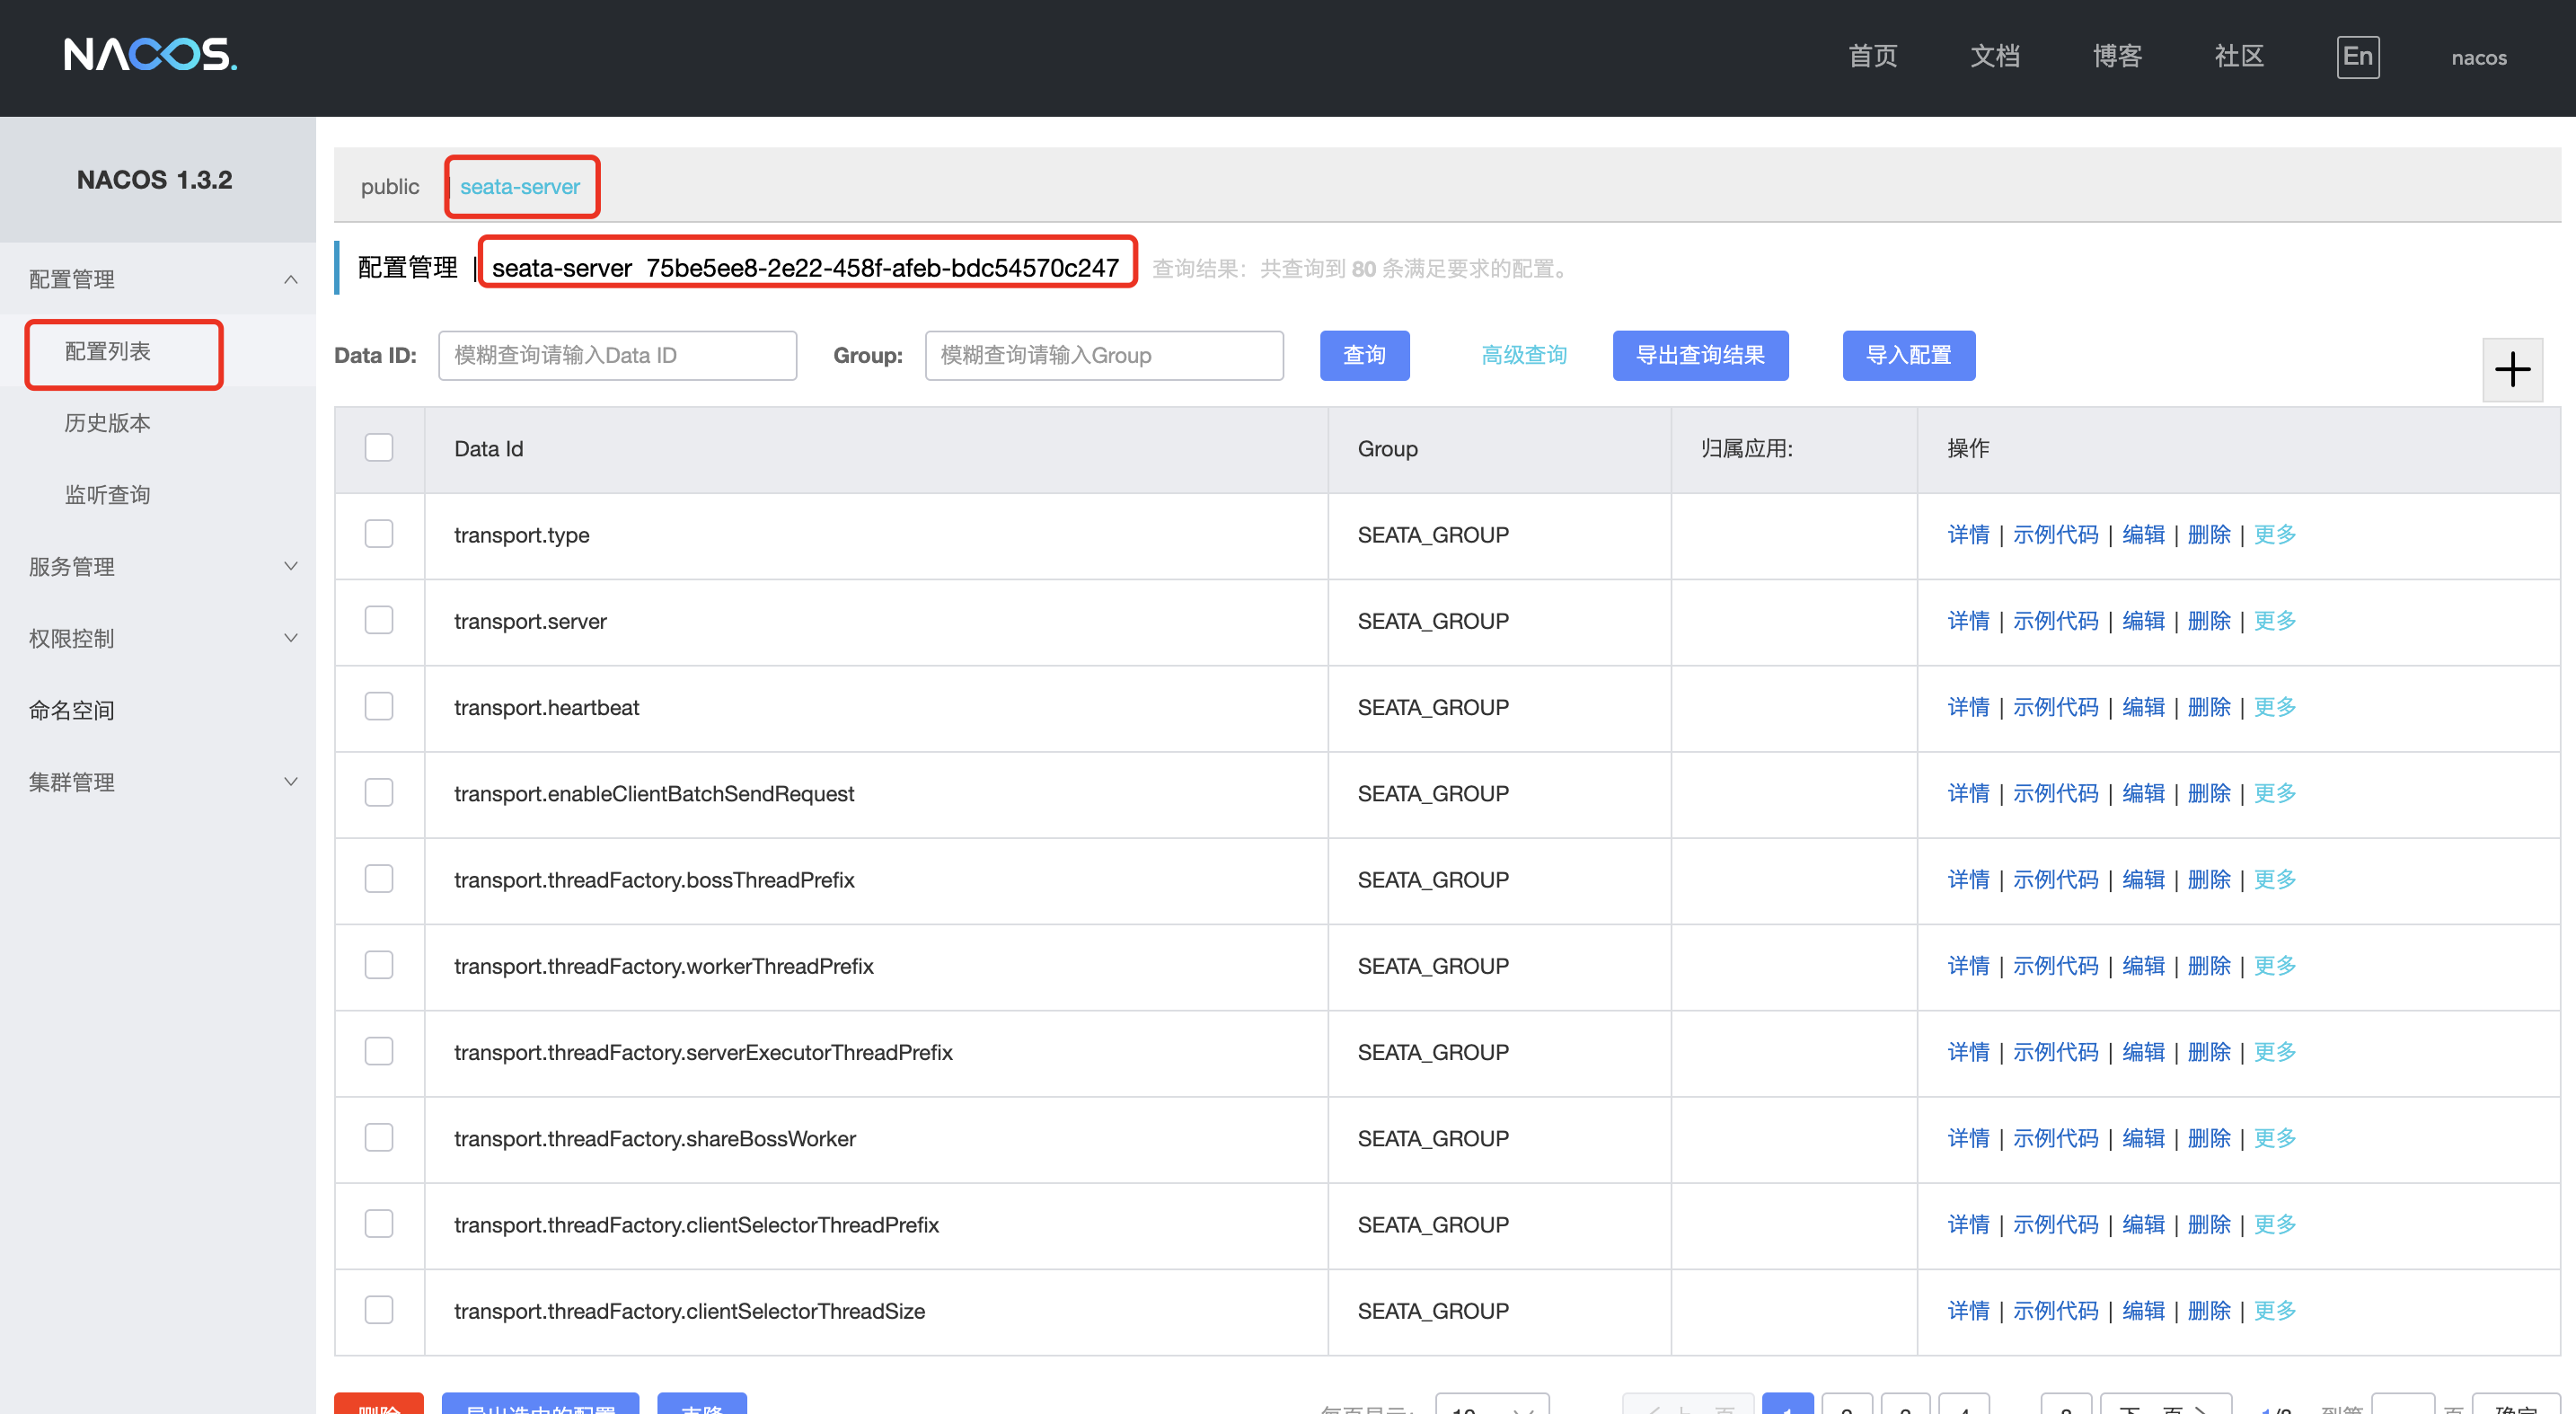
配置中心配置文件
配置中心读取配置的流程
选择配置文件, 例如registry.conf
根据配置文件的文件类型选择基础配置
通过基础配置进行驱动, 加载核心配置
seata 在加载核心配置的时候, 会放到本地的 ConcurrentHashMap 缓存。 取值时可以分为三个级别:
优先从缓存中获取
从 System.getProperty 获取
从配置中心获取
如果取到值会存放到缓存中
选择配置文件
配置中心配置文件默认是: registry.conf , 可以通过系统属性(System.getProperty),环境变量(System.getenv)指定配置中心配置文件
配置的属性优先获取系统属性值,如果不存在在获取环境变量的配置,如果还没有就获取默认值
系统属性方式 环境变量方式 默认值
seata.config.name SEATA_CONFIG_NAME registry
seataEnv SEATA_ENV 空值
默认配置: registry.conf
通过JVM参数: -DseataEnv=test 指定的配置文件: registry-test.conf
配置中心的配置可以放在很多个地方,例如下图的文件,zk,etcd等。 选择配置中心的形式后,就需要根据选择的类型做参数配置。每种配置中心需要的参数都不一样, 例如文件配置中心只需要: 文件类型=文件,文件名=file.conf 。 而zookeeper就需要指定服务器地址,会话超时时间,连接超时时间 等
基础配置
文件配置中心的基础配置:

若有收获,就点个赞吧
0 人点赞
