前面我们在kubernetes dashboard 升级之路一文中成功的将Dashboard升级到最新版本了,增加了身份认证功能,之前为了方便增加了一个admin用户,然后授予了cluster-admin的角色绑定,而该角色绑定是系统内置的一个超级管理员权限,也就是用该用户的token登录Dashboard后会很强势,什么权限都有,想干嘛干嘛,这样的操作显然是非常危险的。接下来我们来为一个新的用户添加访问权限控制。
K8s的认证包含以下3种方式:
证书认证
设置apiserver的启动参数:
—client_ca_file=SOMEFILE。
Token认证
设置apiserver的启动参数:
—token_auth_file=SOMEFILE。
基本信息认证
设置apiserver的启动参数:
— basic_auth_file=SOMEFILE
Kubectl config:
•clusters :配置要访问的kubernetes集群
•contexts :配置访问kubernetes集群的具体上下文环境
•current-context: 配置当前使用的上下文环境
•users: 配置访问的用户信息,用户名以及证书信息
•kubectl config view
• kubectl config set-cluster k8s-cluster2 —server=https://192.168.198.155:6443 —certificate-authority=/etc/kubernetes/ssl/ca.pem —embed-certs=true
•kubectl config set-context kube-system-ctx —cluster=k8s-cluster1 —user=kubectl —namespace=kube-system
•kubectl config unset [clusters | contexts | users | current-context]
•cfssl gencert -ca /etc/kubernetes/ssl/ca.pem -ca-key /etc/kubernetes/ssl/ca-key.pem -config /etc/kubernetes/ssl/ca-config.json -profile kubernetes kubectl-csr.json | cfssljson -bare kubectl
•kubectl config set-credentials mark —client-certificate=admin.pem —client-key=admin-key.pem —embed-certs=true
•kubectl config —kubeconfig=config-demo set-credentials experimenter —username=exp —password=some-password
[root@master01 auth]# vi basic_auth_file
123456,mark,123,”group1,group2,group3“
Vi /etc/systemd/system/kube-apiserver.service
—basic-auth-file=/etc/kubernetes/auth/basic_auth_file \
K8s权限控制:
•在Kubernetes中,授权有ABAC(基于属性的访问控制)、RBAC(基于角色的访问控制)、Webhook、Node、AlwaysDeny(一直拒绝)和AlwaysAllow(一直允许)这6种模式。
RBAC
•Role-based access control(RBAC)基于企业内个人用户属于角色来访问计算和网络的常规访问控制方法。简单理解为权限与角色关联,用户通过成为角色的成员来得到角色的权限。K8S的RBAC使用rbac.authorization.k8s.io/v1 API组驱动认证决策,准许管理员通过API动态配置策略。为了启用RBAC,需要在apiserver启动参数添加—authorization-mode=RBAC。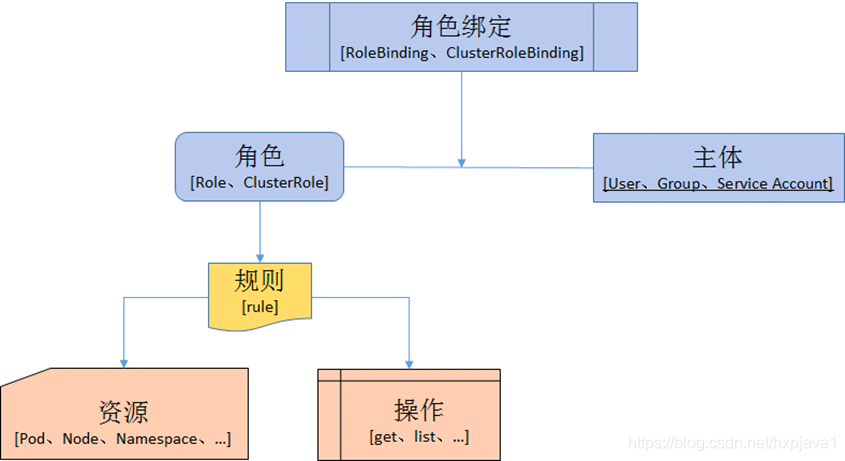
支持的动作
create delete deletecollection get list patch update watch,bind等
支持的资源
“services”, “endpoints”, “pods“,”deployments“
“jobs”,“configmaps”,“nodes”,“rolebindings”,“clusterroles”,等
Role
Role表示是一组规则权限,只能累加,Role可以定义在一个namespace中,只能用于授予对单个命名空间中的资源访问的权限。比如我们新建一个对默认命名空间中Pods具有访问权限的角色:
kind: RoleapiVersion: rbac.authorization.k8s.io/v1beta1metadata:namespace: defaultname: pod-readerrules:- apiGroups: [""] # "" indicates the core API groupresources: ["pods"]verbs: ["get", "watch", "list"]
ClusterRole
ClusterRole具有与Role相同的权限角色控制能力,不同的是ClusterRole是集群级别的,可以用于:
- 集群级别的资源控制(例如 node 访问权限)
- 非资源型 endpoints(例如 /healthz 访问)
- 所有命名空间资源控制(例如 pods)
比如我们要创建一个授权某个特定命名空间或全部命名空间(取决于绑定方式)访问secrets的集群角色:
kind: ClusterRole
apiVersion: rbac.authorization.k8s.io/v1beta1
metadata:
  # "namespace" omitted since ClusterRoles are not namespaced
  name: secret-reader
rules:
- apiGroups: [""]
  resources: ["secrets"]
  verbs: ["get", "watch", "list"]
RoleBinding和ClusterRoleBinding
RoloBinding可以将角色中定义的权限授予用户或用户组,RoleBinding包含一组权限列表(subjects),权限列表中包含有不同形式的待授予权限资源类型(users、groups、service accounts),RoleBinding适用于某个命名空间内授权,而 ClusterRoleBinding适用于集群范围内的授权。
比如我们将默认命名空间的pod-reader角色授予用户jane,这样以后该用户在默认命名空间中将具有pod-reader的权限:
# This role binding allows "jane" to read pods in the "default" namespace.
kind: RoleBinding
apiVersion: rbac.authorization.k8s.io/v1beta1
metadata:
  name: read-pods
  namespace: default
subjects:
- kind: User
  name: jane
  apiGroup: rbac.authorization.k8s.io
roleRef:
  kind: Role
  name: pod-reader
  apiGroup: rbac.authorization.k8s.io
RoleBinding同样可以引用ClusterRole来对当前 namespace 内用户、用户组或 ServiceAccount 进行授权,这种操作允许集群管理员在整个集群内定义一些通用的 ClusterRole,然后在不同的 namespace 中使用 RoleBinding 来引用
例如,以下 RoleBinding 引用了一个 ClusterRole,这个 ClusterRole 具有整个集群内对 secrets 的访问权限;但是其授权用户 dave 只能访问 development 空间中的 secrets(因为 RoleBinding 定义在 development 命名空间)
# This role binding allows "dave" to read secrets in the "development" namespace.
kind: RoleBinding
apiVersion: rbac.authorization.k8s.io/v1beta1
metadata:
  name: read-secrets
  namespace: development # This only grants permissions within the "development" namespace.
subjects:
- kind: User
  name: dave
  apiGroup: rbac.authorization.k8s.io
roleRef:
  kind: ClusterRole
  name: secret-reader
  apiGroup: rbac.authorization.k8s.io
最后,使用 ClusterRoleBinding 可以对整个集群中的所有命名空间资源权限进行授权;以下 ClusterRoleBinding 样例展示了授权 manager 组内所有用户在全部命名空间中对 secrets 进行访问
# This cluster role binding allows anyone in the "manager" group to read secrets in any namespace.
kind: ClusterRoleBinding
apiVersion: rbac.authorization.k8s.io/v1beta1
metadata:
  name: read-secrets-global
subjects:
- kind: Group
  name: manager
  apiGroup: rbac.authorization.k8s.io
roleRef:
  kind: ClusterRole
  name: secret-reader
  apiGroup: rbac.authorization.k8s.io
限制dashboard 用户权限
有了上面的理论基础,我们就可以来新建一个用户,为该用户指定特定的访问权限了,比如我们的需求是:
- 新增一个新的用户
cnych - 该用户只能对命名空间
kube-system下面的pods和deployments进行管理
第一步新建一个ServiceAccount:
$ kubectl create sa cnych -n kube-system
然后我们新建一个角色role-cnych:(role.yaml)
kind: Role
apiVersion: rbac.authorization.k8s.io/v1
metadata:
  namespace: kube-system
  name: role-cnych
rules:
- apiGroups: [""]
  resources: ["pods"]
  verbs: ["get", "watch", "list"]
- apiGroups: ["extensions", "apps"]
  resources: ["deployments"]
  verbs: ["get", "list", "watch", "create", "update", "patch", "delete"]
注意上面的rules规则:管理pods和deployments的权限。
然后我们创建一个角色绑定,将上面的角色role-cnych绑定到cnych的ServiceAccount上:(role-bind.yaml)
kind: RoleBinding
apiVersion: rbac.authorization.k8s.io/v1
metadata:
  name: role-bind-cnych
  namespace: kube-system
subjects:
- kind: ServiceAccount
  name: cnych
  namespace: kube-system
roleRef:
  kind: Role
  name: role-cnych
  apiGroup: rbac.authorization.k8s.io
分别执行上面两个yaml文件:
$ kubect create -f role.yaml
$ kubect create -f role-bind.yaml
接下来该怎么做?和前面一样的,我们只需要拿到cnych这个ServiceAccount的token就可以登录Dashboard了:
$ kubectl get secret -n kube-system |grep cnych
cnych-token-nxgqx                  kubernetes.io/service-account-token   3         47m
$ kubectl get secret cnych-token-nxgqx -o jsonpath={.data.token} -n kube-system |base64 -d
# 会生成一串很长的base64后的字符串
然后在dashboard登录页面上直接使用上面得到的token字符串即可登录,登录过后能看到下面的页面。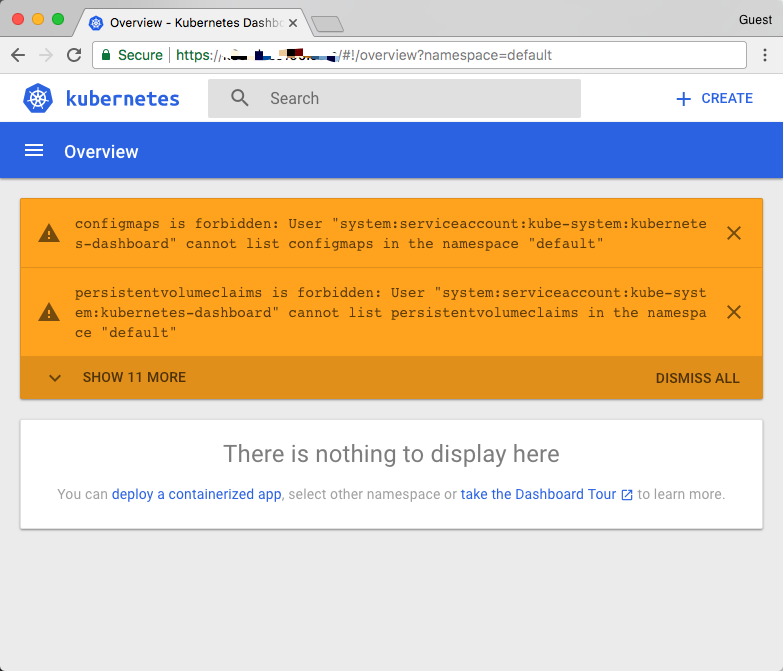
这是因为当前的这个token对应的用户没有被授予访问默认命名空间的权限,所以会出现这种提示,然后我们访问kube-system这个命名空间试下看看(https:///#!/pod?namespace=kube-system):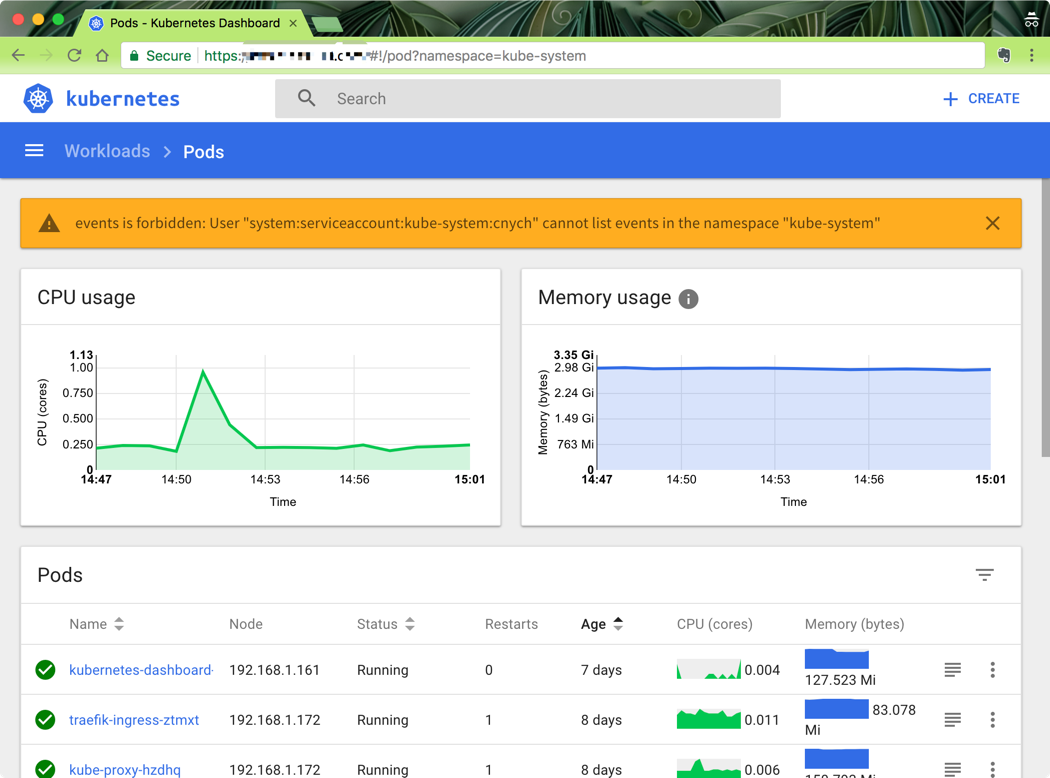
我们可以看到可以访问pod列表了,但是也会有一些其他额外的提示:events is forbidden: User “system:serviceaccount:kube-system:cnych” cannot list events in the namespace “kube-system”,这是因为当前登录用只被授权了访问pod和deployment的权限,同样的,访问下deployment看看可以了吗?
同样的,你可以根据自己的需求来对访问用户的权限进行限制,可以自己通过Role定义更加细粒度的权限,也可以使用系统内置的一些权限……
参考资料

若有收获,就点个赞吧
0 人点赞

: