- 通用参数
index - mBuild 输入模块
- 交互类
- 按钮
- 角度传感器

angle_sensor.get(index = 1)">

angle_sensor.get(index = 1)
angle_sensor.reset(index = 1)">

angle_sensor.reset(index = 1)
angle_sensor.get_speed(index = 1)">

angle_sensor.get_speed(index = 1)
angle_sensor.is_clockwise(index = 1)">

angle_sensor.is_clockwise(index = 1)
angle_sensor.is_anticlockwise(index = 1)">

angle_sensor.is_anticlockwise(index = 1)
- 滑动电位器
- 摇杆

joystick.get_x(index = 1)">

joystick.get_x(index = 1)
joystick.get_y(index = 1)">

joystick.get_y(index = 1)
joystick.is_up(index = 1)">

joystick.is_up(index = 1)
joystick.is_down(index = 1)">

joystick.is_down(index = 1)
joystick.is_left(index = 1)">

joystick.is_left(index = 1)
joystick.is_right(index = 1)">

joystick.is_right(index = 1)
- 多路触摸
- 感知类
- 四路颜色传感器

quad_rgb_sensor.get_line_sta(index = 1)">

quad_rgb_sensor.get_line_sta(index = 1)
quad_rgb_sensor.get_offset_track(index = 1)">

quad_rgb_sensor.get_offset_track(index = 1)
quad_rgb_sensor.is_line(ch, index = 1)">

quad_rgb_sensor.is_line(ch, index = 1)
quad_rgb_sensor.is_background(ch, index = 1)">

quad_rgb_sensor.is_background(ch, index = 1)
quad_rgb_sensor.is_color(color = "white", ch, index = 1)">

quad_rgb_sensor.is_color(color = "white", ch, index = 1)
quad_rgb_sensor.off_led(index = 1)">

quad_rgb_sensor.off_led(index = 1)
- 超声波传感器(新)

ultrasonic2.get(index = 1)">

ultrasonic2.get(index = 1)
ultrasonic2.led_show(bri, index =1)">

ultrasonic2.led_show(bri, index =1)
ultrasonic2.set_bri(led_bri, id, index =1)">

ultrasonic2.set_bri(led_bri, id, index =1)
ultrasonic2.add_bri(led_bri, id, index =1)">

ultrasonic2.add_bri(led_bri, id, index =1)
ultrasonic2.get_bri(id, index =1)">

ultrasonic2.get_bri(id, index =1)
ultrasonic2.play(emotion, index =1)">

ultrasonic2.play(emotion, index =1)
- 光线传感器
- 双路颜色传感器

dual_rgb_sensor.is_color(color = "white", ch, index = 1)">

dual_rgb_sensor.is_color(color = "white", ch, index = 1)
dual_rgb_sensor.get_red(ch = 1, index = 1)">

dual_rgb_sensor.get_red(ch = 1, index = 1)
dual_rgb_sensor.get_green(ch = 1, index = 1)">

dual_rgb_sensor.get_green(ch = 1, index = 1)
dual_rgb_sensor.get_blue(ch = 1, index = 1)">

dual_rgb_sensor.get_blue(ch = 1, index = 1)
dual_rgb_sensor.get_light(ch = 1, index = 1)">

dual_rgb_sensor.get_light(ch = 1, index = 1)
dual_rgb_sensor.get_gray_level(ch = 1, index = 1)">

dual_rgb_sensor.get_gray_level(ch = 1, index = 1)
dual_rgb_sensor.set_led(color = "white", index = 1)">

dual_rgb_sensor.set_led(color = "white", index = 1)
dual_rgb_sensor.off_led(index = 1)">

dual_rgb_sensor.off_led(index = 1)
- 声音传感器
- 热运动传感器
- 超声波
- 测距传感器
- 运动传感器

motion_sensor.is_shake(index = 1)">

motion_sensor.is_shake(index = 1)
motion_sensor.get_shakeval(index = 1)">

motion_sensor.get_shakeval(index = 1)
motion_sensor.get_accel(axis, index = 1)">

motion_sensor.get_accel(axis, index = 1)
motion_sensor.is_tiltleft(index = 1)">

motion_sensor.is_tiltleft(index = 1)
motion_sensor.is_tiltright(index = 1)">

motion_sensor.is_tiltright(index = 1)
motion_sensor.is_tiltup(index = 1)">

motion_sensor.is_tiltup(index = 1)
motion_sensor.is_tiltdown(index = 1)">

motion_sensor.is_tiltdown(index = 1)
motion_sensor.is_faceup(index = 1)">

motion_sensor.is_faceup(index = 1)
motion_sensor.is_facedown(index = 1)">

motion_sensor.is_facedown(index = 1)
motion_sensor.get_roll(index = 1)">

motion_sensor.get_roll(index = 1)
motion_sensor.get_pitch(index = 1)">

motion_sensor.get_pitch(index = 1)
motion_sensor.get_yaw(index = 1)">

motion_sensor.get_yaw(index = 1)
motion_sensor.get_gyro(axis, index = 1)">

motion_sensor.get_gyro(axis, index = 1)
motion_sensor.get_rotation(axis, index = 1)">

motion_sensor.get_rotation(axis, index = 1)
motion_sensor.reset_rotation(axis= "all", index = 1)">

motion_sensor.reset_rotation(axis= "all", index = 1)
- 土壤湿度传感器
- 温度传感器
- 温湿度传感器
- MQ2气体传感器
- 火焰传感器
- 磁敏传感器
- 视觉模块

smart_camera.set_mode(mode = "color", index = 1)">

smart_camera.set_mode(mode = "color", index = 1)
smart_camera.learn(sign = 1, t = "until_button", index = 1)">

smart_camera.learn(sign = 1, t = "until_button", index = 1)
smart_camera.detect_sign(sign, index = 1)">

smart_camera.detect_sign(sign, index = 1)
smart_camera.detect_sign_location(sign, location, index = 1)">

smart_camera.detect_sign_location(sign, location, index = 1)
smart_camera.get_sign_x(sign, index = 1)">

smart_camera.get_sign_x(sign, index = 1)
smart_camera.get_sign_y(sign, index = 1)">

smart_camera.get_sign_y(sign, index = 1)
smart_camera.get_sign_wide(sign, index = 1)">

smart_camera.get_sign_wide(sign, index = 1)
smart_camera.get_sign_hight(sign, index = 1)">

smart_camera.get_sign_hight(sign, index = 1)
smart_camera.open_light(index = 1)">

smart_camera.open_light(index = 1)
smart_camera.close_light(index = 1)">

smart_camera.close_light(index = 1)
smart_camera.reset(index = 1)">

smart_camera.reset(index = 1)
smart_camera.detect_label(label, index = 1)">

smart_camera.detect_label(label, index = 1)
smart_camera.get_label_x(label, index = 1)">

smart_camera.get_label_x(label, index = 1)
smart_camera.get_label_y(sign, index = 1)">

smart_camera.get_label_y(sign, index = 1)
smart_camera.detect_cross(index = 1)">

smart_camera.detect_cross(index = 1)
smart_camera.get_cross_x(index = 1)">

smart_camera.get_cross_x(index = 1)
smart_camera.get_cross_y(index = 1)">

smart_camera.get_cross_y(index = 1)
smart_camera.get_cross_road(index = 1)">

smart_camera.get_cross_road(index = 1)
smart_camera.get_cross_angle(sn = 1, index = 1)">

smart_camera.get_cross_angle(sn = 1, index = 1)
smart_camera.set_line(mode = "black, index = 1)">

smart_camera.set_line(mode = "black, index = 1)
smart_camera.get_vector_start_x(index = 1)">

smart_camera.get_vector_start_x(index = 1)
smart_camera.get_vector_start_y(index = 1)">

smart_camera.get_vector_start_y(index = 1)
smart_camera.get_vector_end_x(index = 1)">

smart_camera.get_vector_end_x(index = 1)
smart_camera.get_vector_end_y(index = 1)">

smart_camera.get_vector_end_y(index = 1)
smart_camera.set_vector_angle(angle, index = 1)">

smart_camera.set_vector_angle(angle, index = 1)
smart_camera.get_vector_angle(index = 1)">

smart_camera.get_vector_angle(index = 1)
smart_camera.set_kp(kp, index = 1)">

smart_camera.set_kp(kp, index = 1)
smart_camera.get_sign_diff_speed(sign, axis, axis_val, index = 1)">

smart_camera.get_sign_diff_speed(sign, axis, axis_val, index = 1)
smart_camera.get_label_diff_speed(label, axis, axis_val, index = 1)">

smart_camera.get_label_diff_speed(label, axis, axis_val, index = 1)
smart_camera.get_follow_vector_diff_speed(index = 1)">

smart_camera.get_follow_vector_diff_speed(index = 1)
smart_camera.is_lock_sign(sign, axis, axis_val, index = 1)">

smart_camera.is_lock_sign(sign, axis, axis_val, index = 1)
smart_camera.is_lock_label(sign, axis, axis_val index = 1)">

smart_camera.is_lock_label(sign, axis, axis_val index = 1)
- 交互类
- mBuild 输出模块
- 灯光类
- LED 点阵

led_matrix.show(image = "hi", index = 1)">

led_matrix.show(image = "hi", index = 1)
led_matrix.show_at(image = "hi",x = 0, y = 0, index = 1)">

led_matrix.show_at(image = "hi",x = 0, y = 0, index = 1)
led_matrix.print(message, index = 1)">

led_matrix.print(message, index = 1)
led_matrix.print_until_done(message, index = 1)">

led_matrix.print_until_done(message, index = 1)
led_matrix.print_at(message, x, y, index = 1)">

led_matrix.print_at(message, x, y, index = 1)
led_matrix.on(x, y, index = 1)">

led_matrix.on(x, y, index = 1)
led_matrix.off(x, y, index = 1)">

led_matrix.off(x, y, index = 1)
led_matrix.toggle(x, y, index = 1)">

led_matrix.toggle(x, y, index = 1)
led_matrix.clear(index = 1)">

led_matrix.clear(index = 1)
- RGB 灯

rgb_led.on(r, g, b, index = 1)">

rgb_led.on(r, g, b, index = 1)
rgb_led.off(index = 1)">

rgb_led.off(index = 1)
rgb_led.set_red(val, index = 1)">

rgb_led.set_red(val, index = 1)
rgb_led.set_green(val, index = 1)">

rgb_led.set_green(val, index = 1)
rgb_led.set_blue(val, index = 1)">

rgb_led.set_blue(val, index = 1)
rgb_led.add_red(val, index = 1)">

rgb_led.add_red(val, index = 1)
rgb_led.add_green(val, index = 1)">

rgb_led.add_green(val, index = 1)
rgb_led.add_blue(val, index = 1)">

rgb_led.add_blue(val, index = 1)
rgb_led.get_red(val, index = 1)">

rgb_led.get_red(val, index = 1)
rgb_led.get_green(index = 1)">

rgb_led.get_green(index = 1)
rgb_led.get_blue(index = 1)">

rgb_led.get_blue(index = 1)
- 彩灯驱动

led_driver.on(r, g, b, id = "all", index = 1)">

led_driver.on(r, g, b, id = "all", index = 1)
led_driver.show(color, index = 1)">

led_driver.show(color, index = 1)
led_driver.off(led_id = "all", index = 1)">

led_driver.off(led_id = "all", index = 1)
led_driver.set_red(val, led_id = "all", index = 1)">

led_driver.set_red(val, led_id = "all", index = 1)
led_driver.set_green(val, led_id = "all", index = 1)">

led_driver.set_green(val, led_id = "all", index = 1)
led_driver.set_blue(val, led_id = "all", index = 1)">

led_driver.set_blue(val, led_id = "all", index = 1)
led_driver.add_red(val, led_id = "all", index = 1)">

led_driver.add_red(val, led_id = "all", index = 1)
led_driver.add_green(val, led_id = "all", index = 1)">

led_driver.add_green(val, led_id = "all", index = 1)
led_driver.add_blue(val, led_id = "all", index = 1)">

led_driver.add_blue(val, led_id = "all", index = 1)
led_driver.set_mode(mode = "steady", index = 50)">

led_driver.set_mode(mode = "steady", index = 50)
- LED 点阵
- 播放类
- 扬声器

speaker.mute(index = 1)">

speaker.mute(index = 1)
speaker.play_tone(freq, index = 1)">

speaker.play_tone(freq, index = 1)
speaker.play_music(music, index = 1)">

speaker.play_music(music, index = 1)
speaker.play_music_until_done(music, index = 1)">

speaker.play_music_until_done(music, index = 1)
speaker.set_vol(val, index = 1)">

speaker.set_vol(val, index = 1)
speaker.add_vol(val, index = 1)">

speaker.add_vol(val, index = 1)
speaker.get_vol(index = 1)">

speaker.get_vol(index = 1)
speaker.is_play(index = 1)">

speaker.is_play(index = 1)
- 扬声器
- 动力类
- 电机驱动

motor_driver.set(power, index = 1)">

motor_driver.set(power, index = 1)
motor_driver.add(power, index = 1)">

motor_driver.add(power, index = 1)
motor_driver.get(index = 1)">

motor_driver.get(index = 1)
motor_driver.get_load(index = 1)">

motor_driver.get_load(index = 1)
motor_driver.stop(index = 1)">

motor_driver.stop(index = 1)
- 舵机驱动

servo_driver.set(angle, index = 1)">

servo_driver.set(angle, index = 1)
servo_driver.add(angle, index = 1)">

servo_driver.add(angle, index = 1)
servo_driver.get(index = 1)">

servo_driver.get(index = 1)
servo_driver.get_load(index = 1)">

servo_driver.get_load(index = 1)
servo_driver.release(index = 1)">

servo_driver.release(index = 1)
- 智能伺服电机(12公斤级)
-
smart_servo.turn(angle, speed, index = 1)">
smart_servo.turn(angle, speed, index = 1) -
smart_servo.turn_to(angle, speed, index = 1 )">
smart_servo.turn_to(angle, speed, index = 1 ) -
smart_servo.run(power, index = 1)">
smart_servo.run(power, index = 1) -
smart_servo.stop(index = "all")">
smart_servo.stop(index = "all") -
smart_servo.get_angle(index = 1)">
smart_servo.get_angle(index = 1) -
smart_servo.get_speed(index = 1)">
smart_servo.get_speed(index = 1) -
smart_servo.release_angle(index = "all")">
smart_servo.release_angle(index = "all") -
smart_servo.lock_angle(index = "all")">
smart_servo.lock_angle(index = "all") -
smart_servo.reset(index = "all")">
smart_servo.reset(index = "all")
-
- 电机驱动
- 灯光类
- mBuild 其他模块
- 红外收发
-
ir.send(message, index = 1)">
ir.send(message, index = 1) -
ir.receive(index = 1)">
ir.receive(index = 1) -
ir.record(record_id, index = 1)">
ir.record(record_id, index = 1) -
ir.send_record(record_id, index = 1)">
ir.send_record(record_id, index = 1) -
ir.is_receive(message, index = 1)">
ir.is_receive(message, index = 1)
-
- 红外收发
为了让您更好的阅读童芯派的API文档,我们对API的可使用场景(Python3与MicroPython)进行了标识。Python3 对应的是童芯派在线模式的编程,MicroPython对应的是上传模式的编程。
需要注意的是,如果是Python3模式下调用,需要在API前面增加一个cyberpi的前缀。
比如cyberpi.button.is_press(index = 1),否则可以以mbuild.button.is_press(index=1)的方式进行调用。
支持Python 3 的标识: 
支持MicroPython 的标识:
mBuild 电子模块包含 30 余种模块及配件,能够充分满足您在创意物化、综合实践、项目制教学、编程普及、人工智能科普、机器人赛事等场景中对于电子模块的需求。

:::info 注意:你需要额外购买包含 mBuild 电子模块扩展包或套装来获得 mBuild 模块以使用这些功能。 :::
mBuild 电子模块支持多个主控设备,通过不同的 API 库可以配合不同的主控进行使用,但功能函数相同。实际使用时请导入相应的 API 库。此外,mBuild 电子模块自身也可作为设备单独进行使用。
例如,通过童芯派使用 mBuild 电子模块时,需导入 cyberpi 库。
from cyberpi import *
通过光环板使用 mBuild 电子模块时,需导入 halocode 库。
from halocode import *
将 mBuild 电子模块作为单独的设备进行使用时,需导入 mbuild 库。
from mbuild import *
通用参数 index
所有的 mbuild 电子模块的 API 均有一个参数index,它代表 API 指向的链上的第几个同类型模块。一般,具有默认值1。因此,当链上的每种模块只使用到一个时,你无需关注和独立设置它。
而当链上出现两个同类型模块时,你需要让index等于2、3、4甚至其他数字,以便控制链上的第2个、第3个,甚至第4个同类型模块,比如,motor_driver.set(100, index = 2)表示将链上第二个电机驱动的输出动力变为100。
mBuild 输入模块
交互类
按钮


button.is_press(index = 1)
检测按钮是否被按下。
返回布尔值,True:按钮被按下;False:按钮未被按下。


button.get_count(index = 1)
获得按钮自通电后被按下的次数。
返回数值。


button.reset_count(index = 1)
重置按钮被按下的次数,重置后次数归零。
角度传感器


angle_sensor.get(index = 1)
获得角度传感器转过的角度(相对于通电瞬间所在的位置)。
返回数值,单位°,角度传感器顺时针旋转时角度增大,逆时针旋转时角度减小。


angle_sensor.reset(index = 1)
角度传感器重置转过的角度。


angle_sensor.get_speed(index = 1)
获得角度传感器转动的速度。
返回数值,单位°/s,角度传感器顺时针旋转时返回值为正,逆时针旋转时返回值为负。


angle_sensor.is_clockwise(index = 1)
检测角度传感器是否正顺时针转动。
返回布尔值,True:正顺时针转动;False:未顺时针转动。


angle_sensor.is_anticlockwise(index = 1)
检测角度传感器是否正逆时针转动。
返回布尔值,True:正逆时针转动;False:未逆时针转动。
滑动电位器


slider.get(index = 1)
获得滑动电位器的位置。
返回数值,可能值为0-100,单位为%,表示滑杆所在的位置。
摇杆


joystick.get_x(index = 1)
获得摇杆的 x 轴读数。
返回数值,可能的范围为-100 - 100。


joystick.get_y(index = 1)
获得摇杆的 y 轴读数。
返回数值,可能的范围为-100 - 100。


joystick.is_up(index = 1)
判断摇杆是否摇到上方。 返回布尔值,True:摇杆向上摇动;False:摇杆未向上摇动。


joystick.is_down(index = 1)
判断摇杆是否摇到下方。 返回布尔值,True:摇杆向下摇动;False:摇杆未向下摇动。


joystick.is_left(index = 1)
判断摇杆是否摇到左方。 返回布尔值,True:摇杆向左摇动;False:摇杆未向左摇动。


joystick.is_right(index = 1)
判断摇杆是否摇到右方。 返回布尔值,True:摇杆向右摇动;False:摇杆未向右摇动。
多路触摸


multi_touch.is_touch(ch = "any", index = 1)
检测多路触摸对应触点是否被触摸,多路触摸主要根据触点的电容值变化检测物体,因此在合适的阈值设置下,隔着纸、木板、塑料等绝缘体也可以被检测到,因为导体的靠近终归是改变了触点的电容值,参数:
- ch 字符串或数值变量,默认为”any”。 ch 为字符串类型时,有效值为”any”,此时任意触点被触摸都会被检测到。
ch 为数值时,有效范围为1-8,对应同序号的触摸触点。 返回布尔值,True:对应触点被触摸;False:对应触点未被触摸。


multi_touch.reset(level = "middle", index = 1)
设置多路触摸的触摸阈值,参数:
- level 字符串,有效值为 low:低灵敏度;middle:中灵敏度;high:高灵敏度。
感知类
科学传感器
科学传感器是童心制物(Makeblock)自主开发的一款多合一传感器,集成了MQ2气体、地磁、火焰、气压、温湿度、热运动、触摸以及土壤湿度传感器元件,可方便且高效地应用于多种数据收集、科学探寻和物联网项目。
有关科学传感器的更多信息,参阅 科学传感器。
下文将讲述科学传感器可用的 API。跟其它 mBuild 模块一样,科学传感器的所有 API 中都包含一个参数index。该参数为通用参数。有关其定义和功能,参阅“通用参数 index”。
热运动传感器


**science.pir_is_active(index=1)**
科学传感器上的热运动传感器检测到人体运动。
返回 bool。
火焰传感器


**science.flame_is_active(index=1)**
科学传感器上的火焰传感器检测到火焰。
返回 bool。


**cyberpi.science.flame_get(index=1)**
科学传感器上的火焰传感器检测到的数值。
返回 int。
土壤湿度传感器


**science.soil_get(index=1)**
获取科学传感器上的土壤湿度传感器的湿度值。
返回 int。


**science.soil_get_resistance(index=1)**
获取科学传感器上的土壤湿度传感器极耳间的电阻值 (kΩ)
返回 int。


**science.soil_get_adc_value(index=1)**
检测科学传感器上土壤湿度传感器的极耳是否被导通。
返回 bool。
烟雾传感器


**science.mq2_is_active(index=1)**
科学传感器上的烟雾传感器检测到可燃气体。
返回 bool。


**science.mq2_get(index=1)**
科学传感器上的烟雾传感器检测到可燃气体值。
返回 int。


**science.mq2_on(threshold, index=1)**
按指定的灵敏度打开科学传感器上的可燃气体传感器。即将可燃气体传感器切换至工作模式。
- threshold
float,填入可燃气体传感器的数值。数值取值区间为0.1-1.0。数值越高,则灵敏度越高。


**science.mq2_off(index=1)**
关闭科学传感器的可燃气体传感器。即将可燃气体传感器关闭工作模式。
触摸传感器


**science.touch_get_resistance(index=1)**
获取科学传感器上触摸传感器检测到的电阻值 (kΩ)
返回 int。


**science.touch_is_active(index=1)**
检测科学传感器上触摸传感器是否被触摸
返回 bool。
温湿度传感器


**science.humiture_get_temp(index=1)**
获取科学传感器上的温湿度传感器的温度值(摄氏度)
返回 float。


**science.humiture_get_humidity(index=1)**
获取科学传感器上温湿度传感器的湿度值。
返回 int。
地磁传感器


**science.compass_get(axis,index = 1)**
获取科学传感器上的地磁传感器某个轴(x、y、z)向检测到的磁通量。
- axis
str,填入要获取磁通量的轴向,可填入为”x”、”y”、”z”。
返回 int。


**science.compass_get_angle(index = 1)**
获取科学传感器上地磁传感器返回的指南针角度。
返回 int。


**science.compass_reset(switch,index = 1)**
开启或关闭科学传感器上地磁传感器的校正。
- switch
int,可填入数值为0和1,其中0表示关闭校正,1表示开启校正。


**science.compass_is_active(index = 1)**
科学传感器上地磁传感器是否检测到磁体。
返回 bool。
大气压传感器


**science.atmos_get(index=1)**
取得科学传感器上的大气压传感器获取的气压值。
返回 int。


**science.atmos_get_altitude(index = 1)**
取得科学传感器上大气压传感器获取的预估海拔值。
返回 int。
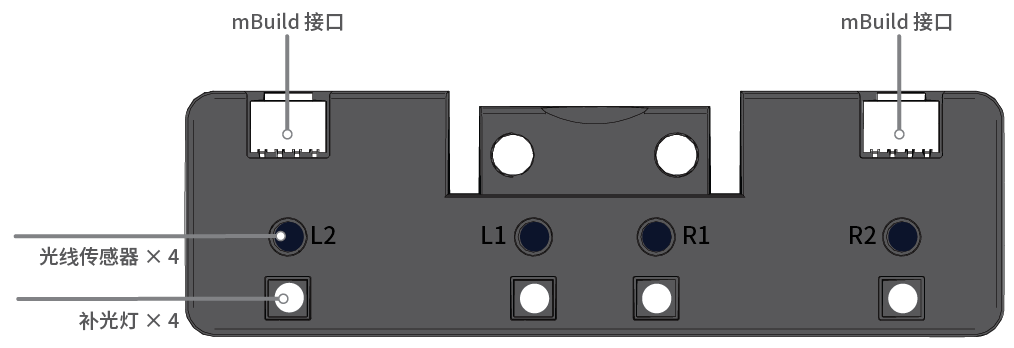
四路颜色传感器


quad_rgb_sensor.get_line_sta(index = 1)
读取四路颜色传感器的巡线状态。参数:
- index
int,表示该模块是第几个 mBuild 串上的同类型模块。
返回 int,可能范围为 0~15,对应二进制数 0000~1111,其中 1 代表对应探头识别到背景(默认为浅色),0 代表对应探头检测到线(默认为深色)。其对应关系及可能的巡线位置推测如下表:
| 返回值大小 | 对应二进制表示 | 传感器看到的画面(白底黑线下) |
|---|---|---|
| 0 | 0000 |  |
| 1 | 0001 |  |
| 2 | 0010 |  |
| 3 | 0011 |  |
| 4 | 0100 |  |
| 5 | 0101 |  |
| 6 | 0110 |  |
| 7 | 0111 |  |
| 8 | 1000 |  |
| 9 | 1001 |  |
| 10 | 1010 |  |
| 11 | 1011 |  |
| 12 | 1100 |  |
| 13 | 1101 |  |
| 14 | 1110 |  |
| 15 | 1111 |  |


quad_rgb_sensor.get_offset_track(index = 1)
返回 int,表示四路颜色传感器检测到巡线的线偏移程度,可能值为 -100~100。-100 时,四路颜色传感器位于巡线的左侧。


quad_rgb_sensor.is_line(ch, index = 1)
判断四路巡线对应探头是否检测到了巡线。参数:
- _ch i_nt 或 str 表示对应的传感器探头,有效值为”any”/“L2”/“L1”/“R1”/“R2”/“l2”/“l1”/“r1”/“r2”/4/3/2/1。
返回 bool,返回 bool,True:检测到巡线;False:未检测到巡线。


quad_rgb_sensor.is_background(ch, index = 1)
返回 bool,表示四路巡线传感器对应探头是否检测到了背景。参数:
_ch i_nt 或 str 表示对应的传感器探头,其对应有效值及指向的探头如下表所示。有效值为”any”/“L2”/“L1”/“R1”/“R2”/“l2”/“l1”/“r1”/“r2”/4/3/2/1。
返回 bool,True:检测到背景色;False:未检测到背景色。


quad_rgb_sensor.is_color(color = "white", ch, index = 1)
判断颜色传感器是否检测到了特定的颜色,参数:
- color 字符串,表示需要检测的颜色,颜色名称及其缩写对照表: ```python 红 red r
黄 yellow y
绿 green g
青 cyan c
蓝 blue b
紫 purple p
白 white w
黑 black k
- _ch _int 或 str 表示对应的传感器探头,有效值为"any"/"L2"/"L1"/"R1"/"R2"/"l2"/"l1"/"r1"/"r2"/4/3/2/1。返回 bool,`True`:检测到指定颜色;`False`:未检测到指定颜色。<a name="ciJNw"></a>####  `quad_rgb_sensor.get_red(ch, index = 1)`获取颜色传感器检测到颜色的R值。参数:- _ch _int 或 str 表示对应的传感器探头,有效值为"L2"/"L1"/"R1"/"R2"/"l2"/"l1"/"r1"/"r2"/4/3/2/1。返回数值,可能值为`0 -255`。<a name="T8BMK"></a>####  `quad_rgb_sensor.get_green(ch, index = 1)`获取颜色传感器检测到颜色的 G 值。参数:- _ch _int 或 str 表示对应的传感器探头,有效值为"L2"/"L1"/"R1"/"R2"/"l2"/"l1"/"r1"/"r2"/4/3/2/1。返回数值,可能值为`0 -255`。<a name="EaA13"></a>####  `quad_rgb_sensor.get_blue(ch, index = 1)`获取颜色传感器检测到颜色的 B 值。参数:- _ch _int 或 str 表示对应的传感器探头,有效值为"L2"/"L1"/"R1"/"R2"/"l2"/"l1"/"r1"/"r2"/4/3/2/1。返回数值,可能值为`0 -255`。<a name="Xdoc1"></a>####  `quad_rgb_sensor.get_gray(ch, index = 1)`获取颜色传感器检测到颜色的灰度值,该读值来自开启白色补光灯的环境光强度与不开启补光灯时环境光强度的差值,能够直观反映了物体反射光的能力。参数:- _ch _int 或 str 表示对应的传感器探头,有效值为"L2"/"L1"/"R1"/"R2"/"l2"/"l1"/"r1"/"r2"/4/3/2/1。返回数值,可能值为`0 -100`。<a name="laa4P"></a>####  `quad_rgb_sensor.get_color(ch, index = 1)`获取颜色传感器检测到颜色的十六进制表达。参数:- _ch _int 或 str 表示对应的传感器探头,有效值为"L2"/"L1"/"R1"/"R2"/"l2"/"l1"/"r1"/"r2"/4/3/2/1。返回数值,可能值为`0x000000~0xffffff`。<a name="NA6dn"></a>####  `quad_rgb_sensor.get_color_sta(ch, index = 1)`获取颜色传感器检测到颜色的字符串表达。参数:- _ch _int 或 str 表示对应的传感器探头,有效值为"L2"/"L1"/"R1"/"R2"/"l2"/"l1"/"r1"/"r2"/4/3/2/1。返回字符串,可能值及对应颜色:<br />"red" 红色<br />"yellow" 黄色<br />"green" 绿色<br />"cyan" 青色<br />"blue" 蓝色<br />"purple" 紫色<br />"white" 白色<br />"black" 黑色<a name="UjhLy"></a>####  `quad_rgb_sensor.get_light(ch, index = 1)`获得颜色传感器检测到环境光强度,颜色传感器自身的补光灯也是环境光的一部分,如有必要请关闭补光灯后使用该 API。参数:- _ch _int 或 str 表示对应的传感器探头,有效值为"L2"/"L1"/"R1"/"R2"/"l2"/"l1"/"r1"/"r2"/4/3/2/1。返回数值,可能范围为`0 -100`。<a name="MyC8U"></a>####  `quad_rgb_sensor.set_led(color = "white", index = 1)`设置全部巡线补光灯的颜色。参数:- _color_ str 或 hex,表示补光灯的点亮颜色.当 color 为 str 时,颜色名称及其缩写对照表:```python红 red r黄 yellow y绿 green g青 cyan c蓝 blue b紫 purple p白 white w黑 black k
但 color 为 hex 时,颜色为 hex 对应的 RGB 数值。


quad_rgb_sensor.off_led(index = 1)
关闭补光灯。需要注意,颜色传感器在调用检测颜色 API 时会自动将补光灯设置为所需的颜色。
超声波传感器(新)


ultrasonic2.get(index = 1)
获得新超声波传感器与障碍物之间的距离。
返回数值,可能的范围为3 - 300,单位是cm,误差为±5%。


ultrasonic2.led_show(bri, index =1)
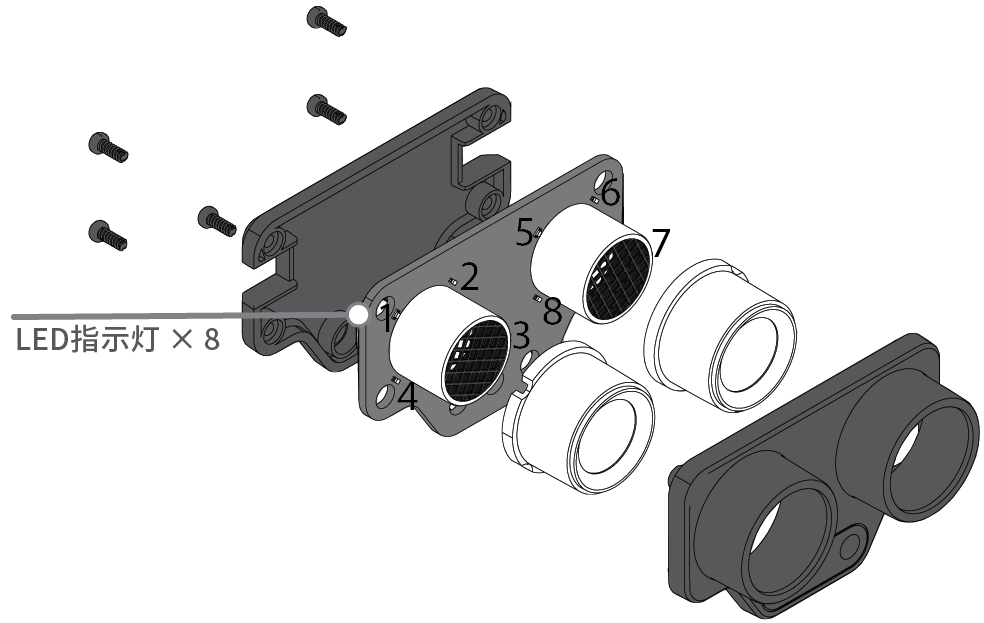
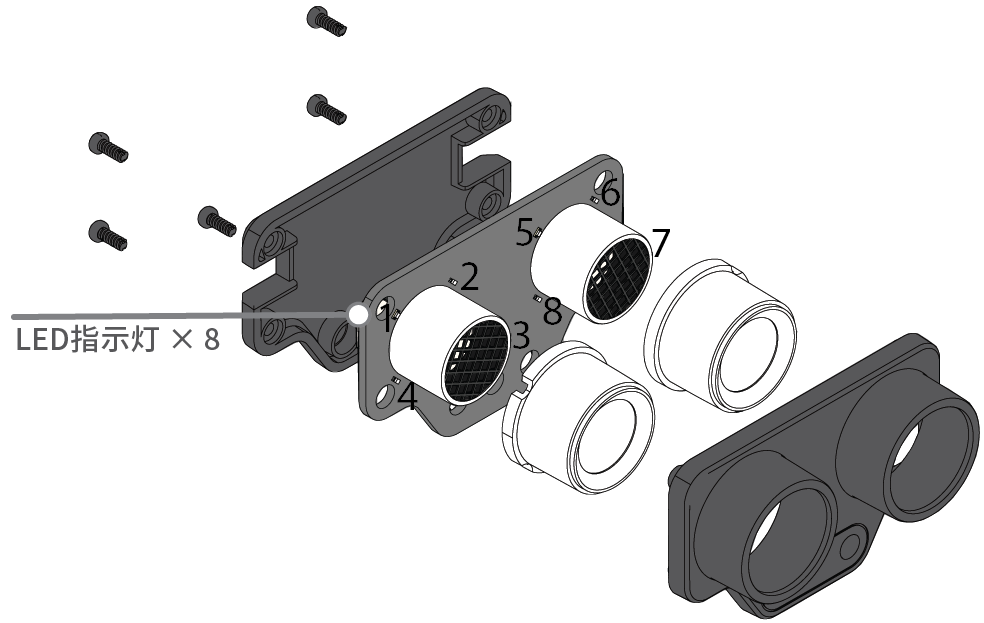
设置超声波模块氛围灯的亮度。参数:
- bri int_list,其格式需满足[
bri1,bri2,bri3,bir4,bri5,bri6,bri7,bri8],其中brix为表示对应序号氛围灯的亮度。灯的序号和其对应位置的参考如下:


ultrasonic2.set_bri(led_bri, id, index =1)
设置超声波模块指定位置氛围灯的亮度。参数:
- led_bri float,有效值为 0~100,表示需要设置的氛围灯的亮度。
- id int 或 str,有效值为 1~8,表示需要设置氛围灯位置。当 id 为 str 时,有效值为 “all”,表示同时设置所有的氛围灯亮度。


ultrasonic2.add_bri(led_bri, id, index =1)
增加超声波模块上指定位置氛围灯的亮度。参数:
led_bri float,有效值为 0~100,表示需要设置的氛围灯的亮度。
id int 或 str,有效值为 1~8,表示需要增加亮度的氛围灯位置。当 id 为 str 时,有效值为 “all”,表示同时增加所有的氛围灯亮度。


ultrasonic2.get_bri(id, index =1)
获得超声波模块上指定位置氛围灯的亮度。参数:
id int 或 str,有效值为 1~8,表示需要获取其亮度的氛围灯位置。当 id 为 str 时,有效值为 “all”,表示同时增加所有的氛围灯亮度。


ultrasonic2.play(emotion, index =1)
控制超声波模块上的氛围灯播放对应表情的灯效。该 API 会阻塞所在线程,直至表情播放结束。参数:
emotion str,有效值为如下,表示氛围灯的表情:
| emotion 参数有效值 | 代表的表情 |
|---|---|
| “sleepy” | 待机 |
| “happy” | 开心 |
| “dizzy” | 晕眩 |
| “wink” | 挑眉 |
| “thinking” | 思考 |
光线传感器


light_sensor.get(index = 1)
获得光线传感数值。
返回数值,可能范围为0 - 100。
双路颜色传感器


dual_rgb_sensor.is_color(color = "white", ch, index = 1)
判断颜色传感器是否检测到了特定的颜色,参数:
color 字符串,表示需要检测的颜色,颜色名称及其缩写对照表:
红 red r黄 yellow y绿 green g青 cyan c蓝 blue b紫 purple p白 white w黑 black k
ch 数值,有效范围为1-2,1对应 RGB1,2对应 RGB2。
返回布尔值,True:检测到指定颜色;False:未检测到指定颜色。


dual_rgb_sensor.get_red(ch = 1, index = 1)
获取颜色传感器检测到颜色的R值。参数:
- ch 数值,默认值1,有效范围为1-2,1对应 RGB1,2对应 RGB2。
返回数值,可能值为0 -255。


dual_rgb_sensor.get_green(ch = 1, index = 1)
获取颜色传感器检测到颜色的G值,参数:
- ch 数值,默认值1,有效范围为1-2,1对应 RGB1,2对应 RGB2。
返回数值,可能值为0 -255。


dual_rgb_sensor.get_blue(ch = 1, index = 1)
获取颜色传感器检测到颜色的B值。参数:
- ch 数值,默认值1,有效范围为1-2,1对应 RGB1,2对应 RGB2。
返回数值,可能值为0 -255。


dual_rgb_sensor.get_light(ch = 1, index = 1)
获得颜色传感器检测到环境光强度,颜色传感器自身的补光灯也是环境光的一部分,如有必要请关闭补光灯后使用该 API。参数:
- ch 数值,默认值1,有效范围为1-2,1对应 RGB1,2对应 RGB2。
返回数值,可能范围为0 -100。


dual_rgb_sensor.get_gray_level(ch = 1, index = 1)
获得颜色传感器检测到物体反射光强度,该读值来自开启白色补光灯的环境光强度与不开启补光灯时环境光强度的差值,参数:
- ch 数值,默认值1,有效范围为1-2,1对应 RGB1,2对应 RGB2。
返回数值,可能范围为0 -100。


dual_rgb_sensor.set_led(color = "white", index = 1)
设置补光灯的颜色。参数:
color 字符串,表示补光灯的点亮颜色,颜色名称及其缩写对照表:
红 red r黄 yellow y绿 green g青 cyan c蓝 blue b紫 purple p白 white w黑 black k
ch 数值,有效范围为1-2,1对应 RGB1,2对应 RGB2。


dual_rgb_sensor.off_led(index = 1)
关闭补光灯。需要注意,颜色传感器在调用检测颜色 API 时会自动将补光灯设置为所需的颜色。
声音传感器


sound_sensor.get(index = 1)
获得声音传感器读值。
返回数值,可能范围为0 - 100。
热运动传感器


pir.is_detect(index = 1)
检测热运动传感器是否检测到人体运动。热运动传感器被触发后,指示灯将被点亮,传感器将保持触发状态3秒,若之后的3秒都未继续检测到人体运动,则传感器退出触发状态,指示灯熄灭。
返回布尔值,True:检测到人体运动;False:未检测到人体运动。


pir.get_count(index = 1)
获得热运动传感器至上电后被触发的次数。
返回数值,可能值为任意正整数。


pir.reset_count(index = 1)
重置热运动传感器被触发的次数为0。
超声波


ultrasonic.get(index = 1)
获得测距传感器与障碍物之间的距离。
返回数值,可能的范围为3 - 300,单位是cm,误差为±5%。
测距传感器


ranging_sensor.get(index = 1)
获得测距传感器与障碍物之间的距离。
返回数值,可能的范围为2 - 200,单位是cm,误差为±5%。
运动传感器


motion_sensor.is_shake(index = 1)
检测运动传感器模块是否有被摇晃。
返回值布尔值,True:表示运动传感器模块被晃动了;False:表示运动传感器模块未被晃动。


motion_sensor.get_shakeval(index = 1)
获得运动传感器模块的摇晃强度。
返回数值,可能范围是0-100,数值越大,晃动的强度就越大。


motion_sensor.get_accel(axis, index = 1)
获取三个轴的加速度值,参数:
- axis 字符串类型,可能的值为 “x”/“y”/“z” 代表运动传感器模块定义的坐标轴。
返回数值,单位是 m/s²。


motion_sensor.is_tiltleft(index = 1)
检测运动传感器模块是否向左倾斜,阈值15°。
返回布尔值,True:表示运动传感器模块向左倾斜了;False:表示运动传感器模块未向左倾斜。


motion_sensor.is_tiltright(index = 1)
检测运动传感器模块是否向右倾斜,阈值15°。
返回布尔值,True:表示运动传感器模块向右倾斜了;False:表示运动传感器模块未向右倾斜。


motion_sensor.is_tiltup(index = 1)
检测运动传感器模块是否前倾,阈值15°。
返回布尔值,True:表示模块前倾,False:表示模块没有前倾。


motion_sensor.is_tiltdown(index = 1)
检测运动传感器模块是否后倾,阈值15°。
返回布尔值,True:表示模块后倾;False:表示模块没有后倾。


motion_sensor.is_faceup(index = 1)
检测模块是否朝上状态。
返回布尔值,True:表示模块朝上;False:表示模块未朝上。


motion_sensor.is_facedown(index = 1)
检测模块是否朝下状态。
返回布尔值,True:表示模块朝下;False:表示模块未朝下。


motion_sensor.get_roll(index = 1)
获取姿态角的翻滚角。
返回数值,可能范围为-90 - 90,单位是°。


motion_sensor.get_pitch(index = 1)
获取姿态角的俯仰角。
返回数值,可能范围为-180 - 180,单位是°。


motion_sensor.get_yaw(index = 1)
获取姿态角的偏航角。
返回数值,可能范围为0 - 360,单位是°。
注意:由于没有电子罗盘,所以实际上偏航角只是使用了Z轴角速度的积分。它存在着积累误差。如果是想获得真实偏航角的,这个 API 不适合使用。


motion_sensor.get_gyro(axis, index = 1)
获取三个轴的角速度值,参数:
- axis 字符串类型,有效值为”x”/“y”/“z”,代表运动传感器模块定义的坐标轴。
返回数值,单位是 °/秒。


motion_sensor.get_rotation(axis, index = 1)
获得运动传感器模块在三个轴上转动的角度,以逆时针转动方向为正方向,参数:
- axis 字符串类型,有效值为”x”/“y”/“z”,代表运动传感器模块定义的坐标轴。
返回数值,单位是 °。


motion_sensor.reset_rotation(axis= "all", index = 1)
初始化绕三个轴转动的当前角度为0,get_rotation() 函数将从 0 开始计算,参数:
- axis 字符串类型,有效值是 “x”/“y”/“z”/“all”。”x”/“y”/“z”代表运动传感器模块定义的坐标轴。默认值为”all” 代表全部的三个轴。
土壤湿度传感器


soil_sensor.get(index = 1)
获得土壤湿度传感器读值。
返回数值,可能范围为0 - 100。
温度传感器


temp_sensor.get(index = 1)
获得温度传感器读值。
返回数值,可能范围为-55 - 125,单位℃。
温湿度传感器


humiture.get_humidity(index = 1)
获得温湿度传感器的湿度读值。
返回数值,可能范围为0 - 100,单位%。


humiture.get_temp(index = 1)
获得温湿度传感器的温度读值。
返回数值,可能范围为-40 - 125,单位℃。
MQ2气体传感器


mq2.is_detect(level = ”high“, index = 1)
检测可燃气体浓度是否超过阈值,参数:
- level 字符串,有效范围为”high”:以高灵敏度检测可燃气体,此时传感器更易被触发;”low”:以低灵敏度检测可燃气体,此时传感器不易被触发


mq2.get(index = 1)
获得 MQ2 气体传感器读值。
返回数值,可能范围为0 - 100,数值越大,可燃性气体浓度越高。
火焰传感器


flame_sensor.is_detect(index = 1)
检测是否有火焰。 返回布尔值,True:检测到火焰;False:未检测到火焰。


flame_sensor.get(index = 1)
获得火焰传感器读值。
返回数值,可能范围为0 - 100。
磁敏传感器


magnetic_sensor.is_detect(index = 1)
检测模块附近是否有磁体。 返回布尔值,True:检测到磁体;False:未检测到磁体。


magnetic_sensor.get_count(index = 1)
获得磁敏模块自通电后被触发的次数。
返回数值。


magnetic_sensor.reset_count(index = 1)
重置磁敏模块被触发的次数,重置后次数归零。
视觉模块


smart_camera.set_mode(mode = "color", index = 1)
设置视觉模块的识别模式,参数:
- mode 字符串,有效值为 color:色块识别模式,此时可以识别和追踪色块;”line”:线追踪模式,此时可以识别线条和条形码。


smart_camera.learn(sign = 1, t = "until_button", index = 1)
视觉模块学习色块标记,参数:
- sign 数值,有效范围为1 - 7的整数,表示对应序号的色块标记。
- t 数值或字符串,默认值为”until_button”。 t 为字符串是,有效值为”until_button”:当板载按钮按下时结束学习。 t 为数值时,表示视觉模块在倒计时结束后学习并记录色块标记,在此之前,线程将持续阻塞。


smart_camera.detect_sign(sign, index = 1)
判断视觉模块是否检测到特定色块标记,参数:
- sign 数值,有效范围为1 - 7的整数,表示对应序号的色块标记。
返回布尔值,True:检测到特定色块标记;False:未检测到特定色块标记。


smart_camera.detect_sign_location(sign, location, index = 1)
判断指定的色块标记是否位于视觉模块画面的某一区域,参数:
- sign 数值,有效范围为1 - 7的整数,表示对应序号的色块标记。
- location 字符串,有效值为 “up”:色块是否位于画面上方;”down”:色块是否位于画面下方;”left”:色块是否位于画面左边;”right”:色块是否位于画面右边;”middle”:色块是否位于画面中央。
各区域示意图如下:
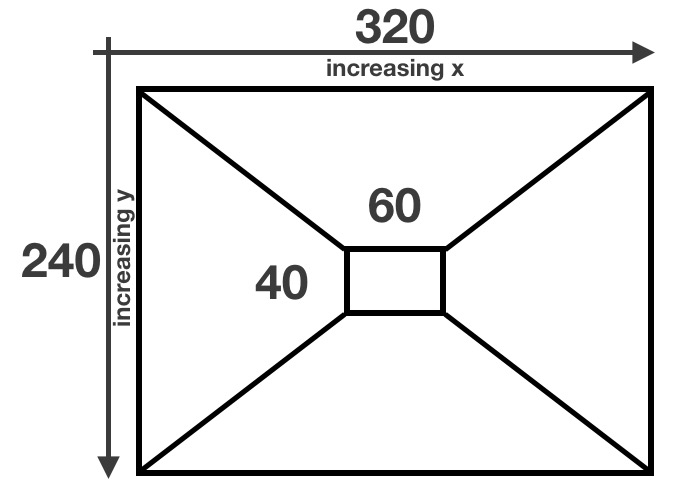
返回布尔值,True:检测到特定色块标记在指定区域;False:未检测到特定色块标记在指定区域。


smart_camera.get_sign_x(sign, index = 1)
获得特定色块标记在画面上的 x 坐标,参数:
- sign 数值,有效范围为1 - 7的整数,表示对应序号的色块标记。
返回值数值,可能的范围为0 - 319,若画面上检测不到指定的色块标记,则返回0值。


smart_camera.get_sign_y(sign, index = 1)
获得特定色块标记在画面上的 y 坐标,参数:
- sign 数值,有效范围为1 - 7的整数,表示对应序号的色块标记。
返回值数值,可能的范围为0 - 239,若画面上检测不到指定的色块标记,则返回0值。


smart_camera.get_sign_wide(sign, index = 1)
获得特定色块标记在画面上的宽度,参数:
- sign 数值,有效范围为1 - 7的整数,表示对应序号的色块标记。
返回值数值,可能的范围为0 - 319,若画面上检测不到指定的色块标记,则返回0值。


smart_camera.get_sign_hight(sign, index = 1)
获得特定视觉标记在画面上的高度,参数:
- sign 数值,有效范围为1 - 7的整数,表示对应序号的色块标记。
返回值数值,可能的范围为0 - 239,若画面上检测不到指定的色块标记,则返回0值。


smart_camera.open_light(index = 1)
打开视觉模块上的两颗补光灯。


smart_camera.close_light(index = 1)
关闭视觉模块上的两颗补光灯。


smart_camera.reset(index = 1)
重置视觉模块的白平衡,该 API 将阻塞当前线程5秒。


smart_camera.detect_label(label, index = 1)
判断视觉模块是否检测到特定条形码标记,参数:
- label 数值,有效范围为1 - 15的整数,表示对应序号的条形码标记。
返回吧布尔值,True:检测到特定条形码标记;False:未检测到特定条形码标记。


smart_camera.get_label_x(label, index = 1)
获得特定条形码标记在画面上的 x 坐标,参数:
- label 数值,有效范围为1 - 15的整数,表示对应序号的条形码标记。
返回值数值,可能的范围为0 - 319,若画面上检测不到指定的条形码标记,则返回0值。


smart_camera.get_label_y(sign, index = 1)
获得特定条形码标记在画面上的 x 坐标,参数:
- label 数值,有效范围为1 - 15的整数,表示对应序号的条形码标记。
返回值数值,可能的范围为0 - 239,若画面上检测不到指定的条形码标记,则返回0值。


smart_camera.detect_cross(index = 1)
判断画面中是否存在交叉路口。


smart_camera.get_cross_x(index = 1)
获得交叉点的 x 轴坐标。
返回值数值,可能的范围为0 - 319,若画面上检测不到交叉点,则返回0值。


smart_camera.get_cross_y(index = 1)
获得交叉点的 y 轴坐标。
返回值数值,可能的范围为0 - 239,若画面上检测不到交叉点,则返回0值。


smart_camera.get_cross_road(index = 1)
获得交叉点上的岔路数量。
返回值数值。


smart_camera.get_cross_angle(sn = 1, index = 1)
获得指定岔路与vector的夹角大小,vector指代视觉模块当前所在的线段,参数:
- sn 数值,表示vector是与岔路上第几个岔路形成夹角。


smart_camera.set_line(mode = "black, index = 1)
设置线追踪模式的色彩偏好,参数:
- mode 字符串,有效范围为 “black”:识别浅色背景下的深色线;”white”:识别深色背景下的浅色线。


smart_camera.get_vector_start_x(index = 1)
获得当前巡线”vector”的起始x坐标值。
返回数值,可能的范围为0 - 319。


smart_camera.get_vector_start_y(index = 1)
获得当前巡线”vector”的起始y坐标值。
返回数值,可能的范围为0 - 239。


smart_camera.get_vector_end_x(index = 1)
获得当前巡线”vector”的终止x坐标值。
返回数值,可能的范围为0 - 319。


smart_camera.get_vector_end_y(index = 1)
获得当前巡线”vector”的终止y坐标值。
返回数值,可能的范围为0 - 239。


smart_camera.set_vector_angle(angle, index = 1)
设置vector的偏好角度,参数:
- angle 数值,表示设置vector的偏好角度,视觉模块在遇到岔路口时,会将最接近angle值的岔路视为下一个vector。


smart_camera.get_vector_angle(index = 1)
获得当前设置的偏好角度。
返回数值,可能范围为-180 - 180,单位°。


smart_camera.set_kp(kp, index = 1)
设置视觉模块计算电机差速的 Kp 值大小,参数:
- kp 数值,表示要设置的 Kp 值大小。


smart_camera.get_sign_diff_speed(sign, axis, axis_val, index = 1)
计算将指定色块标记锁定到指定 x,y坐标上所需要的电机差速值,该差数值大小同时受Kp大小的变化,Kp越大,该值越大,参数:
- sign 数值,有效范围为1 - 7的整数,表示对应序号的色块标记。
- axis 字符串,有效值为”x”:计算将色块移动到 x = axis_val 轴上所需要的电机差速;”y”:计算将色块移动到 y = axis_val 轴上所需要的电机差速。
- axis_val 数值,若 axis = “x”,有效范围0 - 319;若 axis = “y”,有效范围0 - 239。
返回数值,可能值范围0 - 100。


smart_camera.get_label_diff_speed(label, axis, axis_val, index = 1)
计算将指定条形码标记锁定到指定 x,y坐标上所需要的电机差速值,该差数值大小同时受Kp大小的变化,Kp越大,该值越大,参数:
- label 数值,有效范围为1 - 15的整数,表示对应序号的条形码标记。
- axis 字符串,有效值值得”x”:计算将条形码移动到 x = axis_val 轴上所需要的电机差速;”y”:计算将条形码移动到 y = axis_val 轴上所需要的电机差速。
- axis_val 数值,若 axis = “x”,有效范围0 - 319;若 axis = “y”,有效范围0 - 239。
返回数值,可能值范围0 - 100。


smart_camera.get_follow_vector_diff_speed(index = 1)
计算将保持vector位于画面中心所需要的电机差速值,该差数值大小同时受Kp大小的变化,Kp越大,该值越大。 返回数值,可能值范围0 - 100。


smart_camera.is_lock_sign(sign, axis, axis_val, index = 1)
判断色块标记是否位于目标 x,y 附近,参数:
- sign 数值,有效范围为1 - 7的整数,表示对应序号的色块标记。
- axis 字符串,有效值为”x”:判断色块是否移动到 x = axis_val 的轴附近;”y”:判断色块是否移动到 y = axis_val 的轴附近;
- axis_val 数值,若 axis = “x”,有效范围0 - 319;若 axis = “y”,有效范围0 - 239。
返回布尔值,True:位于目标点附近;False:不在目标点附近。


smart_camera.is_lock_label(sign, axis, axis_val index = 1)
判断条形码标记是否位于目标 x,y 附近,参数: label 数值,有效范围为1 - 15的整数,表示对应序号的条形码标记。
- axis 字符串,有效值为”x”:判断条形码是否移动到 x = axis_val 的轴附近;”y”:判断条形码是否移动到 y = axis_val 的轴附近;
- axis_val 数值,若 axis = “x”,有效范围0 - 319;若 axis = “y”,有效范围0 - 239。
返回值为0和1,1:位于目标点附近;0:不在目标点附近。
mBuild 输出模块
灯光类
LED 点阵


led_matrix.show(image = "hi", index = 1)
设置 LED 点阵屏显示图像,参数:
- image 字符串,默认值为”hi”,image = “hi” 时字符串对应的点阵图像如下:

若需要让点阵屏显示非预置的图像,则需要以字符串形式填写自定义图像对应的十六进制数,生成规则如下: 将每列的8颗LED的亮灭状态看做一个8位的2进制数,将该8位2进制数转换为两位的十六进制数,点阵共16列即可以32位16进制数来表示点阵的亮灭状态。
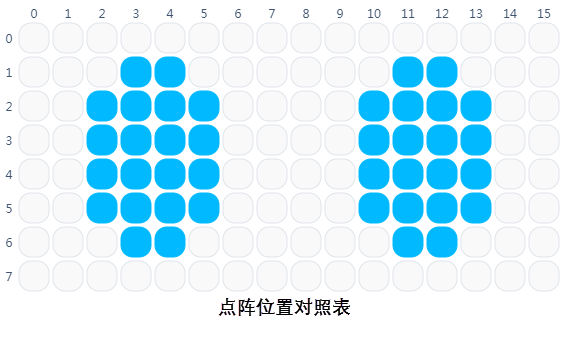
程序示例1
from halocode import *led_matrix.show(image = "hello", index = 1) #让 LED 点阵屏现实 "hello" 表情。
程序示例2
from halocode import *led_matrix.show(image = "00003c7e7e3c000000003c7e7e3c0000", index = 1)#让 LED 点阵屏现实 "hello" 表情。


led_matrix.show_at(image = "hi",x = 0, y = 0, index = 1)
设置 LED 点阵屏显示图像显示在点阵屏的指定位置上,参数:
- image 字符串,默认值为”hi”
- x,y int 用于设置文字的起始坐标


led_matrix.print(message, index = 1)
LED 点阵屏滚动显示字符信息,参数:
- message 字符串,有效范围为任意英文字母、数字、标点的组合,不支持中文,当需要显示的信息超出 LED 点阵屏的显示范围时,字符串将滚动显示。


led_matrix.print_until_done(message, index = 1)
LED 点阵屏滚动显示字符信息直到结束,参数:
- message 字符串,有效范围为任意英文字母、数字、标点的组合,不支持中文,当需要显示的信息超出 LED 点阵屏的显示范围时,字符串将滚动显示,在滚动结束前,线程将阻塞。


led_matrix.print_at(message, x, y, index = 1)
LED 点阵屏以给定的 x、y 坐标为起点显示字符串信息,参数:
- message 字符串,有效范围为任意英文字母、数字、标点的组合,不支持中文,表示需要 LED 点阵显示的信息,当需要显示的信息超出 LED 点阵屏的显示范围时,字符串将滚动显示,在滚动结束前,线程将阻塞。
- x 数值,有效范围0 - 15,表示显示字符串的起始 x 轴坐标。
- y 数值,有效范围0 - 7,表示显示字符串的起始 y 轴坐标。


led_matrix.on(x, y, index = 1)
LED 点阵屏点亮特定位置的灯,参数:
- x 数值,有效范围0 - 15,表示要点亮的灯珠的 x 轴坐标。
- y 数值,有效范围0 - 7,表示要点亮的灯珠的 y 轴坐标。


led_matrix.off(x, y, index = 1)
LED 点阵屏熄灭特定位置的灯,参数:
- x 数值,有效范围0 - 15,表示要熄灭的灯珠的 x 轴坐标。
- y 数值,有效范围0 - 7,表示要熄灭的灯珠的 y 轴坐标。


led_matrix.toggle(x, y, index = 1)
LED 点阵屏切换特定位置的灯的点亮或熄灭状态,参数:
- x 数值,有效范围0 - 15,表示切换状态的灯珠的 x 轴坐标。
- y 数值,有效范围0 - 7,表示切换状态的灯珠的 y 轴坐标。


led_matrix.clear(index = 1)
将整个 LED 点阵屏上的所有灯都熄灭。
RGB 灯


rgb_led.on(r, g, b, index = 1)
设置 RGB 灯模块的颜色,参数:
r 数值或字符串类型。
r 为数值时,有效范围是 0 - 255,表示全彩LED红色分量的数值,0时无红色分量,255时红色分量最亮。
r 为字符串类型时,表示颜色名称或缩写。颜色名称及其缩写对照表:红 red r橙 orange o黄 yellow y绿 green g青 cyan c蓝 blue b紫 purple p白 white w黑 black k
g 数值,全彩LED绿色分量的数值,参数范围是 0 ~ 255, 0为无绿色分量,255时绿色分量最亮。
- b 数值,全彩LED蓝色分量的数值,参数范围是 0 ~ 255, 0为无蓝色分量,255时蓝色分量最亮。
- pct 数值,灯环的亮度的大小,参数范围是0 ~ 100,默认值为 100。 0时灯环熄灭,100时灯环的按照设定的RGB值点亮。


rgb_led.off(index = 1)
熄灭 RGB 灯。


rgb_led.set_red(val, index = 1)
改变 RGB 灯的R值,参数:
- val 数值,有效范围0 -255,表示 RGB 灯模块R值改变后的大小。


rgb_led.set_green(val, index = 1)
改变 RGB 灯的G值,参数:
- val 数值,有效范围0 -255,表示 RGB 灯模块G值改变后的大小。


rgb_led.set_blue(val, index = 1)
改变 RGB 灯的B值,参数:
- val 数值,有效范围0 -255,表示 RGB 灯模块B值改变后的大小。


rgb_led.add_red(val, index = 1)
增加 RGB 灯的R值,参数:
- val 数值,有效范围-255 -255,表示 RGB 灯模块R值增加的大小。


rgb_led.add_green(val, index = 1)
增加 RGB 灯的G值,参数:
- val 数值,有效范围-255 -255,表示 RGB 灯模块G值增加的大小。


rgb_led.add_blue(val, index = 1)
增加 RGB 灯的B值,参数:
- val 数值,有效范围-255 -255,表示 RGB 灯模块B值增加的大小。


rgb_led.get_red(val, index = 1)
获得 RGB 灯模块当前颜色的R值。 返回数值,可能的范围为0 -255。


rgb_led.get_green(index = 1)
获得 RGB 灯模块当前颜色的G值。 返回数值,可能的范围为0 -255。


rgb_led.get_blue(index = 1)
获得 RGB 灯模块当前颜色的B值。 返回数值,可能的范围为0 -255。
彩灯驱动


led_driver.on(r, g, b, id = "all", index = 1)
设置单颗或全部的灯珠颜色,参数:
r 数值或字符串类型。
r 为数值时,有效范围是 0 - 255,表示全彩LED红色分量的数值,0时无红色分量,255时红色分量最亮。
r 为字符串类型时,表示颜色名称或缩写。颜色名称及其缩写对照表:红 red r橙 orange o黄 yellow y绿 green g青 cyan c蓝 blue b紫 purple p白 white w黑 black k
g 数值,全彩LED绿色分量的数值,参数范围是 0 ~ 255, 0为无绿色分量,255时绿色分量最亮。
- b 数值,全彩LED蓝色分量的数值,参数范围是 0 ~ 255, 0为无蓝色分量,255时蓝色分量最亮。
- id 字符串类型或数值,默认值为”all”。 id 为字符串类型时,有效值为”all”,此时设置所有灯珠的颜色。
id 为数值时,有效范围为1-96,此时设置对应位置的灯珠的颜色。


led_driver.show(color, index = 1)
同时设置多颗灯珠为相应的颜色,参数:
- color 字符串类型,字符串格式需满足“color1 color2 color3 color4 color5 color6 color7 color8 color9 color10 color11 color12”,其中colorx为 “red”/“green”/“blue”/“yellow”/“cyan”/“purple”/“white”/“orange”/“black” 或是其缩写 “r”/“g”/“b”/“y”/“c”/“p”/“w”/“o”/“k”。颜色字符间以单个空格隔开。当颜色个数大于12时将被截断成12个。


led_driver.off(led_id = "all", index = 1)
熄灭指定 id 的灯珠,参数:
- id 字符串类型或数值,默认值为”all”。 id 为字符串类型时,有效值为”all”,此时设置所有灯珠的颜色。
id 为数值时,有效范围为1-96,此时设置对应位置的灯珠的颜色。


led_driver.set_red(val, led_id = "all", index = 1)
改变指定位置灯珠的R值,参数:
- val 数值,有效范围0 -255,表示灯珠R值改变后的大小。
- id 字符串类型或数值,默认值为”all”。 id 为字符串类型时,有效值为”all”,此时设置所有灯珠的颜色。
id 为数值时,有效范围为1-96,此时设置对应位置的灯珠的颜色。


led_driver.set_green(val, led_id = "all", index = 1)
改变指定位置灯珠的G值,参数:
- val 数值,有效范围0 -255,表示灯珠G值改变后的大小。
- id 字符串类型或数值,默认值为”all”。 id 为字符串类型时,有效值为”all”,此时设置所有灯珠的颜色。
id 为数值时,有效范围为1-96,此时设置对应位置的灯珠的颜色。


led_driver.set_blue(val, led_id = "all", index = 1)
改变指定位置灯珠的B值,参数:
- val 数值,有效范围0 -255,表示灯珠B值改变后的大小。
- id 字符串类型或数值,默认值为”all”。 id 为字符串类型时,有效值为”all”,此时设置所有灯珠的颜色。
id 为数值时,有效范围为1-96,此时设置对应位置的灯珠的颜色。


led_driver.add_red(val, led_id = "all", index = 1)
增加指定位置灯珠的R值,参数:
- val 数值,有效范围-255 -255,表示灯珠R值增加的大小。
- id 字符串类型或数值,默认值为”all”。 id 为字符串类型时,有效值为”all”,此时设置所有灯珠的颜色。
id 为数值时,有效范围为1-96,此时设置对应位置的灯珠的颜色。


led_driver.add_green(val, led_id = "all", index = 1)
增加指定位置灯珠的G值,参数:
- val 数值,有效范围-255 -255,表示灯珠G值增加的大小。
- id 字符串类型或数值,默认值为”all”。 id 为字符串类型时,有效值为”all”,此时设置所有灯珠的颜色。
id 为数值时,有效范围为1-96,此时设置对应位置的灯珠的颜色。


led_driver.add_blue(val, led_id = "all", index = 1)
增加指定位置灯珠的B值,参数:
- val 数值,有效范围-255 -255,表示灯珠B值增加的大小。
- id 字符串类型或数值,默认值为”all”。 id 为字符串类型时,有效值为”all”,此时设置所有灯珠的颜色。
id 为数值时,有效范围为1-96,此时设置对应位置的灯珠的颜色。


led_driver.set_mode(mode = "steady", index = 50)
设置彩灯驱动的显示样式,参数:
- mode 字符串,有效值为 “steady”:静态,此时灯珠正常显示;”breath”:呼吸,此时灯珠会周期性地发生明亮变化;”marquee”:跑马灯,此时灯条或灯环会循环滚动
播放类
扬声器


speaker.mute(index = 1)
扬声器停止播放。


speaker.play_tone(freq, index = 1)
设置扬声器以特定频率持续鸣叫,参数:
- freq 数值,有效范围为20-20000,超出这一范围,蜂鸣器不发声,另外出于对人耳的保护(长时间处于过高频率声音的环境下会对耳朵造成损失),该蜂鸣器被限制了最高频率5000Hz,因此当freq的值介于5000-20000之间时,扬声器仍只播放5000Hz的声音。 另外,若希望以扬声器通过频率改变播放曲子,我们需要知道不同频率与音符的对应关系,以下是给到的参考:
| do / C | re / D | mi / E | fa / F | sol / G | la / A | si / B | |
|---|---|---|---|---|---|---|---|
| 2 | 65Hz | 73Hz | 82Hz | 87Hz | 98Hz | 110Hz | 123Hz |
| 3 | 131Hz | 147Hz | 165Hz | 175Hz | 196Hz | 220Hz | 247Hz |
| 4(标准中音) | 262Hz | 294Hz | 330Hz | 349Hz | 392Hz | 440Hz | 494Hz |
| 5 | 523Hz | 587Hz | 659Hz | 698Hz | 784Hz | 880Hz | 988Hz |
| 6 | 1047Hz | 1175Hz | 1319Hz | 1397Hz | 1568Hz | 1760Hz | 1976Hz |
| 7 | 2093Hz | 2349Hz | 2637Hz | 2794Hz | 3136Hz | 3520Hz | 3951Hz |
| 8 | 4186Hz | 4699Hz |
例:标准中音音高(第一国际高度)为: A4 = 440Hz。


speaker.play_music(music, index = 1)
扬声器播放预置的或用户自定义的音频文件,参数:
- music 字符串,有效范围为任意4字节长度的英文数字、字母、标点的组合,代表需要播放的音频在扬声器中的文件名,扬声器只支持存放mp3类型的音频文件,该 API 不会持续阻塞当前线程。 该扬声器预置了大量短音频可供使用,它们的文件名和音频内容请点击下载预置音效列表.xlsx;若希望通过扬声器播放自定义的音频文件,可参阅“扬声器”页面。


speaker.play_music_until_done(music, index = 1)
扬声器播放预置的或用户自定义的音频文件,参数:
- music 字符串,有效范围为任意4字节长度的英文数字、字母、标点的组合,代表需要播放的音频在扬声器中的文件名,扬声器只支持存放mp3类型的音频文件,该 API 会持续阻塞当前线程直到音频播放完成。


speaker.set_vol(val, index = 1)
设置扬声器播放音乐的音量大小,参数:
- vol 数值,有效范围 0 - 100,表示设定的扬声器音量值。


speaker.add_vol(val, index = 1)
改变扬声器播放音乐的音量大小(扬声器播放特定频率声音的大小不会被改变),参数:
- vol 数值,有效范围-100 - 100,表示扬声器音量的改变值。


speaker.get_vol(index = 1)
获得扬声器的当前音量。
返回数值,可能范围为0-100,当范围值为100时,表示扬声器达到了其音量的最大值。


speaker.is_play(index = 1)
检测扬声器是否正在播放音乐。
返回布尔值,True:扬声器正在播放歌曲,False:扬声器不在播放歌曲。
动力类
电机驱动


motor_driver.set(power, index = 1)
设置电机驱动的输出功率,参数:
- power 数值,有效范围为-100 -100,表示电机驱动输出的功率大小,单位%。电机驱动功率为100%时,对应1024的PWM波形。一般的,电机驱动输出正功率会使得电机以逆时针旋转,负功率会使电机以顺时针旋转。


motor_driver.add(power, index = 1)
增加电机驱动的输出功率,参数:
- power 数值,有效范围为-200 /~200,表示电机驱动增加的输出的功率大小,单位%。电机驱动功率为100%时,对应1024的PWM波形。


motor_driver.get(index = 1)
获得电机驱动的当前的输出功率大小。
返回数值,可能范围为-100 - 100。


motor_driver.get_load(index = 1)
获得电机驱动的当前负载状况,负载会随着电机的实际转动的情况发生变化,当电机大负载运行或堵转时(短路也有可能造成高负载),电机驱动将检测到一个较大的负载值。
返回数值,可能范围为0 - 1024。


motor_driver.stop(index = 1)
电机驱动停止输出功率。
舵机驱动


servo_driver.set(angle, index = 1)
舵机驱动设置舵机的度数,参数:
- angle 数值,有效范围为0 - 180,单位°,表示舵机转动到的角度。


servo_driver.add(angle, index = 1)
舵机驱动增加舵机的度数,参数:
- angle 数值,有效范围为-180 - 180,单位°,表示舵机从当前位置转动的角度。


servo_driver.get(index = 1)
舵机驱动获得当前设置的度数。
返回数值,可能值为0 - 180,单位为°。


servo_driver.get_load(index = 1)
舵机驱动驱动获得当前负载,负载会随着舵机的实际转动的情况发生变化,当舵机以大负载运行或堵转时(短路也有可能造成高负载),舵机驱动将检测到一个较大的负载值。
返回数值,可能范围为0 - 1024。


servo_driver.release(index = 1)
舵机驱动释放角度,当舵机驱动释放角度后,舵机将可以在外力作用下被拧动,但此时 servo_driver.get(index)将无法正确获得舵机的度数。
智能伺服电机(12公斤级)

smart_servo.turn(angle, speed, index = 1)
智能舵机转动指定角度,该积木块会阻塞线程直至动作完成或被其他指令打断,参数:
- angle 数值,表示舵机在当前位置基础上转过的角度,当该数值为正时,舵机顺时针转动,当该数值为负时,舵机逆时针转动。

smart_servo.turn_to(angle, speed, index = 1 )
智能舵机转动到指定角度,该积木块会阻塞线程直至动作完成或被其他指令打断,参数:
- angle 数值,表示舵机最终转到的角度,数值为正时,舵机顺时针转动,当该数值为负时,舵机逆时针转动。

smart_servo.run(power, index = 1)
设定智能舵机转动的速度,参数 :
- power 数值,有效范围为0 - 100

smart_servo.stop(index = "all")
智能舵机停止运动,参数:
- index 字符串或数值,默认为”all”,此时指令指向链上所有智能舵机。

smart_servo.get_angle(index = 1)
获得智能舵机当前所在的角度。 返回数值,表示智能舵机自初始位置转过的角度。

smart_servo.get_speed(index = 1)
获得智能舵机当前的转动速度,无论是智能舵机自己的转速,抑或是智能舵机在外力作用下被转动的度数。 返回数值,代表转动的速度,单位为°/s。

smart_servo.release_angle(index = "all")
释放智能舵机,此时智能舵机将不会被锁定在当前的角度,因此可以在外力下被转动。智能舵机将保持释放角度状态直到接收到smart_servo.turn(angle),smart_servo.turn_to(angle), smart_servo.drive(power, t = “forever”),smart_servo.lock_angle()中任意一条指令的执行

smart_servo.lock_angle(index = "all")
锁定智能舵机度数,此时智能舵机的角度将不可在外力作用下被改变。

smart_servo.reset(index = "all")
重置智能舵机,重置后智能舵机将以当前位置为舵机零点。由于智能舵机的可重置次数有限,故该指令会阻塞线程3秒以防止该指令被重复执行。
mBuild 其他模块
红外收发

ir.send(message, index = 1)
发送红外消息,参数:
- message 字符串,长度限制为30个,暂时仅支持英文字母、数字标点的组合。

ir.receive(index = 1)
获得红外收发模块收到的消息。
返回字符串。

ir.record(record_id, index = 1)
录制的红外消息,该 API 会阻塞线程3秒以完成红外信号的录制,参数:
- record_id 数值,有效值1或2,红外收发模块最多可以录制两个信号。

ir.send_record(record_id, index = 1)
发送录制的红外消息,参数:
- record_id 数值,有效值1或2,红外收发模块最多可以录制两个信号

ir.is_receive(message, index = 1)
判断红外收发模块是否接受到了特定的红外信号,参数:
- message 字符串,也可以填写代表红外遥控信号的字符串变量,有效的变量及其含义如下表所述:
| 变量 | 含义 |
|---|---|
| IR_REMOTE.up | ↑ |
| IR_REMOTE.down | ↓ |
| IR_REMOTE.left | ← |
| IR_REMOTE.right | → |
| IR_REMOTE.set | 设置 |
| IR_REMOTE.zero | 0 |
| IR_REMOTE.one | 1 |
| IR_REMOTE.two | 2 |
| IR_REMOTE.three | 3 |
| IR_REMOTE.four | 4 |
| IR_REMOTE.five | 5 |
| IR_REMOTE.six | 6 |
| IR_REMOTE.seven | 7 |
| IR_REMOTE.eight | 8 |
| IR_REMOTE.nine | 9 |
| IR_REMOTE.A | A |
| IR_REMOTE.B | B |
| IR_REMOTE.C | C |
| IR_REMOTE.D | D |
| IR_REMOTE.E | E |
| IR_REMOTE.F | F |
