1、ubuntu更换下载源
apt-get国内镜像源添加
备份源文件:sudo cp /etc/apt/sources.list /etc/apt/sources.list.backup操作文件:vim /etc/apt/sources.list添加源地址:#阿里云deb http://mirrors.aliyun.com/ubuntu/ trusty main restricted universe multiversedeb http://mirrors.aliyun.com/ubuntu/ trusty-security main restricted universe multiversedeb http://mirrors.aliyun.com/ubuntu/ trusty-updates main restricted universe multiversedeb http://mirrors.aliyun.com/ubuntu/ trusty-proposed main restricted universe multiversedeb http://mirrors.aliyun.com/ubuntu/ trusty-backports main restricted universe multiversedeb-src http://mirrors.aliyun.com/ubuntu/ trusty main restricted universe multiversedeb-src http://mirrors.aliyun.com/ubuntu/ trusty-security main restricted universe multiversedeb-src http://mirrors.aliyun.com/ubuntu/ trusty-updates main restricted universe multiversedeb-src http://mirrors.aliyun.com/ubuntu/ trusty-proposed main restricted universe multiversedeb-src http://mirrors.aliyun.com/ubuntu/ trusty-backports main restricted universe multiverse#网易163deb http://mirrors.163.com/ubuntu/ trusty main restricted universe multiversedeb http://mirrors.163.com/ubuntu/ trusty-security main restricted universe multiversedeb http://mirrors.163.com/ubuntu/ trusty-updates main restricted universe multiversedeb http://mirrors.163.com/ubuntu/ trusty-proposed main restricted universe multiversedeb http://mirrors.163.com/ubuntu/ trusty-backports main restricted universe multiversedeb-src http://mirrors.163.com/ubuntu/ trusty main restricted universe multiversedeb-src http://mirrors.163.com/ubuntu/ trusty-security main restricted universe multiversedeb-src http://mirrors.163.com/ubuntu/ trusty-updates main restricted universe multiversedeb-src http://mirrors.163.com/ubuntu/ trusty-proposed main restricted universe multiversedeb-src http://mirrors.163.com/ubuntu/ trusty-backports main restricted universe multiverse保存退出并更新源和软件:esc + :wq!sudo apt-get updatesudo apt-get upgrade
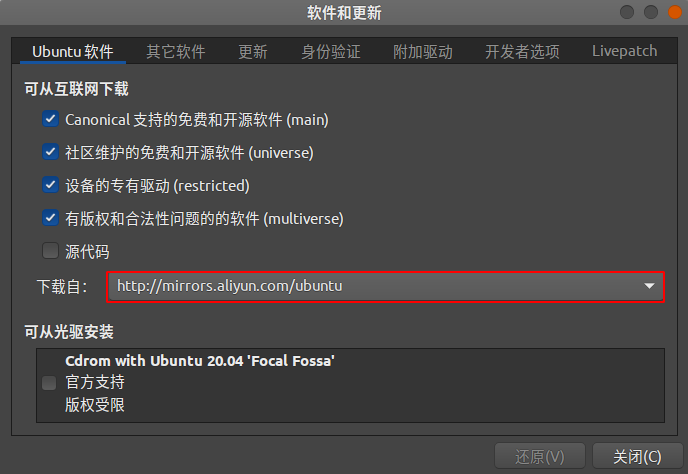
软件中心国内镜像源添加(其实添加之后apt也是使用该镜像源,所以两种选一种即可)
sudo apt-get updatesudo apt-get upgrade
pip国内镜像源添加
vi ~/.pip/pip.conf添加[global]#阿里云index-url = https://mirrors.aliyun.com/pypi/simpletrusted-host = mirrors.aliyun.com#豆瓣index-url = http://pypi.douban.com/simpletrusted-host=pypi.douban.com#清华大学index-url = https://pypi.tuna.tsinghua.edu.cn/simple/trusted-host=pypi.tuna.tsinghua.edu.cn#中国科技大学index-url = https://pypi.mirrors.ustc.edu.cn/simple/trusted-host=pypi.mirrors.ustc.edu.cn
2、ubuntu定制
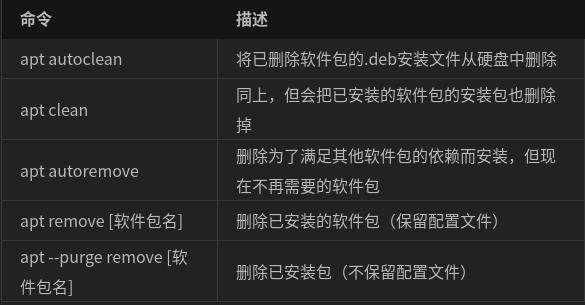
- 常用清理命令
- 配置shell
查看ubuntu内置的shell:cat /etc/shells echo $SHELL
安装zsh:
sudo apt install zsh -y
设置zsh为系统默认shell:
chsh -s /bin/zsh (重启reboot)
安装oh-my-zsh更方便配置zsh:
vim oh-my-zsh.sh chmod +x install.sh apt-get -y install build-essential nghttp2 libnghttp2-dev libssl-dev ./oh-my-zsh.sh
#!/bin/sh## This script should be run via curl:# sh -c "$(curl -fsSL https://raw.githubusercontent.com/ohmyzsh/ohmyzsh/master/tools/install.sh)"# or via wget:# sh -c "$(wget -qO- https://raw.githubusercontent.com/ohmyzsh/ohmyzsh/master/tools/install.sh)"# or via fetch:# sh -c "$(fetch -o - https://raw.githubusercontent.com/ohmyzsh/ohmyzsh/master/tools/install.sh)"## As an alternative, you can first download the install script and run it afterwards:# wget https://raw.githubusercontent.com/ohmyzsh/ohmyzsh/master/tools/install.sh# sh install.sh## You can tweak the install behavior by setting variables when running the script. For# example, to change the path to the Oh My Zsh repository:# ZSH=~/.zsh sh install.sh## Respects the following environment variables:# ZSH - path to the Oh My Zsh repository folder (default: $HOME/.oh-my-zsh)# REPO - name of the GitHub repo to install from (default: ohmyzsh/ohmyzsh)# REMOTE - full remote URL of the git repo to install (default: GitHub via HTTPS)# BRANCH - branch to check out immediately after install (default: master)## Other options:# CHSH - 'no' means the installer will not change the default shell (default: yes)# RUNZSH - 'no' means the installer will not run zsh after the install (default: yes)# KEEP_ZSHRC - 'yes' means the installer will not replace an existing .zshrc (default: no)## You can also pass some arguments to the install script to set some these options:# --skip-chsh: has the same behavior as setting CHSH to 'no'# --unattended: sets both CHSH and RUNZSH to 'no'# --keep-zshrc: sets KEEP_ZSHRC to 'yes'# For example:# sh install.sh --unattended# or:# sh -c "$(curl -fsSL https://raw.githubusercontent.com/ohmyzsh/ohmyzsh/master/tools/install.sh)" "" --unattended#set -e# Track if $ZSH was providedcustom_zsh=${ZSH:+yes}# Default settingsZSH=${ZSH:-~/.oh-my-zsh}REPO=${REPO:-ohmyzsh/ohmyzsh}REMOTE=${REMOTE:-https://github.com/${REPO}.git}BRANCH=${BRANCH:-master}# Other optionsCHSH=${CHSH:-yes}RUNZSH=${RUNZSH:-yes}KEEP_ZSHRC=${KEEP_ZSHRC:-no}command_exists() {command -v "$@" >/dev/null 2>&1}fmt_error() {printf '%sError: %s%s\n' "$BOLD$RED" "$*" "$RESET" >&2}fmt_underline() {printf '\033[4m%s\033[24m\n' "$*"}fmt_code() {# shellcheck disable=SC2016 # backtic in single-quoteprintf '`\033[38;5;247m%s%s`\n' "$*" "$RESET"}setup_color() {# Only use colors if connected to a terminalif [ -t 1 ]; thenRED=$(printf '\033[31m')GREEN=$(printf '\033[32m')YELLOW=$(printf '\033[33m')BLUE=$(printf '\033[34m')BOLD=$(printf '\033[1m')RESET=$(printf '\033[m')elseRED=""GREEN=""YELLOW=""BLUE=""BOLD=""RESET=""fi}setup_ohmyzsh() {# Prevent the cloned repository from having insecure permissions. Failing to do# so causes compinit() calls to fail with "command not found: compdef" errors# for users with insecure umasks (e.g., "002", allowing group writability). Note# that this will be ignored under Cygwin by default, as Windows ACLs take# precedence over umasks except for filesystems mounted with option "noacl".umask g-w,o-wecho "${BLUE}Cloning Oh My Zsh...${RESET}"command_exists git || {fmt_error "git is not installed"exit 1}ostype=$(uname)if [ -z "${ostype%CYGWIN*}" ] && git --version | grep -q msysgit; thenfmt_error "Windows/MSYS Git is not supported on Cygwin"fmt_error "Make sure the Cygwin git package is installed and is first on the \$PATH"exit 1figit clone -c core.eol=lf -c core.autocrlf=false \-c fsck.zeroPaddedFilemode=ignore \-c fetch.fsck.zeroPaddedFilemode=ignore \-c receive.fsck.zeroPaddedFilemode=ignore \--depth=1 --branch "$BRANCH" "$REMOTE" "$ZSH" || {fmt_error "git clone of oh-my-zsh repo failed"exit 1}echo}setup_zshrc() {# Keep most recent old .zshrc at .zshrc.pre-oh-my-zsh, and older ones# with datestamp of installation that moved them aside, so we never actually# destroy a user's original zshrcecho "${BLUE}Looking for an existing zsh config...${RESET}"# Must use this exact name so uninstall.sh can find itOLD_ZSHRC=~/.zshrc.pre-oh-my-zshif [ -f ~/.zshrc ] || [ -h ~/.zshrc ]; then# Skip this if the user doesn't want to replace an existing .zshrcif [ "$KEEP_ZSHRC" = yes ]; thenecho "${YELLOW}Found ~/.zshrc.${RESET} ${GREEN}Keeping...${RESET}"returnfiif [ -e "$OLD_ZSHRC" ]; thenOLD_OLD_ZSHRC="${OLD_ZSHRC}-$(date +%Y-%m-%d_%H-%M-%S)"if [ -e "$OLD_OLD_ZSHRC" ]; thenfmt_error "$OLD_OLD_ZSHRC exists. Can't back up ${OLD_ZSHRC}"fmt_error "re-run the installer again in a couple of seconds"exit 1fimv "$OLD_ZSHRC" "${OLD_OLD_ZSHRC}"echo "${YELLOW}Found old ~/.zshrc.pre-oh-my-zsh." \"${GREEN}Backing up to ${OLD_OLD_ZSHRC}${RESET}"fiecho "${YELLOW}Found ~/.zshrc.${RESET} ${GREEN}Backing up to ${OLD_ZSHRC}${RESET}"mv ~/.zshrc "$OLD_ZSHRC"fiecho "${GREEN}Using the Oh My Zsh template file and adding it to ~/.zshrc.${RESET}"sed "/^export ZSH=/ c\\export ZSH=\"$ZSH\"" "$ZSH/templates/zshrc.zsh-template" > ~/.zshrc-omztempmv -f ~/.zshrc-omztemp ~/.zshrcecho}setup_shell() {# Skip setup if the user wants or stdin is closed (not running interactively).if [ "$CHSH" = no ]; thenreturnfi# If this user's login shell is already "zsh", do not attempt to switch.if [ "$(basename -- "$SHELL")" = "zsh" ]; thenreturnfi# If this platform doesn't provide a "chsh" command, bail out.if ! command_exists chsh; thencat <<EOFI can't change your shell automatically because this system does not have chsh.${BLUE}Please manually change your default shell to zsh${RESET}EOFreturnfiecho "${BLUE}Time to change your default shell to zsh:${RESET}"# Prompt for user choice on changing the default login shellprintf '%sDo you want to change your default shell to zsh? [Y/n]%s ' \"$YELLOW" "$RESET"read -r optcase $opt iny*|Y*|"") echo "Changing the shell..." ;;n*|N*) echo "Shell change skipped."; return ;;*) echo "Invalid choice. Shell change skipped."; return ;;esac# Check if we're running on Termuxcase "$PREFIX" in*com.termux*) termux=true; zsh=zsh ;;*) termux=false ;;esacif [ "$termux" != true ]; then# Test for the right location of the "shells" fileif [ -f /etc/shells ]; thenshells_file=/etc/shellselif [ -f /usr/share/defaults/etc/shells ]; then # Solus OSshells_file=/usr/share/defaults/etc/shellselsefmt_error "could not find /etc/shells file. Change your default shell manually."returnfi# Get the path to the right zsh binary# 1. Use the most preceding one based on $PATH, then check that it's in the shells file# 2. If that fails, get a zsh path from the shells file, then check it actually existsif ! zsh=$(command -v zsh) || ! grep -qx "$zsh" "$shells_file"; thenif ! zsh=$(grep '^/.*/zsh$' "$shells_file" | tail -1) || [ ! -f "$zsh" ]; thenfmt_error "no zsh binary found or not present in '$shells_file'"fmt_error "change your default shell manually."returnfififi# We're going to change the default shell, so back up the current oneif [ -n "$SHELL" ]; thenecho "$SHELL" > ~/.shell.pre-oh-my-zshelsegrep "^$USERNAME:" /etc/passwd | awk -F: '{print $7}' > ~/.shell.pre-oh-my-zshfi# Actually change the default shell to zshif ! chsh -s "$zsh"; thenfmt_error "chsh command unsuccessful. Change your default shell manually."elseexport SHELL="$zsh"echo "${GREEN}Shell successfully changed to '$zsh'.${RESET}"fiecho}main() {# Run as unattended if stdin is not a ttyif [ ! -t 0 ]; thenRUNZSH=noCHSH=nofi# Parse argumentswhile [ $# -gt 0 ]; docase $1 in--unattended) RUNZSH=no; CHSH=no ;;--skip-chsh) CHSH=no ;;--keep-zshrc) KEEP_ZSHRC=yes ;;esacshiftdonesetup_colorif ! command_exists zsh; thenecho "${YELLOW}Zsh is not installed.${RESET} Please install zsh first."exit 1fiif [ -d "$ZSH" ]; thenecho "${YELLOW}The \$ZSH folder already exists ($ZSH).${RESET}"if [ "$custom_zsh" = yes ]; thencat <<EOFYou ran the installer with the \$ZSH setting or the \$ZSH variable isexported. You have 3 options:1. Unset the ZSH variable when calling the installer:$(fmt_code "ZSH= sh install.sh")2. Install Oh My Zsh to a directory that doesn't exist yet:$(fmt_code "ZSH=path/to/new/ohmyzsh/folder sh install.sh")3. (Caution) If the folder doesn't contain important information,you can just remove it with $(fmt_code "rm -r $ZSH")EOFelseecho "You'll need to remove it if you want to reinstall."fiexit 1fisetup_ohmyzshsetup_zshrcsetup_shellprintf %s "$GREEN"cat <<'EOF'__ ______ / /_ ____ ___ __ __ ____ _____/ /_/ __ \/ __ \ / __ `__ \/ / / / /_ / / ___/ __ \/ /_/ / / / / / / / / / / /_/ / / /_(__ ) / / /\____/_/ /_/ /_/ /_/ /_/\__, / /___/____/_/ /_//____/ ....is now installed!EOFcat <<EOFBefore you scream Oh My Zsh! please look over the ~/.zshrc file to select plugins, themes, and options.• Follow us on Twitter: $(fmt_underline https://twitter.com/ohmyzsh)• Join our Discord server: $(fmt_underline https://discord.gg/ohmyzsh)• Get stickers, shirts, coffee mugs and other swag: $(fmt_underline https://shop.planetargon.com/collections/oh-my-zsh)EOFprintf %s "$RESET"if [ $RUNZSH = no ]; thenecho "${YELLOW}Run zsh to try it out.${RESET}"exitfiexec zsh -l}main "$@"
配置.zshrc
ZSH_THEME=”ys” source ~/.zshrc
语法高亮
sudo apt install zsh-syntax-highlighting echo “source /usr/share/zsh-syntax-highlighting/zsh-syntax-highlighting.zsh” >> ~/.zshrc source ~/.zshrc
- 桌面美化 ```bash 安装优化工具 sudo apt install gnome-tweak-tool 使gnome支持插件扩展,以插件形式扩展应用 sudo apt install gnome-shell-extensions 使浏览器支持插件扩展,在浏览器打开按钮即可用 sudo apt install chrome-gnome-shell 插件网站 https://extensions.gnome.org 常用插件 Arcmenu、Clipboard indicator、Compiz alike windows effect、Coverflow alt-tab、Dash to dock、Dash to panel、Internet speed meter、Openweather、User themes
桌面、shell、图标和光标主题安装 网址:https://www.opendesktop.org/p/1013714/、https://www.pling.com/p/1312658/、https://www.gnome-look.org/browse/cat/ 方式一: 可通过ocs安装工具进行网页一键安装主题,下载路径(https://www.gnome-look.org/p/1136805/),下完之后用dpkg -i ocs.deb命令安装ocs工具(如果遇到依赖包问题用sudo apt-get install -f解决),安装好就可以在以上网址支持ocs安装主题的页面进行一键安装,再在优化工具中选择即可 方式二: 下载tar包,tar -xvf .tar 解压到/usr/share/icons、/usr/share/themes或者~/.themes、~/.icons目录下,再在优化工具中选
<a name="21f4b796"></a>#### 3、安装工具```bash安装gitsudo apt install git安装vimsudo apt install vim安装python2sudo apt install python安装pip3sudo apt install python3-pip安装ifconfigsudo apt install net-tools安装curlsudo apt install curl
安装Typroasudo apt-key adv --keyserver keyserver.ubuntu.com --recv-keys BA300B7755AFCFAEwget -qO - https://typora.io/linux/public-key.asc | sudo apt-key add -sudo add-apt-repository 'deb https://typora.io/linux ./'sudo apt updatesudo apt install typora
安装JetBrains全家桶https://www.jetbrains.com/toolbox-app/下载该工具进行无脑安装,注意解压后在非root用户启动
安装java8sudo apt updatesudo apt install openjdk-8-jdk如果安装了多个版本可通过命令设置默认版本sudo update-alternatives --config java配置环境变量vim /etc/profile添加#JAVAexport JAVA_HOME=/usr/lib/jvm/java-8-openjdk-amd64(echo $JAVA_HOME可查看java安装目录)export JRE_HOME=${JAVA_HOME}/jreexport CLASSPATH=.:${JAVA_HOME}/lib:${JRE_HOME}/libexport PATH=${JAVA_HOME}/bin:$PATH使配置生效source /etc/profile
安装mavensudo apt install maven配置环境变量vim /etc/profile添加#MAVENMAVEN_HOME=/usr/share/maven(echo $MVN可查看maven安装目录)export MAVEN_HOMEexport PATH=${PATH}:${MAVEN_HOME}/bin配置maven本地仓库和远程仓库vim /usr/share/maven/conf/settings.xml添加<localRepository>/home/data/java-repository</localRepository><mirror><id>alimaven</id><name>aliyun maven</name><url>http://maven.aliyun.com/nexus/content/groups/public/</url><mirrorOf>central</mirrorOf></mirror>
安装redis可视化工具sudo snap install redis-desktop-manager
安装vscode和网易云音乐https://code.visualstudio.com/https://music.163.com/#/download下载.deb包dpkg -i 或者 apt install *.deb命令安装
安装sshapt install openssh-server打开防火墙并允许sshufw enableufw allow ssh查看ssh运行状态service ssh status连接远程服务器ssh user@ip
安装deepin-wine上的软件(QQ、微信等)wget -O- https://deepin-wine.i-m.dev/setup.sh | shsudo apt-get install 包名(https://github.com/zq1997/deepin-wine在github上看有哪些软件包)
安装dockercurl -fsSL https://get.docker.com | bash -s docker --mirror Aliyunvim /etc/docker/daemon.json添加docker国内镜像{"registry-mirrors": ["https://mj9kvemk.mirror.aliyuncs.com"]}重启生效systemctl daemon-reloadsystemctl restart docker非root用户如何使用docker:查看是否有docker用户组sudo cat /etc/group | grep docker若没有进行添加sudo groupadd -g 999 docker(999为组id,docker为组名)添加用户进docker组sudo usermod -aG docker user重启dockersudo systemctl restart docker给权限sudo chmod a+rw /var/run/docker.sock安装docker-composesudo curl -L "https://github.com/docker/compose/releases/download/1.25.5/docker-compose-$(uname -s)-$(uname -m)" -o /usr/local/bin/docker-composesudo chmod +x /usr/local/bin/docker-composedocker-compose --version
4、修改用户名
修改用户名,需要杀掉该用户所有的进程sudo pkill -u dansudo pkill -9 -u dan如果不行用root用户登陆操作,默认root是不能通过图形界面登陆的,需要修改配置:设置root用户密码:sudo passwd rootsudo vim /usr/share/lightdm/lightdm.conf.d/50-ubuntu.conf 添加greeter-show-manual-login= truesudo vim /etc/pam.d/gdm-autologin 注释掉auth required pam_succeed_if.so user != root quiet_successsudo vim /etc/pam.d/gdm-password 注释掉auth required pam_succeed_if.so user != root quiet_successsudo vim/root/.profile 添加tty -s && mesg n || true 和 mesg n || true 将原来的mesg n 2> /dev/null || true注释掉修改完重启选择root用户登陆即可,修改完再恢复配置修改用户名usermod -l new_username old_username修改home目录sudo usermod -d /home/new_username -m new_username修改用户UIDsudo usermod -u uid new_username修改用户组名groupmod -n new_username old_username查看用户信息id user_name
5、ubuntu笔记本设置关闭盖子不休眠
sudo vim /etc/systemd/logind.conf#HandleLidSwitch=suspend -> HandleLidSwitch=ignoreservice systemd-logind restart

若有收获,就点个赞吧
0 人点赞
