spring介绍
1.解耦
耦合就是指代码之间的依赖性。解耦就是尽可能的降低代码之间的依赖性。
class1 = new Class2(),那么class1就和class2耦合了,如果class2没有的话,那么class1就会出现编译错误(ERROR,而不是异常Exception),所以可以用映射文件的办法,来解耦。
减少耦合性,就是少用new
2.解耦常用的一种方法是:利用映射文件来进行创建新对象。
配置文件中,后面要写全类限定名。而且写的是实现类。
映射法需要用到配置文件。以后不再有各种各样复杂的配置,而是通过配置文件来进行修改。只使用字符串,而不使用真实的类名。
3.javaBean和properties对象的创建,尤其是spring Resource,见下图。
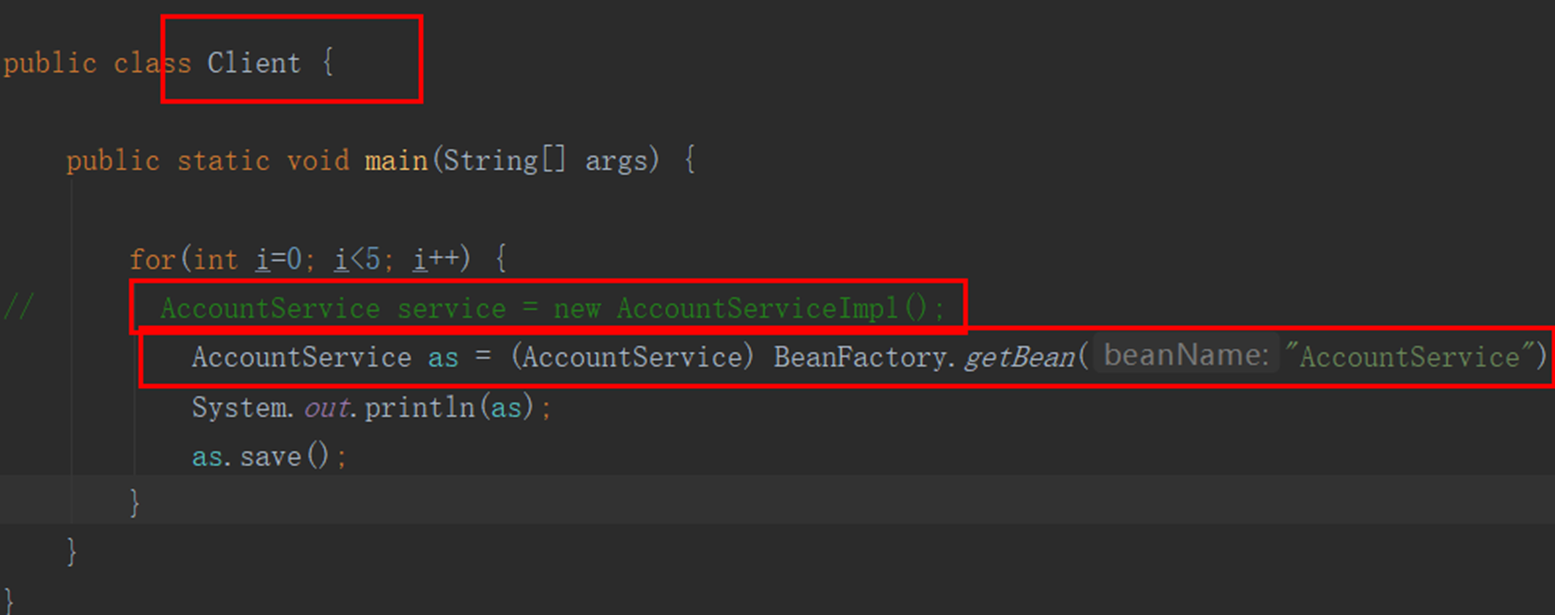
4.引入工厂模式,所需要的对象直接从工厂里面拿。这是ioc核心。
ioc全名叫做反转控制,为什么这么叫?因为如果有类使用工厂模式,相当于把他自己创建新对象的权利交给了BeanFactory,那么就称为把权利反转给BeanFactory,由BeanFactory进行控制。
比如后图2.
如图所示,Client把自己new一个对象的权利交给beanFactory。
/*** 仿照 BeanFactory 创建一个自己的*/public class MyFactory {private static Properties prop;private static Map<String, Object> map;static {try {prop = new Properties();map = new HashMap<>();InputStream is = MyFactory.class.getClassLoader().getResourceAsStream("application.properties");prop.load(is);Enumeration<Object> keys = prop.keys();while(keys.hasMoreElements()) {String key = keys.nextElement().toString();Object o = Class.forName(prop.getProperty(key)).newInstance();map.put(key,o);}} catch (Exception e) {e.printStackTrace();}}public Object getBean(String name) {return map.get(name);}}
5.总结一句话:ioc(控制反转)作用就是为了解耦。
二、spring项目的创建
1.把bean交给spring管理。怎么交?
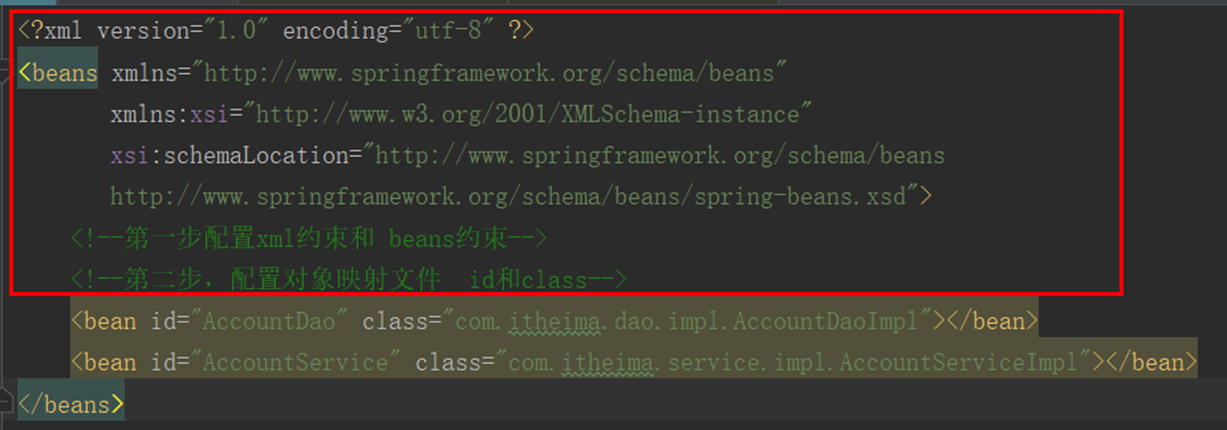
在resource下创建bean.xml文件。然后引入约束,进行bean配置(创建对象的映射。)
<?xml version="1.0" encoding="utf-8" ?>
<beans xmlns="http://www.springframework.org/schema/beans"
       xmlns:xsi="http://www.w3.org/2001/XMLSchema-instance"
       xsi:schemaLocation="http://www.springframework.org/schema/beans
      http://www.springframework.org/schema/beans/spring-beans.xsd">
    <!--第一步配置xml约束和 beans约束-->
    <!--第二步,配置对象映射文件  id和class-->
    <bean id="AccountDao" class="com.itheima.dao.impl.AccountDaoImpl"></bean>
    <bean id="AccountService"class="com.itheima.service.impl.AccountServiceImpl"></bean>
</beans>
2.第二步:获取容器对象,得到配置文件中的内容。怎么获取?
用ApplicationContext对象。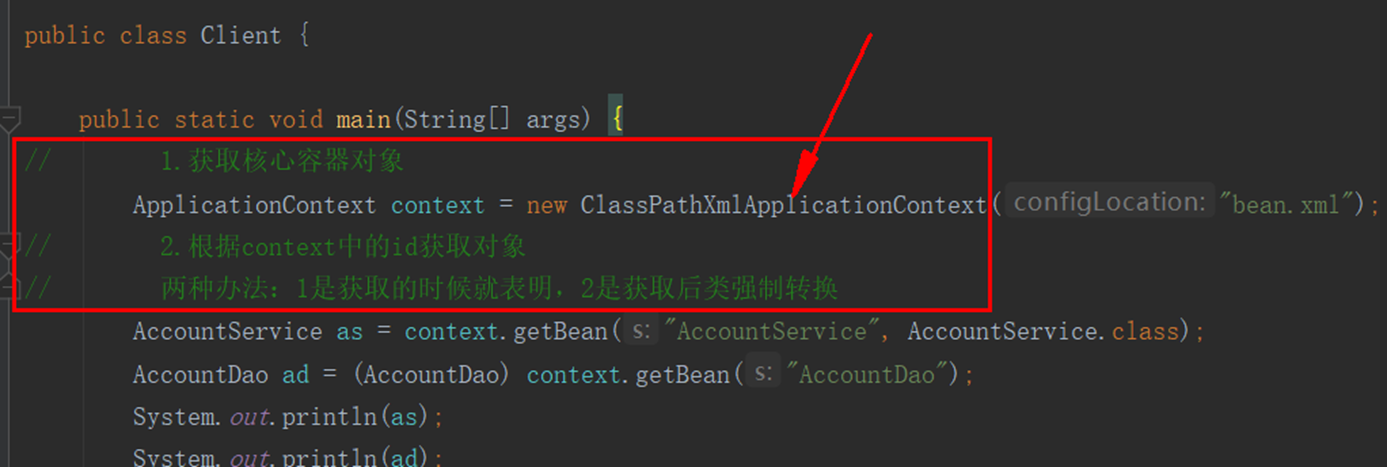
ApplicationContext是一个接口,常用的实现类有三种。
1.)AnnontationConfigApplicationContext
2.)FileSystemXmlApplicationContext
3.)ClassPathXmlApplicationContext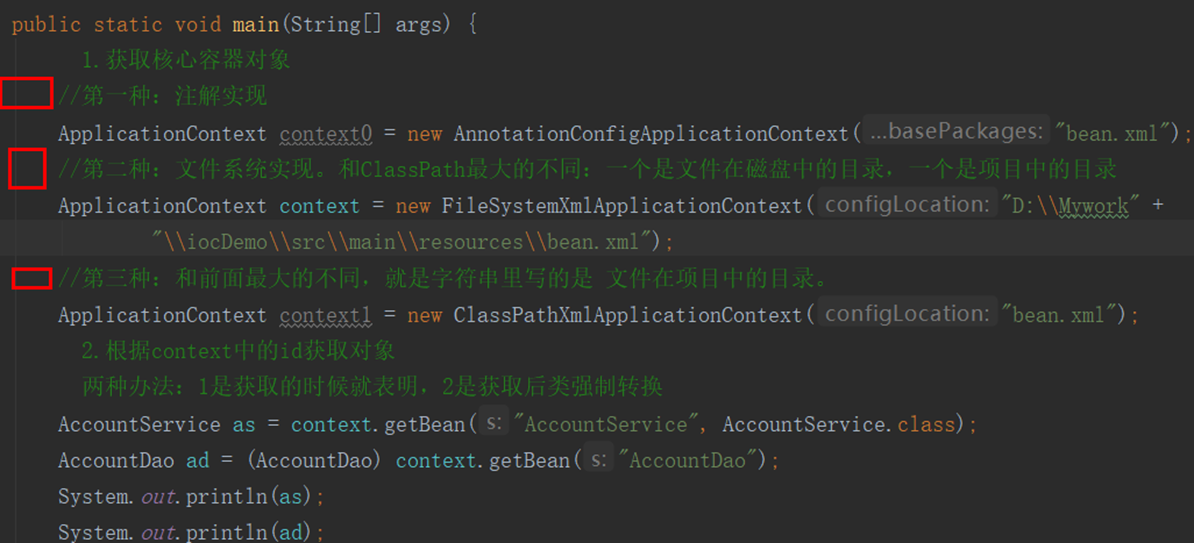
BeanFactory和ApplicationContext:一个延迟加载创建多例对象。另一个立即加载产生单例对象
3.核心容器接口有很多,包括BeanFactory和ApplicationContext,怎么确定选择哪一个呢?
三、依赖注入:普通无参注入,有参注入(此又分构造注入、传值注入)
1.普通无参构造方法注入

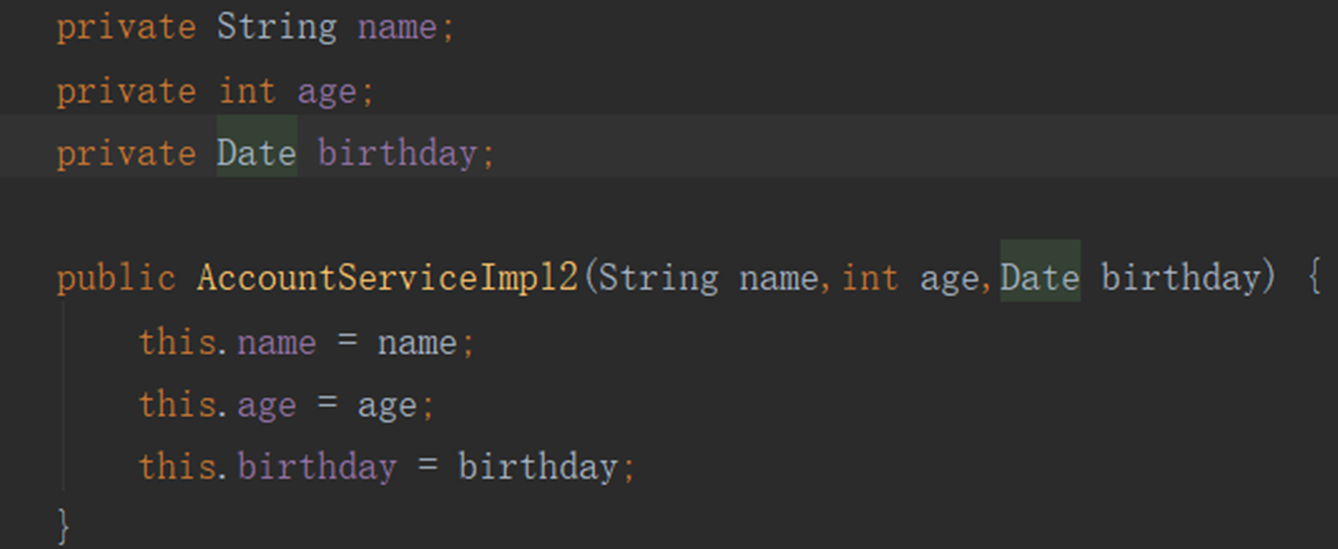
2.有参方法注入,分两种(构造注入,传值注入)
下图是构造注入

还有一种是传值注入
1.被注入的类中要写set方法
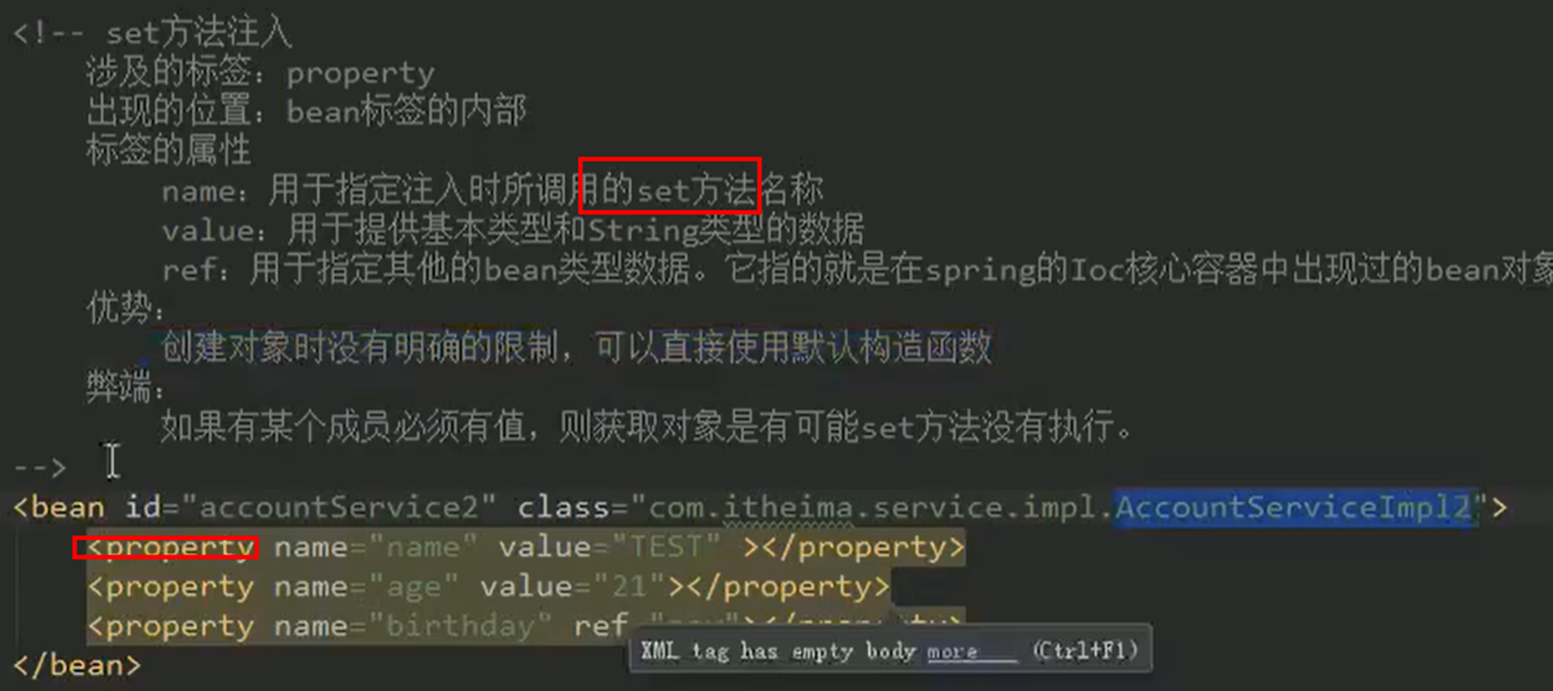
2.配置文件中使用property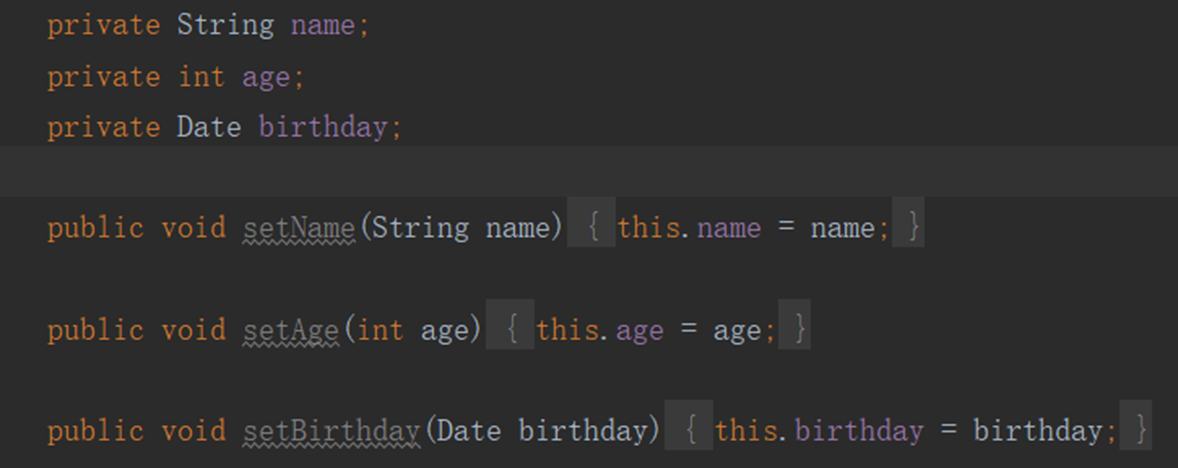
四、几种表达式
${ } **是jsp中 EL标签的最常用表达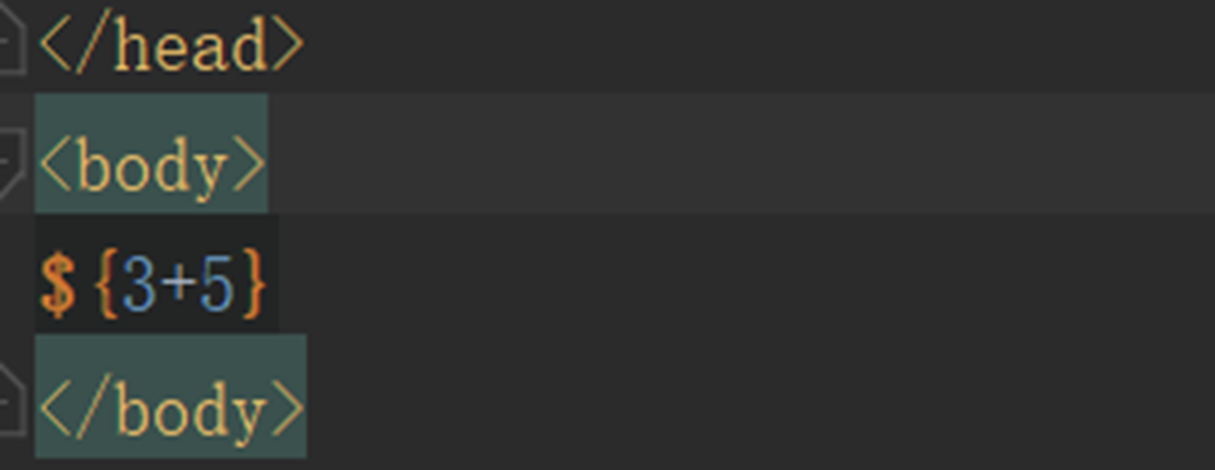
OGNL标签是直接使用
下图:s:property是struts的标签。
value后面的值是 OGNL表达式。
注意OGNL如果取类怎么取?取类中的静态方法呢?加@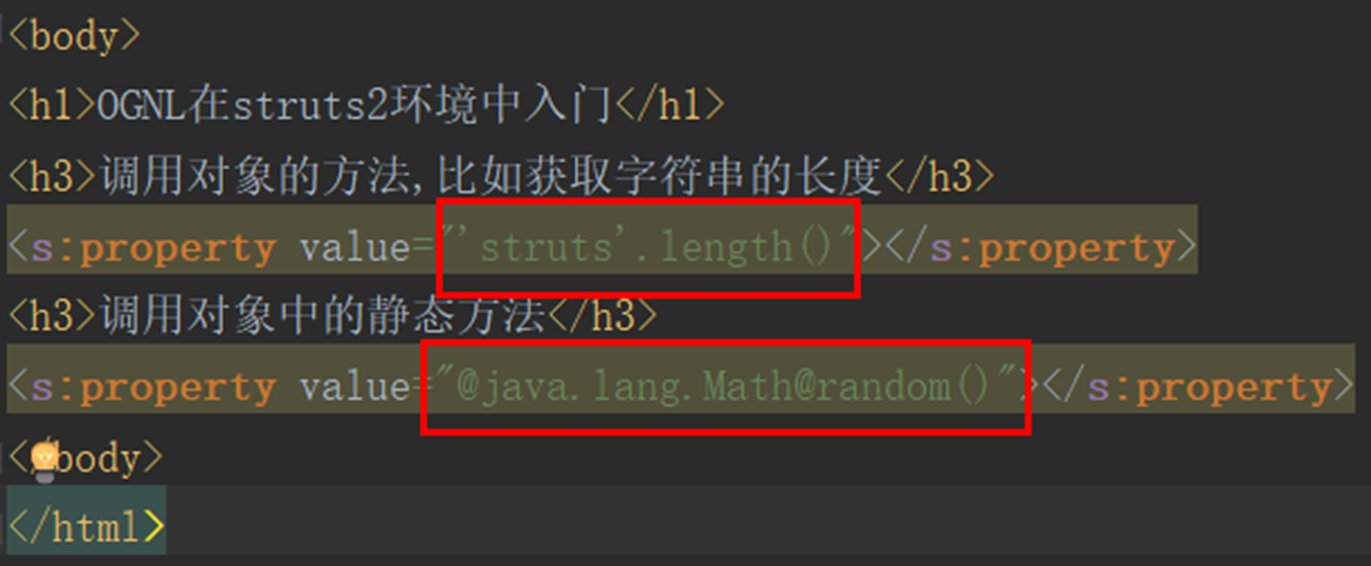
单例,多例
scope作用范围
init-method
destroy-mothod
复杂类型的注入list,map等
分模块开发
第二天
使用注解方式的步骤
在service中写注解(比如@Component等)—>在配置文件中写context**
1.注解
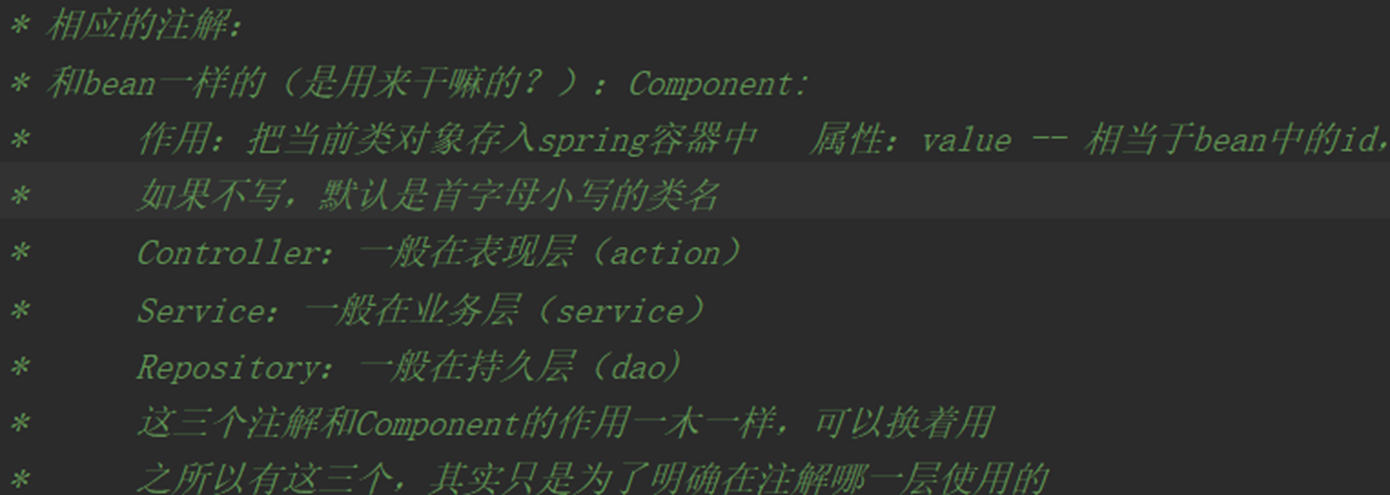
1)Component,Service,Repository注解: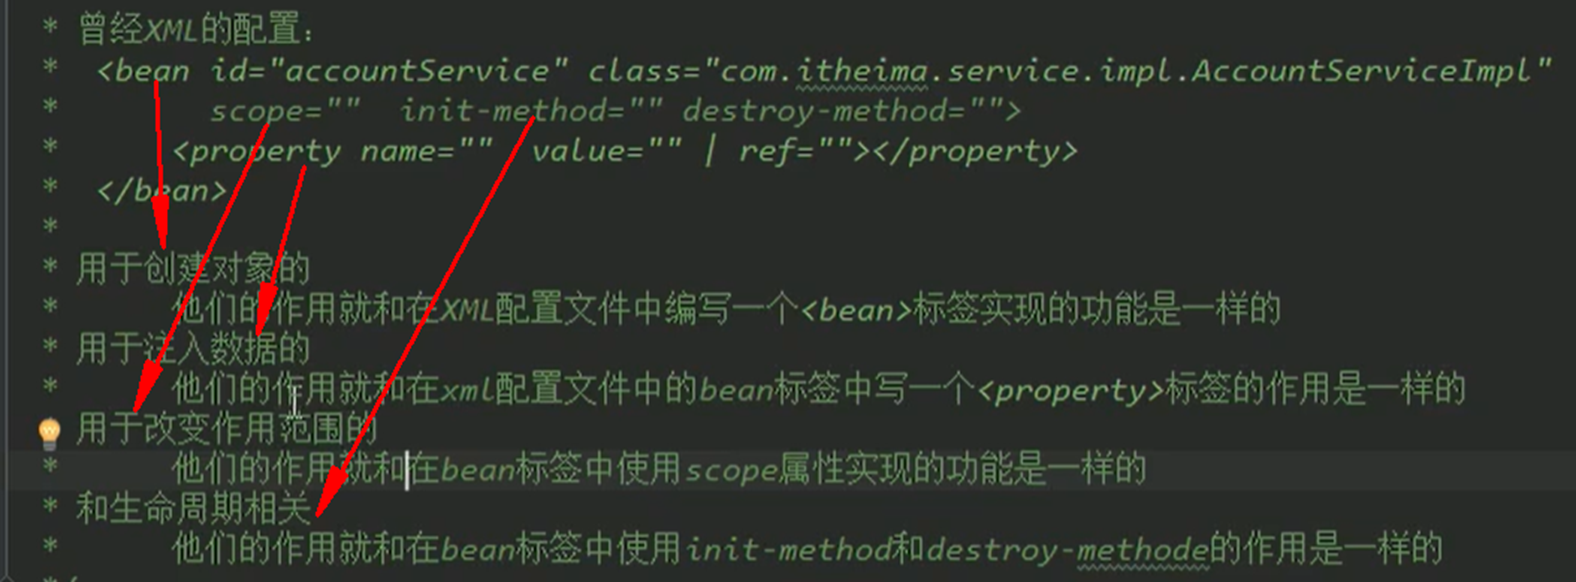
2)Autowired,Qualifier,Resource,Value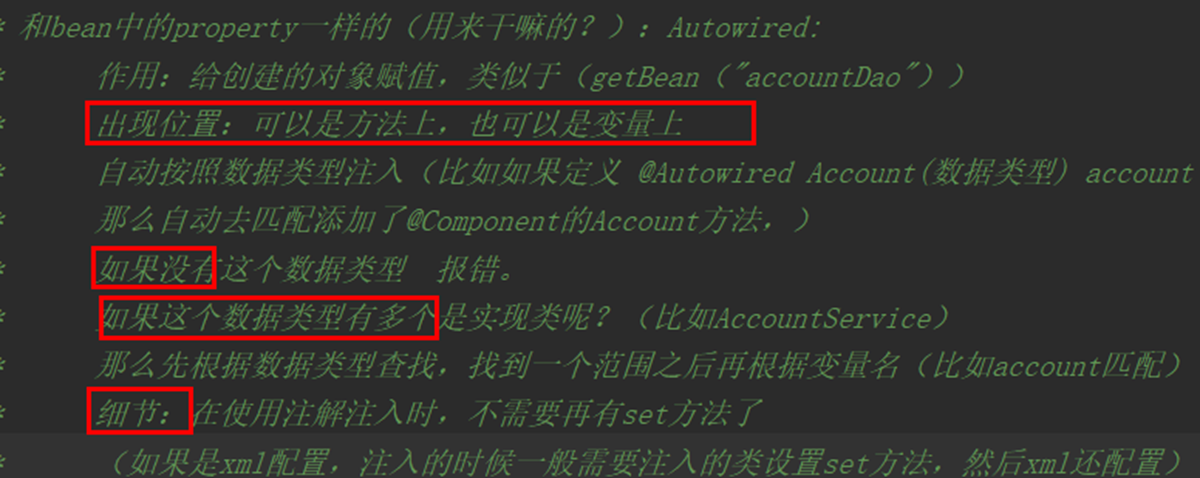
使用set方法是怎样的?(类中写set,配置中写property)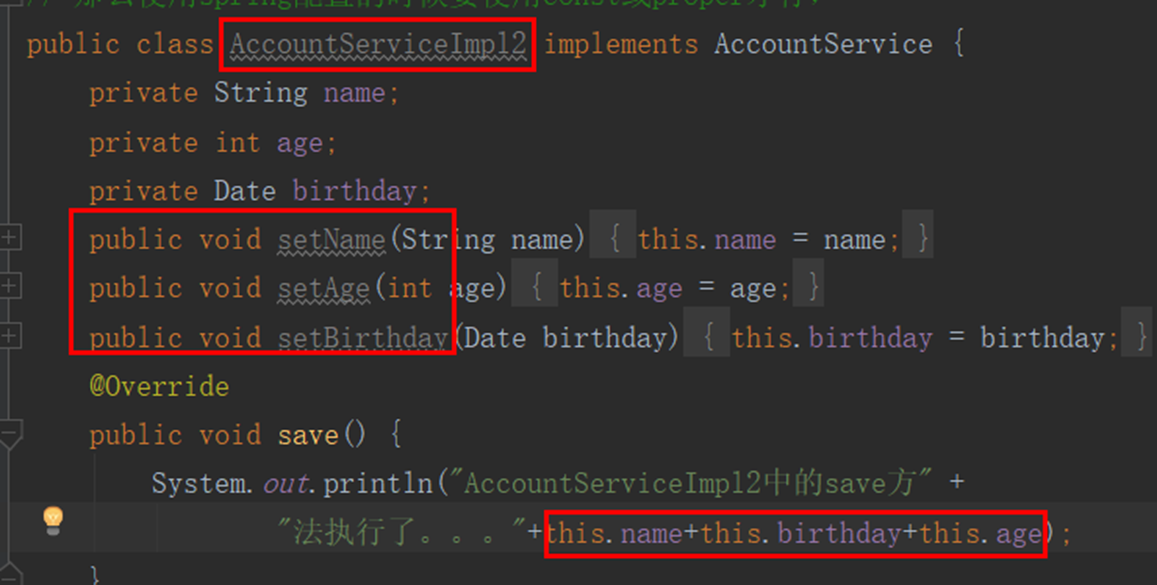

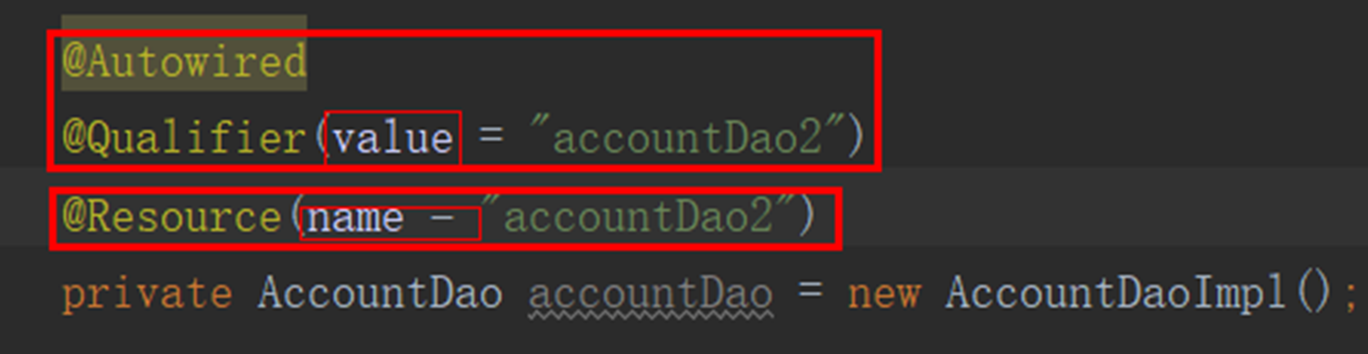
Autowired+private行中的
accountDao = Autowired+Qualifier=resource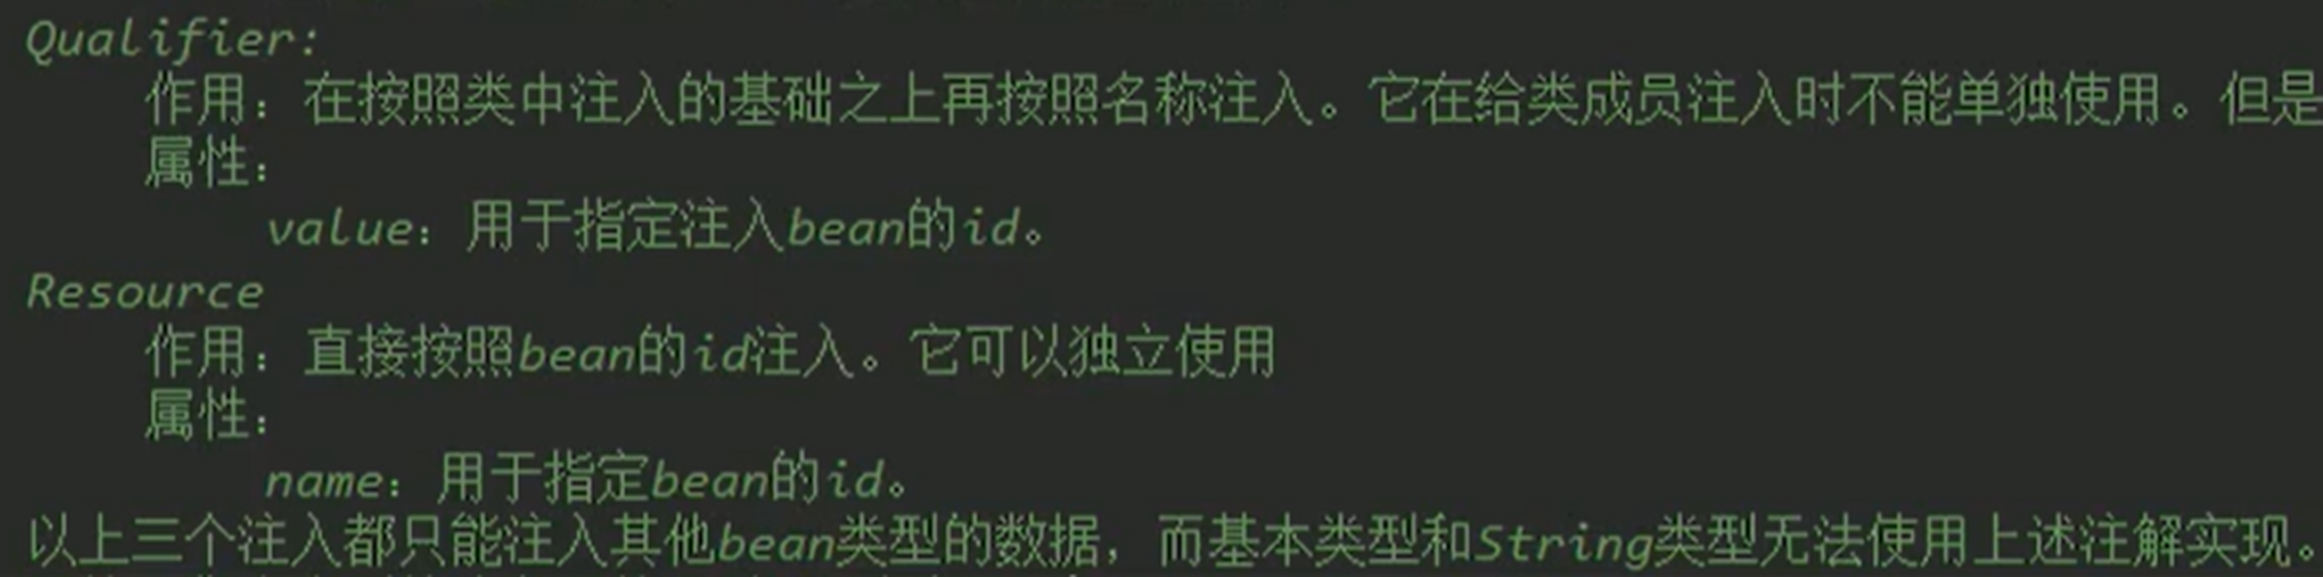

3)Scope,PreDestory,PostConstruct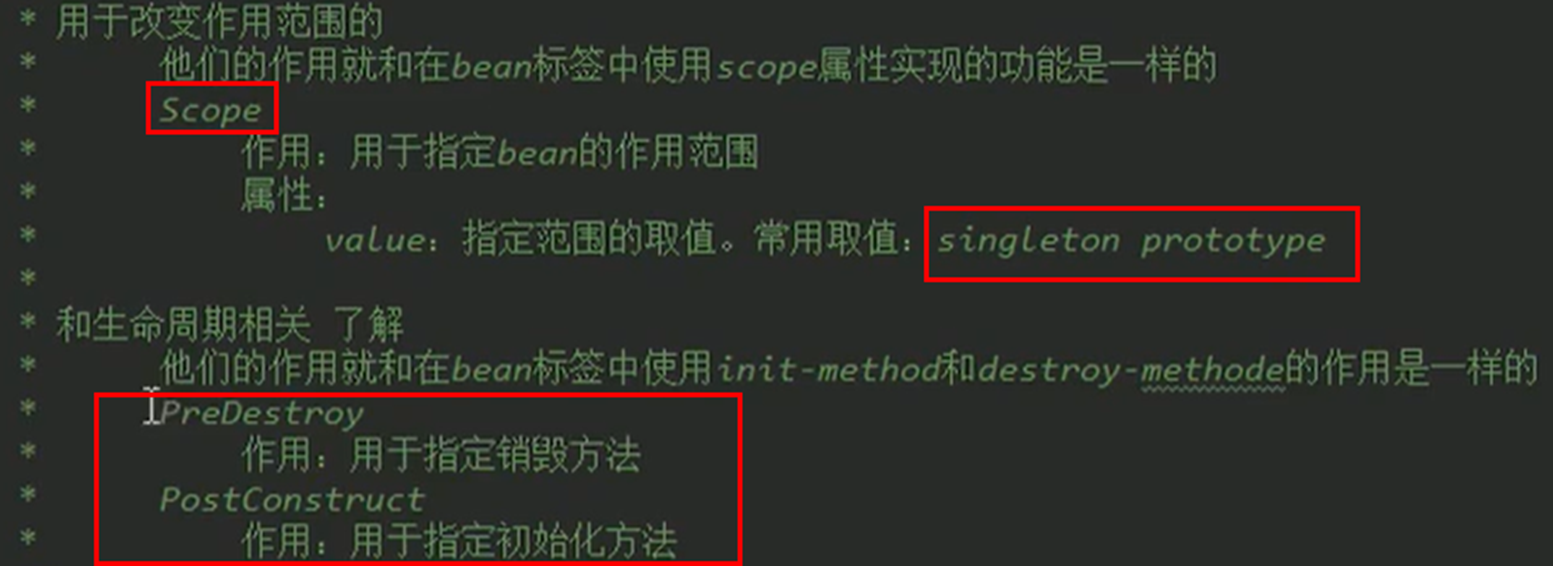
303.ApplicationContext是一个接口,常用的实现类有三种。(了解)
1.)AnnontationConfigApplicationContext
2.)FileSystemXmlApplicationContext
3.)ClassPathXmlApplicationContext
304.根据context中的id获取对象(了解)
// 从容器里取值的时候有两种方法,一种强制转换,一种是在第二个参数位置,显示声明
// Student student1 = context.getBean(“student”,Student.class);
Student student = (Student) context.getBean(“student2”);
305. bean中属性的含义:id,class,name,scope(了解)
id:相当于对象名
class:对象所对应的全限定名
name:相当于别名,而且可以取多个,可以通过 逗号, 分号; 或 空格分开
scope:singleton(单例) prototype(多例)
306. 有参构造方法有三种方式(了解)
第一种:通过属性名
第二种:通过属性类型(不常用)
第三种:通过索引
307.设置别名 (了解)
通过import导入其他的配置文件
指定要扫描的包
bean属性autowire:byName:通过名字去查找,自动注入;byType:通过class去查。
p命名空间和c命名空间(p:property;c:constructor):
<bean id="student2" class="demo.pojo.Student" c:name="李四"
      c:wife="gg" p:name="张三" p:wife="ss"/>
308.丰富类型赋值(了解)**
空是
    <!-- String-->
    <property name="wife">
        <null/>
    </property>
    <!-- 配置-->
    <property name="info">
        <props>
            <prop key="driver">demo.pojo.Student</prop>
        </props>
    </property>
    <!-- 数组注入-->
    <property name="books">
        <array>
            <value>红楼梦</value>
        </array>
    </property>
    <!-- List注入-->
    <property name="bobbys">
        <list>
            <value>打代码</value>
        </list>
    </property>
    <!-- map注入-->
    <property name="card">
        <map>
            <entry key="身份证" value="1222"/>
        </map>
    </property>
    <!-- Set-->
    <property name="games">
        <set>
            <value>LOL</value>
        </set>
    </property>
上面都是一些xml文件的配置
怎么配置bean,如果有很多配置文件怎么导入,set,map,property这些特殊类型怎么赋值,有参构造方法怎么赋值,怎么扫描包,怎么设置别名,怎么取值
但是以后最常用的还是注解方式
309.**以上各种问题怎么用注解解决?(了解)**
@Scope(“singleton”) property对应的是 @Value(“kuangshen”) public String name;
@ComponentScan(basePackages = {“aop.anno”})
@Component @Repository @Service @Controller
@Autowire是通过byType的,如果有很多的话(比如一个接口有多个实现类),还要通过@Qualifier再通过名字找一次
@Resource是先通过byName去找,如果找不到,会自动通过byType再找一次。
@Nullable字段标记了这个注解,说明这个字段可以是null
下面进入AOP的学习
310.静态代理。
类如下:Service接口(add del等方法) ServiceImpl(Service的实现类。真实类)
ServiceProxy类(代理类)实现了Service接口,接受实现类作为参数
public class ServiceProxy implements Service {
    private Service service;
    public void log(String msg) { System.out.println("方法名是:"+msg); }
    public void setService(Service service) { this.service = service; }
    public void del() { log("del");  service.del(); }
    public void add() { log("add");  service.add(); }
}
具体流程:代理类实现了真实类实现的接口。 代理类接受真实类作为参数。
代理类对接口里的方法进行加工(比如运行前打印下日志。或者对参数进行一些变动)
具体看下面(Service是接口。 ServiceImpl是真实类。 ServiceProxy是代理类)
public interface Service {
    void del();
    void add();
    void update();
    void query();
}
public class ServiceImpl implements Service {
    public void del() {
        System.out.println("del执行了。");
    }
    public void add() {
        System.out.println("add执行了。");
    }
    public void update() {
        System.out.println("update执行了。");
    }
    public void query() {
        System.out.println("query执行了。");
    }
}
public class ServiceProxy implements Service {
    private Service service;
    //这里对具体的方法进行日志输出,然后再调用真实方法
    public void log(String msg) {
        System.out.println("方法名是:" + msg);
    }
    //接受真实类作为参数
    public void setService(Service service) {
        this.service = service;
    }
    public void del() {
        log("del");
        service.del();
    }
    public void add() {
        log("add");
        service.add();
    }
    public void update() {
        log("update");
        service.update();
    }
    public void query() {
        log("query");
        service.query();
    }
}
public class Client {
    public static void main(String[] args) {
          //先创建真实角色
        ServiceImpl impl = new ServiceImpl();
          //创建代理角色
        ServiceProxy proxy = new ServiceProxy();
          //把真实角色给代理角色
        proxy.setService(impl);
          //通过代理角色调用方法
        proxy.add();
    }
}
311.动态代理:即代理类不是我们写的,而是动态生成的
动态代理分成两大类:
基于接口—JDK动态代理(创建实现类代理对象,增强类的方法)
基于类:CGLIB(创建子类的代理对象,增强类的方法)
jdk动态代理
首先是一个程序:调用处理程序。 所属:代理类的实例。
作用,接受真实角色(setTarget),创建代理类实例(代理角色)(return new Proxy.new),
处理代理角色接管的真实角色的方法,并且可以加上代理角色自己的方法。
/**
 * 1.ClassLoad为什么用的是这个类的ClassLoad?JDKProxy是什么?
 * 2.上一个用的是MyInvocationHandler的ClassLoad
 * MyInvocationHandler是 调用处理程序 (实现了InvocationHandler接口)
 * 3.invoke方法什么时候被调用的?怎么被调用的?整个动态代理的实现流程是什么?
 * Proxy.newnewProxyInstance(ClassLoad,行为接口的class,调用处理程序) ->
 * 给第3参数传真实角色 —>第3参数调用invoke()实现增强。
 */
public class JDKProxy {
    public static void main(String[] args) {
        Class<UserDAO>[] interfaces = new Class[]{UserDAO.class};
        //        先生成代理类,通过代理类执行方法
        //        三个参数:当前类的ClassLoader; 要被代理的接口(要字节码形式的); 调用处理程序;
        UserDAO userDAO = new UserDAOImpl();
        UserDAO proxy = (UserDAO) Proxy.newProxyInstance(JDKProxy.class.getClassLoader(), interfaces, new MyInvoHanlder(userDAO));
        int add = proxy.add(1, 2);
        proxy.update("d");
        System.out.println(add);
    }
}

class MyInvoHanlder implements InvocationHandler {
    private Object obj;

    //    调用 调用处理程序 的时候必须给定 真实角色(就是接口的实现类)
    public MyInvoHanlder(Object obj) {
        this.obj = obj;
    }

    public Object invoke(Object proxy, Method method, Object[] args) throws Throwable {
        //方法执行之前:方法的名字是 ‘add’。  给方法传递的参数是:‘[1, 2]’
        System.out.println("方法执行之前:方法的名字是 ‘" + method.getName() + "’。  给方法传递的参数是:‘" + Arrays.toString(args) + "’");
        Object returnValue = method.invoke(obj, args);  //returnValue=null
        System.out.println("方法执行之后。。" + returnValue);
        return returnValue;
    }
}
说明:AOP是属于代理模式的,他们都是面向切面编程。
代理模式是嵌入到每个方法内部的。(比如一个UserService接口里有add,del,update方法,那么这些方法里面都需要添加一个打印语句。就可以通过代理模式实现。代理角色自己有一个log方法,并且给每个真实方法里加上这个log方法。)
基于类:CGLIB
//这里是动态代理机制:即代理类不是我们写的,而是动态生成的
//这是 代理实例的  调用处理程序(是一个程序,属于代理实例)
public class MyInvocationHandler implements InvocationHandler {
    //    被代理的接口
    private Object target;

    public void setRent(Rent rent) {
        this.target = rent;
    }

    //    生成代理类
    public Object getProxy() {
        return Proxy.newProxyInstance(this.getClass().getClassLoader(),
                target.getClass().getInterfaces(), this);
    }

    //    处理代理实例,并返回结果
    public Object invoke(Object proxy, Method method, Object[] args) throws Throwable {
//        动态代理的本质,就是使用反射机制实现
        log(method.getName());
        Object result = method.invoke(target, args);
        return result;
    }

    public void log(String msg) {
        System.out.println("方法" + msg + "执行了");
    }
}
312.AOP重点名词辨析
被增强类的所有方法都是连接点,其中真正被增强的方法称为切入点 增强类的增强方法被称为通知。 通知根据时期分为多种:前置通知、后期通知、返回通知、环绕通知、异常通知 切面:是动作,或者说一个过程。没有具体意义 **代理:生成的代理对象
1、连接点(JointPoint) 类里面哪些方法可以被增强,这些方法称为连接点
2、切入点(PointCut) 实际被真正增强的方法,称为切入点
3、通知(Advice,增强方法):
(1)实际增强的逻辑部分称为通知(增强)
(2)通知有多钟类型:前置通知(Before) 后置通知(AfterReturning也叫返回通知)
环绕通知(Around) 异常通知(AfterThrowing) 最终通知
4、切面(Aspect) 是动作,把通知应用到切入点的过程
5、代理(Proxy):目标对象应用通知之后创建的对象
313.AOP应用实例
纯注解版:
使用aop的流程
- 创建需要被增强的类(比如User)
- 创建增强类(比如UserProxy)
- 创建配置文件,开启注解扫描(比如在ProxyConfig上加上@ComponentScan)
- 配置注解,确定前置后置,环绕等(在UserProxy类里添加 @Before、@After方法)
增强类和被增强类 都加Component,归spring管理
给增强类增加 Aspect —- 生成代理类(比如给UserProxy加上@Aspect)
开启Aspect自动生成代理对象(比如给ProxyConfig加上@EnableAspectJAutoProxy)
配置不同的通知类型 后面的值是切入点表达式:表示出切入点的位置(就是对那个类的那个方法进行增强)
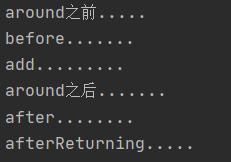
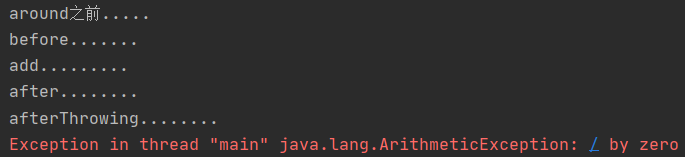
@Component
public class User {
 public void addUser() {
     System.out.println("add.........");
     // int i = 5/0;
 }
}
/** * around在before之前,在after之后 * * after是防止执行完,return之前执行,afterReturning是执行return之后才调用 * 所以后者早于前者 * * 如果出现异常,after执行,afterReturning和around后面都不执行 */ @Component @Aspect public class UserProxy { //相同切入点抽取 @Pointcut("execution(* aop2.*.*(..))") public void pointDemo() { } // execution(权限修饰符、返回类型[可省略]、全类名.方法名(参数列表)) @Before("execution(* aop2.User.addUser(..))") public void before() { System.out.println("before......."); } @After("execution(* *.*.*(..))") public void after() { System.out.println("after........"); } @AfterReturning("execution(* aop2.*.*(..))") public void afterReturning() { System.out.println("afterReturning....."); } @Around("pointDemo()") public void around(ProceedingJoinPoint proceedingJoinPoint) throws Throwable { System.out.println("around之前....."); proceedingJoinPoint.proceed(); System.out.println("around之后......."); } @AfterThrowing("pointDemo()") public void afterThrowing() { System.out.println("afterThrowing........"); } }@Component @EnableAspectJAutoProxy public class AopConfig { }public class TestAop { public static void main(String[] args) { ApplicationContext context = new AnnotationConfigApplicationContext("aop2"); User user = context.getBean("user", User.class); user.addUser(); } }没开 5/0的运行结果: after在return之前。 afterReturning在return之后。所以 afterReturning肯定在return之前。around两个之前。 before之前,after之前
开始5/0之后:before、after不受影响。 around和afterReturning都不执行
也可以不用注解实现,用纯xml实现
增强类实现通知,然后xml只配置切入点和通知的ref
//method:要执行的目标对象的方法   args:参数   target:目标对象
public class BeforeLog implements MethodBeforeAdvice {
    public void before(Method method, Object[] args, Object target) throws Throwable {
        System.out.println(target.getClass().getName() + "的" + method.getName() + "被执行了");
    }
}
public class AfterLog implements AfterReturningAdvice {
    //    returnValue:返回值
    public void afterReturning(Object returnValue, Method method, Object[] args, Object target) throws Throwable {
        System.out.println("执行了" + method.getName() + "方法,返回结果为:" + returnValue);
    }
}
xml配置
<bean id="beforeLog" class="aop.model.BeforeLog"/>
<bean id="afterLog" class="aop.model.AfterLog"/>

    <!--配置aop-->
<aop:config>
        <!--切入点:expression:表达式,execution(要执行的位置)-->
    <aop:pointcut id="pointcut" expression="execution(* aop.service.UserServiceImpl.*(..))"/>
    <aop:pointcut id="pointcut1" expression="execution(* aop.service.UserServiceImpl.*(..))"/>
        <!--执行环绕通知-->
    <aop:advisor advice-ref="beforeLog" pointcut-ref="pointcut"/>
    <aop:advisor advice-ref="afterLog" pointcut-ref="pointcut1"/>
</aop:config>
第二种方法
增强类不实现增强方法
<!--配置aop增强-->
<aop:config>
  <!--切入点-->
  <aop:pointcut id="p" expression="execution(* aop.anno.*.*(..))"/>
  <!--配置切面-->
  <aop:aspect ref="recordProxy">
    <!--增强作用在具体的方法上-->
    <aop:after method="after" pointcut-ref="p"/>
  </aop:aspect>
</aop:config>
注意:切面的ref必须是recordProxy(增强类)
method必须是切面的ref联系的类里面的方法。 pointcut-ref连接的是切入点。(切入点表达式说明了切点所在的位置。)
注意:无论是@Aspect还是

若有收获,就点个赞吧
0 人点赞
