1、同节点,同Pod,不同容器之间通信
采用container 模式这个模式指定新创建的容器和已经存在的一个容器共享一个 Network Namespace,而不是和宿主机共享。新创建的容器不会创建自己的网卡,配置自己的 IP,而是和一个指定的容器共享 IP、端口范围等。同样,两个容器除了网络方面,其他的如文件系统、进程列表等还是隔离的。# [两个容器的进程可以通过 lo 网卡设备通信。]
2、同节点,不同Pod之间通信
# 同节点不同Pod之间的通信:/#/ 有一个前提,我们在iconfig中看到的网卡都是在内核级别的,或是说在内核这个层面。Pod - Pod[Same Node]:通常情况下,在Flannel上解决同节点Pod之间的通信依赖的是Linux Bridge,和我们在Docker中不同的是,在Kubernetes Flannel的环境中使用的Linux Bridge为cni0,而不是原来的docker0。可通过:brctl show查看对应的Linux Bridge的bridge name和interfaces。[root@k8s-1 ~]# brctl showbridge name bridge id STP enabled interfacescni0 8000.1edb12e1c079 no veth54a9e98a # cni0 为Linux下的一个虚拟Bridge。docker0 8000.0242da0ca579 no[root@k8s-1 ~]#此时我们看到一端在ROOT NS中的一个接口,而Pod中的eth0中的接口在Pod所在的namespace中。此时两者之间有通信的需求,何种方案比较合适呢?--- #[veth pair]其中veth device(pair)的定义为:# The veth devices are virtual Ethernet devices. They can act as tunnels between network namespaces。topo like below:APP APP| || |kernel ------------------------------ kernel| |network stack network stack| ||______________________________|veth-m veth-n#对于此种模式我们普通Linux中是怎么实现呢?#5.2.1:创建 namespaceip netns a ns1ip netns a ns2#5.2.2:创建一对 veth-pair veth0 veth1ip l a veth0 type veth peer name veth1#5.2.3:将 veth0 veth1 分别加入两个 nsip l s veth0 netns ns1ip l s veth1 netns ns2#5.2.4:给两个 veth0 veth1 配上 IP 并启用ip netns exec ns1 ip a a 10.1.1.2/24 dev veth0ip netns exec ns1 ip l s veth0 upip netns exec ns2 ip a a 10.1.1.3/24 dev veth1ip netns exec ns2 ip l s veth1 up# veth0 ping veth1[root@k8s-1 ~]# ip netns exec ns1 ping 10.1.1.3PING 10.1.1.3 (10.1.1.3) 56(84) bytes of data.64 bytes from 10.1.1.3: icmp_seq=1 ttl=64 time=0.060 ms/此时需要弄清楚两个问题:1.此时如何知道Pod中的eth0的pair是谁?2.此时由Pod-1进入内核,如果想要把数据包转发给另外一个Pod-2?#1.使用ethtool -S eth0[root@k8s-1 ~]# kubectl exec -it cni-59h6g bashkubectl exec [POD] [COMMAND] is DEPRECATED and will be removed in a future version. Use kubectl exec [POD] -- [COMMAND] instead.bash-5.1# ethtool -S eth0NIC statistics:peer_ifindex: 6 ##此时在Pod中查看peer的index为6.我们可以在ROOT NS中查看,ifindex为6的网卡。rx_queue_0_xdp_packets: 0rx_queue_0_xdp_bytes: 0rx_queue_0_drops: 0rx_queue_0_xdp_redirect: 0rx_queue_0_xdp_drops: 0rx_queue_0_xdp_tx: 0rx_queue_0_xdp_tx_errors: 0tx_queue_0_xdp_xmit: 0tx_queue_0_xdp_xmit_errors: 0bash-5.1# exitexit[root@k8s-1 ~]# ip a1: lo: <LOOPBACK,UP,LOWER_UP> mtu 65536 qdisc noqueue state UNKNOWN group default qlen 1000link/loopback 00:00:00:00:00:00 brd 00:00:00:00:00:00inet 127.0.0.1/8 scope host lovalid_lft forever preferred_lft foreverinet6 ::1/128 scope hostvalid_lft forever preferred_lft forever2: ens33: <BROADCAST,MULTICAST,UP,LOWER_UP> mtu 1500 qdisc pfifo_fast state UP group default qlen 1000link/ether 00:0c:29:bd:fb:4a brd ff:ff:ff:ff:ff:ffinet 172.12.1.11/24 brd 172.12.1.255 scope global noprefixroute ens33valid_lft forever preferred_lft foreverinet6 fe80::e222:32bb:f400:f0c3/64 scope link noprefixroutevalid_lft forever preferred_lft forever3: docker0: <NO-CARRIER,BROADCAST,MULTICAST,UP> mtu 1500 qdisc noqueue state DOWN group defaultlink/ether 02:42:da:0c:a5:79 brd ff:ff:ff:ff:ff:ffinet 172.17.0.1/16 brd 172.17.255.255 scope global docker0valid_lft forever preferred_lft forever5: cni0: <BROADCAST,MULTICAST,UP,LOWER_UP> mtu 1472 qdisc noqueue state UP group default qlen 1000link/ether 1e:db:12:e1:c0:79 brd ff:ff:ff:ff:ff:ffinet 10.244.0.1/24 brd 10.244.0.255 scope global cni0valid_lft forever preferred_lft foreverinet6 fe80::1cdb:12ff:fee1:c079/64 scope linkvalid_lft forever preferred_lft forever6: veth54a9e98a@if3: <BROADCAST,MULTICAST,UP,LOWER_UP> mtu 1472 qdisc noqueue master cni0 state UP group default # 这里的ifindex为6.link/ether 66:c5:ab:c8:03:4e brd ff:ff:ff:ff:ff:ff link-netnsid 0inet6 fe80::64c5:abff:fec8:34e/64 scope linkvalid_lft forever preferred_lft forever[root@k8s-1 ~]#[root@k8s-1 ~]# brctl showbridge name bridge id STP enabled interfacescni0 8000.1edb12e1c079 no veth54a9e98a # 此时该接口是在cni0这个bridge上。docker0 8000.0242da0ca579 no[root@k8s-1 ~]#下边以两个在同一个节点上的两个Pod的情况分析:# network topo:10.244.1.10 10.244.1.7[ns1] [ns2]| |-- [cni0] --#[root@k8s-1 ~]# kubectl get pods -o wide | grep k8s-2cc 1/1 Running 0 32h 10.244.1.10 k8s-2 <none> <none>cni-svtwf 1/1 Running 1 109d 10.244.1.7 k8s-2 <none> <none>[root@k8s-1 ~]#在pod cni-svtwf中去ping cc这个pod。抓包显示为:[root@k8s-1 ~]# kubectl exec -it cni-svtwf bashkubectl exec [POD] [COMMAND] is DEPRECATED and will be removed in a future version. Use kubectl exec [POD] -- [COMMAND] instead.bash-5.1# tcpdump -n -e -i eth0tcpdump: verbose output suppressed, use -v[v]... for full protocol decodelistening on eth0, link-type EN10MB (Ethernet), snapshot length 262144 bytes14:31:06.751041 9a:16:45:30:3a:c6 > ee:6f:75:01:ed:bb, ethertype IPv4 (0x0800), length 98: 10.244.1.7 > 10.244.1.10: ICMP echo request, id 17920, seq 0, length 6414:31:06.751096 ee:6f:75:01:ed:bb > 9a:16:45:30:3a:c6, ethertype IPv4 (0x0800), length 98: 10.244.1.10 > 10.244.1.7: ICMP echo reply, id 17920, seq 0, length 64^C#从抓包可以看出,cni-svtwf 的eth0的网卡的MAC地址为:9a:16:45:30:3a:c6cc 的eth0的网卡的MAC地址为:ee:6f:75:01:ed:bb此时我们在cni0 bridge中查看MAC地址表:[root@k8s-2 ~]# brctl showmacs cni0port no mac addr is local? ageing timer1 1e:89:b9:2c:44:b1 yes 0.001 1e:89:b9:2c:44:b1 yes 0.003 32:2e:01:1d:a1:53 yes 0.003 32:2e:01:1d:a1:53 yes 0.002 4a:bc:c1:08:30:04 no 1.702 5e:14:4c:e2:2b:22 yes 0.002 5e:14:4c:e2:2b:22 yes 0.003 9a:16:45:30:3a:c6 no 32.42 # 此地址对应 cni-svtwf的eht0 MAC地址,对应bridge上的端口3.4 b2:8e:21:90:45:39 yes 0.004 b2:8e:21:90:45:39 yes 0.001 ce:22:d7:ee:59:7d no 1.704 ee:6f:75:01:ed:bb no 32.42 # 此地址对应cc 的eth0 的MAC地址,对应bridge上的端口4.[root@k8s-2 ~]##此种Bridge模式把相应的peer建立在pod和bridge之间。此时Linux中又是如何实现呢:# network topo:10.1.1.2 10.1.1.3[ns1] [ns2]| |-- [br0] --##创建nsip netns a ns1ip netns a ns2#首先创建 bridge br0ip l a br0 type bridgeip l s br0 up#然后创建两对 veth-pairip l a veth0 type veth peer name br-veth0ip l a veth1 type veth peer name br-veth1#分别将两对 veth-pair 加入两个 ns 和 br0ip l s veth0 netns ns1ip l s br-veth0 master br0ip l s br-veth0 upip l s veth1 netns ns2ip l s br-veth1 master br0ip l s br-veth1 up#给两个 ns 中的 veth 配置 IP 并启用ip netns exec ns1 ip a a 10.1.1.2/24 dev veth0ip netns exec ns1 ip l s veth0 upip netns exec ns2 ip a a 10.1.1.3/24 dev veth1ip netns exec ns2 ip l s veth1 up# ping 测:[root@k8s-2 ~]# ip netns exec ns1 ping 10.1.1.3PING 10.1.1.3 (10.1.1.3) 56(84) bytes of data.64 bytes from 10.1.1.3: icmp_seq=1 ttl=64 time=0.173 ms64 bytes from 10.1.1.3: icmp_seq=2 ttl=64 time=0.068 ms^C--- 10.1.1.3 ping statistics ---2 packets transmitted, 2 received, 0% packet loss, time 1020msrtt min/avg/max/mdev = 0.068/0.120/0.173/0.053 ms# 查看bridge br0上的端口:[root@k8s-2 ~]# brctl showbridge name bridge id STP enabled interfacesbr0 8000.8e495ef498dd no br-veth0br-veth1# 查看对应的MAC地址和不同ns中的MAC。[root@k8s-2 ~]# brctl showmacs br0port no mac addr is local? ageing timer2 06:b5:78:d9:7b:75 no 16.28 # ns21 1a:7e:30:46:72:11 no 12.18 # ns11 8e:49:5e:f4:98:dd yes 0.001 8e:49:5e:f4:98:dd yes 0.002 ca:b6:7e:6:c2:bf yes 0.002 ca:b6:7e:06:c2:bf yes 0.00[root@k8s-2 ~]#
3、内核转发
"IP forwarding" is a synonym for "routing." It is called "kernel IP forwarding" because it is a feature of the Linux kernel.

A router has multiple network interfaces. If traffic comes in on one interface that matches a subnet of another network interface, a router then forwards that traffic to the other network interface.

# 重点看这里:
# So, let's say you have two NICs, one (NIC 1) is at address 192.168.2.1/24, and the other (NIC 2) is 192.168.3.1/24. If forwarding is enabled, and a packet comes in on NIC 1 with a "destination address" of 192.168.3.8, the router will resend that packet out of the NIC 2.

It's common for routers functioning as gateways to the Internet to have a default route whereby any traffic that doesn't match any NICs will go through the default route's NIC. So in the above example, if you have an internet connection on NIC 2, you'd set NIC 2 as your default route and then any traffic coming in from NIC 1 that isn't destined for something on 192.168.2.0/24 will go through NIC 2. Hopefully there's other routers past NIC 2 that can further route it (in the case of the Internet, the next hop would be your ISP's router, and then their providers upstream router, etc.)

Enabling ip_forward tells your Linux system to do this. For it to be meaningful, you need two network interfaces (any 2 or more of wired NIC cards, Wifi cards or chipsets, PPP links over a 56k modem or serial, etc.).

When doing routing, security is important and that's where Linux's packet filter, iptables, gets involved. So you will need an iptables configuration consistent with your needs.

Note that enabling forwarding with iptables disabled and/or without taking firewalling and security into account could leave you open to vulnerabilites if one of the NICs is facing the Internet or a subnet you don't have control over.
IP Forward 转发配置逻辑:
# topo:
      v1        v2
   10.1.1.2  10.1.2.2
    [ns1]      [ns2]
      |          |
      - [kernel] -   # echo 1 > /proc/sys/net/ipv4/ip_forward    # 开启内核转发
  v1_r|          |v2_r
  10.1.1.1     10.1.2.1
#
1.创建两个 namespace:
ip netns add ns1
ip netns add ns2
2.创建两对 veth-pair,一端分别挂在两个 namespace 中:
ip link add v1 type veth peer name v1_r
ip link add v2 type veth peer name v2_r
ip link set v1 netns ns1
ip link set v2 netns ns2
3.分别给两对 veth-pair 端点配上 IP 并启用:
ip a a 10.1.1.1/24 dev v1_r
ip l s v1_r up
ip a a 10.1.2.1/24 dev v2_r
ip l s v2_r up
ip netns exec ns1 ip a a 10.1.1.2/24 dev v1
ip netns exec ns1 ip l s v1 up
ip netns exec ns2 ip a a 10.1.2.2/24 dev v2
ip netns exec ns2 ip l s v2 up
4.添加路由:
ip netns exec ns1 route add -net 10.1.2.0 netmask 255.255.255.0 gw 10.1.1.1  # 注意和Docker逻辑中添加默认路由方式思考对比
ip netns exec ns2 route add -net 10.1.1.0 netmask 255.255.255.0 gw 10.1.2.1  # 注意和Docker逻辑中添加默认路由方式思考对比
5.修改内核转发:
echo 1 > /proc/sys/net/ipv4/ip_forward
#路由表:
[root@k8s-1 ~]# ip netns exec ns1 route -n
Kernel IP routing table
Destination     Gateway         Genmask         Flags Metric Ref    Use Iface
10.1.1.0        0.0.0.0         255.255.255.0   U     0      0        0 v1
10.1.2.0        10.1.1.1        255.255.255.0   UG    0      0        0 v1  # 匹配该路由
[root@k8s-1 ~]#
# 抓包:
[root@k8s-1 ~]# ip netns exec ns1 ping 10.1.2.2
PING 10.1.2.2 (10.1.2.2) 56(84) bytes of data.
64 bytes from 10.1.2.2: icmp_seq=1 ttl=63 time=0.087 ms
^C
--- 10.1.2.2 ping statistics ---
1 packets transmitted, 1 received, 0% packet loss, time 0ms
rtt min/avg/max/mdev = 0.087/0.087/0.087/0.000 ms
[root@k8s-1 ~]#

# 抓包详情:
 ip netns exec ns1 arp -d 10.1.1.1 # 清空对应gateway的arp缓存
[root@k8s-1 ~]# ip netns exec ns1 tcpdump  -ne -i v1
tcpdump: verbose output suppressed, use -v or -vv for full protocol decode
listening on v1, link-type EN10MB (Ethernet), capture size 262144 bytes
14:13:03.636646 26:e9:e2:4b:ff:e9 > Broadcast, ethertype ARP (0x0806), length 42: Request who-has 10.1.1.1 tell 10.1.1.2, length 28
14:13:03.636673 42:58:a1:ed:f4:d3 > 26:e9:e2:4b:ff:e9, ethertype ARP (0x0806), length 42: Reply 10.1.1.1 is-at 42:58:a1:ed:f4:d3, length 28
14:13:03.636676 26:e9:e2:4b:ff:e9 > 42:58:a1:ed:f4:d3, ethertype IPv4 (0x0800), length 98: 10.1.1.2 > 10.1.2.2: ICMP echo request, id 42491, seq 1, length 64
14:13:03.636717 42:58:a1:ed:f4:d3 > 26:e9:e2:4b:ff:e9, ethertype IPv4 (0x0800), length 98: 10.1.2.2 > 10.1.1.2: ICMP echo reply, id 42491, seq 1, length 64
14:13:08.935762 42:58:a1:ed:f4:d3 > 26:e9:e2:4b:ff:e9, ethertype ARP (0x0806), length 42: Request who-has 10.1.1.2 tell 10.1.1.1, length 28
14:13:08.935820 26:e9:e2:4b:ff:e9 > 42:58:a1:ed:f4:d3, ethertype ARP (0x0806), length 42: Reply 10.1.1.2 is-at 26:e9:e2:4b:ff:e9, length 28
4、Docker Network Model[Routing Table]
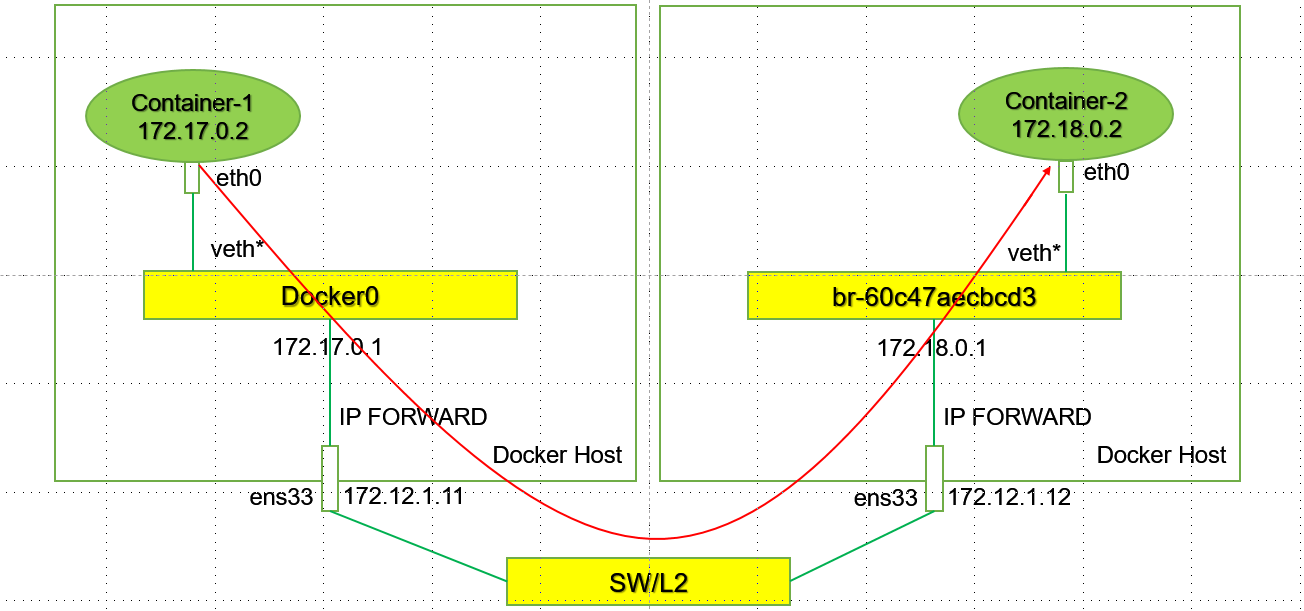
# 手工实现不同host上的不同网段的Docker容器之间互通:
使用两台不同的HOST,分别是172.12.1.11 和 172.12.1.12。
其中172.12.1.11上的docker使用默认的172.17.0.0/16的网络,172.12.1.12上使用的docker 网络为172.18.0.0/16 ---- # 当然这里我们可以自己创建24位掩码的网络。也是基于NS演示。
#1.在172.12.1.11上创建容器c1:
# docker run --name c1 -td burlyluo/nettoolbox
[root@k8s-1 ~]# docker ps -a
CONTAINER ID   IMAGE                                               COMMAND                  CREATED          STATUS                     PORTS     NAMES
aa03e3388c1f   burlyluo/nettoolbox                                 "/sbin/tini -g -- /e…"   21 seconds ago   Up 20 seconds              80/tcp    c1
[root@k8s-1 ~]# docker exec -it c1 bash
bash-5.1# ifconfig
eth0      Link encap:Ethernet  HWaddr 02:42:AC:11:00:02
          inet addr:172.17.0.2  Bcast:172.17.255.255  Mask:255.255.0.0
          UP BROADCAST RUNNING MULTICAST  MTU:1500  Metric:1
          RX packets:15 errors:0 dropped:0 overruns:0 frame:0
          TX packets:0 errors:0 dropped:0 overruns:0 carrier:0
          collisions:0 txqueuelen:0
          RX bytes:1322 (1.2 KiB)  TX bytes:0 (0.0 B)

lo        Link encap:Local Loopback
          inet addr:127.0.0.1  Mask:255.0.0.0
          UP LOOPBACK RUNNING  MTU:65536  Metric:1
          RX packets:0 errors:0 dropped:0 overruns:0 frame:0
          TX packets:0 errors:0 dropped:0 overruns:0 carrier:0
          collisions:0 txqueuelen:1000
          RX bytes:0 (0.0 B)  TX bytes:0 (0.0 B)

bash-5.1#


#2.在172.12.1.12上创建17.18.0.0/16网络和c2容器:
# docker network create -d bridge --subnet 172.18.0.0/16 br_net18   # 创建172.18.0.0/16的网络的bridge br_net18
# docker network list
NETWORK ID     NAME       DRIVER    SCOPE
f858947429bb   br_net18   bridge    local
在节点172.12.1.12上使用br_net18创建容器:
# docker run --name c2 --network br_net18 -td burlyluo/nettoolbox
[root@k8s-2 ~]# docker exec -it c2 bash
bash-5.1# ifconfig
eth0      Link encap:Ethernet  HWaddr 02:42:AC:12:00:02
          inet addr:172.18.0.2  Bcast:172.18.255.255  Mask:255.255.0.0
          UP BROADCAST RUNNING MULTICAST  MTU:1500  Metric:1
          RX packets:13 errors:0 dropped:0 overruns:0 frame:0
          TX packets:0 errors:0 dropped:0 overruns:0 carrier:0
          collisions:0 txqueuelen:0
          RX bytes:1182 (1.1 KiB)  TX bytes:0 (0.0 B)

lo        Link encap:Local Loopback
          inet addr:127.0.0.1  Mask:255.0.0.0
          UP LOOPBACK RUNNING  MTU:65536  Metric:1
          RX packets:0 errors:0 dropped:0 overruns:0 frame:0
          TX packets:0 errors:0 dropped:0 overruns:0 carrier:0
          collisions:0 txqueuelen:1000
          RX bytes:0 (0.0 B)  TX bytes:0 (0.0 B)

bash-5.1#


#3.此时做ping测试:
在c1上pingc2,此时不通:
原因是数据从c1容器出来以后达到172.12.1.11的ROOT NS中以后,此时查看172.12.1.11节点上的路由表:
[root@k8s-1 ~]# route -n
Kernel IP routing table
Destination     Gateway         Genmask         Flags Metric Ref    Use Iface
0.0.0.0         172.12.1.2      0.0.0.0         UG    100    0        0 ens33
10.244.0.0      0.0.0.0         255.255.255.0   U     0      0        0 cni0
10.244.1.0      172.12.1.12     255.255.255.0   UG    0      0        0 ens33
172.12.1.0      0.0.0.0         255.255.255.0   U     100    0        0 ens33
172.17.0.0      0.0.0.0         255.255.0.0     U     0      0        0 docker0
[root@k8s-1 ~]#
此时没有到172.18.0.0/16该网络的具体路由,所以此时会匹配到默认路由,会被送到网关,网关上可能没有其路由,从而造成该数据报文被丢弃。 # 可通过抓包观察
所以我们想要和对端的c2容器172.18.0.2/16互通的话,需要做相应的路由。
我们在172.12.1.11节点上需要做172.18.0.0/16的路由:
# route add -h 需要net-tools的库:yum -y install net-tools
# route add -net 172.18.0.0/16 gw 172.12.1.12
[root@k8s-1 ~]# route -n   ## 此时查看路由表:
Kernel IP routing table
Destination     Gateway         Genmask         Flags Metric Ref    Use Iface
0.0.0.0         172.12.1.2      0.0.0.0         UG    100    0        0 ens33
10.244.0.0      0.0.0.0         255.255.255.0   U     0      0        0 cni0
10.244.1.0      172.12.1.12     255.255.255.0   UG    0      0        0 ens33
172.12.1.0      0.0.0.0         255.255.255.0   U     100    0        0 ens33
172.17.0.0      0.0.0.0         255.255.0.0     U     0      0        0 docker0
172.18.0.0      172.12.1.12     255.255.0.0     UG    0      0        0 ens33 # 匹配到这一跳路由
[root@k8s-1 ~]#

这样数据包就能被转发到172.12.1.12节点上,现在我们到172.12.1.12上观察数据包转发过程:

# 节点172.12.1.12
[root@k8s-2 ~]# route -n
Kernel IP routing table
Destination     Gateway         Genmask         Flags Metric Ref    Use Iface
0.0.0.0         172.12.1.2      0.0.0.0         UG    100    0        0 ens33
10.244.0.0      172.12.1.11     255.255.255.0   UG    0      0        0 ens33
10.244.1.0      0.0.0.0         255.255.255.0   U     0      0        0 cni0
172.12.1.0      0.0.0.0         255.255.255.0   U     100    0        0 ens33
172.17.0.0      0.0.0.0         255.255.0.0     U     0      0        0 docker0
172.18.0.0      0.0.0.0         255.255.0.0     U     0      0        0 br-f858947429bb  ## 此时匹配到这条路由,数据包被转发到c2容器中。比如这里是ICMP 的Request。
当c2收到这个ICMP Request以后,需要构造ICMP的Replay:
 此时源ip是172.18.0.2,目的ip是172.17.0.2。此时查询c2容器的路由表:
 [root@k8s-2 ~]# docker exec -it c2 bash
bash-5.1# route -n
Kernel IP routing table
Destination     Gateway         Genmask         Flags Metric Ref    Use Iface
0.0.0.0         172.18.0.1      0.0.0.0         UG    0      0        0 eth0  # 由于目的ip172.17.0.2/16位和自己172.18.0.2/16不在同一网段,走三层。
172.18.0.0      0.0.0.0         255.255.0.0     U     0      0        0 eth0
bash-5.1#
此时由c2的路由表可知需要把数据包转发到172.12.1.12的RORT NS中:此时查询节点172.12.1.12的路由表:
[root@k8s-2 ~]# route -n
Kernel IP routing table
Destination     Gateway         Genmask         Flags Metric Ref    Use Iface
0.0.0.0         172.12.1.2      0.0.0.0         UG    100    0        0 ens33
10.244.0.0      172.12.1.11     255.255.255.0   UG    0      0        0 ens33
10.244.1.0      0.0.0.0         255.255.255.0   U     0      0        0 cni0              # ?此时没有到172.17.0.0/16的路由表项,只有一个交换的路由信息。
172.12.1.0      0.0.0.0         255.255.255.0   U     100    0        0 ens33
172.17.0.0      0.0.0.0         255.255.0.0     U     0      0        0 docker0           # 该条路由信息是交换的路由信息。但是此时是走三层,走交换肯定不行。
172.18.0.0      0.0.0.0         255.255.0.0     U     0      0        0 br-f858947429bb
[root@k8s-2 ~]#
所以需要手工添加路由信息:
route add -net 172.17.0.0/16 gw 172.12.1.11
[root@k8s-2 ~]# route add -net 172.17.0.0/16 gw 172.12.1.11
[root@k8s-2 ~]# route -n
Kernel IP routing table
Destination     Gateway         Genmask         Flags Metric Ref    Use Iface
0.0.0.0         172.12.1.2      0.0.0.0         UG    100    0        0 ens33
10.244.0.0      172.12.1.11     255.255.255.0   UG    0      0        0 ens33
10.244.1.0      0.0.0.0         255.255.255.0   U     0      0        0 cni0
172.12.1.0      0.0.0.0         255.255.255.0   U     100    0        0 ens33
172.17.0.0      172.12.1.11     255.255.0.0     UG    0      0        0 ens33   # 此时查询路由表。匹配到这里。下一跳是172.12.1.11.至此数据包回到了节点172.12.1.11上
172.17.0.0      0.0.0.0         255.255.0.0     U     0      0        0 docker0 # 该条路由信息是交换的路由信息。但是此时是走三层,走交换肯定不行。
172.18.0.0      0.0.0.0         255.255.0.0     U     0      0        0 br-f858947429bb
[root@k8s-2 ~]#
此时做ping测试:
使用172.12.1.11节点上的c1去ping 172.12.1.12上的c2容器:
[root@k8s-1 ~]# docker exec -it c1 bash     ## 这里实际上使用到了Linux 内核的路由转发功能,所以:需要开启内核转发能力:echo 1 > /proc/sys/net/ipv4/ip_forward
bash-5.1# ping 172.18.0.2
PING 172.18.0.2 (172.18.0.2): 56 data bytes
64 bytes from 172.18.0.2: seq=0 ttl=62 time=0.612 ms
64 bytes from 172.18.0.2: seq=1 ttl=62 time=0.501 ms
^C
--- 172.18.0.2 ping statistics ---
2 packets transmitted, 2 packets received, 0% packet loss
round-trip min/avg/max = 0.501/0.556/0.612 ms
bash-5.1#
# 至此,我们完成了一个手工环境的基于路由模式的Pre-Flannel HOST-GW的模式。
接下来:我们开始探索,Flannel的HOST-GW模式。
5、Flannel HOST-GW Mode
# 配置backend 为host-gw:
---
kind: ConfigMap
apiVersion: v1
metadata:
  name: kube-flannel-cfg
  namespace: kube-system
  labels:
    tier: node
    app: flannel
data:
  cni-conf.json: |
    {
      "name": "cbr0",
      "cniVersion": "0.3.1",
      "plugins": [
        {
          "type": "flannel",
          "delegate": {
            "hairpinMode": true,
            "isDefaultGateway": true
          }
        },
        {
          "type": "portmap",
          "capabilities": {
            "portMappings": true
          }
        }
      ]
    }
  net-conf.json: |
    {
      "Network": "10.244.0.0/16",
      "Backend": {
        "Type": "host-gw"
      }
    }
---
##
env:
[root@k8s-1 ~]# kubectl get pods -o wide
NAME        READY   STATUS    RESTARTS   AGE    IP           NODE    NOMINATED NODE   READINESS GATES
cni-b9kmz   1/1     Running   1          126d   10.244.1.6   k8s-2   <none>           <none>
cni-vmntp   1/1     Running   1          126d   10.244.0.3   k8s-1   <none>           <none>
[root@k8s-1 ~]#
# 节点k8s-1(172.12.1.11)和k8s-2(172.12.1.12)的路由表信息:
#k8s-1(172.12.1.11)
[root@k8s-1 ~]# route -n
Kernel IP routing table
Destination     Gateway         Genmask         Flags Metric Ref    Use Iface
0.0.0.0         172.12.1.2      0.0.0.0         UG    100    0        0 ens33
10.244.0.0      0.0.0.0         255.255.255.0   U     0      0        0 cni0
10.244.1.0      172.12.1.12     255.255.255.0   UG    0      0        0 ens33  # 去往10.244.1.0/24地址段的路由条目
172.12.1.0      0.0.0.0         255.255.255.0   U     100    0        0 ens33
172.17.0.0      0.0.0.0         255.255.0.0     U     0      0        0 docker0
172.18.0.0      172.12.1.12     255.255.0.0     UG    0      0        0 ens33
[root@k8s-1 ~]#
#k8s-2(172.12.1.12)
[root@k8s-2 ~]# route -n
Kernel IP routing table
Destination     Gateway         Genmask         Flags Metric Ref    Use Iface
0.0.0.0         172.12.1.2      0.0.0.0         UG    100    0        0 ens33
10.244.0.0      172.12.1.11     255.255.255.0   UG    0      0        0 ens33 # 去往10.244.0.0/24地址段的路由条目
10.244.1.0      0.0.0.0         255.255.255.0   U     0      0        0 cni0
172.12.1.0      0.0.0.0         255.255.255.0   U     100    0        0 ens33
172.17.0.0      172.12.1.11     255.255.0.0     UG    0      0        0 ens33
172.17.0.0      0.0.0.0         255.255.0.0     U     0      0        0 docker0
172.18.0.0      0.0.0.0         255.255.0.0     U     0      0        0 br-f858947429bb
[root@k8s-2 ~]#
# 至此,去程路由和回程路由均已具备,即可完成Pod之间的通信。
# ping 测:
[root@k8s-1 ~]# kubectl exec -it cni-vmntp  -- ping 10.244.1.6
PING 10.244.1.6 (10.244.1.6): 56 data bytes
64 bytes from 10.244.1.6: seq=0 ttl=62 time=0.509 ms
^C
--- 10.244.1.6 ping statistics ---
1 packets transmitted, 1 packets received, 0% packet loss
round-trip min/avg/max = 0.509/0.509/0.509 ms
[root@k8s-1 ~]#

若有收获,就点个赞吧
0 人点赞
