学会这两件事,让你成为 Git 老司机
How to become a Git expert

“time-lapse photography of man standing beside road and bridge during daytime” by Ahsan Avi on Unsplash
I made a mistake in my commit, how do I fix it ?
我在提交中犯了个错误,我如何修正它?
My commit history is a mess, how do I make it neater?
我的提交历史一团糟,我该如何让它更整洁?
If you have ever had the above questions, then this post is for you. This post covers a list of topics which will make you a Git expert.
如果你曾经有上述问题,那么这篇文章很适合你。这篇文章介绍了一个让你成为 Git 老司机的清单。
If you do not know Git basics, click here to check out my blog on Git basics. It is necessary that you know basics of Git to make the best use of this article.
I made a mistake in my commit. What should I do?
我在提交中犯了个错误,我该怎么办?

“broken ceramic plate on floor” by chuttersnap on Unsplash
Scenario 1
情景 1
Let’s say that you have committed a bunch of files and realised that the commit message you entered is actually not clear. Now you want to change the commit message. In order to do this you can use git commit --amend
假设你已经提交了一堆文件,并发现输入的提交信息实际上并不清晰。现在你要更改提交消息。为此,你可以使用 git commit --amend:
git commit --amend -m “New commit message”
Scenario 2
场景 2
Let’s say that you wanted to commit six files but, by mistake, you end up committing only five files. You may think that you can create a new commit and add the 6th file to that commit.
假设你要提交六个文件,但你最终错误地只提交了五个文件。你可能认为可以创建新提交并将第六个文件添加到该提交。
There is nothing wrong with this approach. But, to maintain a neat commit history, wouldn’t it be nicer if you could actually somehow add this file to your previous commit itself? This can be done through git commit --amend as well:
这种方法没错。但是,为了保持整洁的提交历史,如果你可以以某种方式将此文件加入到你之前的提交本身,那岂不是更好?这也可以通过 git commit --amend 完成:
git add file6git commit --amend --no-edit
--no-edit means that the commit message does not change.
--no-edit 表示提交信息不会更改。
Scenario 3
场景 3
Whenever you do a commit in Git, the commit has an author name and author email tied to it. Generally, when you set up Git for the first time, you set up the author name and email. You don’t need to worry about the author details for every commit.
无论你何时在 Git 进行提交,提交都会附上作者名称和作者电子邮箱。通常,当你第一次配置 Git 时,就需要设置作者和电子邮箱。你无需担心每次提交的作者详细信息。
That said, it’s possible that for a particular project you want to use a different email ID. You need to configure the email id for that project with the command:
也就是说,对于特定项目,你可能希望使用不同的电子邮箱 ID。你需要使用以下命令为该项目配置电子邮箱 ID:
git config user.email “your email id”
Let’s say that you forgot to configure the email and already did your first commit. Amend can be used to change the author of your previous commit as well. The author of the commit can be changed using the following command:
假设你忘记配置电子邮箱,并且已经完成了第一次提交。amend 命令也可以用于更改先前提交的作者消息。可以使用以下命令更改提交的作者信息:
git commit --amend --author "Author Name <Author Email>"
Point to note
注意事项
Use the amend command only in your local repository. Using amend for the remote repository can create a lot of confusion.
应该仅在本地仓库使用 amend 命令。在远端仓库使用 amend 命令会制造大量混乱。
My Commit history is a mess. How do I handle it?
我的提交历史一团糟,我该如何处理?
Let’s say that you are working on a piece of code. You know that the code is going to take approximately ten days to complete. Within those ten days, the other developers will also be committing code to the remote repository.
假设你正在处理一段代码。你知道代码大约需要十天完成。在这十天内,其他开发人员也将提交代码到远程仓库。
It is a good practise to keep your local repository code up-to-date with the code in the remote repository. This avoids a lot of merge conflicts later when you raise a pull request. So you decide that you will pull the changes from the remote repository once every two days.
将本地仓库代码与远程仓库代码保持同步是个很好的做法。这在你拉取请求时会避免许多合并冲突的操作。因此,你应该每两天从远程仓库中拉取一个变更。
Every time you pull the code from the remote repository to the local repository a new merge commit is created in your local repository. This means that your local commit history is going to have a lot of merge commits which can make things look confusing to the reviewer.
每次将代码从远程仓库拉取到本地仓库时,都会在本地操作中创建新的合并提交。这意味着你的本地历史提交记录会有大量的合并提交,这会让审阅人员头大。
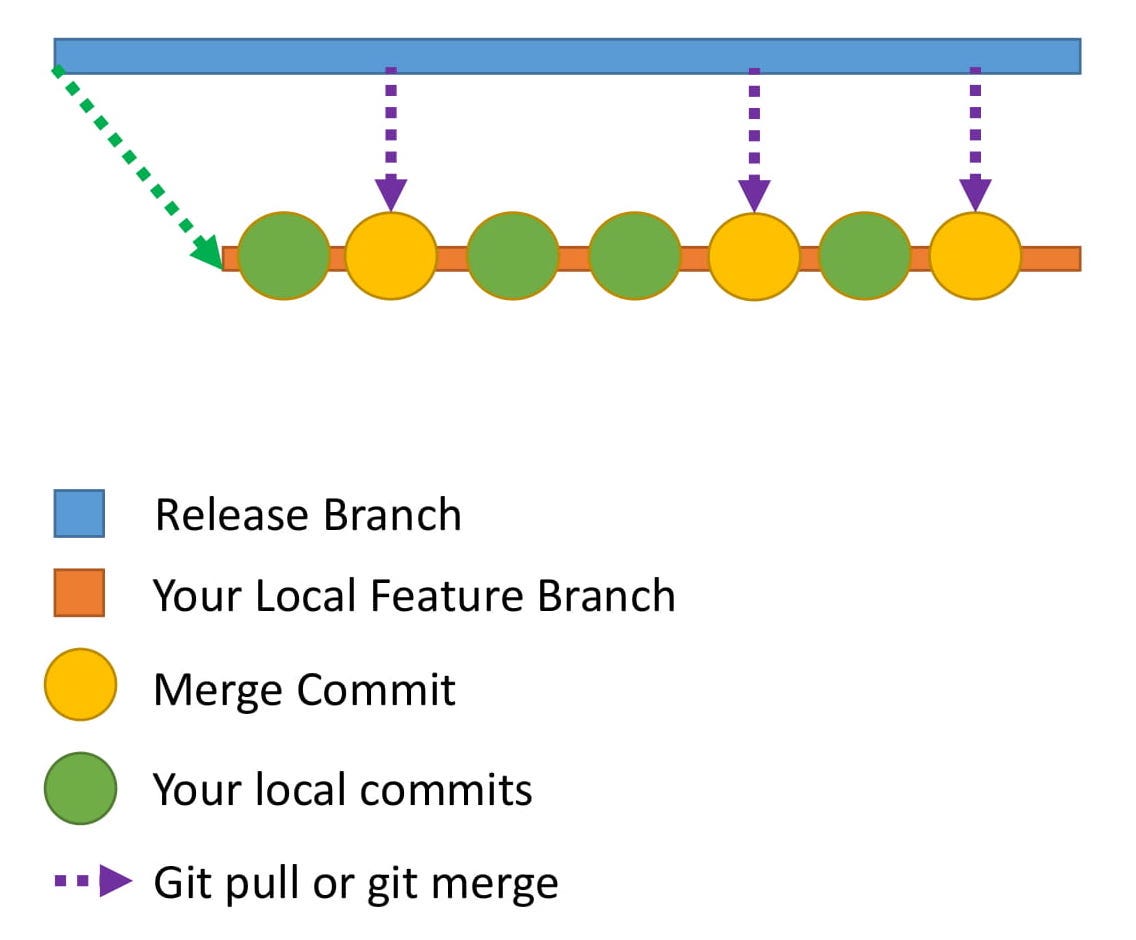
Here is how the commit history would look in your local repository.
上面是历史提交记录在本地仓库中的显示方式。
How do you make the commit history look neater?
如何让历史提交记录看起来更整洁?
This is where rebase comes to the rescue.
这就需要用到 rebase 了。
What is rebasing?
什么是变基(rebase)?
Let me explain this through an example.
举个🌰。
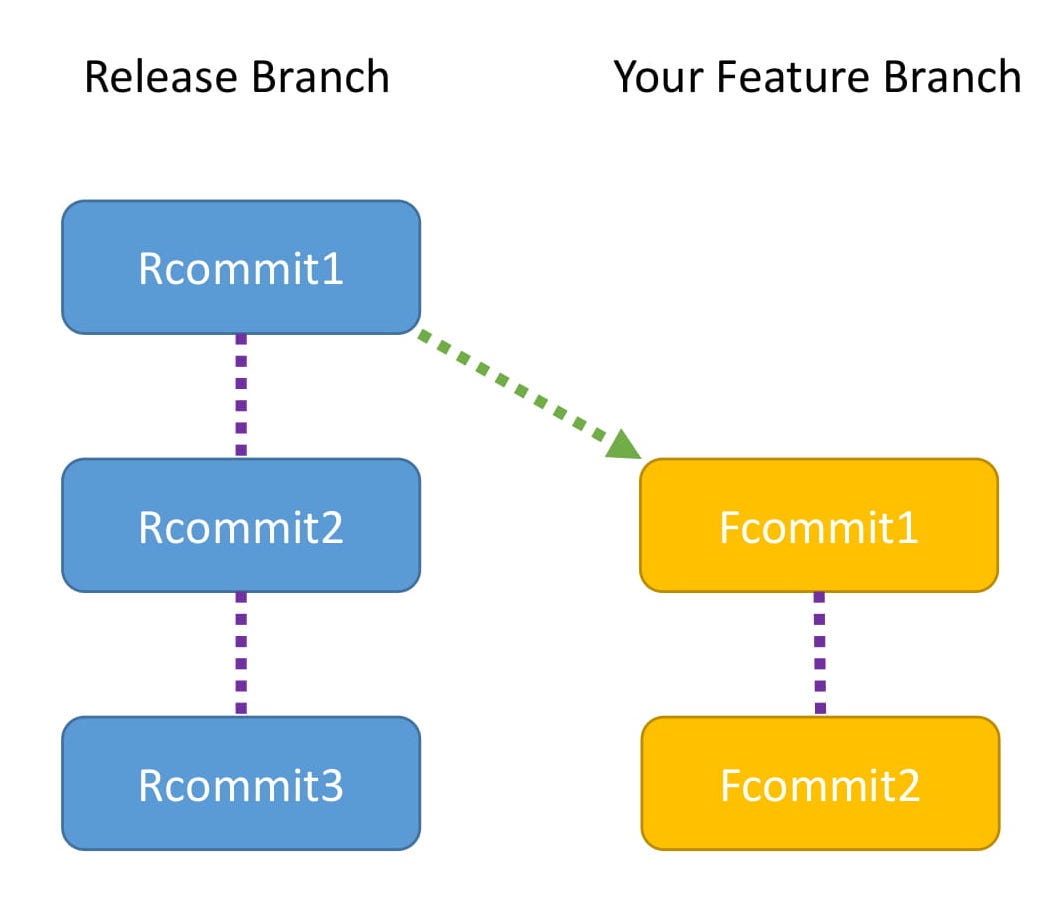
This diagram shows the commits in the release branch and your feature branch
此图显示了发布(release)分支和功能(feature)分支中的提交。
- The Release branch has three commits: Rcommit1, Rcommit2, and Rcommit3.
- You created your Feature branch from the Release branch when it had only one commit, which is Rcommit1.
- You have added two commits to the Feature branch. They are Fcommit1 and Fcommit2.
- Your goal is to get the commits from the Release branch into your Feature branch.
- You are going to use rebase to do this.
- Let the name of the Release branch be release and the name of the Feature branch be feature.
Rebasing can be done using the following commands:
发布分支有三个提交:Rcommit1、Rcommit2 和 Rcommit3。
- 你在发布分支中仅有一个提交(即 Rcommit1)时,创建了功能分支。
- 你已向功能分支添加了两个提交。它们是 Fcommit1 和 Fcommit2。
- 你希望从发布分支提交到功能分支中。
- 你将可以使用变基来完成该操作。
- 让发布分支命名为 release,让功能分支命名为 feature。
- 可以使用以下命令进行变基:
git checkout featuregit rebase release
Rebasing
变基
While rebasing, your goal is to ensure the Feature branch gets the latest code from the Release branch.
当执行变基时,你的目标是确保功能分支从发布分支获取最新代码。
Rebasing tries to add each commit, one by one, and checks for conflicts. Does that sound confusing?
变基命令尝试逐个添加每个提交,并检查冲突。这听起来是不是有点头大?
Let me explain with the help of a diagram.
让我画个图帮助理解。
This shows what rebasing actually does internally:
这显示了变基内部实际做的事情:
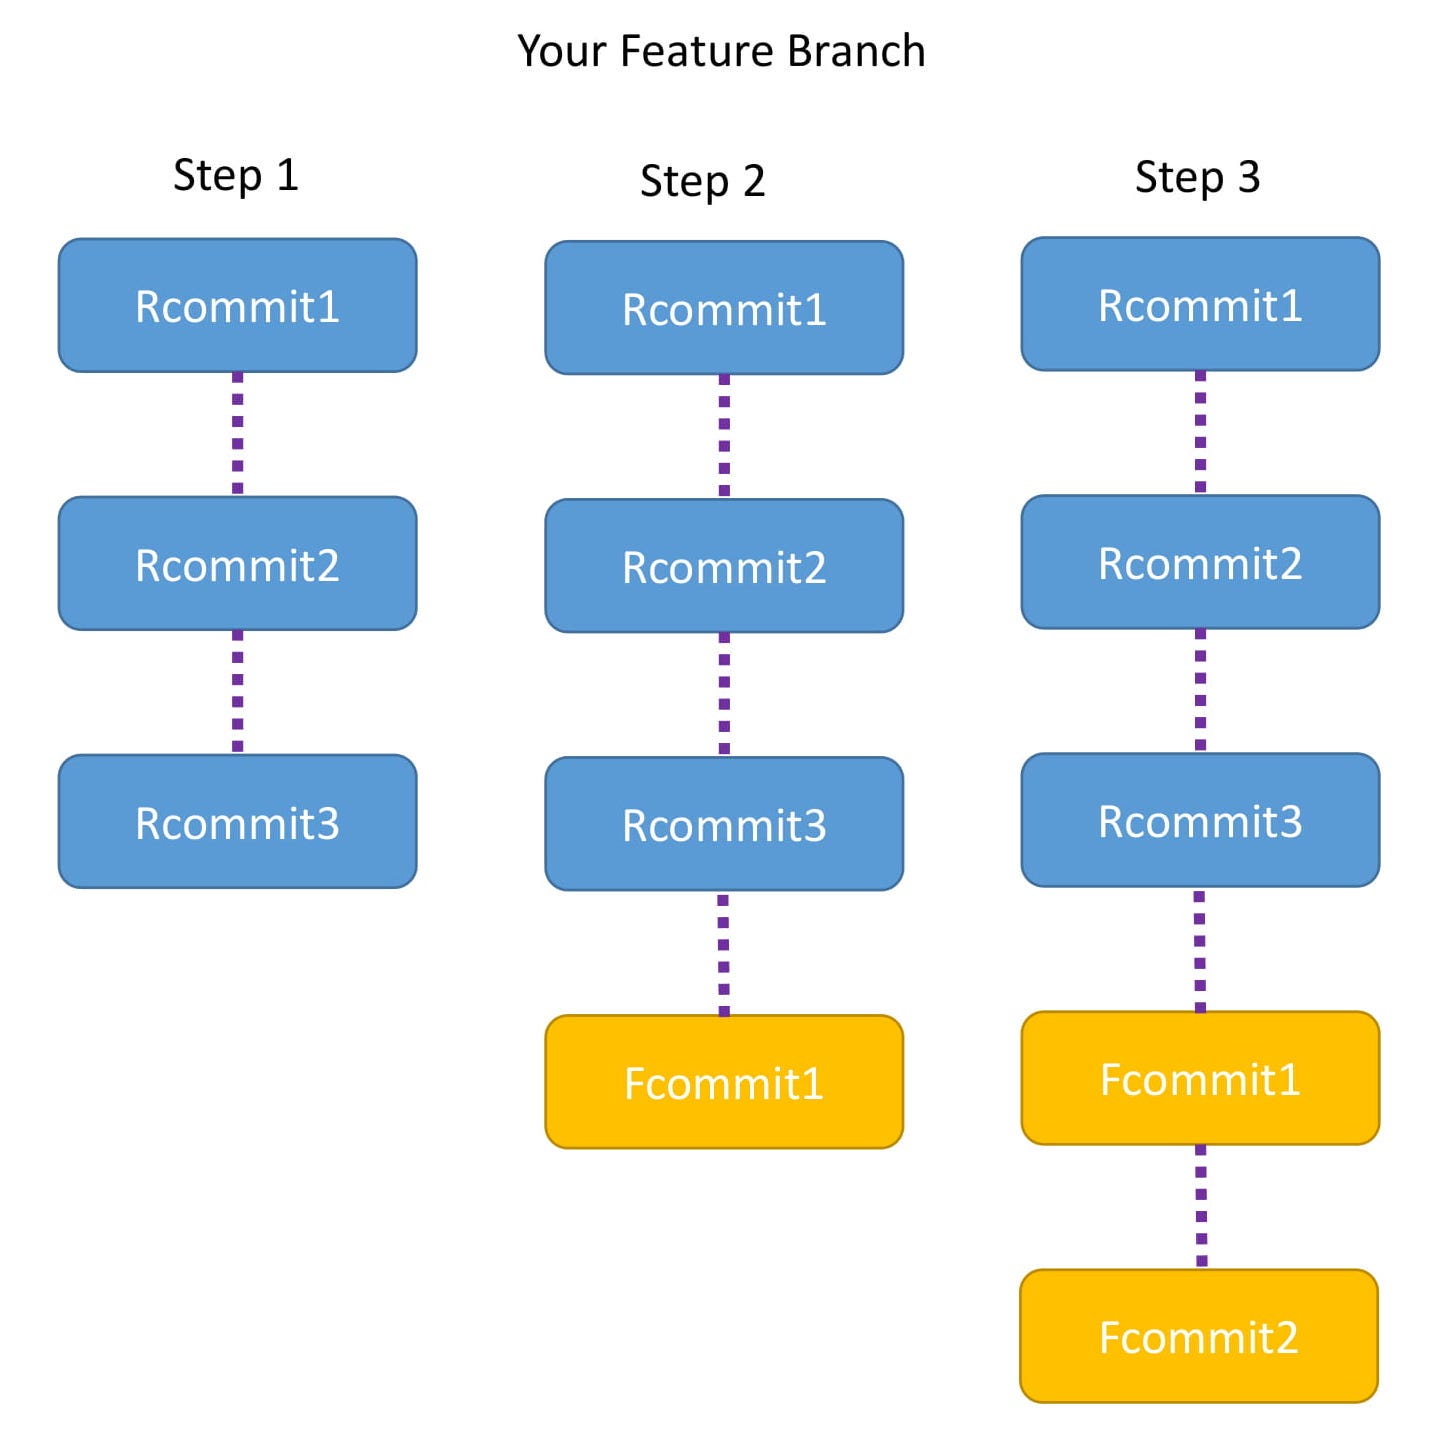
Step 1
第 1 步
- The moment you run the command, the Feature branch is pointed to the head of Release branch.
- Now the Feature branch has three commits: Rcommit1, Rcommit2, and Rcommit3.
- You may be wondering what happened to Fcommit1 and Fcommit2.
The commits are still there and will be used in the steps below.
运行该命令的那一刻,功能分支指向发布分支的头部。
- 现在,功能分支有三个提交,Rcommit1、Rcommit2 和 Rcommit3。
- 你可能想知道 Rcommit1 和 Rcommit2 发生了什么?
- 提交仍然存在,将在下面步骤中使用。
Step 2
第 2 步
- Now Git tries to add Fcommit1 to the Feature branch.
- If there is no conflict Fcommit1 is added after Rcommit3
If there is a conflict, Git will notify you, and you will have to resolve the conflict manually. After the conflict is resolved use the following commands to continue rebasing
现在 Git 尝试将 Fcommit1 添加到功能分支上。
- 如果没有冲突,则在 Rcommit3 之后添加 Fcommit1;
- 如果存在冲突,Git 会通知你,你必须手动解决冲突。解决冲突后,使用以下命令继续变基:
git add fixedfilegit rebase --continue
Step 3
第 3 步
- Once Fcommit1 is added, Git will try to add Fcommit2.
- Again, if there is no conflict Fcommit2 is added after Fcommit1 and the rebase is successful.
- If there is a conflict, Git will notify you, and you will have to resolve it manually. Use the same commands mentioned in Step 2 after resolving conflicts
After the entire rebase is done, you will notice that the Feature branch has Rcommit1, Rcommit2, Rcommit3, Fcommit1, and Fcommit2.
一旦添加了 Fcommit1,Git 将尝试添加 Fcommit2。
- 同样,如果没有冲突,则在 Fcommit1 之后添加 Fcommit2,并且变基成功。
- 如果存在冲突,Git 会通知你,你必须手动解决。解决冲突后,使用第 2 步提到的相同命令。
- 整个变基完成后,你会发现功能分支有 Rcommit1、Rcommit2、Rcommit3、Fcommit1 和 Fcommit2。
Points to note
注意事项
- Both Rebase and Merge are useful in Git. One is not better than the other.
- In the case of a merge you will have a merge commit. In the case of a rebase there is no extra commit like a merge commit.
- One best practise is to use the commands at different points. Use rebase when you are updating your local code repository with the latest code from the remote repository. Use merge when you are dealing with pull requests to merge the Feature branch back with the Release or Master branch.
- Using Rebase alters the commit history ( it makes it neater) . But that being said, altering the commit history has it’s risks. So ensure you never use rebase on a code that is there in the remote repository. Always use rebase only to alter the commit history of your local repo code.
- If rebase is done to a remote repository it can create a lot of confusion since other developers will not recognise the new history.
Also if rebase is done on the remote repository, it can create issues when other developers try to pull the latest code from remote repository. So I repeat again, always use rebase only for the local repository 😃
变基和合并(merge)在 Git 中都很有用。两种并无优劣之分。
- 在合并的情况下,你将有个合并提交。在变基的情况下,不会像合并提交那样有额外的提交。
- 一种最佳的实践是一分为二。使用远端仓库中的最新代码更新本地仓库时,请使用变基。在处理拉取请求,以将功能分支和发布分支或主分支合并时,请使用合并。
- 使用变基会更改历史提交记录(使其更整洁)。但话虽如此,改变历史提交存在风险。因此,请确保永远不要对远程存储仓库的代码使用变基。始终仅对本地仓库代码使用变基,来更改历史提交记录。
- 如果对远端仓库进行变基,会制造许多混乱,因为其他开发人员无法识别新的历史记录。
- 此外,如果在远端仓库上完成变基,则当其他开发人员尝试从远端仓库中拉取最新代码时,就可能会出问题。所以,我再重申一遍,变基总是仅在本地仓库中进行。😃
Congrats
恭喜
You are now a Git expert 😃
你现在是个 Git 老司机了。😃
In this post you have learnt about:
在这篇文章中,你了解到:
- amending commits
rebase
修改提交记录
- 变基
Both of these are very useful concepts. Go explore the world of Git to learn even more.
这两个都是非常实用的概念。探索 Git 的世界,继续学习吧。

若有收获,就点个赞吧
0 人点赞
