GraphQL是这两年兴起的一种查询语言,国内一些比较潮的公司正在使用,它解决了Rest接口方式的一些问题,同时也带来了一些新的问题。对于我们底层程序员来说,学就对了,万一用上了呢。
框架选择
graphql在各种语言,各种框架都有对应的实现,可以查看官网根据情况选择适合自己的实现,概念上都是一致的。本文更着重于实际代码,理论部分请结合官网教程观看。
本文使用nodejs作为开发语言,使用express作为服务器,展示graphql的简单搭建过程,并逐步添加mysql,typescript,type-graphql,typeorm的支持。这个过程是渐进的,如果你不喜欢(学不动)某个部分,跳过就好。注意本文携带大量私货,未必是最佳实践,如果有错误,请评论指出,共同学习,谢谢。
快速实现
首先我们先快速实现一个graphql的服务器
mkdir graphqldemo;cd graphqldemo;npm init -yes;npm i express apollo-server-express;
然后创建一个index.js
const express = require("express");const { ApolloServer } = require("apollo-server-express");const PORT = 4000;const app = express();const box = {width: 100,height: 200,weight: "100g",color: "white"}const typeDefs = [`"""一个盒子模型"""type Box{"""这是盒子的宽度"""width:Int,height:Int,color:String}type Query {getBox: Box}type Mutation{setWidth(width:Int):Box}schema {query: Query,mutation: Mutation}`]const resolvers = {Query: {getBox(_) {return box;}},Mutation: {setWidth(_, { width }) {box.width = width;return box}}};const server = new ApolloServer({typeDefs,resolvers});server.applyMiddleware({ app });app.listen(PORT, () =>console.log(`🚀 Server ready at http://localhost:${PORT}${server.graphqlPath}`));
然后运行
node index.js
等出现成功提示后就可以在浏览器打开 http://localhost:4000/graphql,就可以看到graphql提供的playground
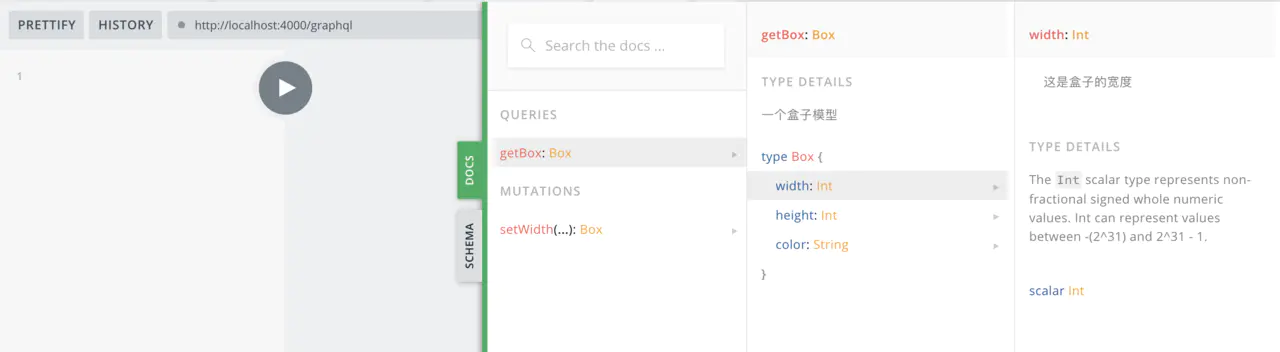
点击右侧的docs,就能查看到我们设定的type和对应的数据类型,还有我们写的注释,这其实是一份很完备的接口文档了。
代码分析
刚刚我们使用express和Apollo Server实现了一个最简单的graphql服务器(Apollo Server是graphql规范的一个实现)。
const server = new ApolloServer({typeDefs,resolvers});
在new一个ApolloServer的时候,传入了两个参数,一个typeDefs和一个resolvers。
typeDefs是一个字符串或者字符串数组,里面的内容是我们定义的schema,而resolvers是schema的实现,也就是typeDefs里的Query和Mutation,注意所有的schema都要实现之后程序才能启动。
也可以只传入一个schema参数来new ApolloServer,使用buildSchema方法可以将typeDefs和resolvers生成schema(schema这个概念在graphql中到处出现,不要搞混了)。
resolver的返回值需要符合定义的类型,否则会报错。在ApolloServer中,也可以返回对应类型的Promise。
server.applyMiddleware({ app });复制代码
这一行将Apollo作为Express的一个中间件
const box = {width: 100,height: 200,weight: "100g",color: "white"}复制代码
声明一个盒子,作为数据源。graphql并不在意数据是从哪里来的,可以从普通变量,数据库,redis,甚至http请求中获取,只要这个数据的结构能符合定义即可。现在我们向服务器请求一下这个box
graphql一共有三种操作类型,query、mutation 或 subscription,这里演示一下query、mutation
query
query是graphql中的查询操作,在playground左侧输入
query {getBox {widthheightcolor}}复制代码
点击按钮,可以在右边获得返回值
{"data": {"getBox": {"width": 100,"height": 200,"color": "white"}}}复制代码
我们可以随意减少getBox里的字段(至少有一个),比如只要width
query {getBox {width}}复制代码
可以看到返回值里只有width属性了。
{"data": {"getBox": {"width": 100}}}复制代码
graphql在这里解决了传统接口模式中一个问题,就是后端在向前端传输数据的过程中,会传递很多无效字段,无效字段过多会影响传输效率,前端可以主动获取自己所需的字段。
另一方面,后端的DAO层的一些字段从安全角度也是不应该传递给前端的,在上文的这个例子里,box的weight属性可以理解为一个前端不应可见的字段,因为在graphql中没有被定义,所以被自动过滤了,前端无法查询到。传统后端解决这个问题的方案是在DAO层之上引入一个DTO层。
mutation
mutation代表对数据源会产生副作用的操作,在playground中输入
mutation {setWidth(width: 108) {widthheightcolor}}复制代码
得到结果
{"data": {"setWidth": {"width": 108,"height": 200,"color": "white"}}}复制代码
可以看到box的width已经被更新到108了。注意,query和mutation都可以发起多个,服务器内部会顺序执行,但是query和mutation不能同时使用,下面是一个多个mutation的例子,query同理
mutation {m1:setWidth(width: 108) {width}m2:setWidth(width: 99) {width}}复制代码
返回值
{"data": {"m1": {"width": 108},"m2": {"width": 99}}}复制代码
因为setWidth重复使用了两次,重名了,所以我们使用m1、m2作为别名(Aliases),语法如上,非常简单。
传参
刚刚的mutation我们直接在语句里写了参数,因为语句本身是字符串不利于组合,同时也不适合传递复杂的参数,所以我们需要定义参数。点击playground左下的Query Variables,在这里可以声明参数,注意需要是标准json格式
{"length": 128}
同时将语句改为
mutation($length: Int) {setWidth(width: $length) {width}}
在length前加一个$就能在语句中使用了,可以查看一下浏览器控制台的请求有什么变化
稍微复杂一点
我们再看一点复杂的模型,现在给盒子里装点随机的小球,将数据源修改为如下形式
class Ball {constructor() {this.size = ((Math.random() * 10) | 0) + 5;this.color = ["black", "red", "white", "blue"][(Math.random() * 4) | 0];}}const box = {width: 100,height: 200,weight: "100g",color: "white",balls: new Array(10).fill().map(n => new Ball())}复制代码
然后在typeDefs中增加一个类型,并且修改box的类型
type Box{width:Int,height:Int,color:String,balls:[Ball]}type Ball{size:Int,color:String}复制代码
重启服务,进行一次查询
query {getBox {widthballs {sizecolor}}}
结果
{"data": {"getBox": {"width": 100,"balls": [{"size": 5,"color": "black"},//...]}}}
似乎没有报错,不过这种情况并不符合graphql设计的本意。graphql的数据一层应该只携带本层的信息,想象一下这个需求,我需要box和box里所有color为red的球。正确做法如下,先修改box让他有参数
type Box{width:Int,height:Int,color:String,balls(color:String):[Ball]}复制代码
然后在resolvers里添加一个Box,注意resolver的第一个参数parent指向的是他的父元素也就是box,这一点很重要,如果有复数的盒子,需要这个参数判断返回哪个盒子里的球
const resolvers = {Query: {getBox(_) {return box},},Mutation: {setWidth(_, { width }) {box.width = width;return box}},Box: {balls(parent, { color }) {return color ? box.balls.filter(ball => ball.color === color) : box.balls}}};复制代码
现在可以使用查询查出所有的颜色为red的球
query {getBox {widthballs (color:"red"){sizecolor}}}
如果没有参数,就是全部的球。graphql这么设计的好处是,可以在数据库查询中,少写很多的join,坏处是更多的查询次数
前端使用
在使用http请求graphql服务器时的载体仍然是json,所以即使不使用任何特殊的库也可以与graphql服务器通信
axios
先用比较经典的axios来试一下,创建一个html文件
<script src="https://cdn.bootcss.com/axios/0.19.0/axios.min.js"></script><script>const query = `query($color:String) {getBox {widthballs (color:$color){sizecolor}}}`;const variables = {color: "red"};axios.post("http://localhost:4000/graphql", {query,variables}).then(res => {console.log("res: ", res);});</script>
另外GET也是完全合法的
axios.get("http://localhost:4000/graphql", {params: { query, variables }})
或者直接访问
http://localhost:4000/graphql?query=query($color:String){getBox{width,balls(color:$color){size,color}}}&variables={"color":"red"}
相比传统方式,graphql的特点就是返回值可预测,而且因为地址、请求方式和参数名固定,封装起来更简单。
现在看一下专业的客户端是这么做的,既然服务端使用了apollo-server,那客户端就看一下apollo-client怎么做的apollo-client官网。因为提供了错误处理,数据缓存,错误处理等等,配置项稍显复杂,官方提供了一个apollo-boost的东西简化了配置。我们可以自己对照官方实现一个简化版,深入学习一下。
客户端实现
私货警告
以下内容在react16.8+的hooks API和typescript下实现,模仿官方包的api设计,去掉了缓存等功能。缓存可以说是apollo提供的核心功能了,但为了缓存增加了巨量的代码,并不适合学习。 首先我们创建一个新的react工程
create-react-app graphql-client --typescript复制代码
接下来我们要参考官方包实现以下几个使用频率最高的模块(超级精简版):ApolloClient、ApolloProvider、useQuery、Query
ApolloClient
入参包括uri,fetchOptions等,实际就是一个http请求库,这部分省点事直接用axios替代吧。注意官方实例,使用了从graphql-tag导出的gql方法处理graphql字符串,包括server端也有这个方法,它的作用是将字符串转换成ast,方便检查编写schema文件时出现的错误,本文中都省略掉了,都直接使用字符串。
import Axios, { AxiosInstance } from "axios";type config = {uri: string;};class Client {constructor({ uri }: config) {this.uri = uri;this.axios = Axios.create();}private uri: string;private axios: AxiosInstance;query({ query, variables }: { query: string; variables: any }) {return this.axios.post(this.uri, { query, variables });}}复制代码
ApolloProvider
这个组件看得出是将client作为一个context提供给下文,使用createContext即可完成这个组件
interface ProviderProps {client: Client;}const graphqlContext: React.Context<{client: Client;}> = React.createContext(null as any);const GraphProvider: React.FC<ProviderProps> = ({ client, children }) => {return (<graphqlContext.Provider value={{ client }}>{children}</graphqlContext.Provider>);};复制代码
useQuery
因为graphql的入参固定,所以创建一个hook很容易。这里使用了一个泛型T去定义预期返回值的类型,官方包在这里还使用了第二个泛型来确定variables参数的类型。
import { useState, useContext, useEffect, Dispatch } from "react";const useQuery = <T = any>(query: string, variables?: any) => {const { client } = useContext(graphqlContext);const [data, setData]: [T, Dispatch<T>] = useState(null as any);const [loading, setLoading] = useState(true);const [error, setError] = useState(null as any);useEffect(() => {setLoading(true);setError(null);client.query({ query, variables }).then(res => {setData(res.data.data);setLoading(false);}).catch(err => {setError(err);setLoading(false);});}, [query, variables, client]);return { data, loading, error };};复制代码
到这里就可以使用封装后的组件了 首先是App.tsx
const client = new Client({uri: "http://localhost:4000/graphql"});const App: React.FC = () => {return (<Provider client={client}><Home></Home></Provider>);};复制代码
然后是Home.tsx
interface ResData {getBox: {width: number;balls: { size: number; color: string }[];};}const query = `query {getBox {widthballs (color:"red"){sizecolor}}}`;const Home: FC = () => {const { data, loading, error } = useQuery<ResData>(query);if (loading) return <div>loading</div>;if (error) return <div>{error}</div>;return (<div><h2>{data.getBox.width}</h2><ul>{data.getBox.balls.map(n => (<li>size:{n.size} color:{n.color}</li>))}</ul></div>);}复制代码
因为获取的数据是可预测的,所以在写出查询语句的同时完成类型文件。如果到现在编码正确,你的react项目上已经可以看到效果了
Query
该组件在创建hook之后就非常容易了,一笔带过
interface queryProps {query: string;variables?: any;children: React.FC<{ data: any; loading: boolean; error: any }>;}const Query: React.FC<queryProps> = ({ query, variables, children }) => {const { data, loading, error } = useQuery(query, variables);return children({ data, loading, error });};复制代码
总结
对前端来说,应用graphql并不是难点,只要能写出正确的查询语句,必然能得到正确的查询结果,难点可能是融合进现有项目,使用typescript等工具,加速开发效率。改造的难度依然在后端,想到我们之前的后端太过简陋,现在来优化一下吧,顺便补齐后端非常重要的身份认证等功能
后端目录结构优化
后端一直以来我们都在一个文件里写,随着模型变得复杂,代码开始臃肿了,同时在字符串里写schema也挺别扭,最好能写到单独的graphql/gql文件里去,这样还能有编辑器提供的格式化功能(我使用的是vscode中的Apollo GraphQL插件)。
我在这里的处理是将typeDefs拆分成对应的graphql文件,resolvers也进行文件拆分,然后使用文件扫描器自动依赖。
现在创建一个typeDefs文件夹,然后创建一个index.graphql文件,将原来的typeDefs字符串复制进去。
在同一个目录创建一个ball.gql文件,将index.graphql文件中Ball相关的定义剪贴进去。
接下来创建一个util.js,写一个代码扫描器,因为需要获取的就是字符串,所以直接用fs模块读取文件就行了
const fs = require("fs");const path = require("path");function requireAllGql(dir, parentArray) {let arr = [];let files = fs.readdirSync(dir);for (let f of files) {let p = path.join(dir, f);let stat = fs.statSync(p);if (stat.isDirectory()) {requireAllGql(p, arr);} else {let extname = path.extname(p);if (extname === ".gql" || extname === ".graphql") {let text = fs.readFileSync(p).toString();if (!parentArray) {arr.push(text);} else {parentArray.push(text);}}}}return arr;}module.exports = {requireAllGql};复制代码
这样index.js里的typeRefs就可以改成这样
const { requireAllGql } = require('./utils.js')const path = require("path")const typeDefs = requireAllGql(path.resolve(__dirname, './typeDefs'))复制代码
用同样的方式解决resolver,不过要先创建一个dataSource.js,将Ball和box移到这个文件里,然后创建一个resolvers文件夹,然后创建一个query.js文件,一个mutation.js文件,一个box文件(一般根据功能模块分文件,这里是个例子)。比如现在query.js就是这样
const { box } = require('../dataSource.js')exports.default = {Query: {getBox(_) {return box}}}复制代码
其余略过。再在utils.js创建一个resolver扫描器,每个文件的默认导出都是一个普通对象,所以处理起来并不复杂
function requireAllResolvers(dir, parentArray) {let arr = [];let files = fs.readdirSync(dir);for (let f of files) {let p = path.join(dir, f);let stat = fs.statSync(p);if (stat.isDirectory()) {requireAllResolvers(p, arr);} else {let extname = path.extname(p);if (extname === ".js" || extname === ".ts") {let resolver = require(p).default;if (!parentArray) {arr.push(resolver);} else {parentArray.push(resolver);}}}}return arr;}复制代码
同理可以搞定index文件里的resolvers
const resolvers = requireAllResolvers(path.resolve(__dirname, './resolvers'))复制代码
Apollo会帮我们把数组内的内容进行merge,所以我们只要保证每个文件里的内容符合格式即可。如果一切顺利的话,项目仍然可以正确运行,并没有什么改变,但是却可以在这基础上横向扩展了。
数据库
对于一个web服务来说,数据应该储存在专门的数据库中,比如mysql、redis等,此处以常用的mysql为例,看看graphql在跟数据库结合时有什么不同。还以之前的盒子小球为例,创建一个数据库。
SET NAMES utf8mb4;SET FOREIGN_KEY_CHECKS = 0;DROP TABLE IF EXISTS `t_ball`;CREATE TABLE `t_ball` (`id` int(10) NOT NULL,`size` int(255) DEFAULT NULL,`color` varchar(255) DEFAULT NULL,`boxId` int(10) DEFAULT NULL,PRIMARY KEY (`id`)) ENGINE=InnoDB DEFAULT CHARSET=utf8mb4;BEGIN;INSERT INTO `t_ball` VALUES (1, 5, 'red', 1);INSERT INTO `t_ball` VALUES (2, 6, 'blue', 1);INSERT INTO `t_ball` VALUES (3, 7, 'white', 2);INSERT INTO `t_ball` VALUES (4, 8, 'black', 2);COMMIT;DROP TABLE IF EXISTS `t_box`;CREATE TABLE `t_box` (`id` int(10) NOT NULL AUTO_INCREMENT,`width` int(255) DEFAULT NULL,`height` int(255) DEFAULT NULL,`color` varchar(255) DEFAULT NULL,PRIMARY KEY (`id`)) ENGINE=InnoDB AUTO_INCREMENT=3 DEFAULT CHARSET=utf8mb4;BEGIN;INSERT INTO `t_box` VALUES (1, 100, 100, 'red');INSERT INTO `t_box` VALUES (2, 200, 200, 'blue');COMMIT;SET FOREIGN_KEY_CHECKS = 1;复制代码
回到express项目,因为模型有点细微的变化,加入了主键id,所以gql文件中的schema需要加入id,下面列出需要修改的schema
type Box {id: Intwidth: Intheight: Intcolor: Stringballs(color: String): [Ball]}type Ball {id: Intsize: Intcolor: String}type Query {getBox: [Box]}type Mutation {setWidth(width: Int, id: Int): Box}复制代码
在项目里增加mysql的包
yarn add mysql复制代码
建立连接池,将查询简单封装,就不引入DAO层了,毕竟一共没几句sql
const mysql = require('mysql')const pool = mysql.createPool({host: '127.0.0.1',user: 'root',password: 'password',database: 'graphqldemo',port: 3306})const query = (sql, params) => {return new Promise((res, rej) => {pool.getConnection(function (err, connection) {connection.query(sql, params, function (err, result) {if (err) {rej(err);} else {res(result);}connection.release();});});})}复制代码
在resolver中引入sql前需要知道resolver的四个参数。第一个参数parent,是当前元素的父元素,顶级的schema的父元素称为root,大部分教程中用_代替。第二个参数是params,也就是查询参数。第三个参数是config,其中有一个参数dataSources我们过会儿需要用到。第四个参数是context,它的入参是express的Request和Response,可以用来传入身份信息,进行鉴权等操作。
我们把封装好的query函数放进这个dataSources。在index.js中修改
const server = new ApolloServer({typeDefs,resolvers,dataSources: () => ({query})});复制代码
接着就可以修改resolvers,先实现第一个getBox,因为现在不止一个盒子,所以返回的是一个数组,schema已经进行了修改
Query: {getBox(_, __, { dataSources: { query } }) {return query('select * from t_box')}}复制代码
query返回的是一个Promise,Apollo是支持这种写法的
然后完成Box的balls,我们需要从parent中拿到父元素的id
Box: {balls(parent, { color }, { dataSources: { query } }) {return query('select * from t_ball where box_id=? and color=?', [parent.id, color])}}复制代码
最后还有一个Mutation需要修改,schema中的定义返回的是被修改后的box,所以需要两条sql来完成这个部分
Mutation: {async setWidth(_, { width, id }, { dataSources: { query } }) {await query('update t_box set width=? where id=?', [width, id])return query('select * from t_box where id=?', [id]).then(res => res[0])}}复制代码
到这里,基本已经完成了一个graphql项目的基础,在此基础上横向扩展就能够完成一个简单的项目。另外,正式的项目中,还是需要DAO层来管理数据,否则重构会教你做人的。
typescript & type-graphql
迎合潮流,我们需要typescript的加持,否则怎么写都会被认为是玩具。但是我们思考一个问题,typescript的类型和graphql都是对模型的描述,基本一致,只在语法上有一些区别,能不能通用呢。官方提供了相关的API实现这个需求,但是语法并不简洁,type-graphql也许是更好的选择。
先导入typescript和type-graphql,还有之前用到的包的描述文件,另外type-graphql扫描注解用到了reflect-metadata这个还未进入标准的特性,所以需要引入这个包
yarn add typescript type-graphql reflect-metadata @types/mysql @types/express复制代码
typescript老规矩,先写tsconfig.json,大概有以下内容就差不多了
{"compilerOptions": {"target": "es6","module": "commonjs","lib": ["es6", "es7", "esnext", "esnext.asynciterable"],"noImplicitAny": false,"moduleResolution": "node","baseUrl": ".","esModuleInterop": true,"inlineSourceMap": true,"experimentalDecorators": true,"emitDecoratorMetadata": true,"watch": true}}复制代码
然后把所有require改成import,后缀名js改成ts就行了如果有报错就写个any
运行项目我们使用ts-node,全局安装ts-node之后执行ts-node index.ts即可启动。正式项目我们可以使用pm2指定解释器或者将项目编译成js来运行。然后我们将type-graphql引入项目。
非常遗憾的是引入type-graphql后代码结构发生大改,除了数据库相关的内容基本可以重写了,graphql文件也不需要了。先建立一个models文件夹,新增两个文件Box.ts和Ball.ts
import { ObjectType, Field } from "type-graphql";@ObjectType()export default class Ball {@Field()id: number;@Field()size: number;@Field()color: string;boxId: number;}复制代码
import { ObjectType, Field, Int } from "type-graphql";import Ball from "./Ball";@ObjectType({ description: "这是盒子模型" })export default class Box {@Field(type => Int)id: number;@Field(type => Int, { nullable: true, description: "这是宽度" })width: number;@Field(type => Int)height: number;@Field()color: string;@Field(() => [Ball])balls: Ball[];}复制代码
ObjectType注解代表这个类是graphql中的对象类型,而被Field注解的属性就是定义到graphql中的属性。Field的第一个参数是个函数用来表示类型,函数的入参没有意义,写type是为了语义化,返回值是类型(typescript的数字类型是number,但graphql的数字类型分为Int和Float,如果不指定为Int,typegraphql默认number为Float);第二个参数是配置项,nullable默认为false,这里可以改为true,description是注释
然后修改一下index.ts,引入graphql之前的东西基本都不要了,就保留数据库的query方法,另外query方法不放到dataSources中了,放到Context中
import "reflect-metadata";import express from "express";import { ApolloServer } from "apollo-server-express";import path from "path";import query from "./db";import { buildSchema } from "type-graphql";const PORT = 4000;const app = express();app.use(express.static("public"));buildSchema({resolvers: [path.resolve(__dirname, "./resolvers/*.resolver.ts")]}).then(schema => {const server = new ApolloServer({schema,context: () => ({query})});server.applyMiddleware({ app });app.listen(PORT, () =>console.log(`🚀 Server ready at http://localhost:${PORT}${server.graphqlPath}`));});复制代码
buildSchema是异步的,所以ApolloServer启动要放在这之后,之前提到过ApolloServer需要提供typeDefs和resolvers两个参数或一个schema参数。看buildSchema这个函数的入参,就知道我们还有resolvers没有改造,在resolvers文件夹下新建一个Box.resolver.ts,把之前的三个resolver改造一下
import {Resolver,Query,Arg,Mutation,Ctx,FieldResolver,Root} from "type-graphql";import Box from "../models/Box";import Ball from "../models/Ball";@Resolver(Box)export default class BoxResolver {@Query(returns => [Box])getBox(@Ctx() { query }) {return query("select * from t_box");}@FieldResolver(returns => [Ball])balls(@Root() box: Box, @Ctx() { query }, @Arg("color") color: string) {return query("select * from t_ball where boxId=? and color=?", [box.id,color]);}@Mutation(returns => Box)async setWidth(@Arg("width") width: number,@Arg("id") id: number,@Ctx() { query }) {await query("update t_box set width=? where id=?", [width, id]);return query("select * from t_box where id=?", [id]).then(res => res[0]);}}复制代码
简单说一下几个注解的意思。Query和Mutation代表是这两个基础类型下的resolver,参数是个函数,表示预期的返回类型;FieldResolver与类注解Resolver关联,代表Box这个对象类型下的字段balls的resolver;Arg注解的是参数,第一个参数是入参的参数名,它还有第二个参数,可以配置nullable;Root注解的参数是父元素,在balls方法中拿到了父盒子的id;Ctx注解的是Context,从中取到了apolloserver中context的query方法。
到这里,不需要手写graphql文件,依然完成了一个graphql服务器,而且typeDefs和resolvers结合到了一起,不用担心漏写了。并且我们的程序已经大变样,不深入学习一番已经看不懂了,恭喜你离建立技术护城河更进一步。
type-graphql有个内置的权限管理,有兴趣的话可以看看Authorized注解
typeorm
ORM是否要引入项目,主要还是看项目需求。这里使用typeorm,它在写法上与typegraphql非常契合,因为他可以直接复用typegraphql中创建的model,是typegraphql在数据层上非常好的一个实现方式。typeorm本身内容很多,可以单独写一篇文章,本文只介绍与graphql有关的部分,先引入typeorm
yarn add typeorm复制代码
然后在项目根目录创建一个ormconfig.json,输入数据库配置
{"type": "mysql","host": "127.0.0.1","port": 3306,"username": "root","password": "password","database": "graphqldemo","synchronize": false,"logging": false,"entities": ["./models/*.ts"]}复制代码
其中type是数据库类型,typeorm支持MySQL、MariaDB、Postgres、SQLite、Oracle、MongoDB等多种数据库。synchronize如果为true,typeorm会根据模型自动建表,如果模型有修改还会对表结构进行修改(外键等原因会导致修改失败项目无法启动,需要手动干预或者使用typeorm中的migrations)。logging为true会在控制台打印自动生成的sql语句。
先修改index.ts
import { createConnection } from "typeorm";//····在app.listen之前添加createConnection().then(() => {app.listen(PORT, () =>console.log(`🚀 Server ready at http://localhost:${PORT}${server.graphqlPath}`));});//····复制代码
跟typegraphql的buildSchema一样,createConnection也是个异步的promise,所以为了防止一些意外情况,app.listen的操作要在这两个过程之后。如果已经建立了ormconfig.json文件,createConnection会自动读取其中的配置,否则需要将其作为参数填进去。
然后修改models,之后models可以同时在type-graphql中表示类型,也可以在typeorm中作为数据实体,一模两吃
import { ObjectType, Field, Int } from "type-graphql";import Box from "./Box";import {Column,ManyToOne,Entity,BaseEntity,PrimaryGeneratedColumn} from "typeorm";@Entity({ name: "t_ball" })@ObjectType()export default class Ball extends BaseEntity {@PrimaryGeneratedColumn()@Field(type => Int)id: number;@Column()@Field(type => Int)size: number;@Column({ type: "varchar", length: 255 })@Field()color: string;@Column()boxId: number;@ManyToOne(type => Box)box: Box;}复制代码
import { ObjectType, Field, Int } from "type-graphql";import Ball from "./Ball";import {Entity,PrimaryGeneratedColumn,Column,OneToMany,BaseEntity} from "typeorm";@Entity({ name: "t_box" })@ObjectType({ description: "这是盒子模型" })export default class Box extends BaseEntity {@PrimaryGeneratedColumn()@Field(type => Int)id: number;@Column()@Field(type => Int, { nullable: true, description: "这是宽度" })width: number;@Column()@Field(type => Int)height: number;@Column({ type: "varchar", length: 255 })@Field()color: string;@OneToMany(type => Ball, ball => ball.box)@Field(() => [Ball])balls: Ball[];}复制代码
首先将类继承自typeorm中的BaseEntity,并且类上增加了一个Entity注解,参数的配置项中加一个name可以指定表名;Column注解这个属性是数据库的一列,参数可以指定具体的类型和长度;PrimaryGeneratedColumn注解代表这是一个自增主键;OneToMany是个特殊的注解,用来描述实体直接的relations,一共包括OneToMany,ManyToOne,ManyToMany三种,具体用法说来话长,请自行摸索。这样就和之前建立的数据库对应了,感兴趣的可以使用typeorm的自动建表功能看看有什么不同。
现在我们可以抛弃简陋封装的query方法,直接使用typeorm提供的数据获取方式
import {Resolver,Query,Arg,Mutation,FieldResolver,Root,Int} from "type-graphql";import Box from "../models/Box";import Ball from "../models/Ball";@Resolver(Box)export default class BoxResolver {@Query(returns => [Box])getBox() {return Box.find();}@FieldResolver(returns => [Ball])balls(@Root() box: Box, @Arg("color", { nullable: true }) color: string) {return Ball.find({ boxId: box.id, color });}@Mutation(returns => Box)async setWidth(@Arg("width", type => Int) width: number,@Arg("id", type => Int) id: number) {let box = await Box.findOne({ id });box.width = width;return box.save();}}复制代码
整个程序实现非常的优雅,并且很难懂~。typeorm的内容非常多,如果对其他的orm有经验,上手还是很快的。另外如果真的有typeorm写不出来的sql,该手写就手写吧~
总结
这篇文章我很早就开始写了,但是摊子铺的太大,所以一直写不完主要是打怪物猎人冰原。文中选取的模型也非常简单,但是基本完成了一个graphql服务器的框架,当然也留下很多内容没有讲,比如非常重要的标量类型和输入类型。因为本人主业是前端,会一点java后端,所以如果文章中出现概念性错误,请评论指出,共同进步。
作者:Type_Zer0
链接:https://juejin.im/post/6844903984084287496
来源:掘金
著作权归作者所有。商业转载请联系作者获得授权,非商业转载请注明出处。

若有收获,就点个赞吧
0 人点赞
