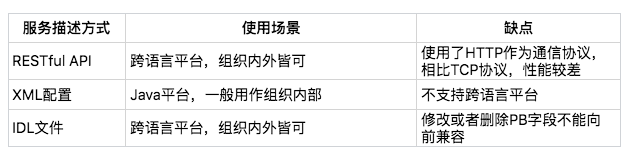
最常见的服务发布和引用的方式有三种:
- RESTful API
- XML 配置
- IDL 文件
- 从抽象上来看,服务的发布和引用是通过接口完成的,所以“发布和引用服务”就是定义接口,也就是代表 client 知道 server 的接口定义。
- 从实现上来看,服务的发布和引用是以 RPC 来实现的。
- 需要注意它们与注册中心的区别与联系。
RESTful API
主要被用作 HTTP 或者 HTTPS 协议的接口定义,即使在非微服务架构体系下,也被广泛采用。
@Path("/rest")public interface RestfulService {@GET@Produces(MediaType.APPLICATION_JSON)List<User> getUsers(@QueryParam("uid") int uid);@GET@Path("/primitive")@Produces(MediaType.TEXT_PLAIN)String testPrimitiveType();@POST@Consumes(MediaType.APPLICATION_FORM_URLENCODED)@Produces(MediaType.APPLICATION_JSON)Response add(@FormParam("id") int id, @FormParam("name") String name);
具体的服务实现如下:
public class RestfulServerDemo implements RestfulService {@Overridepublic List<User> getUsers(@CookieParam("uid") int uid) {return Arrays.asList(new User(uid, "name" + uid));}@Overridepublic String testPrimitiveType() {return "helloworld!";}@Overridepublic Response add(@FormParam("id") int id, @FormParam("name") String name) {return Response.ok().cookie(new NewCookie("ck", String.valueOf(id))).entity(new User(id, name)).build();}
服务提供者这一端通过部署代码到 Tomcat 中,并配置 Tomcat 中如下的 web.xml,就可以通过 servlet 的方式对外提供 RESTful API。
<listener>
     <listener-class>com.weibo.api.motan.protocol.restful.support.servlet.RestfulServletContainerListener</listener-class>
 </listener>

 <servlet>
     <servlet-name>dispatcher</servlet-name>
     <servlet-class>org.jboss.resteasy.plugins.server.servlet.HttpServletDispatcher</servlet-class>
     <load-on-startup>1</load-on-startup>
     <init-param>
         <param-name>resteasy.servlet.mapping.prefix</param-name>
         <param-value>/servlet</param-value>  <!-- 此处实际为servlet-mapping的url-pattern,具体配置见resteasy文档-->
     </init-param>
 </servlet>

 <servlet-mapping>
     <servlet-name>dispatcher</servlet-name>
     <url-pattern>/servlet/*</url-pattern>
 </servlet-mapping>
HTTP 协议本身是一个公开的协议,对于服务消费者来说几乎没有学习成本,所以比较适合用作跨业务平台之间的服务协议。
XML 配置
这种方式的服务发布和引用主要分三个步骤:
- 服务提供者定义接口,并实现接口。
- 服务提供者进程启动时,通过加载 server.xml 配置文件将接口暴露出去。
- 服务消费者进程启动时,通过加载 client.xml 配置文件来引入要调用的接口。
以服务化框架 Motan 为例,它还支持以 XML 配置的方式来发布和引用服务。
服务提供者定义接口:
public interface FooService {
    public String hello(String name);
}
服务提供者实现接口:
public class FooServiceImpl implements FooService {

    public String hello(String name) {
        System.out.println(name + " invoked rpc service");
        return "hello " + name;
    }
}
服务提供者进程启动时,加载 server.xml 配置文件,开启 8002 端口监听;
<?xml version="1.0" encoding="UTF-8"?>
<beans xmlns="http://www.springframework.org/schema/beans"
 xmlns:xsi="http://www.w3.org/2001/XMLSchema-instance"
 xmlns:motan="http://api.weibo.com/schema/motan"
 xsi:schemaLocation="http://www.springframework.org/schema/beans http://www.springframework.org/schema/beans/spring-beans-2.5.xsd
   http://api.weibo.com/schema/motan http://api.weibo.com/schema/motan.xsd">

    <!-- service implemention bean -->
    <bean id="serviceImpl" class="quickstart.FooServiceImpl" />
    <!-- exporting service by Motan -->
    <motan:service interface="quickstart.FooService" ref="serviceImpl" export="8002" />
</beans>
服务提供者加载 server.xml 的代码如下:
import org.springframework.context.ApplicationContext;
import org.springframework.context.support.ClassPathXmlApplicationContext;

public class Server {

    public static void main(String[] args) throws InterruptedException {
        ApplicationContext applicationContext = new ClassPathXmlApplicationContext("classpath:motan_server.xml");
        System.out.println("server start...");
    }
}
服务消费者要想调用服务,就必须在进程启动时,加载配置 client.xml,引用接口定义,然后发起调用:
<?xml version="1.0" encoding="UTF-8"?>
<beans xmlns="http://www.springframework.org/schema/beans"
xmlns:xsi="http://www.w3.org/2001/XMLSchema-instance"
xmlns:motan="http://api.weibo.com/schema/motan"
xsi:schemaLocation="http://www.springframework.org/schema/beans http://www.springframework.org/schema/beans/spring-beans-2.5.xsd
   http://api.weibo.com/schema/motan http://api.weibo.com/schema/motan.xsd">

    <!-- reference to the remote service -->
    <motan:referer id="remoteService" interface="quickstart.FooService" directUrl="localhost:8002"/>
</beans>
服务消费者启动时,加载 client.xml 的代码如下:
import org.springframework.context.ApplicationContext;
import org.springframework.context.support.ClassPathXmlApplicationContext;


public class Client {

    public static void main(String[] args) throws InterruptedException {
        ApplicationContext ctx = new ClassPathXmlApplicationContext("classpath:motan_client.xml");
        FooService service = (FooService) ctx.getBean("remoteService");
        System.out.println(service.hello("motan"));
    }
}
对于 XML 配置方式的服务描述,一旦应用到多个部门之间的接口格式约定,如果有变更,最好是新增接口,不到万不得已不要对原有的接口格式做变更。
IDL 文件
IDL 就是接口描述语言(interface description language)的缩写,通过一种中立的方式来描述接口,使得在不同的平台上运行的对象和不同语言编写的程序可以相互通信交流。比如你用 Java 语言实现提供的一个服务,也能被 PHP 语言调用。
- 要是用作跨语言平台的服务之间的调用
- Thrift 协议
- gRPC 协议
gRPC 协议使用 Protobuf 简称 proto 文件来定义接口名、调用参数以及返回值类型。
// The greeter service definition.
service Greeter {
  // Sends a greeting
  rpc SayHello (HelloRequest) returns (HelloReply) {}
  rpc SayHelloAgain (HelloRequest) returns (HelloReply) {}

}

// The request message containing the user's name.
message HelloRequest {
  string name = 1;
}

// The response message containing the greetings
message HelloReply {
  string message = 1;
}
假如服务提供者使用的是 Java 语言,那么利用 protoc 插件即可自动生成 Server 端的 Java 代码:
private class GreeterImpl extends GreeterGrpc.GreeterImplBase {

  @Override
  public void sayHello(HelloRequest req, StreamObserver<HelloReply> responseObserver) {
    HelloReply reply = HelloReply.newBuilder().setMessage("Hello " + req.getName()).build();
    responseObserver.onNext(reply);
    responseObserver.onCompleted();
  }

  @Override
  public void sayHelloAgain(HelloRequest req, StreamObserver<HelloReply> responseObserver) {
    HelloReply reply = HelloReply.newBuilder().setMessage("Hello again " + req.getName()).build();
    responseObserver.onNext(reply);
    responseObserver.onCompleted();
  }
}
假如服务消费者使用的也是 Java 语言,那么利用 protoc 插件即可自动生成 Client 端的 Java 代码:
public void greet(String name) {
  logger.info("Will try to greet " + name + " ...");
  HelloRequest request = HelloRequest.newBuilder().setName(name).build();
  HelloReply response;
  try {
    response = blockingStub.sayHello(request);
  } catch (StatusRuntimeException e) {
    logger.log(Level.WARNING, "RPC failed: {0}", e.getStatus());
    return;
  }
  logger.info("Greeting: " + response.getMessage());
  try {
    response = blockingStub.sayHelloAgain(request);
  } catch (StatusRuntimeException e) {
    logger.log(Level.WARNING, "RPC failed: {0}", e.getStatus());
    return;
  }
  logger.info("Greeting: " + response.getMessage());
}
假如服务消费者使用的是 PHP 语言,那么利用 protoc 插件即可自动生成 Client 端的 PHP 代码:
$request = new Helloworld\HelloRequest();
$request->setName($name);
list($reply, $status) = $client->SayHello($request)->wait();
$message = $reply->getMessage();
list($reply, $status) = $client->SayHelloAgain($request)->wait();
$message = $reply->getMessage();
注意:
- 在描述接口定义时,IDL 文件需要对接口返回值进行详细定义
- 如果接口返回值的字段比较多,并且经常变化时,采用 IDL 文件方式的接口定义就不太合适了
总结

若有收获,就点个赞吧
0 人点赞
