1简介
1.1分布式文件服务器 FastDFS
FastDFS 是用 c 语言编写的一款开源的分布式文件系统。FastDFS 为互联网量身定制, 充分考虑了冗余备份、负载均衡、线性扩容等机制,并注重高可用、高性能等指标,使用 FastDFS 很容易搭建一套高性能的文件服务器集群提供文件上传、下载等服务
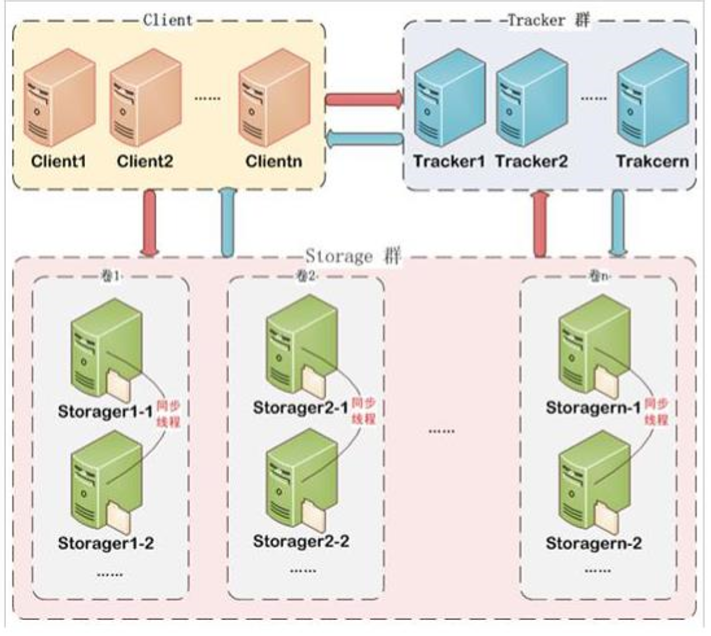
FastDFS 架构包括 Tracker server 和 Storage server。客户端请求 Tracker server 进行文 件上传、下载,通过 Tracker server 调度最终由 Storage server 完成文件上传和下载。
Tracker server 作用是负载均衡和调度,通过 Tracker server 在文件上传时可以根据一些 策略找到 Storage server 提供文件上传服务。可以将 tracker 称为追踪服务器或调度服务 器。
Storage server 作用是文件存储,客户端上传的文件最终存储在 Storage 服务器上, Storageserver 没有实现自己的文件系统而是利用操作系统 的文件系统来管理文件。可以将 storage 称为存储服务器
服务端两个角色:
Tracker:管理集群,tracker 也可以实现集群。每个 tracker 节点地位平等。收集 Storage 集群的状态。
Storage:实际保存文件 Storage 分为多个组,每个组之间保存的文件是不同的。每 个组内部可以有多个成员,组成员内部保存的内容是一样的,组成员的地位是一致的,没有 主从的概念。
1.2上传下载流程
上传流程
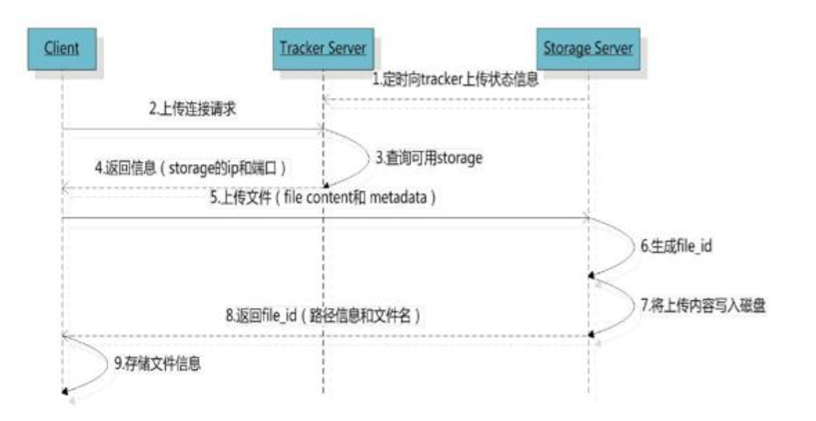
客户端上传文件后存储服务器将文件 ID 返回给客户端,此文件 ID 用于以后访问该文 件的索引信息。文件索引信息包括:
组名,虚拟磁盘路径,数据两级目录,文件名
组名:文件上传后所在的 storage 组名称,在文件上传成功后有 storage 服务器返回, 需要客户端自行保存
虚拟磁盘路径:storage 配置的虚拟路径,与磁盘选项 store_path*对应。如果配置了 store_path0 则是 M00,如果配置了 store_path1 则是 M01,以此类推。
数据两级目录:storage 服务器在每个虚拟磁盘路径下创建的两级目录,用于存储数据 文件
文件名:与文件上传时不同。是由存储服务器根据特定信息生成,文件名包含:源存储 服务器 IP 地址、文件创建时间戳、文件大小、随机数和文件拓展名等信息
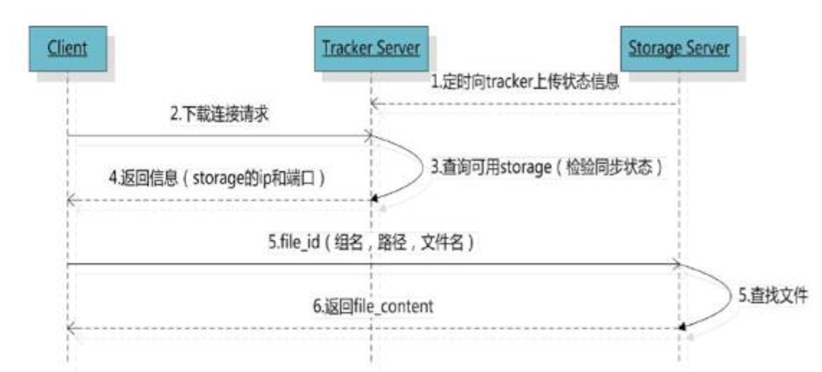
下载流程
2.FastDFS 安装
分布式存储 CentOS6.5虚拟机环境搭建FastDFS-5.0.5集群.pdf
3.入门
3.1.创建maven工程
(1)下载FastDFS 需要的jar包
fastdfs_client_v1.20.jar.zip
将 jar 包放到 d 盘 setup 目录中,执行下边代码安装到仓库
mvn install:install-file -DgroupId=org.csource.fastdfs -DartifactId=fastdfs -Dversion=1.2 -Dpackaging=jar -Dfile=d:\setup\fastdfs_client_v1.20.jar
pom.cml文件中引入约束
<dependency><groupId>org.csource.fastdfs</groupId><artifactId>fastdfs</artifactId><version>1.2</version></dependency>
(2) fdfs_client.conf 配置文件
定义服务器的ip地址和端口
# connect timeout in seconds# default value is 30sconnect_timeout=30# network timeout in seconds# default value is 30snetwork_timeout=60# the base path to store log filesbase_path=/home/fastdfs# tracker_server can ocur more than once, and tracker_server format is# "host:port", host can be hostname or ip addresstracker_server=192.168.25.133:22122#standard log level as syslog, case insensitive, value list:### emerg for emergency### alert### crit for critical### error### warn for warning### notice### info### debuglog_level=info# if use connection pool# default value is false# since V4.05use_connection_pool = false# connections whose the idle time exceeds this time will be closed# unit: second# default value is 3600# since V4.05connection_pool_max_idle_time = 3600# if load FastDFS parameters from tracker server# since V4.05# default value is falseload_fdfs_parameters_from_tracker=false# if use storage ID instead of IP address# same as tracker.conf# valid only when load_fdfs_parameters_from_tracker is false# default value is false# since V4.05use_storage_id = false# specify storage ids filename, can use relative or absolute path# same as tracker.conf# valid only when load_fdfs_parameters_from_tracker is false# since V4.05storage_ids_filename = storage_ids.conf#HTTP settingshttp.tracker_server_port=80#use "#include" directive to include HTTP other settiongs##include http.conf
(3)创建 java 类,main 方法代码如下
// 1、加载配置文件,配置文件中的内容就是 tracker 服务的地址。ClientGlobal.init("D:/maven_work/fastDFS-demo/src/fdfs_client.conf");// 2、创建一个 TrackerClient 对象。直接 new 一个。TrackerClient trackerClient = new TrackerClient();// 3、使用 TrackerClient 对象创建连接,获得一个 TrackerServer 对象。TrackerServer trackerServer = trackerClient.getConnection();// 4、创建一个 StorageServer 的引用,值为 nullStorageServer storageServer = null;// 5、创建一个 StorageClient 对象,需要两个参数 TrackerServer 对象、StorageServer 的引用StorageClient storageClient = new StorageClient(trackerServer, storageServer);// 6、使用 StorageClient 对象上传图片。//扩展名不带“.”String[] strings = storageClient.upload_file("D:/pic/benchi.jpg", "jpg",null);// 7、返回数组。包含组名和图片的路径。for (String string : strings) {System.out.println(string);}// 输出结果//group1 -->组名//M00/00/00/wKgZhVkMP4KAZEy-AAA-tCf93Fo973.jpg -->图片地址和名称
访问上传的文件
ip+端口+组名+文件名
http://192.168.25.133/group1/M00/00/00/wKgZhVkMP4KAZEy-AAA-tCf93Fo973.jpg
4.将上传服务集成到项目中
4.1引入文件传依赖坐标
<!-- 文件上传组件 --><dependency><groupId>org.csource.fastdfs</groupId><artifactId>fastdfs</artifactId></dependency><dependency><groupId>commons-fileupload</groupId><artifactId>commons-fileupload</artifactId></dependency>
4.2创建工具类
import org.csource.common.NameValuePair;import org.csource.fastdfs.ClientGlobal;import org.csource.fastdfs.StorageClient1;import org.csource.fastdfs.StorageServer;import org.csource.fastdfs.TrackerClient;import org.csource.fastdfs.TrackerServer;public class FastDFSClient {private TrackerClient trackerClient = null;private TrackerServer trackerServer = null;private StorageServer storageServer = null;private StorageClient1 storageClient = null;public FastDFSClient(String conf) throws Exception {if (conf.contains("classpath:")) {conf = conf.replace("classpath:", this.getClass().getResource("/").getPath());}ClientGlobal.init(conf);trackerClient = new TrackerClient();trackerServer = trackerClient.getConnection();storageServer = null;storageClient = new StorageClient1(trackerServer, storageServer);}/*** 上传文件方法* <p>Title: uploadFile</p>* <p>Description: </p>* @param fileName 文件全路径* @param extName 文件扩展名,不包含(.)* @param metas 文件扩展信息* @return* @throws Exception*/public String uploadFile(String fileName, String extName, NameValuePair[] metas) throws Exception {String result = storageClient.upload_file1(fileName, extName, metas);return result;}public String uploadFile(String fileName) throws Exception {return uploadFile(fileName, null, null);}public String uploadFile(String fileName, String extName) throws Exception {return uploadFile(fileName, extName, null);}/*** 上传文件方法* <p>Title: uploadFile</p>* <p>Description: </p>* @param fileContent 文件的内容,字节数组* @param extName 文件扩展名* @param metas 文件扩展信息* @return* @throws Exception*/public String uploadFile(byte[] fileContent, String extName, NameValuePair[] metas) throws Exception {String result = storageClient.upload_file1(fileContent, extName, metas);return result;}public String uploadFile(byte[] fileContent) throws Exception {return uploadFile(fileContent, null, null);}public String uploadFile(byte[] fileContent, String extName) throws Exception {return uploadFile(fileContent, extName, null);}}
4.3 fdfs_client.conf 配置文件
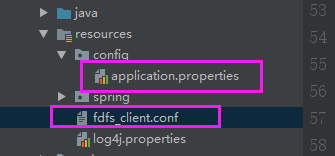
在resources文件下创建fdfs_client.conf 配置文件
fdfs_client.zip
在config文件下的application.properties文件下配置ip地址
FILE_SERVER_URL=http://192.168.25.133/

4.4配置媒体解析器
程 springmvc.xml 添加配置
<!-- 配置多媒体解析器 --><bean id="multipartResolver"class="org.springframework.web.multipart.commons.CommonsMultipartResolver"><property name="defaultEncoding" value="UTF-8"></property><!-- 设定文件上传的最大值 5MB,5*1024*1024 --><property name="maxUploadSize" value="5242880"></property></bean>
4.5控制层
创建UploadController.java
该类直接返回一个可以访问上传文件的url地址
import com.moonhu.utils.FastDFSClient;import entity.Result;import org.springframework.beans.factory.annotation.Value;import org.springframework.web.bind.annotation.RequestMapping;import org.springframework.web.bind.annotation.RestController;import org.springframework.web.multipart.MultipartFile;/*** 图片上传的控制器*/@RestControllerpublic class UploadController {@Value("${FILE_SERVER_URL}")private String server_url; // 文件服务器地址@RequestMapping("/uploadImage.do")public Result uploadImage(MultipartFile file) {// 1.取文件的扩展名String name = file.getOriginalFilename();String extName = name.substring(name.lastIndexOf(".") + 1);try {//2.创建一个 FastDFS 的客户端FastDFSClient fastDFSClient = new FastDFSClient("classpath:fdfs_client.conf");//3、执行上传处理String path = fastDFSClient.uploadFile(file.getBytes(), extName);//4、拼接返回的 url 和 ip 地址,拼装成完整的 urlreturn new Result(true, server_url + path);} catch (Exception e) {e.printStackTrace();return new Result(false,"图片上传失败"+e);}}}
4.6前端代码
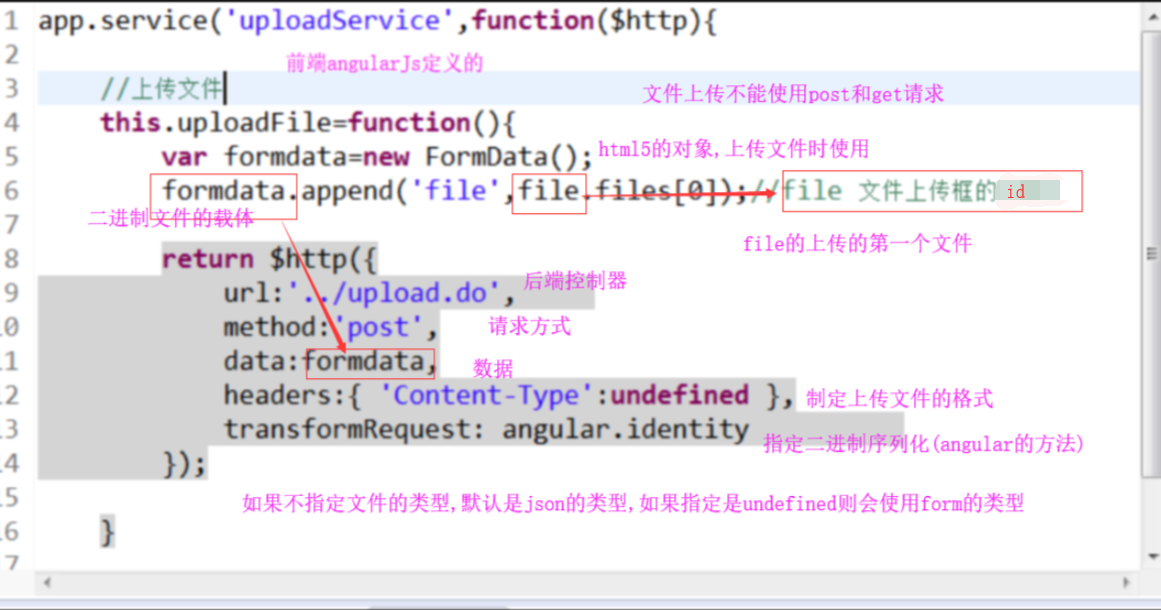
注意文件上传不能使用post或者get请求,只能使用通用请求,指定post格式(angularjs)
anjularjs 对于 post 和 get 请求默认的 Content-Type header 是 application/json。通过设置 ‘Content-Type’: undefined,这样浏览器会帮我们把 Content-Type 设置为 multipart/form-data.
通过设置 transformRequest: angular.identity ,anjularjs transformRequest function 将序列化 我们的 formdata object.
formData.append(“file”, file.files[0]); 此处的file是只input框中id为file的
formData.append(“file”, file.files[0]);指多个file中的第一个(multiple指定多选)
formData.append(“file”, file.files[0]);后台需要用file接收此文件
// 文件上传this.uploadImage = function () {// 创建文件对象var formData = new FormData();// 将需要上传的文件添加到容器中formData.append("file", file.files[0]);// 上传文件return $http({//请求方式method: "post",// 请求地址url: "../uploadImage.do",// 上传数据data: formData,// 只当数据格式headers: {'Content-Type': undefined},// 对数据进行二进制编码transformRequest: angular.identity});};

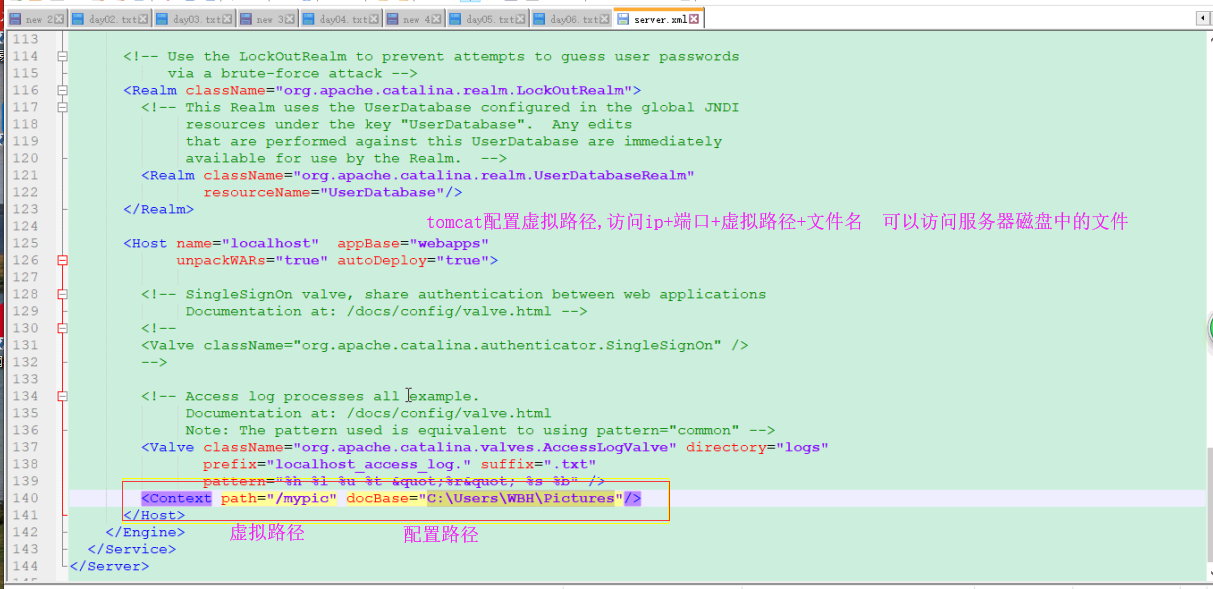
使用tomcat访问服务器同样可以实现对服务器文件的访问
