
Docker命令帮助文档(重要)
attach Attach to a running container # 当前shell下attach连接指定运行的镜像build Build an image from a Dockerfile # 通过Dockerfile定制镜像commit Create a new image from a container changes #提交当前容器为新的镜像cp Copy files/folders between a container and the local filesystem #从容器中拷贝指定文件或目录到宿主机中create Create a new container # 创建一个新的容器,同run,但不启动容器diff Inspect changes to files or directories on a container's filesystem #查看docker容器的变化events Get real time events from the server # 从docker服务获取容器实时事件exec Run a command in a running container # 在已存在的容器上运行命令export Export a container filesystem as a tar archive # 导出容器的内容流作为一个tar归档文件[对应import]history Show the history of an image # 展示一个镜像形成历史images List images # 列出系统当前的镜像import Import the contents from a tarball to create a filesystem image # 从tar包中的内容创建一个新的文件系统镜像[对应export]info Display system-wide information # 显示系统相关信息inspect Return low-level information on Docker objects # 查看容器详细信息kill Kill one or more running containers # 杀死指定的docker容器load Load an image from a tar archive or STDIN # 从一个tar包加载一个镜像[对应save]login Log in to a Docker registry # 注册或者登录一个docker源服务器logout Log out from a Docker registry # 从当前Docker registry退出logs Fetch the logs of a container # 输出当前容器日志信息pause Pause all processes within one or more containers # 暂停容器port List port mappings or a specific mapping for the container # 查看映射端口对应容器内部源端口ps List containers # 列出容器列表pull Pull an image or a repository from a registry # 从docker镜像源服务器拉取指定镜像或库镜像push Push an image or a repository to a registry # 推送指定镜像或者库镜像至docker源服务器rename Rename a container # 给docker容器重新命名restart Restart one or more containers # 重启运行的容器rm Remove one or more containers # 移除一个或者多个容器rmi Remove one or more images # 移除一个或者多个镜像[无容器使用该镜像时才可删除,否则需删除相关容器才可继续或 -f 强制删除]run Run a command in a new container # 创建一个新的容器并运行一个命令save Save one or more images to a tar archive (streamed to STDOUT by default) # 保存一个镜像为一个tar包[对应load]search Search the Docker Hub for images # 在docker hub中搜索镜像start Start one or more stopped containers # 启动容器stats Display a live stream of container(s) resource usage statistics # 实时显示容器资源使用统计stop Stop one or more running containers # 停止容器tag Create a tag TARGET_IMAGE that refers to SOURCE_IMAGE # 给源中镜像打标签top Display the running processes of a container # 查看容器中运行的进程信息unpause Unpause all processes within one or more containers # 取消暂停容器update Update configuration of one or more containers # 更新一个或多个容器配置version Show the Docker version information # 查看docker版本号wait Block until one or more containers stop, then print their exit codes # 截取容器停止时的退出状态值
作业练习
三个作业:作业1告诉我们暴露端口的重要性;作业2告诉我们进入容器的重要性;作业3告诉我们查看当前容器状态的重要性,如何修改容器运行的环境。
Docker 安装Nginx
# 1.搜索镜像 search 建议去docker搜索,可以看到帮助文档# 2.下载镜像 pull# 3.运行测试[root@localhost /]# docker imagesREPOSITORY TAG IMAGE ID CREATED SIZEnginx latest 2622e6cca7eb 23 hours ago 132MBcentos latest 470671670cac 4 months ago 237MB# -d 后台运行# --name 给容器命名# -p 宿主机端口:容器内部端口 【端口映射操作】[root@localhost /]# docker run -d --name nginx01 -p 3344:80 nginxd60570d1e45024e3687e3bf3105a6959af8ee68d34f0c62a7deee1c16ec6579fCONTAINER ID IMAGE COMMAND CREATED STATUS PORTS NAMESd60570d1e450 nginx "/docker-entrypoint.…" 2 minutes ago Up 2 minutes 0.0.0.0:3344->80/tcp nginx01# 本地测试访问nginx[root@localhost /]# curl localhost:3344# 进入容器[root@localhost /]# docker exec -it nginx01 /bin/bashroot@d60570d1e450:/# whereis nginxnginx: /usr/sbin/nginx /usr/lib/nginx /etc/nginx /usr/share/nginxroot@d60570d1e450:/# cd /etc/nginx/root@d60570d1e450:/etc/nginx# lsconf.d fastcgi_params koi-utf koi-win mime.types modules nginx.conf scgi_params uwsgi_params win-utf
端口暴露示意图: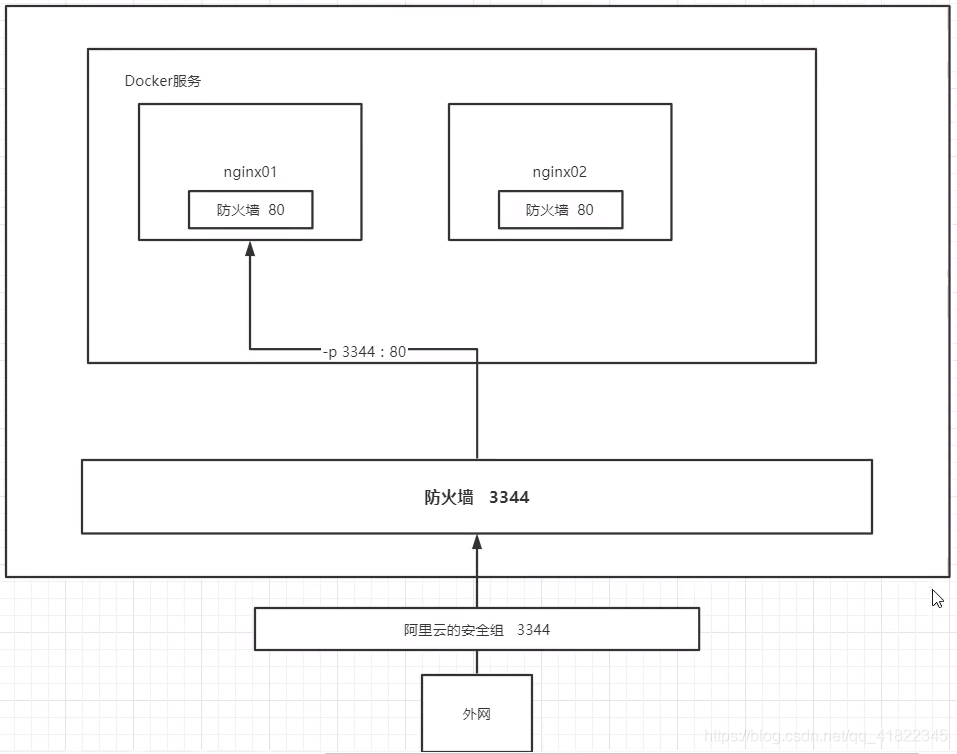
思考问题:我们每次改动nginx配置文件,都需要进入容器内部?十分的麻烦,要是可以在容器外部提供一个映射路径,达到在容器修改文件名,容器内部就可以自动修改?→ 数据卷!
docker 安装tomcat
# 官方文档docker run -it --rm tomcat:9.0# 我们之前的启动都是后台,停止了容器之后,容器还是可以查到 docker run -it --rm,一般用来测试,用完就删除# 下载再启动docker pull tomcat# 启动运行docker run -d -p 3355:8080 --name tomcat01 tomcat#测试访问没有问题# 进入容器[root@localhost /]# docker exec -it tomcat01 /bin/bash# 发现问题:1、linux命令少了 2、webapps内没有内容(这是阿里云镜像的原因:默认是最小镜像,所有不必要的都删除)# 保证最小可运行环境#解决方法:将webapps.dist目录下内容拷至webapps下root@c435d5b974a7:/usr/local/tomcat# cd webappsroot@c435d5b974a7:/usr/local/tomcat/webapps# lsroot@c435d5b974a7:/usr/local/tomcat/webapps# cd ..root@c435d5b974a7:/usr/local/tomcat# lsBUILDING.txt CONTRIBUTING.md LICENSE NOTICE README.md RELEASE-NOTES RUNNING.txt bin conf lib logs native-jni-lib temp webapps webapps.dist workroot@c435d5b974a7:/usr/local/tomcat# cd webapps.dist/root@c435d5b974a7:/usr/local/tomcat/webapps.dist# lsROOT docs examples host-manager managerroot@c435d5b974a7:/usr/local/tomcat/webapps.dist# cd ..root@c435d5b974a7:/usr/local/tomcat# cp -r webapps.dist/* webappsroot@c435d5b974a7:/usr/local/tomcat# cd webappsroot@c435d5b974a7:/usr/local/tomcat/webapps# lsROOT docs examples host-manager manager
拷贝完成就可以访问了:
思考问题:我们以后要部署项目,如果每次都要进入容器是不是十分麻烦?要是可以在容器外部提供一个映射路径,webapps,我们在外部放置项目,就自动同步内部就好了!
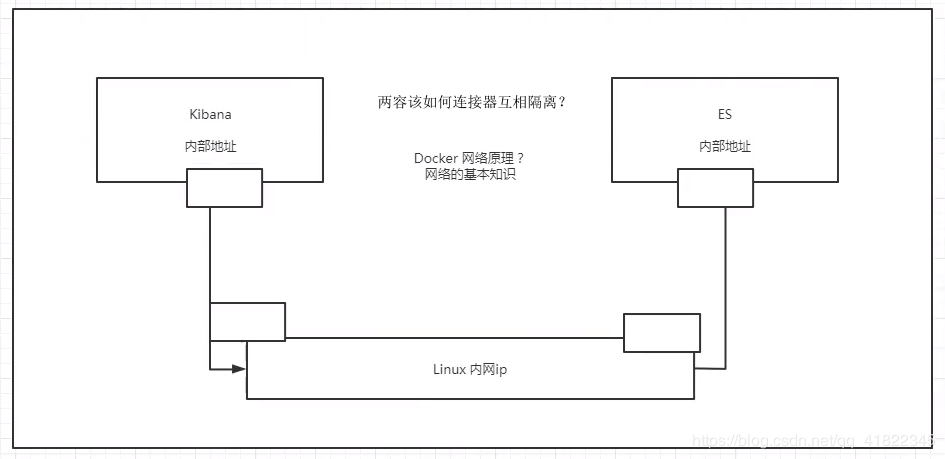
部署es+kibana
# es 暴露的端口很多!# es 十分耗内存# es 的数据一般需要放置到安全目录!挂载# --net somenetwork?网络配置# 启动 elasticsearchdocker run -d --name elasticsearch -p 9200:9200 -p 9300:9300 -e "discovery.type=single-node" elasticsearch:7.6.2# 启动了 Linux就可卡住了 docker stats 查看cpu的状态# es 是十分耗内存的# 测试一下es是否成功了[root@localhost /]# curl localhost:9200{"name" : "83b0d5dca26e","cluster_name" : "docker-cluster","cluster_uuid" : "MjhNfYTvRVui1UCrAwMdqw","version" : {"number" : "7.6.2","build_flavor" : "default","build_type" : "docker","build_hash" : "ef48eb35cf30adf4db14086e8aabd07ef6fb113f","build_date" : "2020-03-26T06:34:37.794943Z","build_snapshot" : false,"lucene_version" : "8.4.0","minimum_wire_compatibility_version" : "6.8.0","minimum_index_compatibility_version" : "6.0.0-beta1"},"tagline" : "You Know, for Search"}# 查看docker容器占用资源情况

# 赶紧关闭容器,增加内存限制,修改配置文件 -e 环境配置修改docker run -d --name elasticsearch02 -p 9200:9200 -p 9300:9300 -e "discovery.type=single-node" -e ES_JAVA_OPTS="-Xms64m -Xmx512m" elasticsearch:7.6.2# 查看docker容器占用资源情况

[root@localhost /]# curl localhost:9200{"name" : "5a262b522bbf","cluster_name" : "docker-cluster","cluster_uuid" : "rGMaCpVXScGaZcv_UtK3gQ","version" : {"number" : "7.6.2","build_flavor" : "default","build_type" : "docker","build_hash" : "ef48eb35cf30adf4db14086e8aabd07ef6fb113f","build_date" : "2020-03-26T06:34:37.794943Z","build_snapshot" : false,"lucene_version" : "8.4.0","minimum_wire_compatibility_version" : "6.8.0","minimum_index_compatibility_version" : "6.0.0-beta1"},"tagline" : "You Know, for Search"}
Docker可视化
什么是portainer?
portainer(线用这个)
docker run -d -p 8088:9000 \--restart=always -v /var/run/docker.sock:/var/run/docker.sock --privileged=true portainer/portainer
-
什么是portainer ?
Docker图形化界面管理工具!提供一个后台面板供我们操作!
docker run -d -p 8088:9000 \--restart=always -v /var/run/docker.sock:/var/run/docker.sock --privileged=true portainer/portainer
外部访问测试:http://ip:8088/
通过它来访问了;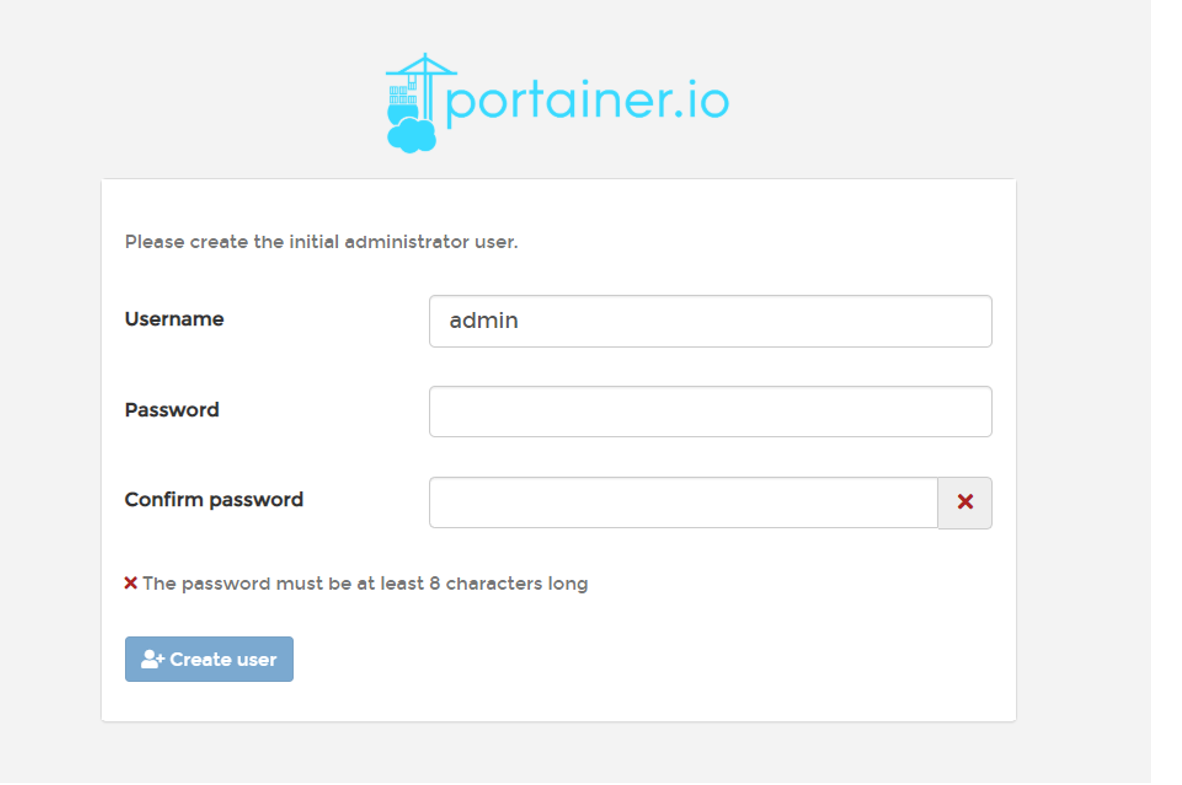
选择本地的: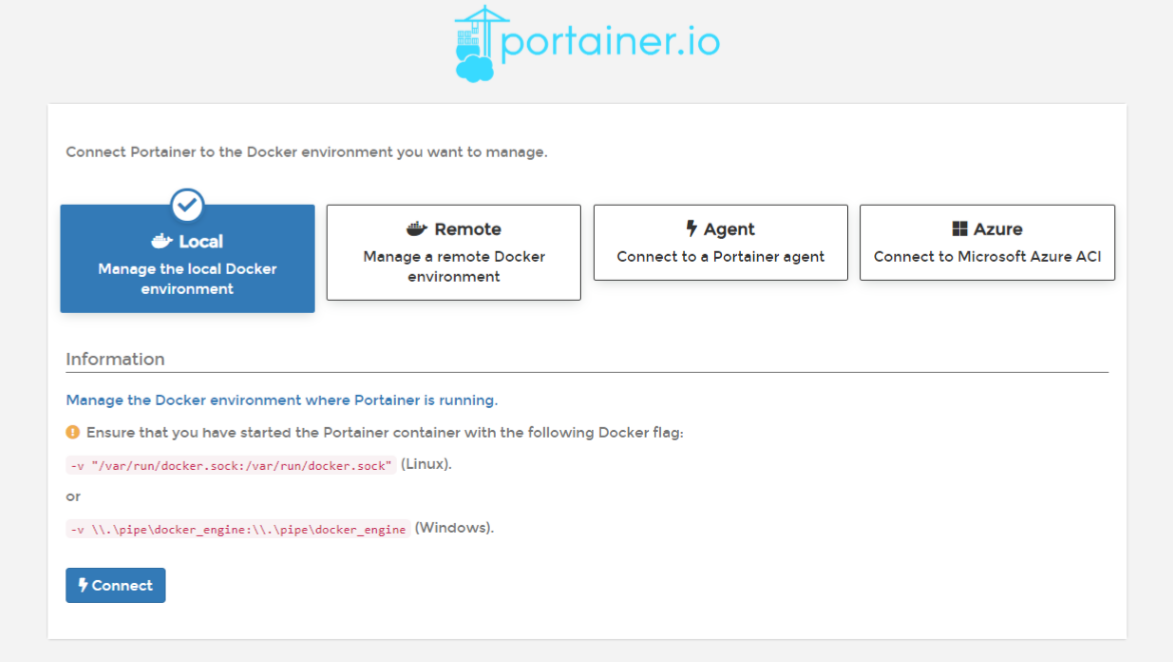
进入之后的面板: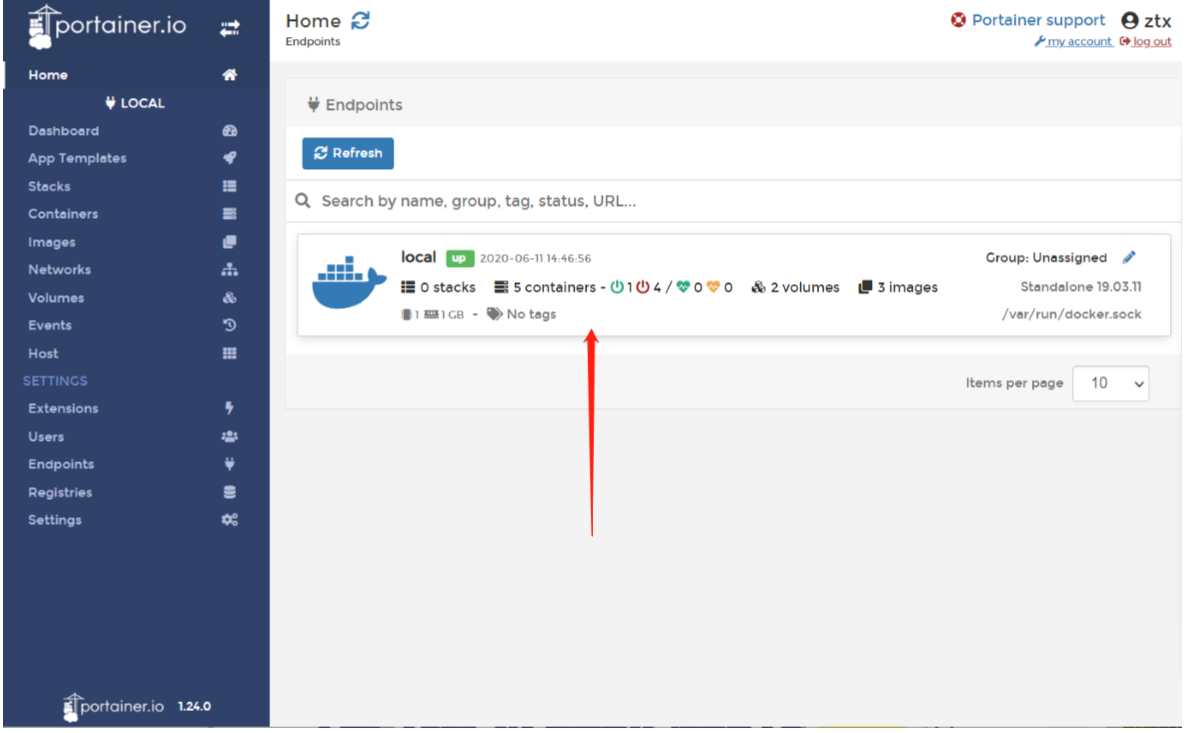

可视化面板我们平时不会使用,大家自己测试玩玩即可!

若有收获,就点个赞吧
0 人点赞
