这是我参与8月更文挑战的第3天,活动详情查看:8月更文挑战
前言:
这一篇我们一起来了解一下和组件相关的其他几个概念,上手开发Angular的项目还是难免遇到了很多的坑,工作之余的话也准备整理一下。希望可以坚持吧,初识Angular,不当之处还请指正。
正文:
组件动效
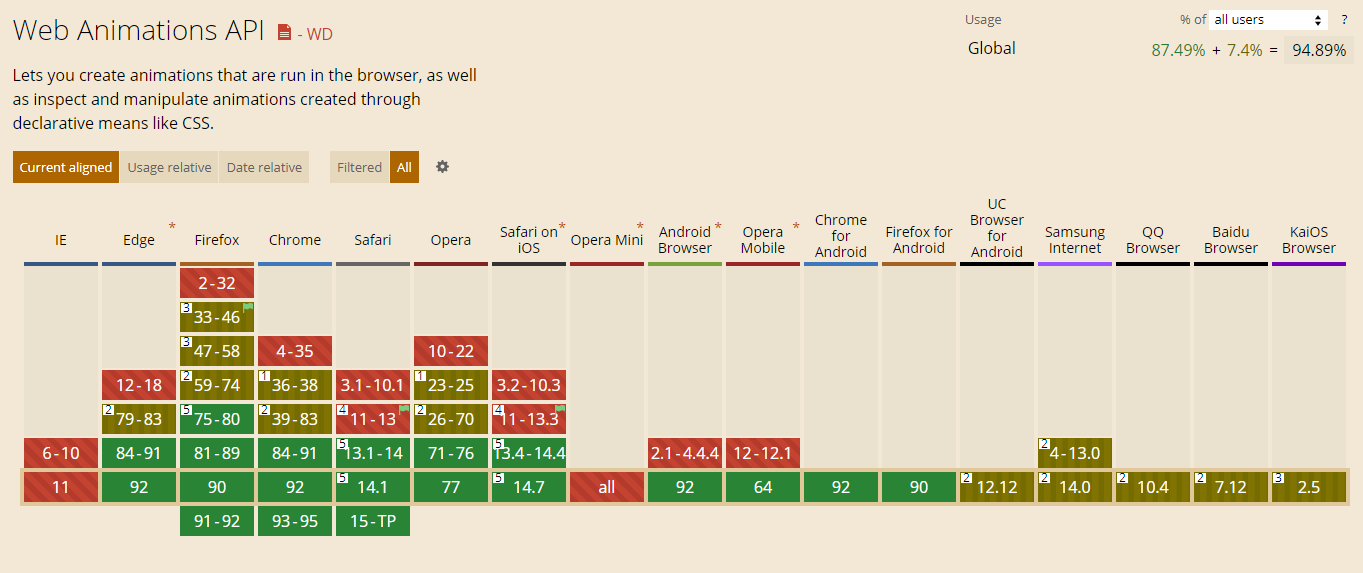
Angular默认的动画模块使用的事Web Animations规范,需要注意兼容问题。 兼容查看
- 按照惯例使用前需要导入对应的模块,我们这里需要用到动画的模块
BrowserAnimationsModule- 模块地址:
@angular/platform-browser/animations - 加入NgModule中:
imports: [ BrowserAnimationsModule ]
- 模块地址:
- 编写动画效果
```typescript
import {
trigger,
style,
transition,
animate,
keyframes,
} from ‘@angular/animations’;
export const flyIn = trigger(‘flyIn’, [
transition(‘void => *’, [
animate(
3000,
keyframes([
]) ), ]), transition(‘* => void’, [ animate( 3000, keyframes([style({ opacity: 0, transform: 'translateX(-100%)', offset: 0 }),style({ opacity: 1, transform: 'translateX(25px)', offset: 0.5 }),style({ opacity: 1, transform: 'translateX(0)', offset: 1.0 }),
]) ), ]), ]);style({ opacity: 1, transform: 'translateX(0)', offset: 0 }),style({ opacity: 1, transform: 'translateX(25px)', offset: 0.5 }),style({ opacity: 0, transform: 'translateX(100%)', offset: 1 }),
1. 代码中有一些似懂非懂的部分我们标注一下,代码中的**星号表示状态不可见**, **void表示任意状态**,这两个状态均为内置1. 进场动画: * => void1. 出厂动画: void => *1. keyframes: 定义我们动画的关键帧3. 将我们编写的动画加到组件上吧1. 在我们的app组件中放置一个div和两个按钮来模拟```html<div [@flyIn]="isIn ? '*' : 'void'">Hello World</div><button (click)="in()">进场动画</button><button (click)="out()">出场动画</button>
- 在app组件中的@Component装饰器中新增动画相关属性:
animations: [flyIn],记得导入我们的flyIn动画的ts文件。 - 增加两个函数来控制分别绑定到我们html中的两个按钮上。 ```typescript import { flyIn } from ‘./flyin’;
@Component({ … animations: [flyIn], }) export class AppComponent { isIn: boolean = true;
// 模拟进场 in() { this.isIn = true; }
// 模拟出场 out() { this.isIn = false; } }
4. 来看一下演示动画<a name="uX0YF"></a>#### 动态组件> 前面两篇涉及到的组件都是通过标签的形式来使用的,当然也是使用频率最多的一种方式,但在Angular中还给我们提供了另外一种组件的使用方式,通过ts代码来动态组合组件1. 动态的组件也需要我们在父组件中提供一块区域: `<div #container></div>`1. 看这块代码像不像React中创建Ref```typescript// 看这块代码像不像React中创建Ref@ViewChild('container', { read: ViewContainerRef, static: true })container!: ViewContainerRef;
定义我们实际需要挂载进来的组件,HW组件我们临时创建一个用来演示
hwComp!: ComponentRef<HelloWorldComponent>;
导入用于解析组件的工厂
constructor(private resolver: ComponentFactoryResolver) {}
解析并挂载组件
ngAfterContentInit(): void {const comp = this.resolver.resolveComponentFactory(HelloWorldComponent);// 将工厂解析后的组件载入到预定义的容器中this.hwComp = this.container.createComponent(comp);}
接下来我们就可以使用hwComp.instance来对加载的组件做操作了, 使用完组件后一定记得hwComp.destroy()进行销毁
视图封视图封装模式
视图封装模式
通过改变组件装饰器的
encapsulation属性可以单独控制每个组件的封装模式
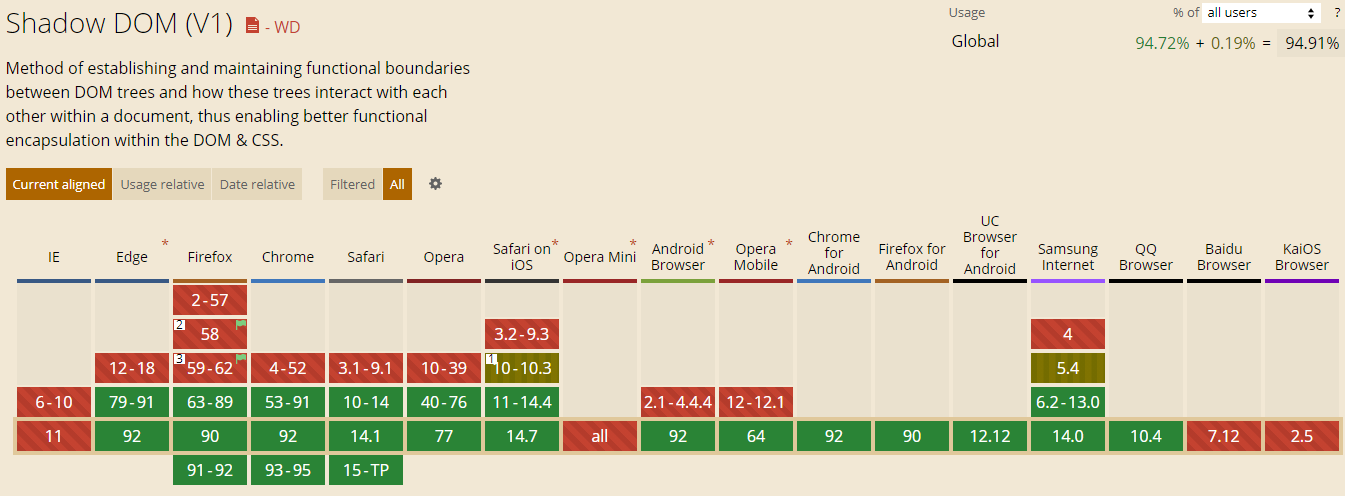
- ShadowDom: 使用浏览器原生Shadow DOM来实现,模式特点是不受全局样式影响,不影响其他组件样式

若有收获,就点个赞吧
0 人点赞
