demo16源码地址、
新建index.js,math.js,string.js
// index.jsimport * as math from './math'import * as string from './string'export default{math,string}// math.jsexport function add(a,b) {return a+b;}export function multiply(a,b) {return a*b;}export function division(a,b) {return a/b;}// string.jsexport function join(a,b) {return a + '' + b;}
代码写完,使用webpack打包,安装webpack,-D表示—save -dev 的缩写
npm i webpack webpack-cli -D
修改package.json
{"name": "library","version": "1.0.0","description": "","main": "index.js","scripts": {"build": "webpack"},"keywords": [],"author": "xh","license": "MIT","devDependencies": {"webpack": "^4.29.6","webpack-cli": "^3.3.0"}}
"license": "MIT"表示完全开源的协议,name 表示你的组件库的名称
新建webpack.config.js配置
const path = require("path");module.export = {mode: "production",entry: "./src/index.js",output: {path: path.resolve(__dirname,'dist'),filename: "library.js"}}
运行打包命令,生成打包后的library.js文件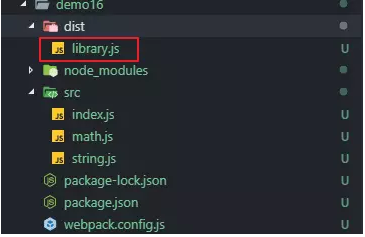
这个文件就可以在项目中用了,但是我们要做的是一个开源库,是给别人用的,别人也可能这么用:
// ES moduleimport library from 'library'// CommonJSconst library = require('library')// AMDrequire(['library'], function() {})
我们要支持三种形式的使用,可以在webpack里配置,加上 libraryTarget 参数
const path = require('path')module.exports = {mode: 'production',entry: './src/index.js',output: {path: path.resolve(__dirname, 'dist'),filename: 'library.js',libraryTarget: 'umd'}}
当然,如果你希望用户还可以使用 script 标签的形式引入
用户希望可以通过 library 全局变量来使用,比如 library.math 要怎么办
可以再配置一个参数,叫 library
const path = require('path')module.exports = {mode: 'production',entry: './src/index.js',output: {path: path.resolve(__dirname, 'dist'),filename: 'library.js',library: 'root', // root 可以随便更换,不是固定值libraryTarget: 'umd'}}
umd 是支持前面三种语法,但是不支持全局变量这种用法,如果配置了 library,打包之后就会将代码挂载到 root 这个全局变量上,通过 script 来引入 library,现在来打包一下,打包完之后来测试用 script 标签来引入我们写的库
在 dist 目录下新建个 index.html 文件,并打开页面
<!DOCTYPE html><html lang="en"><head><meta charset="UTF-8" /><meta name="viewport" content="width=device-width, initial-scale=1.0" /><meta http-equiv="X-UA-Compatible" content="ie=edge" /><title>自定义库</title><script src="./library.js"></script></head><body></body></html>
在控制台中输入 root,回车,就能看到我们前面封装的函数了
libraryTarget: 'umd' 如果将 umd 改为 this
再去打包,在控制台输入 this.root** 也能看到效果
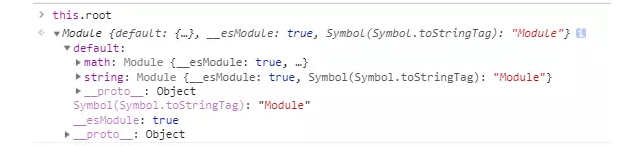
libraryTarget 也可以填 window,如果在 node 环境下也可以使用 global
不过一般我们都是使用 umd**
还有一种情况要注意,我们现在写的 string.js 我觉得写的不好,lodash 写的更好,我要引入这个第三方库,来代替我写的一些功能
npm install lodash
// string.js
import _ from 'lodash'

export function join(a, b) {
  return _.join([a, b], ' ')
}
重新打包,体积为 70kb,因为我们也把 lodash 也打包进去了
别人要使用我们的库的话,需要这样 import library from 'library',也许别人也会用到 lodash 库,结果变成了这样:
import _ from 'lodash'
import library from 'library'
最终用户的代码中就会存在两份 lodash 的代码,这种情况就要再去更改一下我们的 webpack 配置
const path = require('path')

module.exports = {
  mode: 'production',
  entry: './src/index.js',
  externals: ['lodash'],
  output: {
    path: path.resolve(__dirname, 'dist'),
    filename: 'library.js',
    library: 'root',
    libraryTarget: 'umd'
  }
}
externals 会在打包的过程中,如果遇到了 lodash 这个库,就不会打包进去,可以写成数组形式也可以是字符串,更改完后再次打包
可以发现我们库里使用的 lodash 并没有被打包进去,体积只有 1kb
这个时候别人再次使用我们的 library 这个库,如果不引入 lodash,则会失败,别人在使用 library 之前要先引入 lodash
如果改为 externals: 'lodash',则使用的时候为,import lodash from lodash,而不能用 下划线来代替 lodash, `import from lodash`
如果要让别人使用你的库,其实就是使用你打包后的文件,需要先在 package.json,将 main: index.js 改为 main: ./dist/library.js,通过 npm 发布之前,你要确保你的库的 name 不会和别人上线的 name 冲突,改一个有特点的 name,来确保能发布成功,如 library-xh-2019,感兴趣的可以自己去研究一下如何通过 npm 发布
出处。
{
  "name": "library-xh-2019",
  "version": "1.0.0",
  "description": "",
  "main": "./dist/library.js",
  "scripts": {
    "build": "webpack"
  },
  "keywords": [],
  "author": "xh",
  "license": "MIT",
  "devDependencies": {
    "webpack": "^4.29.6",
    "webpack-cli": "^3.3.0"
  },
  "dependencies": {
    "lodash": "^4.17.11"
  }
}

若有收获,就点个赞吧
0 人点赞


