[Tutorial] Undetected Cheat Engine + Driver | 2022 | Bypass Anticheats (BE / EAC)
Preface:
Every now and then I come across someone asking about how to use Cheat Engine in games with anticheats, such as Easy Anticheat or Battle Eye.
Since most of these information are spread over numerous tutorials on the internet, I thought I’d summarize everything I know about it in one comprehensive and unambiguous tutorial here on Unknowncheats for novices.
This very simple step by step tutorial will cover basically everything, how to download, compile and modify cheat engine and its driver & hypervisor to bypass anticheats.
First of all I would like to note that for those of you with some experience, this tutorial probably won’t offer any new information.
But for “newbies” it might be a little assistance to get started with something.
Information:
With the methods and “bypasses” shown in this tutorial, Cheat Engine will no longer be blocked by most anticheats.
You will be able to read & write to memory, debug and pointerscan, basically do everything as if no anticheat was running.
However, this does not mean that your Cheat Engine will be completely undetectable if you follow this tutorial.
Be aware that there is always a risk of getting banned with Cheat Engine no matter how much you modify, so If possible get a working spoofer ready and always use an alt account when using it!
Tutorial Video:
In addition to the guide, I thought I’d make a simple video that you can follow step by step to make it easier for beginners.
Instructions:
Quote:
| Step 1: Download Cheat Engine Source
Download the Cheat Engine Source Code on this website: https://github.com/cheat-engine/cheat-engine
Just click on the green “Code” button and click on “Download Zip” in order to download the latest Source Code.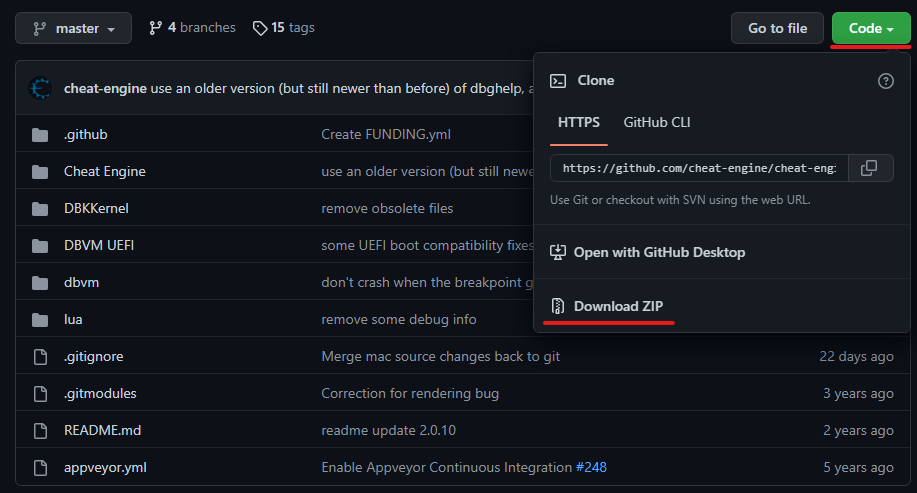 |
| —- |
|
| —- |
Quote:
| Step 2: Download Lazarus Compiler
In order to compile an .exe file out of the Cheat Engine source code you need Lazarus.
You can download it here: https://www.lazarus-ide.org/index.php?page=downloads
Choose the “Windows (32 Bits) Add ons”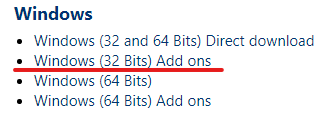
After that download and install the “lazarus-2.2.2-fpc-3.2.2-win32.exe” version first.
Then download and install the cross plugin “lazarus-2.2.2-fpc-3.2.2-cross-x86_64-win64-win32.exe”.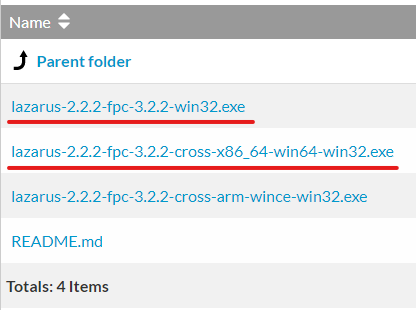 |
| —- |
|
| —- |
Quote:
| Step 3: Change Driver Name
Many Anticheats block the Cheat Engine Driver from running just because of a blacklisted driver name “dbk64.sys” you will have to change the driver name to something else before we compile Cheat Engine.
In order to do that open up the downloaded Cheat Engine Source Code folder and go to “Cheat Engine -> dbk32” where you will find the “DBK32function.pas” file.
Open this file with any Editor you want for example Notepad++.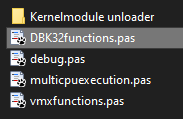
Inside this file search for the string “dbk64.sys” and you will find the following: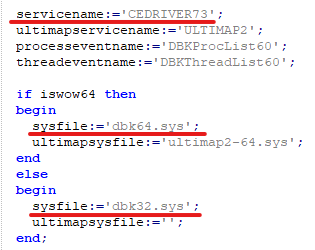
Change the servicename to something else, also change the sysfile for both dbk64 and dbk32 to something else.
For example “mynewdriver64.sys” and “mynewdriver32.sys”.
After that save the file and close it. |
| —- |
Quote:
| Step 4: Modify & Compile Cheat Engine
Go back inside the “Cheat Engine” folder and scroll down until you find the “cheatengine.lpi” file.
Just open it with double click and Lazarus should open up.
On the left side you should see the “Object Inspector” window and inside there the “Caption” named “Cheat Engine”.
Change it to something else you want (example: Mynew Engine).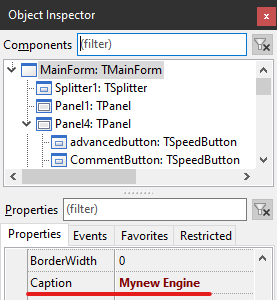
After that click on Project -> Project Options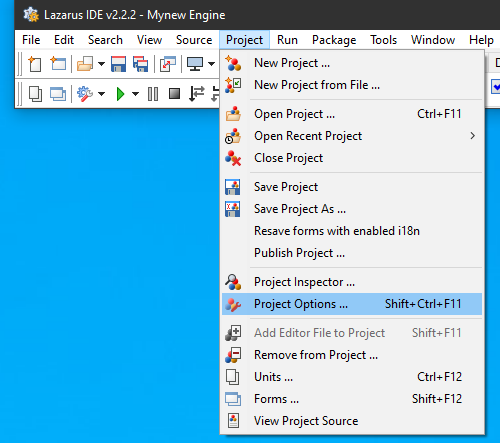
A new Window will open up, go to Project Options -> Application.
Change the Title which is named “Cheat Engine Version“ to something else.
Also click on “Clear Icon”, you can Load a new Icon if you want.
Additionally change the “Name” “Cheat Engine” to something else.
Then go to the “Version Info” tab and change the “CompanyName” and “FileDescription” to something else.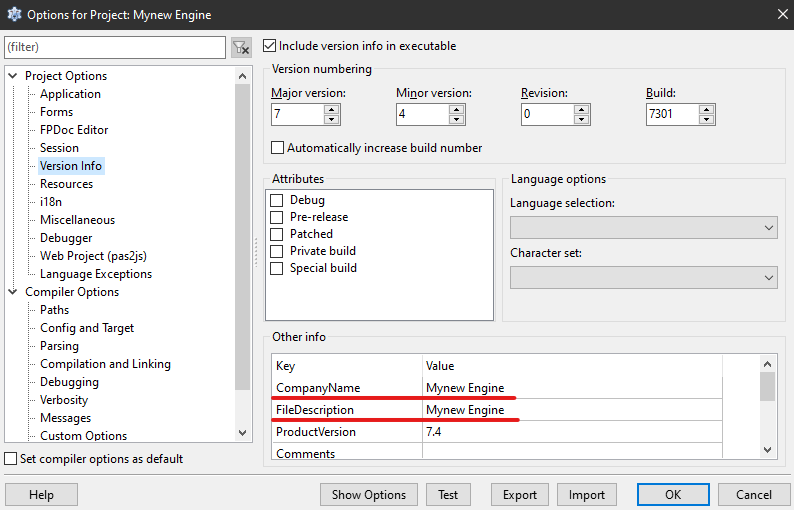
Next go to the “Compiler Options -> Paths” and select “Release 32-Bit” as “Build modes”.
Replace “cheatengine” inside “Target file name (-0):” to something else.
Then select “Release 64-Bit” as Build modes and also replace the “cheatengine” string.
Do the same for the “Release 64-Bit O4 AVX2” Build mode.
Then just press on the “OK” button.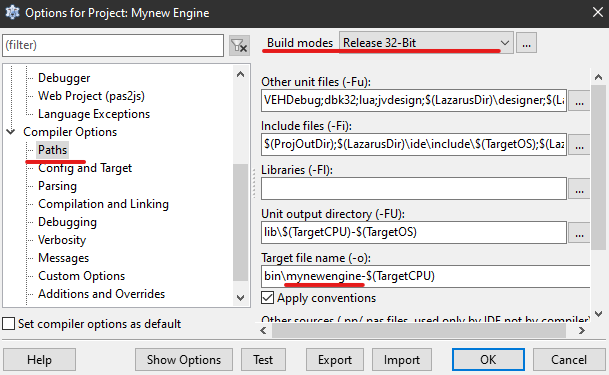
To compile Cheat Engine go to “Run” -> “Compile many Modes”.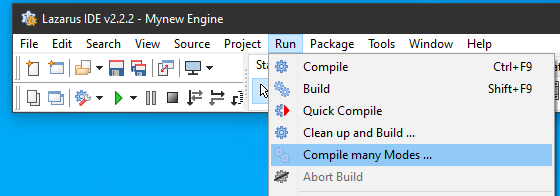
Check “Release 64-Bit” and “Release 64-Bit O4 AVX2” to compile these both versions.
You can also check “Release 32-Bit” if prefered, but this sometimes causes error messages, so if that doesn’t work just keep the 32 Bit version unchecked.
Then just press “OK” and Cheat Engine will compile.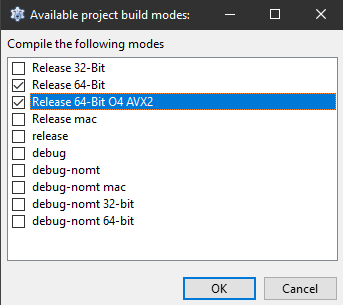 |
| —- |
|
| —- |
Quote:
| Step 5: Change Cheat Engine Strings with HxD
After you compiled Cheat Engine you will be able to find it inside “Cheat Engine” -> “bin”.
If you open it you will see that all the “Cheat Engine” strings are still named “Cheat Engine”.
Since some Anticheats might detect the string “Cheat Engine” by signature you will have to change that string to something else.
To do that you will need to download and install the program “HxD” which you can download here:
https://mh-nexus.de/de/downloads.php?product=HxD20
Just open HxD and drag and drop your compiled CheatEngine.exe or whatever name you chose inside HxD.
Then click on “Search” -> “Replace”.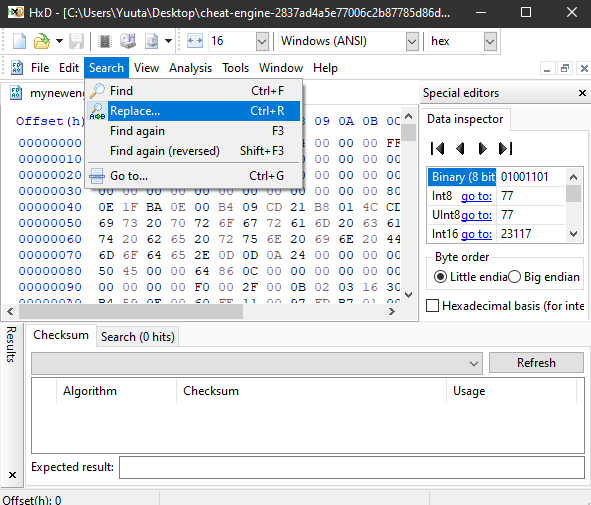
First make sure that “All” and “Case sensitive” is checked.
Inside the “Search for:” field enter “Cheat Engine”.
Inside the “Replace with:” field enter a different Name that you want.
Make sure that the name you want to replace “Cheat Engine” with has the same amount of letters and same amount of spaces.
“Cheat Engine” has 11 letters and 1 space in between.
For example you could chose “Mynew Engine” since it also has 11 letters and 1 space in between.
Then click on “Replace all”.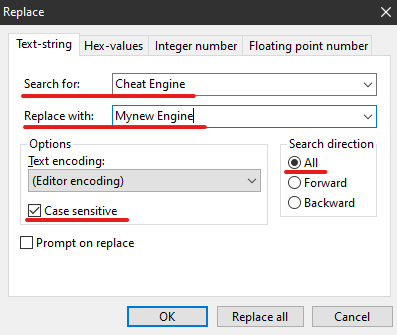
Now do that again for the strings:
“cheat engine” and in my example replace it with “mynew engine”
“cheatengine” and in my example replace it with “mynewengine”
“CheatEngine” and in my example replace it with “MynewEngine”
Also do it with all strings again for the “Unicode (UTF-16 little endian)” option in “Text encoding:”.
After that click on “File” -> “Save” and close HxD.
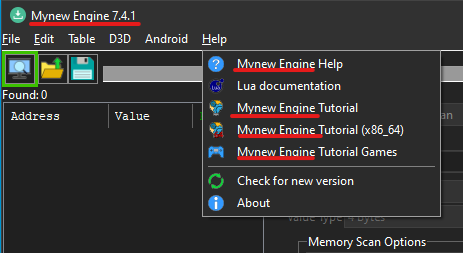
Now if you open up the modified Cheat Engine you should see that all “Cheat Engine” strings have been replaced with the name you chose.
 |
| —- |
|
| —- |
Quote:
| Step 6: VMProtect
In order to make Cheat Engine a slight bit more secure against some Signature Checks you can use “VMProtect”.
Iirc it also makes Cheat Engine “undetected” against the FiveM Anticheat.
“VMProtect” is a paid software but if you search around on Google you might find it for free ![[Tutorial] Undetected Cheat Engine Driver | 2022 | Bypass Anticheats (BE / EAC) - 图16](/uploads/projects/helloppm@index/224f83780575dcee889ff9fa3464a727.gif) .
.
If you downloaded and installed it just open it up and drag & drop cheat engine inside the VMProtect program.
then click on “Add Function” and click on “EntryPoint”.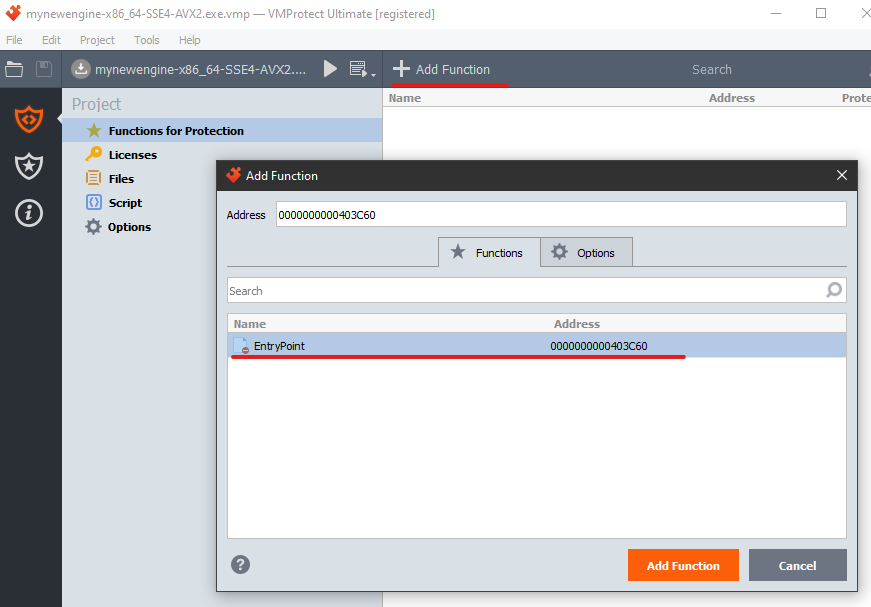
Now switch to the “Options” tab and double click on “Virtualization”.
Do it again if needed, until it says “Ultra (Mutation + Virtualization)”.
Then just click on “Add Function”.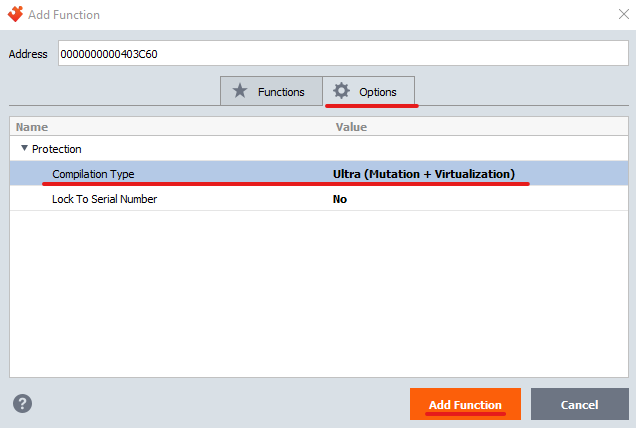
Inside the “Options” tab make sure the following marked features are enabled or disabled the same as in my Screenshot below.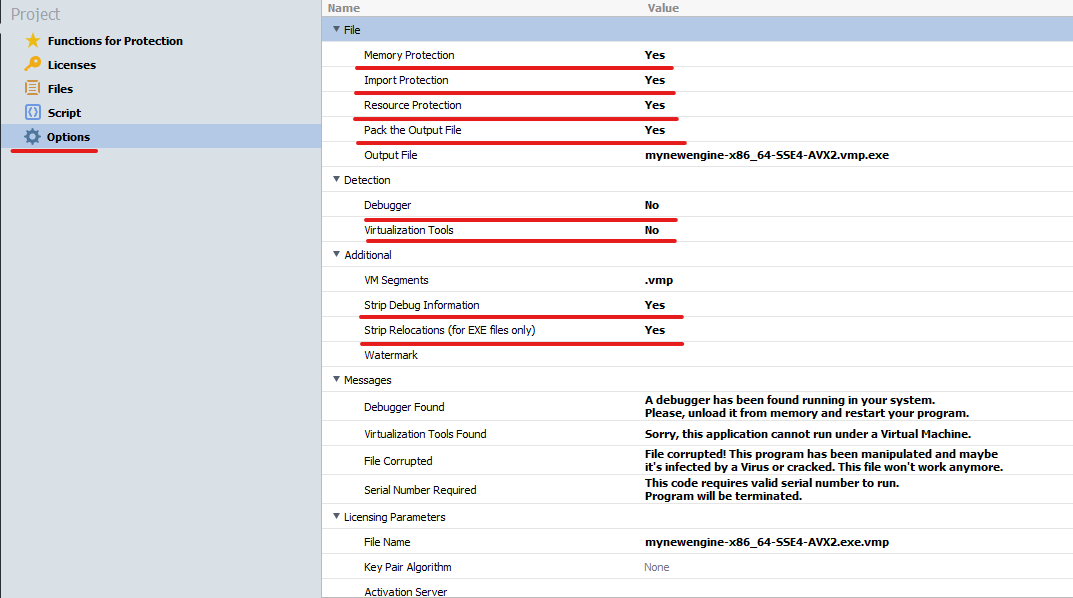
Then click on the arrow to start compiling.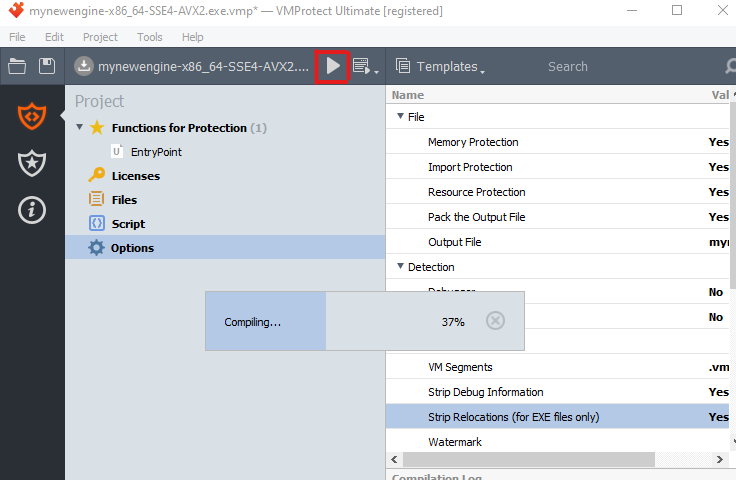
After it finished compiling you should find a file named “thenameyouchose.vmp.exe” inside your “Cheat Engine” -> “bin” folder.
This file is the Vmprotected Cheat Engine which might be a bit more secure against some Anticheats.
Use this one instead if it is working for you. |
| —- |
Quote:
| Step 7: String Lua Script
If you want to change all the strings inside Cheat Engine for maximum security against signature checks (which is not really needed) you could use this Lua Script.
Just open up Cheat Engine and click on “Memory View”, then go to “Tools” -> “Lua Engine”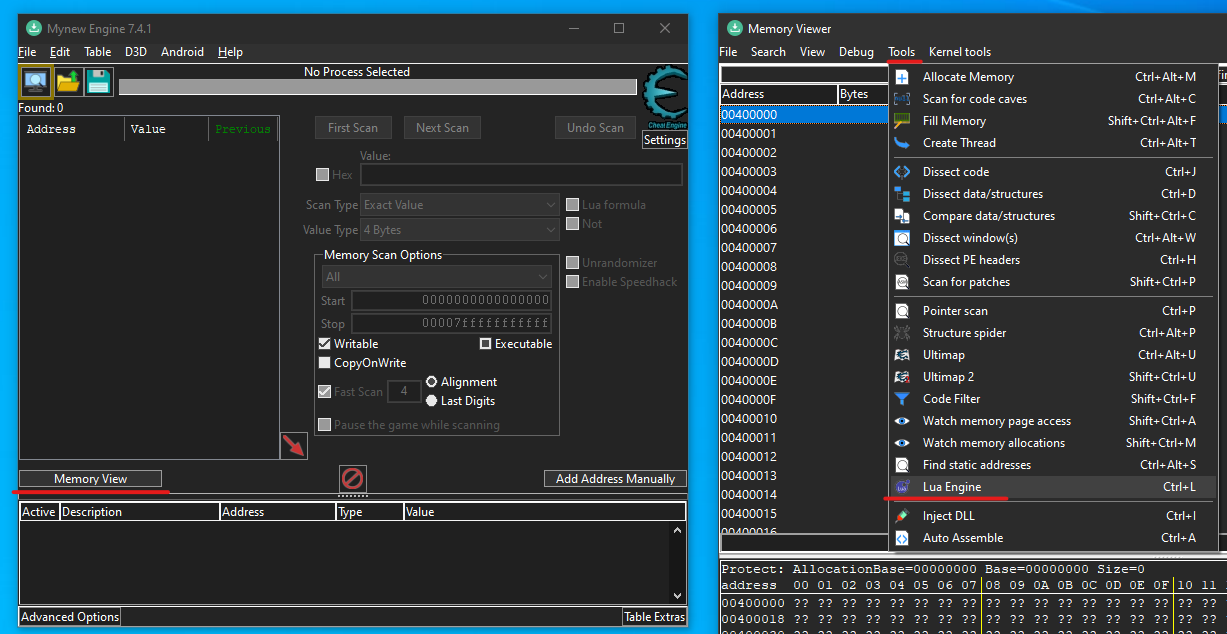
Then Copy the following Code:
Code:
function renameComponents(c)
local i
if c.Component then
for i=0,c.ComponentCount-1 do
renameComponents(c.Component[i])
end
end
if c.Caption then
c.Caption=’WTF’
end
end
for i=0,getFormCount()-1 do
local form = getForm(i)
for j=0,form.ControlCount-1 do
renameComponents(form)
end
form.Caption=’Bla’
end
registerFormAddNotification(function(f)
f.registerCreateCallback(function(frm)
renameComponents(f)
end)
end)
Paste it inside the bottom Inputfield and press “Execute”.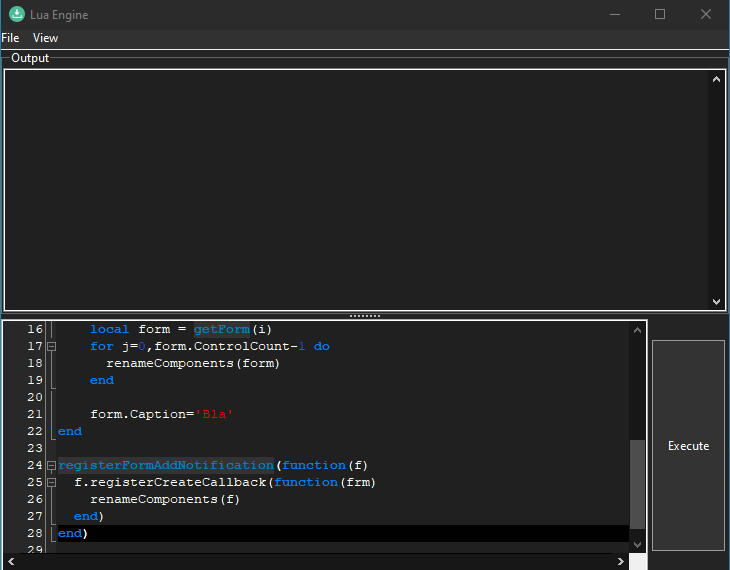
Now most Strings in Cheat Engine will be replaced with “WTF”.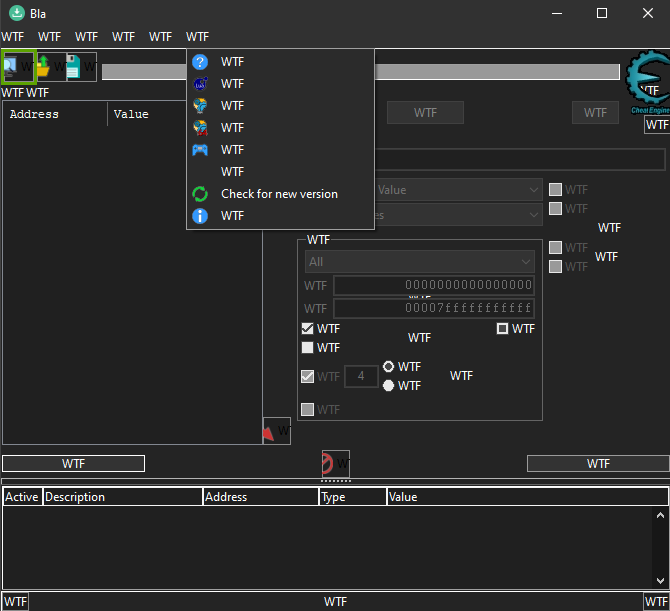 |
| —- |
|
| —- |
Quote:
| Step 8: Install Visual Studio 2019 + SDK + WDK
To read and write to the memory from games with kernel or driver anticheat we also need at least a driver.
What is a “driver” you may ask, well here is a “simple” explanation:
Suppose you need to write a tool that has access to core operating system data structures (games with anticheat), which can be accessed only by code running in kernel mode.
You can do that by splitting the tool into two components.
The first component (Cheat Engine) runs in user mode and presents the user interface.
The second component (Cheat Engine Driver) runs in kernel mode and has access to the core operating system data.
The component that runs in user mode is called an application, and the component that runs in kernel mode is called a “software driver”.
This basically means that we will use a driver to read and write from memory since it has the same access level as the kernel anticheat.
Using just Cheat Engine won’t work because it only has usermode level access and gets blocked by the Anticheat.
Since Cheat Engine has a Driver that we can compile, we will just use this one.
To build this driver we need Visual Studio which is like “Lazarus” a compiler that creates a file from the source code.
You can download Visual Studio 2019 on this website: https://docs.microsoft.com/de-de/vis…/release-notes
Just click on the blue “Download Community 2019” button to download it.
Then install it until you see this window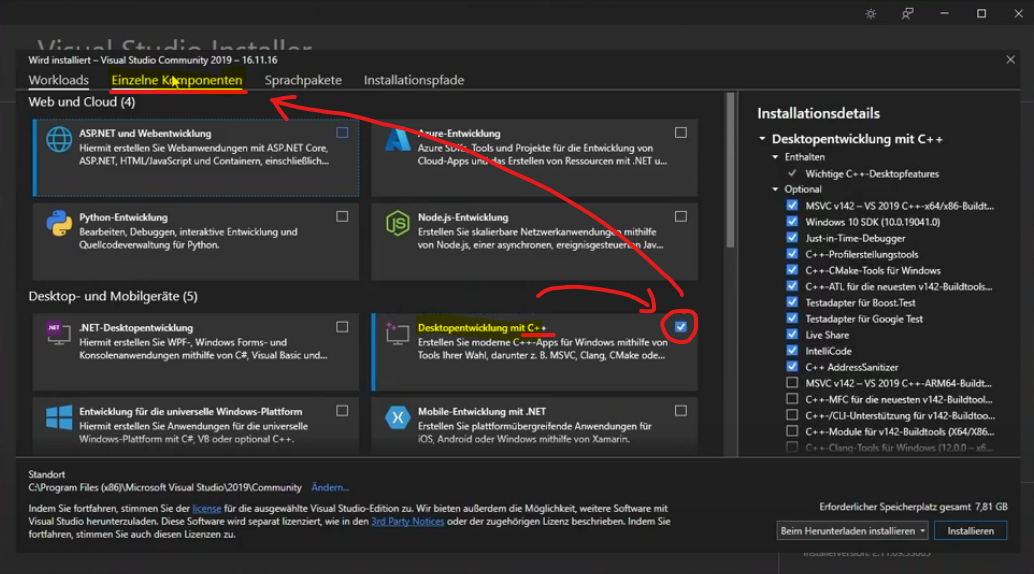
Check the “Desktopdevelopment with C++” checkbox and click on “Individual Components”.
Inside the Filter Input enter “142 x64”.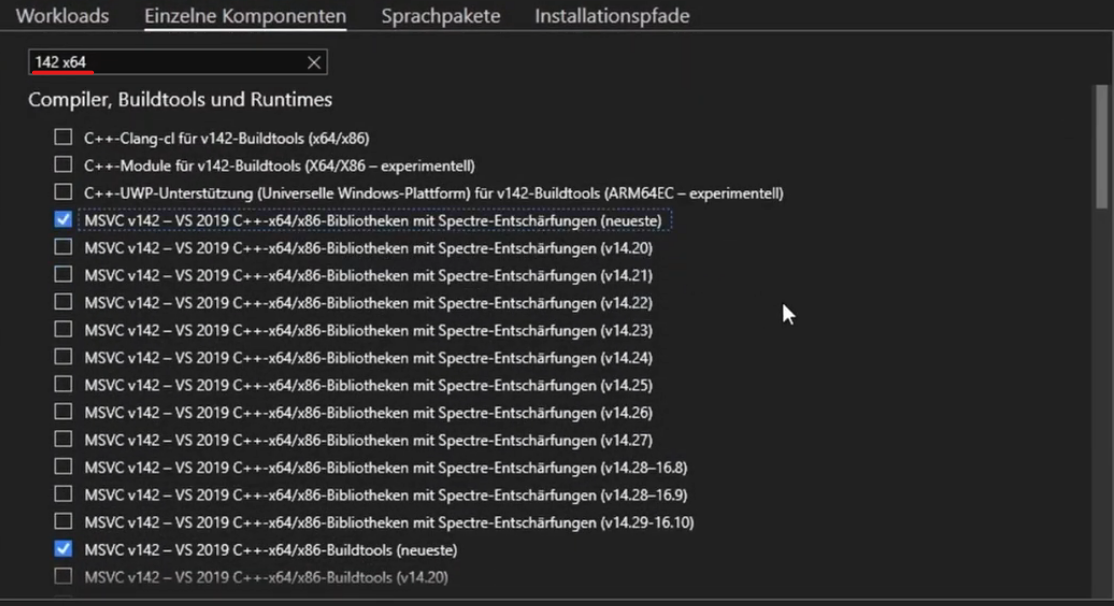
Now check the following checkboxes:
- MSVC v142 - VS 2019 C++ x64/x86 Spectre-mitigated libs (latest)
- MSVC v142 - VS 2019 C++ x64/x86 build tools (latest)
- C++ ATL for latest v142 build tools (x86 & x64)
- C++ ATL for latest v142 build tools with Spectre Mitigations (x86 & x64)
- C++ MFC for latest v142 build tools with Spectre Mitigations (x86 & x64)
After that click on the bottom right “Install” button and wait until Visual Studio finished installing.
Once it finished go to this website: https://developer.microsoft.com/de-d…s/sdk-archive/
Scroll down until under Windows 10 you find “Windows 10 SDK, version 2004 (10.0.19041.0) and click on the blue “Install SDK” right next to it.
Then open it up and wait until the SDK finished installing.
Now go to this website: https://docs.microsoft.com/de-de/win…-wdk-downloads
Also scroll down until you find “Step 2: Install the WDK” and click on the blue “WDK for Windows 10, version 2004”.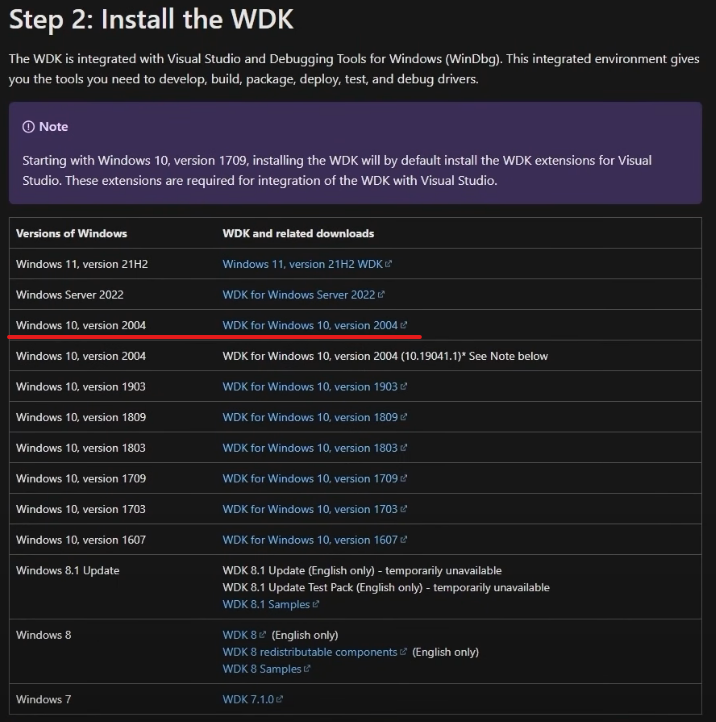
Then install it, if everything worked you should get this message at the end.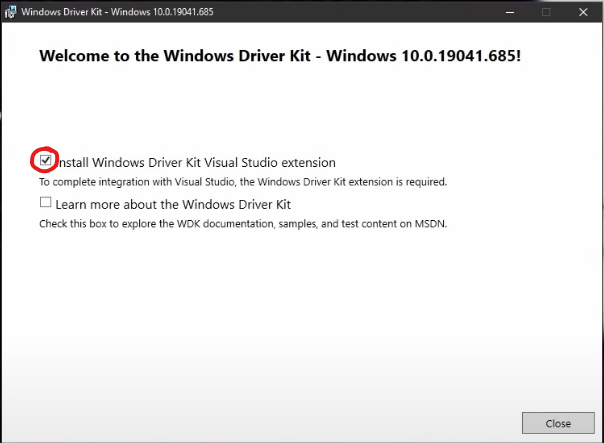
Make sure that “Install Windows Driver kit Visual Studio extension” is checked and click on “close”.
After that the “VSIX Installer” should open up, make sure to press Install.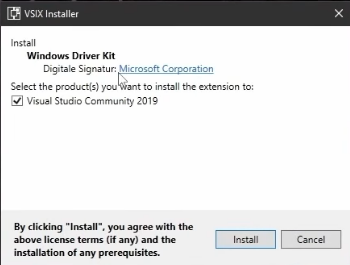
| | —- |
Quote:
| Step 9: Modify & Compile CE Driver (DBK)
To compile the Cheat Engine Driver now go inside the “DBKKernel” folder in your downloaded “Cheat Engine” folder.
Inside there you will find the “DBKKernel.sln” file which you can open up with double click.
Once Visual Studio opened up you will see the Project Explorer on the right side.
Click on the “DBKKernel” arrow -> “Driver Files” and double click the DBK64.inf file.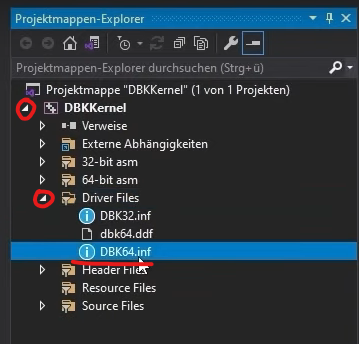
This text should be visible now
Inside here you have to change the Cheat Engine driver name from “DBK64” to the driver name you chose in Step 3.
To do that hit CTRL + H to open up the replace window.
Now inside the first field enter “DBK64” and inside the second field enter the driver name you chose (without the .sys at the end).
then press on the button which is red circled on the image below to replace all DBK strings.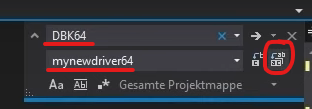
Now all the strings which were “DBK64” should be renamed to your driver name.
Also change the “ManufacturerName=”Cheat Engine”” to your driver name.
Then rightclick on the “DBKKernel” -> “Options” and inside the new window change it to “Release without sig” and “x64”.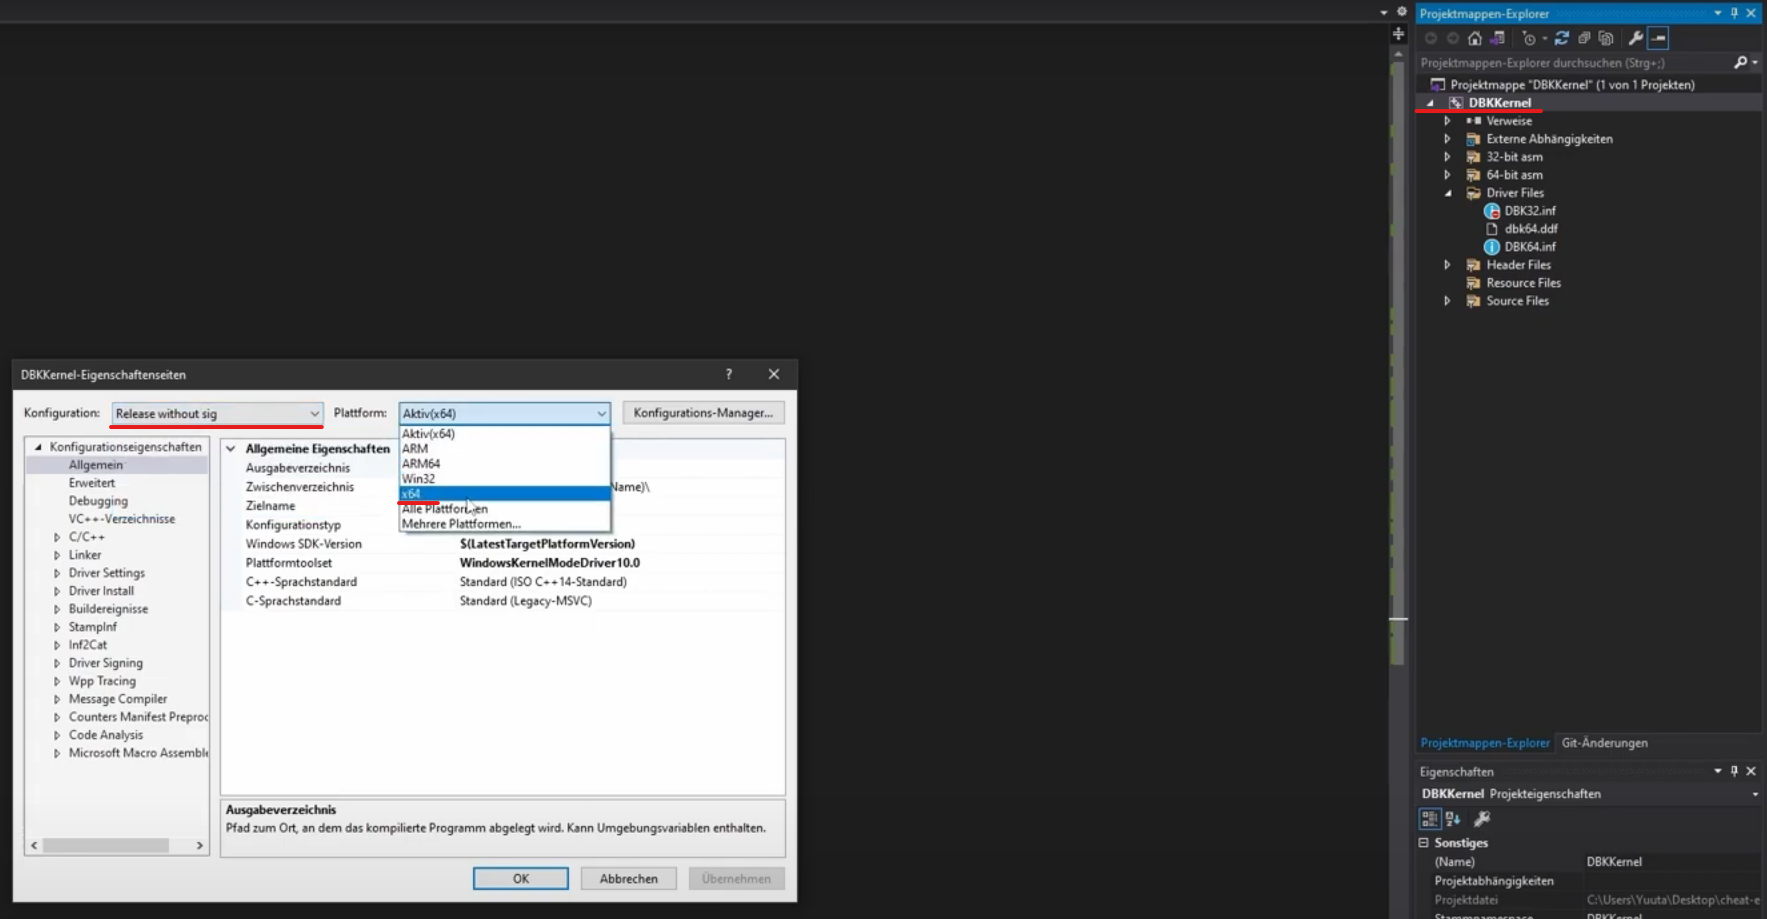
Inside that window change the “Targetname” from “DBK64” to your driver name.
After that go to “Buildevents” -> “Postbuildevents” and remove all the text from the “Commandline”, you can just mark it and delete it.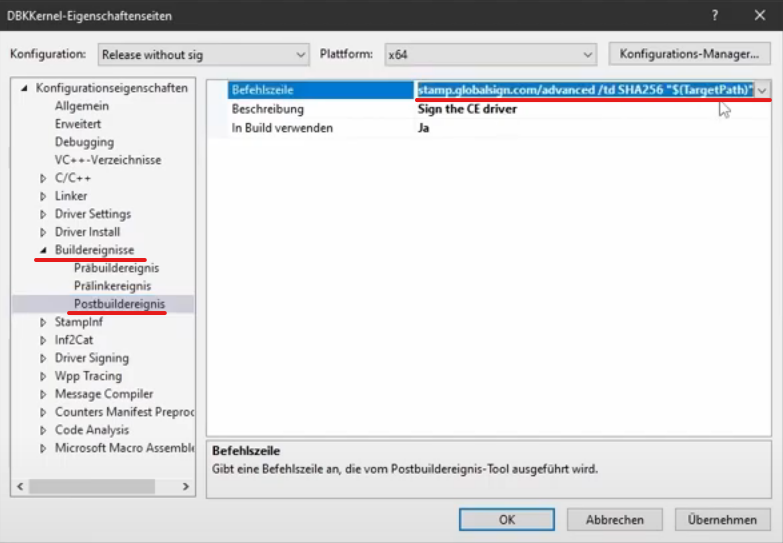
Now go to “Driver Signing” -> “General” and click on the arrow in “Test Certificate” -> click on “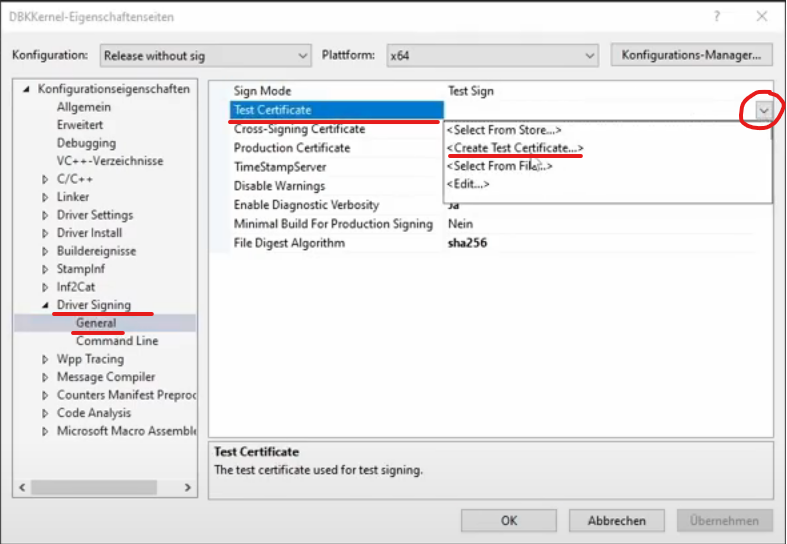
Then hit the “Apply” button.
At the top bar change it to “Release without sig” and “x64”.
Now you can compile the Driver.
Click on “Build” -> “Build Solution”.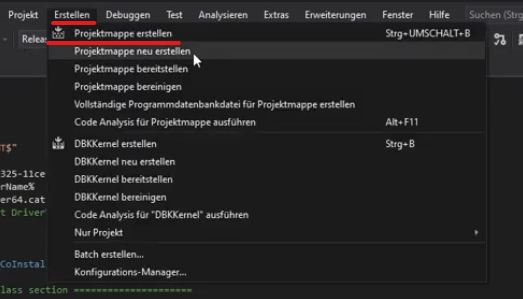
If you go inside your “Cheat Engine” folder -> “bin” you should find your driver file now which is named “yourdrivername.sys”
| | —- |
Quote:
| Step 10: Bypass Test Sign Mode (DSE / EFIGUARD)
Well now you have your cheat engine driver compiled.
But to be able to start that driver without any issues you have to sign the driver with a certificate which normally costs about 100$.
Since you don’t have 100$ you would have to disable the “Test Sign Mode” in the boot options to be able to run drivers without certificates.
However, this will prevent you from launching games with anticheats.
Most anticheats don’t allow to run games with “Test Sign Mode” disabled.
Accordingly, you are now in a quandary.
Either you can’t launch the game, or you can’t launch the driver.
So you have to find a way to start both, the driver and the game, and hey, there is one.
It is called “Efiguard”.
Simply explained, You boot from an USB using Efiguard which then allows you to disable this “Test Sign mode” while windows is active, then you can start the driver, then you can re-enable the “Test Sign mode” and start the game without issues.
You can download Efiguard here: https://github.com/Mattiwatti/EfiGua…ses/tag/v1.2.1
Just click on the blue “EfiGuard-v1.2.1.zip”.
Now get a USB stick and format it with FAT / FAT32.
To do that go to your Desktop and Press Windows + X.
A new list should open up, click on “DiskManagement”.
Before you continue make sure that you backup all the data on your USB since we are going to delete everything on that USB.
Then right click on the Volume of your USB and click on “Delete Volume”.
The volume color should turn black, right click on it again and click on “new simple volume”.
Inside the new window click “Next” until you get here.
Change it to either “FAT” or “FAT32” and press “next” and then “finish”.
Now open up your USB and Drag & Drop the “EFI” folder which is inside the downloaded “Efiguard” folder into your USB stick.
Then open up the “EFI” folder on your usb stick -> “Boot” and delete the “Loader.config.efi” file.
Rename the “Loader.efi” file to “bootx64.efi”.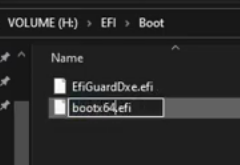
Okay now your Boot USB is ready.
Restart your computer now and Boot from your USB stick.
If you don’t know how to do that, well just google it https://bfy.tw/TF4i
.
Most of the time you can get into your Boot menu with spam clicking “F1” / “F2” / “F11” / “F12” / “ESC” while starting up your computer.
While booting from the USB you will see this green Message here which is normal, just wait until it finishes, it will normally start up your windows after that.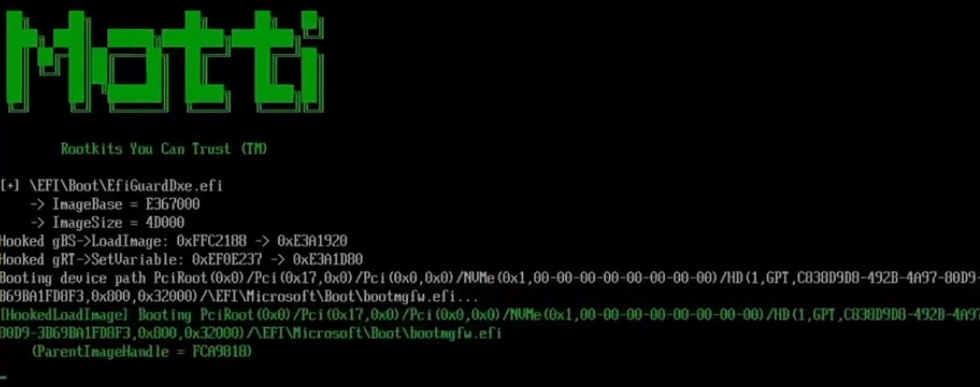
Now you are able to disable “Driver Signature Enforcement” which you have to do in order to start unsigned drivers.
To do that open up CMD with Adminpermissions and navigate inside the downloaded “Efiguard” folder where also the “EfiDSEFix.exe” file is.
You can do that if you copy the folder path and enter “cd folderpath” inside cmd.
Also in CMD enter “efidsefix.exe -d” to disable Driver Signature Enforcement.
Then don’t close the CMD window yet, leave it open!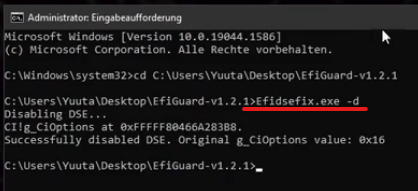
Now start your modified Cheat Engine.
Inside Cheat Engine go to “Edit” -> “Settings” -> “Debugger Options” and check “Use kernelmode debugger (Requires DBVM)”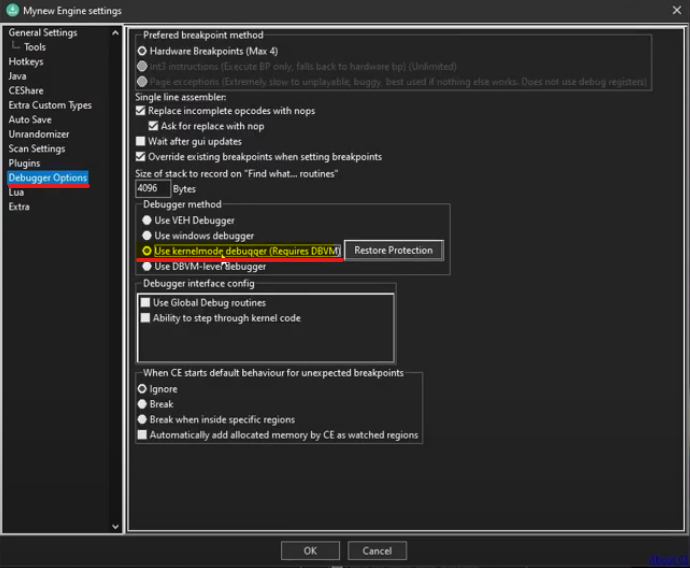
Then go to “Extra” and check all 4 checkboxes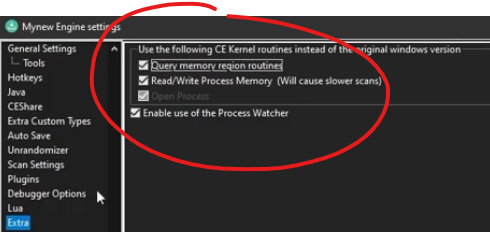
If you press the bottom “OK” button now, in the top left screen you should see “DBK64 LOADED”.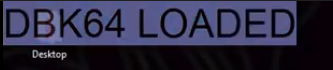
Great, your modified Cheat Engine Driver is running now.
BUT before you start any game now you have to (re)enable Driver Signature Enforcement again, otherwise you will get an error Message “Test Sign Mode is not supported” from the Anticheat.
Go back inside CMD and enter “efidsefix.exe -e” to enable DSE again.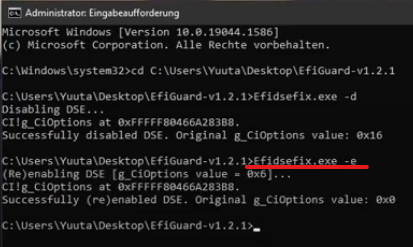
Now you should be able to open up games with anticheats, while your Driver is still running, which also means, hey you can read and write to games memory now while the Anticheat is running.
But there are still 2 isues now.
The first issue is that you can’t see the module names yet, so you wouldn’t be able to go to baseaddress + offset.
And the second issue is that you won’t be able to debug, or find out what is accessing / writing to an address without the Cheat Engine DBVM Hypervisor.
I will show you in the next 2 steps how to fix that.
| | —- |
Quote:
| Step 11: Module Lua Script
With some anticheats you won’t be able to read the module names of the game just using the DBK Driver.
But there is a fix for that, thanks to CompiledCode for his Lua Script: https://www.unknowncheats.me/forum/3417611-post6.html
Just copy his code and open up Cheat Engine.
Then click on “Memory View” and inside the Memory View window go to “Tools” -> “Lua Engine”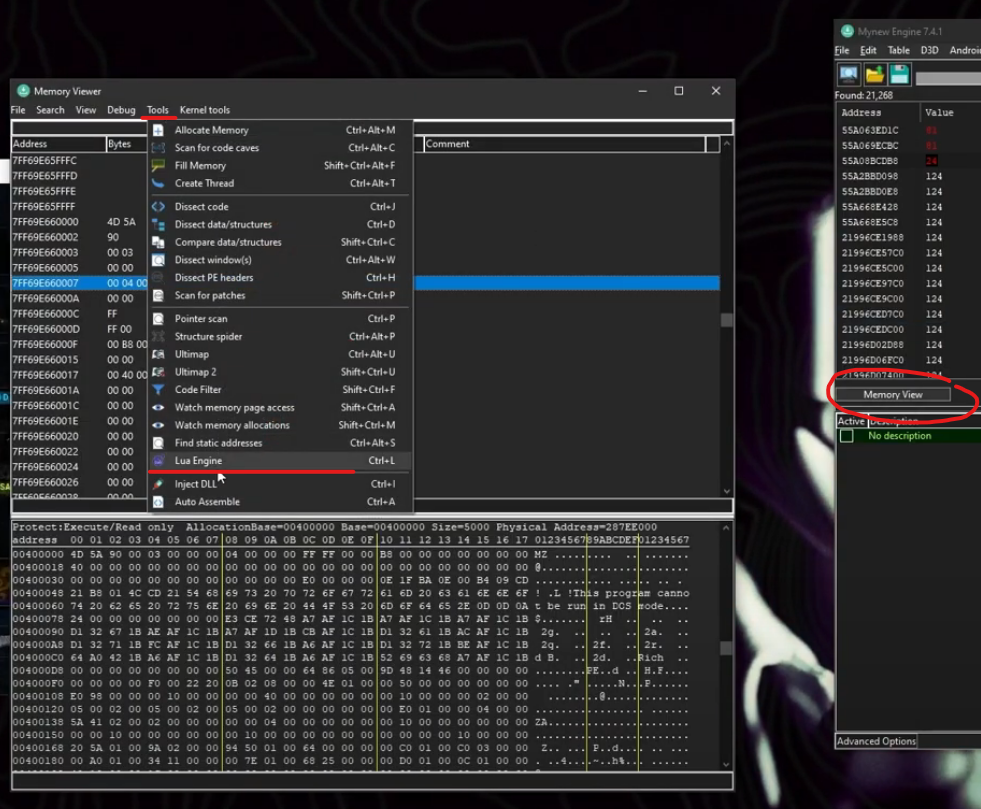
Paste the code inside the bottom window and press Execute.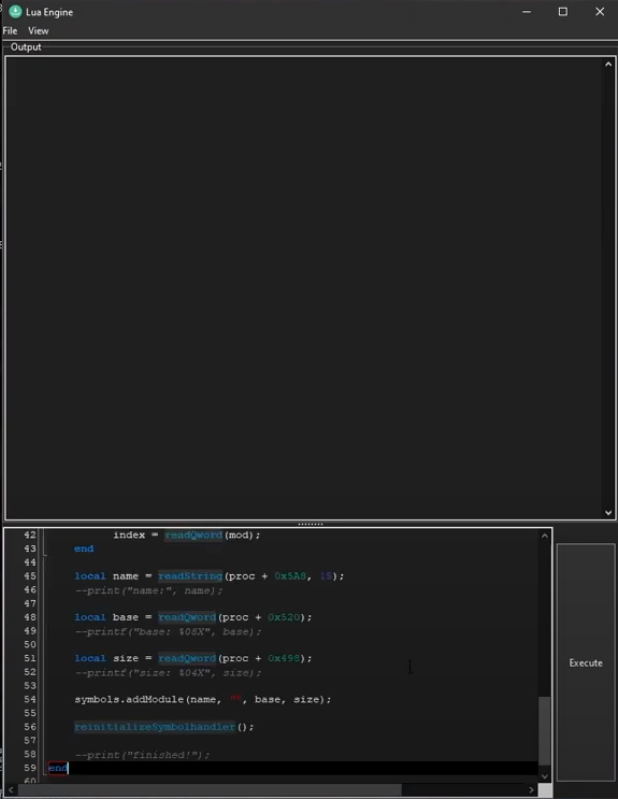
Now (re)attach Cheat Engine to the game you want to cheat in.
This time all the module names should show up inside the memory view window.
If Cheat Engine freezes or crashes instead while (re)attaching to the game after executing the Lua script you can fix that with replacing the following code line inside the lua script:
“while (index ~= ldr + 0x10) do”
with this code
“for i=1, 150 do”
| | —- |
Quote:
| Step 12: DBVM Hypervisor
If you also want to debug the game and want to find out what is accessing or writing to an address you may need the Cheat Engine Hypervisor (DBVM).
Warning: the DBVM Hypervisor might be detected for EAC games, use it at your own risk.
So you might ask yourself now, what is a hypervisor?
As for this i have limited experience myself, Ill leave this qoute here.
Quote:
The good thing about Cheat Engines Hypervisor is, we won’t have to compile it ourselves.
I mean you can do that if you want to, then just follow this video by “script daddy”: https://www.youtube.com/watch?v=X0lMBRaZgL4&t=1s
But in this tutorial you can also just use the precompiled default Hypervisor from Cheat Engine since it doesn’t get blocked by Anticheats (yet).
I will upload the default CE Hypervisor here to download (vmdisk.img):
https://www.unknowncheats.me/forum/d…=file&id=37389
Download the vmdisk.img file and drop it inside your “Cheat Engine” -> “bin” folder where also your cheat engine and driver is in.
Now open Cheat Engine, go into the Settings -> Debugger Options and make sure to switch to “Use DBVM-level debugger”.
Then go inside “Help” -> “About” and click on “Your system supports DBVM”.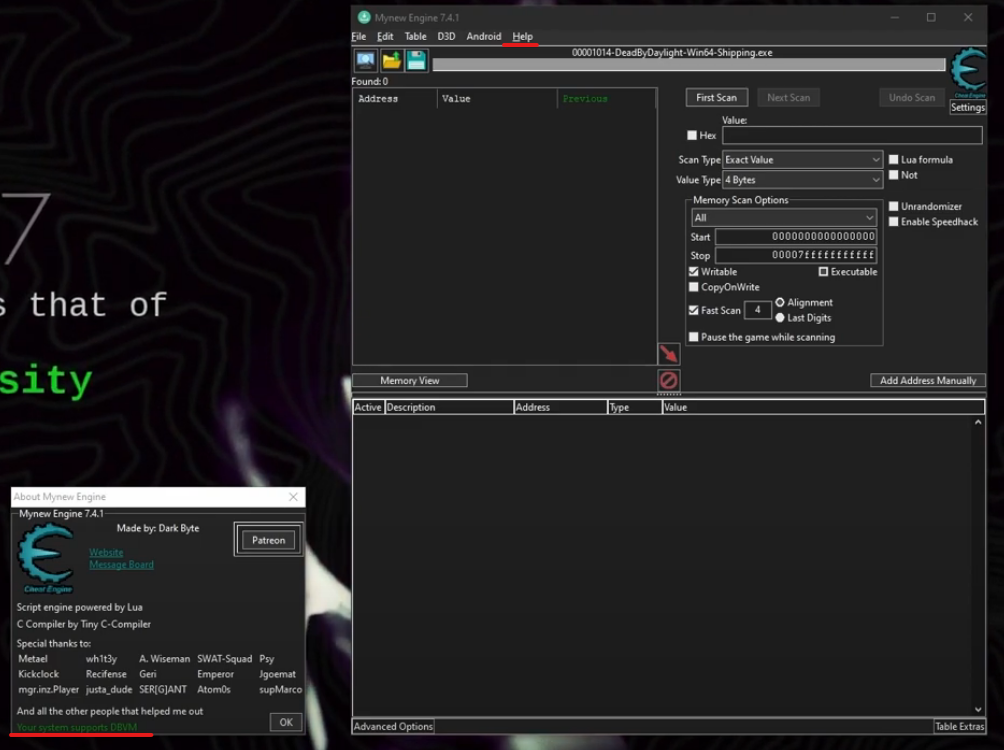
Now your DVBM Hypervisor is running and you should be able to debug the game and do everything else despite the Anticheat is still running.
|
| —- |
| Originally Posted by babama ![[Tutorial] Undetected Cheat Engine Driver | 2022 | Bypass Anticheats (BE / EAC) - 图53](/uploads/projects/helloppm@index/f10d91da0f19c1f9f8e3e3f030ad13b3.gif)
_Hypervisors are a different concept and approach, especially for the game hacking community.
Before hypervisors hit the mainstream, most physical computers could only run one operating system at a time. This made them stable because the computing hardware only had to handle requests from that one OS. The downside of this approach was that it wasted resources because the operating system couldn’t always use all of the computer’s power.
A hypervisor solves that problem. It is a small software layer that enables multiple operating systems to run alongside each other, sharing the same physical computing resources. These operating systems come as virtual machines - files that mimic an entire computing hardware environment in software.
The hypervisor, also known as a virtual machine monitor (VMM), manages these VMs as they run alongside each other. It separates VMs from each other logically, assigning each its own slice of the underlying computing power, memory, and storage. This prevents the VMs from interfering with each other; so if, for example, one OS suffers a crash or a security compromise, the others survive.
It’s more complicated than that as there are 2 different Types, but that not important right now.
The game hacking community tries to abuse the fact the hv runs above the operating system and thereby above the corresponding Anti-Cheat.
It’s a cat and mouse game. When AntiCheats were Ring 3 only, the cheaters moved on to Ring 0 to be above the AntiCheat and sneak their way around it. Now that many Games are protected by an AntiCheat System that has a kernel (Ring 0) component, people want to go the easy route and get even further below the AntiCheat and since there is no layer in an Operating System below Ring 0, people move on to the so called Ring -1. The Hypervisor below the Operating System.
It’s a lazy approach if your only intent is to bypass a Game’s AntiCheat._ |
Quote:
| Bonus: Access - Noseh
There is also another way without using the cheat engine driver or hypervisor.
You can use this “bypass” here, credits to s4ncak1: Valorant Cheat Engine Bypass + Debug Bypass
It works not only for Cheat Engine but also for several other 3rd party programs like Reclass or various memory dumpers.
Be warned though: This bypass is already detected by many anticheats.
I used it several times yet and haven’t been banned once for it, which is probably luck and doesn’t mean that you wont get banned.
So still be careful with this bypass, and be prepared to get banned sooner or later if you use it.
How does this “bypass” work.
It is basically a syscall wrapper, so you inject a dll inside a third party program like Reclass or Cheat Engine, then the third party program will be able to read and write to the games memory even tho anticheat is running.
You can download the bypass files here if you don’t want to compile them yourself:
https://www.unknowncheats.me/forum/d…=file&id=37388
Otherwise you can get the source code here: https://github.com/btbd/access
Compile the Driver and the Dll using Visual Studio.
also get the “kdu.exe” from this Kernel Driver Utility here: https://github.com/hfiref0x/KDU
Once you either compiled it yourself or downloaded the files, open up CMD with admin permissions.
Navigate inside the Noseh - Access folder and inside CMD enter:
“kdu.exe -dse 6”
After that map the Bypass Driver entering:
“kdu.exe -map Driver.sys”
Now open up Cheat Engine and attach Cheat Engine to itself, go inside “Memory View” -> “Tools” -> “Inject Dll” and inject the “Dll.dll” into Cheat Engine.
Then you can attach Cheat Engine to any game and you will be able to read and write to the games memory without the Cheat Engine Driver or Hypervisor even tho the Anticheat is running.
You can do the same with Reclass, just inject the Dll into Reclass, this way Reclass will be able to read the games memory.
| | —- |
github: https://github.com/Baseult
Last edited by iBaseult; 26th June 2022 at 06:52 PM.

若有收获,就点个赞吧
0 人点赞
