车牌识别
功能简介
车牌识别技术(Vehicle License Plate Recognition,VLPR)是指能够检测到受监控路面的车辆并自动提取车辆牌照信息(含汉字字符、英文字母、阿拉伯数字及号牌颜色)并进行处理的技术,利用车辆的动态视频或静态图像进行牌照号码、牌照颜色进行自动识别。
技术流程
车牌识别分为四大步骤,分别为图像预处理、车牌定位、字符分割、字符识别。
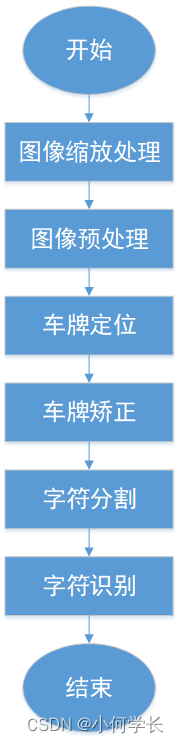
图像预处理阶段:由于在恶例的气候条件下(如光照不足、大雾等),监控摄像头拍摄到的车辆图片往往十分的模糊,如果不对图像进行处理,我们很难准确的定位到车牌。因此,在图像预处理阶段,我们一般要用图像形态学、图像的增强技术对图像进行增强。
车牌定位阶段:定位到图像中的车牌区域,即将图像中包含车牌区域提取出来,常见的算法有小波变换、边缘增强等。
字符分割:在提取车牌区域后,车牌中的字符仍然是连在一起的字符串,字符分割的任务就是将字符串中的字符逐个分割出来,形成一个一个单独的字符,常见的算法有图像投影等。
字符识别:将前一阶段分割出来的单个字符识别出来,常见的算法有神经网络、遗传算法、支持向量机(SVM)、KL变换等。
功能实现
算法原理参考gitee项目:https://gitee.com/admin_yu/yx-image-recognition
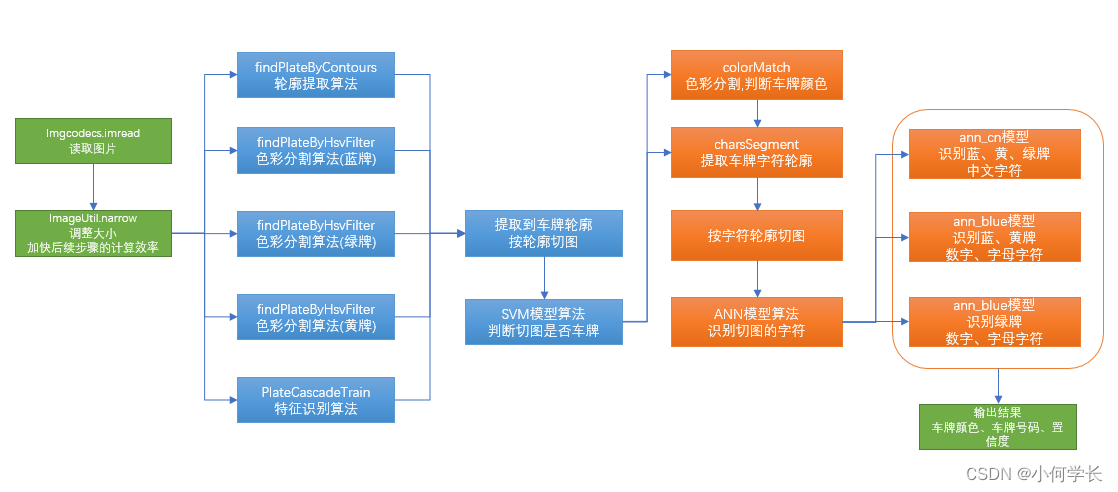
整体流程主要分两个大的步骤:
- 1、使用多种算法,提取到车牌的轮廓,按轮廓从原图片获取车牌的切图,使用SVM算法模型,判断该切图是否是车牌
- 2、根据车牌切图,判定车牌颜色,同时使用轮廓提取算法,提取车牌字符轮廓,按轮廓从二值图片获取车牌切图;使用ANN算法模型,分别使用中文字符模型、蓝牌模型、绿牌模型识别字符切图的文字内容
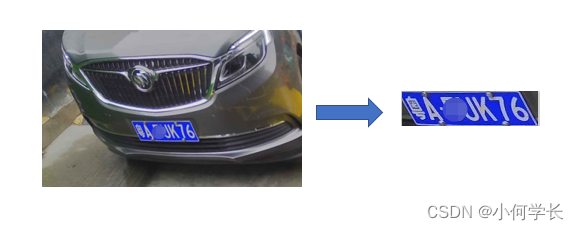
车牌图块提取
其目的是从车牌图片中,提取到包含车牌的图块;这里有三种实现方式:
- 1、轮廓提取算法
- 2、色彩分割提取算法
- 3、特征识别提取算法
1、轮廓提取算法
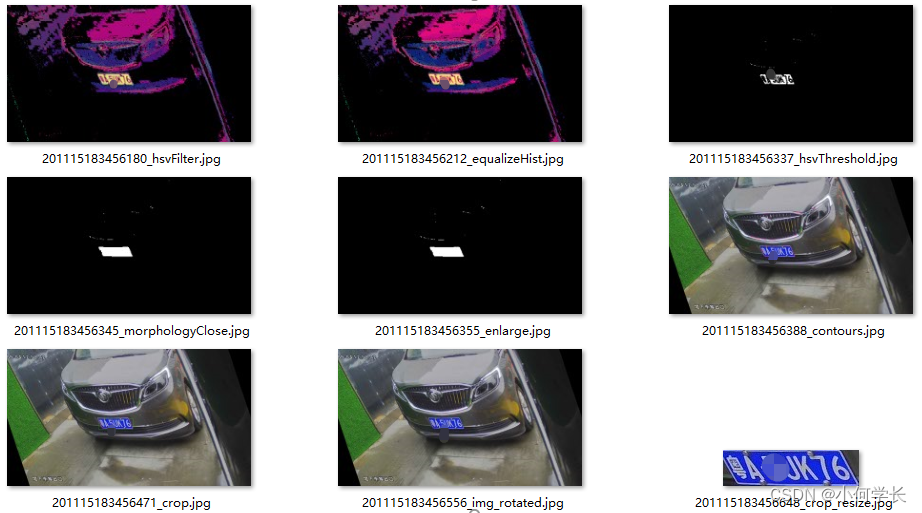
主要的图片处理过程如下:
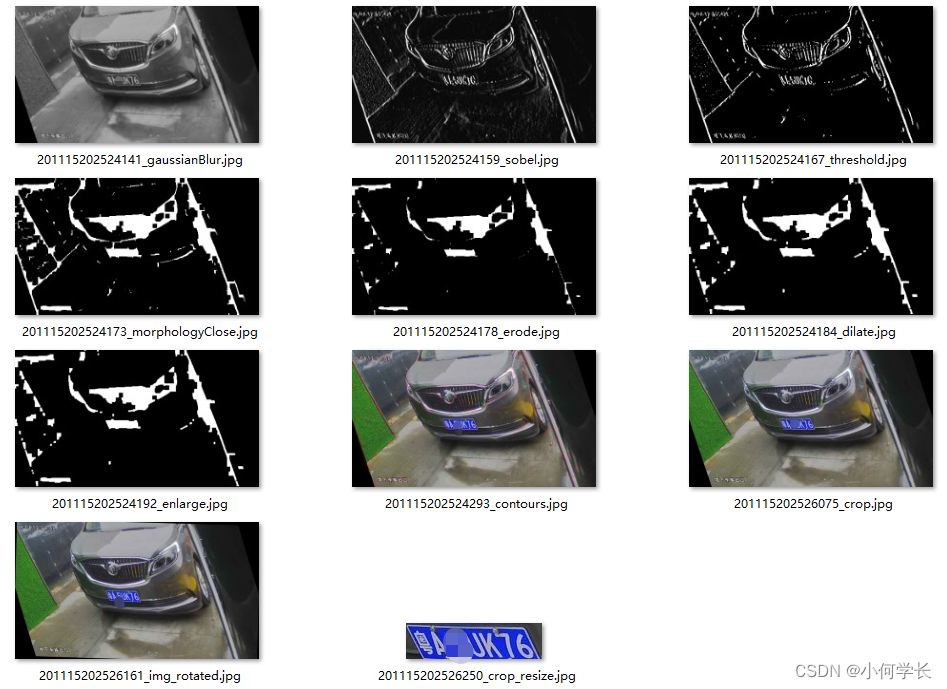
- 读取图像,转换大小,然后灰度化图像;- 高斯模糊,去除噪点;- sobel运算,检测图像边缘- 图像二值化,将边缘转成白色(取值255),其他内容转为黑色(取值0)- 图像闭操作,将临近的边缘线,合并成块- 边缘腐蚀操作,将一些细小的连接线去掉,分离出一些大的块装区域- 边缘膨胀,还原腐蚀操作影响的块状区域大小- 还原图像到原始图像大小,根据二值图像,提取轮廓- 根据提取的轮廓,从原始图像上,切图- 将得到的切图,调整到固定大小: 136*36像素,用于SVM算法模型,判断是否是车牌
- 该方法是互联网上常见的处理办法,大体流程基本一致,这里稍微整理,也增加了一些优化
- 以上操作步骤,还会包含一些其他小的步骤,比如:轮廓筛选、图像旋转校正等等,这里不详细展开
- 这种方法可以说比较具有通用性,大家调整一下一下各个步骤的一些参数,也能在特定场景下,大大增加识别准确率
2、色彩分割提取算法
主要的图片处理过程如下:
- 转换到HSV色彩空间,对hsv取值范围过滤(取值范围,可以使用我的色彩切割工具,大体定位);
- 蓝牌、绿牌、黄牌的操作步骤基本一致,区别仅在于HSV取值范围不一样
- 图像均衡化,增强对比度
- 图像二值化,得到车牌区域
- 图像闭操作,将车牌区域连成片
- 还原图像到原始图像大小,根据二值图像,提取轮廓
- 根据提取的轮廓,从原始图像上,切图
- 将得到的切图,调整到固定大小: 136*36像素,用于SVM算法模型,判断是否是车牌
- 以上操作步骤,还会包含一些其他小的步骤,比如:轮廓筛选、图像旋转校正等等,这里不详细展开
- 以上操作步骤也并非所有都必要,项目其目的在于学习交流,重点在于算法的实现
- 这种方法在特定场景下,识别准确率比较高
3、特征识别提取算法
主要的图片处理过程如下:

- 使用harrcascade模型,直接识别图片中的图块位置,提取图块切图
- 将得到的切图,调整到固定大小: 136*36像素,用于SVM算法模型,判断是否是车牌
- 这种方法,应用应该也比较广泛,人脸识别也常用这种方法
- 特征识别的算法有很多,harr的算法比较老套了,我打算去尝试其他特征识别算法,所以这里就先放弃了
车牌字符识别
其目的是从车牌图块中,识别车牌的颜色、车牌号码
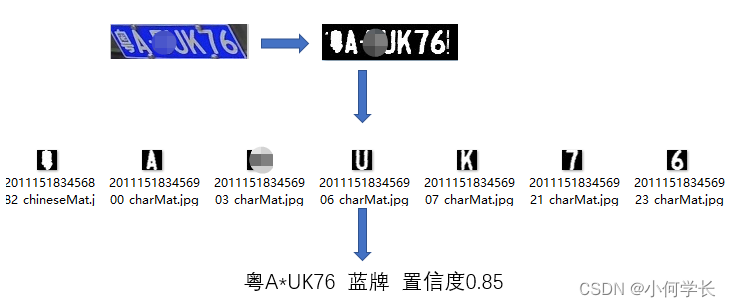
图片debug过程
- 使用SVM模型算法,判断图块是否是车牌
- 将图块转到HSV色彩空间,图像均衡化之后,根据H的取值范围及占比,计算属于何种颜色车牌
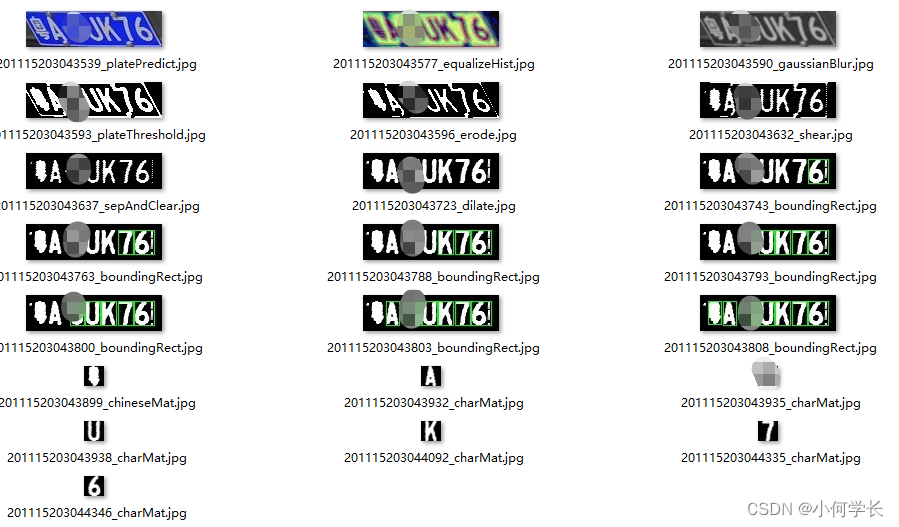
- 原图灰度化、高斯模糊
- 然后直接二值化;对于车牌来说一般仅包含两种颜色
- 边缘腐蚀、膨胀
- 水平或者垂直方向投影去除边框、铆钉干扰等
- 错切校正
- 轮廓提取,轮廓位置、大小校正、轮廓过滤等
- 提取字符图块,调整为统一大小20*20像素,使用ANN算法,识别图块的字符,计算置信度等
- 车牌字符识别,这种方式比较通用,成功率也比较高
- 以上操作步骤并非所有都必要,项目其目的在于学习交流,重点在于算法的实现。
- 当然还有别的识别方案,大家可以一起完善。
核心代码
大家可以参考 https://gitee.com/admin_yu/yx-image-recognition 项目的代码,这里我给出我的代码,我的代码核心是参考EasyPR-Java的,目前代码实现整合到spring boot中还有问题,但是在控制台直接运行是完全没问题的,后期有待改进完善。
字符识别
import com.ruoyi.ai.aiModels.car.deal.Convert;
import org.bytedeco.javacpp.opencv_core.Mat;
import org.bytedeco.javacpp.opencv_ml.ANN_MLP;

import java.nio.file.Paths;
import java.util.HashMap;
import java.util.Map;


import static org.bytedeco.javacpp.opencv_core.CV_32FC1;

/**
 * 字符识别
 * @author 何翔
 */
public class CharsIdentify {

    public CharsIdentify() {
        loadModel();

        if (this.map.isEmpty()) {
            map.put("zh_cuan", "川");
            map.put("zh_e", "鄂");
            map.put("zh_gan", "赣");
            map.put("zh_gan1", "甘");
            map.put("zh_gui", "贵");
            map.put("zh_gui1", "桂");
            map.put("zh_hei", "黑");
            map.put("zh_hu", "沪");
            map.put("zh_ji", "冀");
            map.put("zh_jin", "津");
            map.put("zh_jing", "京");
            map.put("zh_jl", "吉");
            map.put("zh_liao", "辽");
            map.put("zh_lu", "鲁");
            map.put("zh_meng", "蒙");
            map.put("zh_min", "闽");
            map.put("zh_ning", "宁");
            map.put("zh_qing", "青");
            map.put("zh_qiong", "琼");
            map.put("zh_shan", "陕");
            map.put("zh_su", "苏");
            map.put("zh_sx", "晋");
            map.put("zh_wan", "皖");
            map.put("zh_xiang", "湘");
            map.put("zh_xin", "新");
            map.put("zh_yu", "豫");
            map.put("zh_yu1", "渝");
            map.put("zh_yue", "粤");
            map.put("zh_yun", "云");
            map.put("zh_zang", "藏");
            map.put("zh_zhe", "浙");
        }
    }

    /**
     * 字符识别
     * @param input
     * @param isChinese
     * @return
     */
    public String charsIdentify(final Mat input, final Boolean isChinese, final Boolean isSpeci) {
        String result = "";
        Mat f = CoreFunc.features(input, this.predictSize);
        int index = classify(f, isChinese, isSpeci);
        if (!isChinese) {
            result = String.valueOf(strCharacters[index]);
        } else {
            String s = strChinese[index - numCharacter];
            result = map.get(s);
        }
        return result;
    }

    /**
     * 分类预测
     * @param f
     * @param isChinses
     * @param isSpeci
     * @return
     */
    private int classify(Mat f, final Boolean isChinses, final Boolean isSpeci) {
        int result = -1;
        Mat output = new Mat(1, numAll, CV_32FC1);
        //预测
        ann.predict(f, output, 0);
        int ann_min = (!isChinses) ? ((isSpeci) ? 10 : 0) : numCharacter;
        int ann_max = (!isChinses) ? numCharacter : numAll;
        float maxVal = -2;
        for (int j = ann_min; j < ann_max; j++) {
            float val = Convert.toFloat(output.ptr(0, j));
            if (val > maxVal) {
                maxVal = val;
                result = j;
            }
        }
        return result;
    }

    private void loadModel() {
        loadModel(this.path);
    }

    public void loadModel(String s) {
       ann.clear();
       ann= ANN_MLP.loadANN_MLP(s, "ann");
    }

    static boolean hasPrint = false;

    public final void setModelPath(String path) {
        this.path = path;
    }

    public final String getModelPath() {
        return this.path;
    }

    //private CvANN_MLP ann = new CvANN_MLP();
    private ANN_MLP ann= ANN_MLP.create();

    private String path = Paths.get("build","car","model","ann.xml").toAbsolutePath().toString();

    private int predictSize = 10;

    private Map<String, String> map = new HashMap<String, String>();

    private final char strCharacters[] = { '0', '1', '2', '3', '4', '5', '6', '7', '8', '9', 'A', 'B', 'C', 'D', 'E',
            'F', 'G', 'H', /* 没有I */'J', 'K', 'L', 'M', 'N', /* 没有O */'P', 'Q', 'R', 'S', 'T', 'U', 'V', 'W', 'X', 'Y',
            'Z' };
    private final static int numCharacter = 34; // 没有I和0,10个数字与24个英文字符之和

    private final String strChinese[] = { "zh_cuan" /* 川 */, "zh_e" /* 鄂 */, "zh_gan" /* 赣 */, "zh_gan1"/* 甘 */,
            "zh_gui"/* 贵 */, "zh_gui1"/* 桂 */, "zh_hei" /* 黑 */, "zh_hu" /* 沪 */, "zh_ji" /* 冀 */, "zh_jin" /* 津 */,
            "zh_jing" /* 京 */, "zh_jl" /* 吉 */, "zh_liao" /* 辽 */, "zh_lu" /* 鲁 */, "zh_meng" /* 蒙 */,
            "zh_min" /* 闽 */, "zh_ning" /* 宁 */, "zh_qing" /* 青 */, "zh_qiong" /* 琼 */, "zh_shan" /* 陕 */,
            "zh_su" /* 苏 */, "zh_sx" /* 晋 */, "zh_wan" /* 皖 */, "zh_xiang" /* 湘 */, "zh_xin" /* 新 */, "zh_yu" /* 豫 */,
            "zh_yu1" /* 渝 */, "zh_yue" /* 粤 */, "zh_yun" /* 云 */, "zh_zang" /* 藏 */, "zh_zhe" /* 浙 */};
    @SuppressWarnings("unused")
    private final static int numChinese = 31;

    private final static int numAll = 65; /* 34+31=65 */
}
字符分割识别(多字符)
import org.bytedeco.javacpp.opencv_core.Mat;

import java.util.Vector;

/**
 * 字符分割识别(多字符)
 * @author 何翔
 *
 */
public class CharsRecognise {

    public void loadANN(final String s) {
        charsIdentify.loadModel(s);
    }

    /**
     * Chars segment and identify 字符分割与识别
     *
     * @param plate - the input plate
     * @return the result of plate recognition
     */
    public String charsRecognise(final Mat plate) {

        // the set of plate character after segment 车牌字符方块集合
        Vector<Mat> matVec = new Vector<Mat>();
        // the result of plate recognition
        String plateIdentify = "";
        int result = charsSegment.charsSegment(plate, matVec);

        if (0 == result) {
            for (int j = 0; j < matVec.size(); j++) {
                Mat charMat = matVec.get(j);
                // the first is Chinese char as default 默认首个字符块是中文字符
                String charcater = charsIdentify.charsIdentify(charMat, (0 == j), (1 == j));
                plateIdentify = plateIdentify + charcater;
            }
        }

        return plateIdentify;
    }

    /**
     * 是否开启调试模式
     *
     * @param isDebug
     */
    public void setCRDebug(final boolean isDebug) {
        charsSegment.setDebug(isDebug);
    }

    /**
     * 获取调试模式状态
     *
     * @return
     */
    public boolean getCRDebug() {
        return charsSegment.getDebug();
    }

    /**
     * 获得车牌颜色
     *
     * @param input
     * @return
     */
    public final String getPlateType(final Mat input) {
        String color = "未知";
        CoreFunc.Color result = CoreFunc.getPlateType(input, true);
        if (CoreFunc.Color.BLUE == result)
            color = "蓝牌";
        if (CoreFunc.Color.YELLOW == result)
            color = "黄牌";
        return color;
    }

    /**
     * 设置柳丁大小变量
     *
     * @param param
     */
    public void setLiuDingSize(final int param) {
        charsSegment.setLiuDingSize(param);
    }

    /**
     * 设置颜色阈值
     *
     * @param param
     */
    public void setColorThreshold(final int param) {
        charsSegment.setColorThreshold(param);
    }

    /**
     * 设置蓝色百分比
     *
     * @param param
     */
    public void setBluePercent(final float param) {
        charsSegment.setBluePercent(param);
    }

    /**
     * 得到蓝色百分比
     *
     * @param
     */
    public final float getBluePercent() {
        return charsSegment.getBluePercent();
    }

    /**
     * 设置白色百分比
     *
     * @param param
     */
    public void setWhitePercent(final float param) {
        charsSegment.setWhitePercent(param);
    }

    /**
     * 得到白色百分比
     *
     * @param
     */
    public final float getWhitePercent() {
        return charsSegment.getWhitePercent();
    }

    private CharsSegment charsSegment = new CharsSegment();

    private CharsIdentify charsIdentify = new CharsIdentify();
}
字符分割处理
import com.ruoyi.ai.aiModels.car.deal.Convert;
import org.bytedeco.javacpp.BytePointer;
import org.bytedeco.javacpp.opencv_core;

import java.util.Vector;

import static com.ruoyi.ai.aiModels.car.core.CoreFunc.getPlateType;
import static org.bytedeco.javacpp.opencv_core.*;
import static org.bytedeco.javacpp.opencv_imgproc.*;


public class CharsSegment {


    public int charsSegment(final Mat in, Vector<Mat> result) {
        if (in.data().isNull())
            return -3;
        Mat threshold = new Mat();
        Mat grey_img = new Mat();
        cvtColor(in, grey_img, CV_RGB2GRAY);
        int w = in.cols();
        int h = in.rows();
        Mat temp = new Mat(in, new Rect((int) (w * 0.1), (int) (h * 0.1), (int) (w * 0.8), (int) (h * 0.8)));

        switch (getPlateType(temp, true)) {
        case BLUE:
            threshold(grey_img, threshold, 10, 255, CV_THRESH_OTSU + CV_THRESH_BINARY);
            break;
        case YELLOW:
            threshold(grey_img, threshold, 10, 255, CV_THRESH_OTSU + CV_THRESH_BINARY_INV);
            break;
        default:
            return -3;
        }
        Mat num = new Mat();
        threshold.copyTo(num);
        MatVector contours = new MatVector();
        findContours(num, contours, CV_RETR_EXTERNAL, CV_CHAIN_APPROX_NONE);
        Vector<Rect> rect = new Vector<Rect>();
        for (int i = 0; i < contours.size(); ++i) {
            Rect mr = boundingRect(contours.get(i));
            if (verifySizes(new Mat(threshold, mr)))
                rect.add(mr);
        }
        if (rect.size() == 0)
            return -3;
        Vector<Rect> sortedRect = new Vector<Rect>();
        SortRect(rect, sortedRect);
        int specIndex = GetSpecificRect(sortedRect);
        Rect chineseRect = new Rect();
        if (specIndex < sortedRect.size())
            chineseRect = GetChineseRect(sortedRect.get(specIndex));
        else
            return -3;
        Vector<Rect> newSortedRect = new Vector<Rect>();
        newSortedRect.add(chineseRect);
        RebuildRect(sortedRect, newSortedRect, specIndex);

        if (newSortedRect.size() == 0)
            return -3;
        for (int i = 0; i < newSortedRect.size(); i++) {
            Rect mr = newSortedRect.get(i);
            Mat auxRoi = new Mat(threshold, mr);
            auxRoi = preprocessChar(auxRoi);
            result.add(auxRoi);
        }
        return 0;
    }

    /**
     * 字符尺寸验证
     *
     * @param r
     * @return
     */
    private Boolean verifySizes(Mat r) {
        float aspect = 45.0f / 90.0f;
        float charAspect = (float) r.cols() / (float) r.rows();
        float error = 0.7f;
        float minHeight = 10f;
        float maxHeight = 35f;
        // We have a different aspect ratio for number 1, and it can be ~0.2
        float minAspect = 0.05f;
        float maxAspect = aspect + aspect * error;
        // area of pixels
        float area = countNonZero(r);
        // bb area
        float bbArea = r.cols() * r.rows();
        // % of pixel in area
        float percPixels = area / bbArea;

        return percPixels <= 1 && charAspect > minAspect && charAspect < maxAspect && r.rows() >= minHeight
                && r.rows() < maxHeight;
    }

    /**
     * 字符预处理: 统一每个字符的大小
     *
     * @param in
     * @return
     */
    private Mat preprocessChar(Mat in) {
        int h = in.rows();
        int w = in.cols();
        int charSize = CHAR_SIZE;
        Mat transformMat = Mat.eye(2, 3, CV_32F).asMat();
        int m = Math.max(w, h);
        transformMat.ptr(0, 2).put(Convert.getBytes(((m - w) / 2f)));
        transformMat.ptr(1, 2).put(Convert.getBytes((m - h) / 2f));

        Mat warpImage = new Mat(m, m, in.type());

        warpAffine(in, warpImage, transformMat, warpImage.size(), INTER_LINEAR, opencv_core.BORDER_CONSTANT, new Scalar(0));

        Mat out = new Mat();
        resize(warpImage, out, new Size(charSize, charSize));

        return out;
    }

    /**
     * 去除车牌上方的钮钉
     * <p>
     * 计算每行元素的阶跃数,如果小于X认为是柳丁,将此行全部填0(涂黑), X可根据实际调整
     *
     * @param img
     * @return
     */
    private Mat clearLiuDing(Mat img) {
        final int x = this.liuDingSize;

        Mat jump = Mat.zeros(1, img.rows(), CV_32F).asMat();
        CoreFunc.showImage("test", jump);

        System.err.println("图像总行数:"+img.rows());
        for (int i = 0; i < img.rows(); i++) {
            int jumpCount = 0;
            for (int j = 0; j < img.cols() - 1; j++) {
                if (img.ptr(i, j).get() != img.ptr(i, j + 1).get())
                    jumpCount++;
            }
            System.err.println("总数:"+jumpCount);
            System.err.println("第"+i+"行");
            byte[] bt=Convert.getBytes((float) jumpCount);
            System.err.println("test:"+bt.length);
            //指定矩阵行的指针
            BytePointer bp= jump.ptr(i);
//            CoreFunc.showImage("test", jump);
//
            bp.put(bt);
            System.err.println("test:end");
        }

        for (int i = 0; i < img.rows(); i++) {
            if (Convert.toFloat(jump.ptr(i)) <= x) {
                for (int j = 0; j < img.cols(); j++) {
                    img.ptr(i, j).put((byte) 0);
                }
            }
        }
        return img;
    }

    /**
     * 根据特殊车牌来构造猜测中文字符的位置和大小
     *
     * @param rectSpe
     * @return
     */
    private Rect GetChineseRect(final Rect rectSpe) {
        int height = rectSpe.height();
        float newwidth = rectSpe.width() * 1.15f;
        int x = rectSpe.x();
        int y = rectSpe.y();

        int newx = x - (int) (newwidth * 1.15);
        newx = Math.max(newx, 0);
        Rect a = new Rect(newx, y, (int) newwidth, height);
        return a;
    }

    /**
     * 找出指示城市的字符的Rect,例如苏A7003X,就是A的位置
     *
     * @param vecRect
     * @return
     */
    private int GetSpecificRect(final Vector<Rect> vecRect) {
        Vector<Integer> xpositions = new Vector<Integer>();
        int maxHeight = 0;
        int maxWidth = 0;
        for (int i = 0; i < vecRect.size(); i++) {
            xpositions.add(vecRect.get(i).x());

            if (vecRect.get(i).height() > maxHeight) {
                maxHeight = vecRect.get(i).height();
            }
            if (vecRect.get(i).width() > maxWidth) {
                maxWidth = vecRect.get(i).width();
            }
        }

        int specIndex = 0;
        for (int i = 0; i < vecRect.size(); i++) {
            Rect mr = vecRect.get(i);
            int midx = mr.x() + mr.width() / 2;

            // 如果一个字符有一定的大小,并且在整个车牌的1/7到2/7之间,则是我们要找的特殊车牌
            if ((mr.width() > maxWidth * 0.8 || mr.height() > maxHeight * 0.8)
                    && (midx < this.theMatWidth * 2 / 7 && midx > this.theMatWidth / 7)) {
                specIndex = i;
            }
        }

        return specIndex;
    }

    /**
     * 这个函数做两个事情
     * <ul>
     * <li>把特殊字符Rect左边的全部Rect去掉,后面再重建中文字符的位置;
     * <li>从特殊字符Rect开始,依次选择6个Rect,多余的舍去。
     * <ul>
     *
     * @param vecRect
     * @param outRect
     * @param specIndex
     * @return
     */
    private int RebuildRect(final Vector<Rect> vecRect, Vector<Rect> outRect, int specIndex) {
        // 最大只能有7个Rect,减去中文的就只有6个Rect
        int count = 6;
        for (int i = 0; i < vecRect.size(); i++) {
            // 将特殊字符左边的Rect去掉,这个可能会去掉中文Rect,不过没关系,我们后面会重建。
            if (i < specIndex)
                continue;

            outRect.add(vecRect.get(i));
            if (--count == 0)
                break;
        }

        return 0;
    }

    /**
     * 将Rect按位置从左到右进行排序
     *
     * @param vecRect
     * @param out
     * @return
     */
    private void SortRect(final Vector<Rect> vecRect, Vector<Rect> out) {
        Vector<Integer> orderIndex = new Vector<Integer>();
        Vector<Integer> xpositions = new Vector<Integer>();
        for (int i = 0; i < vecRect.size(); ++i) {
            orderIndex.add(i);
            xpositions.add(vecRect.get(i).x());
        }

        float min = xpositions.get(0);
        int minIdx;
        for (int i = 0; i < xpositions.size(); ++i) {
            min = xpositions.get(i);
            minIdx = i;
            for (int j = i; j < xpositions.size(); ++j) {
                if (xpositions.get(j) < min) {
                    min = xpositions.get(j);
                    minIdx = j;
                }
            }
            int aux_i = orderIndex.get(i);
            int aux_min = orderIndex.get(minIdx);
            orderIndex.remove(i);
            orderIndex.insertElementAt(aux_min, i);
            orderIndex.remove(minIdx);
            orderIndex.insertElementAt(aux_i, minIdx);

            float aux_xi = xpositions.get(i);
            float aux_xmin = xpositions.get(minIdx);
            xpositions.remove(i);
            xpositions.insertElementAt((int) aux_xmin, i);
            xpositions.remove(minIdx);
            xpositions.insertElementAt((int) aux_xi, minIdx);
        }

        for (int i = 0; i < orderIndex.size(); i++)
            out.add(vecRect.get(orderIndex.get(i)));

        return;
    }

    public void setLiuDingSize(int param) {
        this.liuDingSize = param;
    }

    public void setColorThreshold(int param) {
        this.colorThreshold = param;
    }

    public void setBluePercent(float param) {
        this.bluePercent = param;
    }

    public final float getBluePercent() {
        return this.bluePercent;
    }

    public void setWhitePercent(float param) {
        this.whitePercent = param;
    }

    public final float getWhitePercent() {
        return this.whitePercent;
    }

    public boolean getDebug() {
        return this.isDebug;
    }

    public void setDebug(boolean isDebug) {
        this.isDebug = isDebug;
    }

    // 是否开启调试模式常量,默认false代表关闭
    final static boolean DEFAULT_DEBUG = false;

    // preprocessChar所用常量
    final static int CHAR_SIZE = 20;
    final static int HORIZONTAL = 1;
    final static int VERTICAL = 0;

    final static int DEFAULT_LIUDING_SIZE = 7;
    final static int DEFAULT_MAT_WIDTH = 136;

    final static int DEFAULT_COLORTHRESHOLD = 150;
    final static float DEFAULT_BLUEPERCEMT = 0.3f;
    final static float DEFAULT_WHITEPERCEMT = 0.1f;

    private int liuDingSize = DEFAULT_LIUDING_SIZE;
    private int theMatWidth = DEFAULT_MAT_WIDTH;

    private int colorThreshold = DEFAULT_COLORTHRESHOLD;
    private float bluePercent = DEFAULT_BLUEPERCEMT;
    private float whitePercent = DEFAULT_WHITEPERCEMT;

    private boolean isDebug = DEFAULT_DEBUG;
}
识别核心算法
import org.bytedeco.javacpp.BytePointer;
import org.bytedeco.javacpp.indexer.FloatIndexer;
import org.bytedeco.javacpp.opencv_highgui;

import static org.bytedeco.javacpp.opencv_core.*;
import static org.bytedeco.javacpp.opencv_highgui.cvWaitKey;
import static org.bytedeco.javacpp.opencv_imgproc.*;

/**
 * 核心
 * @author 何翔
 *
 */
public class CoreFunc {
    public enum Color {
        UNKNOWN, BLUE, YELLOW
    };

    public enum Direction {
        UNKNOWN, VERTICAL, HORIZONTAL
    }

    /**
     * 根据一幅图像与颜色模板获取对应的二值图
     *
     * @param src
     *            输入RGB图像
     * @param r
     *            颜色模板(蓝色、黄色)
     * @param adaptive_minsv
     *            S和V的最小值由adaptive_minsv这个bool值判断
     *            <ul>
     *            <li>如果为true,则最小值取决于H值,按比例衰减
     *            <li>如果为false,则不再自适应,使用固定的最小值minabs_sv
     *            </ul>
     * @return 输出灰度图(只有0和255两个值,255代表匹配,0代表不匹配)
     */
    public static Mat colorMatch(final Mat src, final Color r, final boolean adaptive_minsv) {
        final float max_sv = 255;
        final float minref_sv = 64;
        final float minabs_sv = 95;

        // blue的H范围
        final int min_blue = 100;
        final int max_blue = 140;

        // yellow的H范围
        final int min_yellow = 15;
        final int max_yellow = 40;

        // 转到HSV空间进行处理,颜色搜索主要使用的是H分量进行蓝色与黄色的匹配工作
        Mat src_hsv = new Mat();
        cvtColor(src, src_hsv, CV_BGR2HSV);
        MatVector hsvSplit = new MatVector();
        split(src_hsv, hsvSplit);
        equalizeHist(hsvSplit.get(2), hsvSplit.get(2));
        merge(hsvSplit, src_hsv);

        // 匹配模板基色,切换以查找想要的基色
        int min_h = 0;
        int max_h = 0;
        switch (r) {
        case BLUE:
            min_h = min_blue;
            max_h = max_blue;
            break;
        case YELLOW:
            min_h = min_yellow;
            max_h = max_yellow;
            break;
        default:
            break;
        }

        float diff_h = (float) ((max_h - min_h) / 2);
        int avg_h = (int) (min_h + diff_h);

        int channels = src_hsv.channels();
        int nRows = src_hsv.rows();
        // 图像数据列需要考虑通道数的影响;
        int nCols = src_hsv.cols() * channels;

        // 连续存储的数据,按一行处理
        if (src_hsv.isContinuous()) {
            nCols *= nRows;
            nRows = 1;
        }

        for (int i = 0; i < nRows; ++i) {
            BytePointer p = src_hsv.ptr(i);
            for (int j = 0; j < nCols; j += 3) {
                int H = p.get(j) & 0xFF;
                int S = p.get(j + 1) & 0xFF;
                int V = p.get(j + 2) & 0xFF;

                boolean colorMatched = false;

                if (H > min_h && H < max_h) {
                    int Hdiff = 0;
                    if (H > avg_h)
                        Hdiff = H - avg_h;
                    else
                        Hdiff = avg_h - H;

                    float Hdiff_p = Hdiff / diff_h;

                    float min_sv = 0;
                    if (true == adaptive_minsv)
                        min_sv = minref_sv - minref_sv / 2 * (1 - Hdiff_p);
                    else
                        min_sv = minabs_sv;

                    if ((S > min_sv && S <= max_sv) && (V > min_sv && V <= max_sv))
                        colorMatched = true;
                }

                if (colorMatched == true) {
                    p.put(j, (byte) 0);
                    p.put(j + 1, (byte) 0);
                    p.put(j + 2, (byte) 255);
                } else {
                    p.put(j, (byte) 0);
                    p.put(j + 1, (byte) 0);
                    p.put(j + 2, (byte) 0);
                }
            }
        }

        // 获取颜色匹配后的二值灰度图
        MatVector hsvSplit_done = new MatVector();
        split(src_hsv, hsvSplit_done);
        Mat src_grey = hsvSplit_done.get(2);

        return src_grey;
    }

    /**
     * 判断一个车牌的颜色
     *
     * @param src
     *            车牌mat
     * @param adaptive_minsv
     *            S和V的最小值由adaptive_minsv这个bool值判断
     *            <ul>
     *            <li>如果为true,则最小值取决于H值,按比例衰减
     *            <li>如果为false,则不再自适应,使用固定的最小值minabs_sv
     *            </ul>
     * @return
     */
    public static boolean plateColorJudge(final Mat src, final Color color, final boolean adaptive_minsv) {
        // 判断阈值
        final float thresh = 0.49f;

        Mat gray = colorMatch(src, color, adaptive_minsv);

        float percent = (float) countNonZero(gray) / (gray.rows() * gray.cols());

        return (percent > thresh) ? true : false;
    }

    /**
     * getPlateType 判断车牌的类型
     *
     * @param src
     * @param adaptive_minsv
     *            S和V的最小值由adaptive_minsv这个bool值判断
     *            <ul>
     *            <li>如果为true,则最小值取决于H值,按比例衰减
     *            <li>如果为false,则不再自适应,使用固定的最小值minabs_sv
     *            </ul>
     * @return
     */
    public static Color getPlateType(final Mat src, final boolean adaptive_minsv) {
        if (plateColorJudge(src, Color.BLUE, adaptive_minsv) == true) {
            return Color.BLUE;
        } else if (plateColorJudge(src, Color.YELLOW, adaptive_minsv) == true) {
            return Color.YELLOW;
        } else {
            return Color.UNKNOWN;
        }
    }

    /**
     * 获取垂直或水平方向直方图
     *
     * @param img
     * @param direction
     * @return
     */
    public static float[] projectedHistogram(final Mat img, Direction direction) {
        int sz = 0;
        switch (direction) {
        case HORIZONTAL:
            sz = img.rows();
            break;
        case VERTICAL:
            sz = img.cols();
            break;
        default:
            break;
        }
        // 统计这一行或一列中,非零元素的个数,并保存到nonZeroMat中
        float[] nonZeroMat = new float[sz];
        extractChannel(img, img, 0);
        for (int j = 0; j < sz; j++) {
            Mat data = (direction == Direction.HORIZONTAL) ? img.row(j) : img.col(j);
            int count = countNonZero(data);
            nonZeroMat[j] = count;
        }

        // Normalize histogram
        float max = 0;
        for (int j = 0; j < nonZeroMat.length; ++j) {
            max = Math.max(max, nonZeroMat[j]);
        }

        if (max > 0) {
            for (int j = 0; j < nonZeroMat.length; ++j) {
                nonZeroMat[j] /= max;
            }
        }

        return nonZeroMat;
    }

    /**
     * Assign values to feature
     * <p>
     * 样本特征为水平、垂直直方图和低分辨率图像所组成的矢量
     *
     * @param in
     * @param sizeData - 低分辨率图像size = sizeData*sizeData, 可以为0
     * @return
     */
    public static Mat features(final Mat in, final int sizeData) {
        float[] vhist = projectedHistogram(in, Direction.VERTICAL);
        float[] hhist = projectedHistogram(in, Direction.HORIZONTAL);
        Mat lowData = new Mat();
        if (sizeData > 0) {
            resize(in, lowData, new Size(sizeData, sizeData));
        }

        int numCols = vhist.length + hhist.length + lowData.cols() * lowData.rows();
        Mat out = Mat.zeros(1, numCols, CV_32F).asMat();
        FloatIndexer idx = out.createIndexer();

        int j = 0;
        for (int i = 0; i < vhist.length; ++i, ++j) {
            idx.put(0, j, vhist[i]);
        }
        for (int i = 0; i < hhist.length; ++i, ++j) {
            idx.put(0, j, hhist[i]);
        }
        for (int x = 0; x < lowData.cols(); x++) {
            for (int y = 0; y < lowData.rows(); y++, ++j) {
                float val = lowData.ptr(x, y).get() & 0xFF;
                idx.put(0, j, val);
            }
        }

        return out;
    }

    /**
     * 显示图像
     *
     * @param title
     * @param src
     */
    public static void showImage(final String title, final Mat src) {
        if(src!=null){
           opencv_highgui.imshow(title, src);
           cvWaitKey(0);
        }
    }
}
特征处理
import org.bytedeco.javacpp.opencv_core.Mat;
import org.bytedeco.javacpp.opencv_core.MatVector;


import static com.ruoyi.ai.aiModels.car.core.CoreFunc.features;
import static org.bytedeco.javacpp.opencv_core.merge;
import static org.bytedeco.javacpp.opencv_core.split;
import static org.bytedeco.javacpp.opencv_imgproc.*;

/**
 *
 * @author 何翔
 *
 */
public class Features implements SVMCallback {

    /*
     * (non-Javadoc)
     *
     * @see org.easypr.core.SVMCallback#getHisteqFeatures(org.bytedeco.javacpp.
     * opencv_core.Mat)
     */
    @Override
    public Mat getHisteqFeatures(final Mat image) {
        return histeq(image);
    }

    /*
     * (non-Javadoc)
     *
     * @see
     * org.easypr.core.SVMCallback#getHistogramFeatures(org.bytedeco.javacpp
     * .opencv_core.Mat)
     */
    @Override
    public Mat getHistogramFeatures(Mat image) {
        Mat grayImage = new Mat();
        cvtColor(image, grayImage, CV_RGB2GRAY);

        Mat img_threshold = new Mat();
        threshold(grayImage, img_threshold, 0, 255, CV_THRESH_OTSU + CV_THRESH_BINARY);

        return features(img_threshold, 0);
    }

    /*
     * (non-Javadoc)
     *
     * @see
     * org.easypr.core.SVMCallback#getSIFTFeatures(org.bytedeco.javacpp.opencv_core
     * .Mat)
     */
    @Override
    public Mat getSIFTFeatures(final Mat image) {
        // TODO: 待完善
        return null;
    }

    /*
     * (non-Javadoc)
     *
     * @see
     * org.easypr.core.SVMCallback#getHOGFeatures(org.bytedeco.javacpp.opencv_core
     * .Mat)
     */
    @Override
    public Mat getHOGFeatures(final Mat image) {
        // TODO: 待完善
        return null;
    }

    private Mat histeq(Mat in) {
        Mat out = new Mat(in.size(), in.type());
        if (in.channels() == 3) {
            Mat hsv = new Mat();
            MatVector hsvSplit = new MatVector();
            cvtColor(in, hsv, CV_BGR2HSV);
            split(hsv, hsvSplit);
            equalizeHist(hsvSplit.get(2), hsvSplit.get(2));
            merge(hsvSplit, hsv);
            cvtColor(hsv, out, CV_HSV2BGR);
            hsv = null;
            hsvSplit = null;
            System.gc();
        } else if (in.channels() == 1) {
            equalizeHist(in, out);
        }
        return out;
    }
}
车牌检测
import org.bytedeco.javacpp.opencv_core.Mat;
import org.bytedeco.javacpp.opencv_imgcodecs;

import java.nio.file.Paths;
import java.util.Vector;

/**
 * 车牌检测
 * @author 何翔
 */
public class PlateDetect {

    /**
     * @param src
     * @param resultVec
     *            可能是车牌的图块集合
     * @return the error number
     *         <ul>
     *         <li>0: plate detected successfully;
     *         <li>-1: source Mat is empty;
     *         <li>-2: plate not detected.
     *         </ul>
     */
    public int plateDetect(final Mat src, Vector<Mat> resultVec) {
        Vector<Mat> matVec = plateLocate.plateLocate(src);
        if (0 == matVec.size()) {
            return -1;
        }
        if (0 != plateJudge.plateJudge(matVec, resultVec)) {
            return -2;
        }
        if (getPDDebug()) {
            int size = (int) resultVec.size();
            for (int i = 0; i < size; i++) {
                Mat img = resultVec.get(i);
                String str = Paths.get("build","car","res").toAbsolutePath().toString()+"/plate_judge_result" + ".jpg";
                opencv_imgcodecs.imwrite(str, img);
            }
        }

        return 0;
    }

    /**
     * 生活模式与工业模式切换
     *
     * @param pdLifemode
     */
    public void setPDLifemode(boolean pdLifemode) {
        plateLocate.setLifemode(pdLifemode);
    }

    /**
     * 是否开启调试模式
     *
     * @param pdDebug
     */
    public void setPDDebug(boolean pdDebug) {
        plateLocate.setDebug(pdDebug);
    }

    /**
     * 获取调试模式状态
     *
     * @return
     */
    public boolean getPDDebug() {
        return plateLocate.getDebug();
    }

    public void setGaussianBlurSize(int gaussianBlurSize) {
        plateLocate.setGaussianBlurSize(gaussianBlurSize);
    }

    public final int getGaussianBlurSize() {
        return plateLocate.getGaussianBlurSize();
    }

    public void setMorphSizeWidth(int morphSizeWidth) {
        plateLocate.setMorphSizeWidth(morphSizeWidth);
    }

    public final int getMorphSizeWidth() {
        return plateLocate.getMorphSizeWidth();
    }

    public void setMorphSizeHeight(int morphSizeHeight) {
        plateLocate.setMorphSizeHeight(morphSizeHeight);
    }

    public final int getMorphSizeHeight() {
        return plateLocate.getMorphSizeHeight();
    }

    public void setVerifyError(float verifyError) {
        plateLocate.setVerifyError(verifyError);
    }

    public final float getVerifyError() {
        return plateLocate.getVerifyError();
    }

    public void setVerifyAspect(float verifyAspect) {
        plateLocate.setVerifyAspect(verifyAspect);
    }

    public final float getVerifyAspect() {
        return plateLocate.getVerifyAspect();
    }

    public void setVerifyMin(int verifyMin) {
        plateLocate.setVerifyMin(verifyMin);
    }

    public void setVerifyMax(int verifyMax) {
        plateLocate.setVerifyMax(verifyMax);
    }

    public void setJudgeAngle(int judgeAngle) {
        plateLocate.setJudgeAngle(judgeAngle);
    }

    private PlateLocate plateLocate = new PlateLocate();

    private PlateJudge plateJudge = new PlateJudge();

}
车牌判断
import org.bytedeco.javacpp.opencv_core.Mat;
import org.bytedeco.javacpp.opencv_core.Rect;
import org.bytedeco.javacpp.opencv_core.Size;
import org.bytedeco.javacpp.opencv_ml.SVM;

import java.nio.file.Paths;
import java.util.Vector;

import static org.bytedeco.javacpp.opencv_core.CV_32FC1;
import static org.bytedeco.javacpp.opencv_imgproc.resize;

/**
 * 车牌判断
 * @author 何翔
 *
 */
public class PlateJudge {

    public PlateJudge() {
        loadModel();
    }

    public void loadModel() {
        loadModel(path);
    }

    public void loadModel(String s) {
        svm.clear();
        svm= SVM.loadSVM(s, "svm");
    }

    /**
     * 对单幅图像进行SVM判断
     *
     * @param inMat
     * @return
     */
    public int plateJudge(final Mat inMat) {
        Mat features = this.features.getHistogramFeatures(inMat);

        // 通过直方图均衡化后的彩色图进行预测
        Mat p = features.reshape(1, 1);
        p.convertTo(p, CV_32FC1);

        float ret = svm.predict(p);

        return (int) ret;
    }

    /**
     * 对多幅图像进行SVM判断
     *
     * @param inVec
     * @param resultVec
     * @return
     */
    public int plateJudge(Vector<Mat> inVec, Vector<Mat> resultVec) {

        for (int j = 0; j < inVec.size(); j++) {
            Mat inMat = inVec.get(j);
            if (1 == plateJudge(inMat)) {
                resultVec.add(inMat);
            } else { // 再取中间部分判断一次
                int w = inMat.cols();
                int h = inMat.rows();
                Mat tmpDes = inMat.clone();
                Mat tmpMat = new Mat(inMat, new Rect((int) (w * 0.05), (int) (h * 0.1), (int) (w * 0.9),
                        (int) (h * 0.8)));
                resize(tmpMat, tmpDes, new Size(inMat.size()));

                if (plateJudge(tmpDes) == 1) {
                    resultVec.add(inMat);
                }
            }
        }

        return 0;
    }

    public void setModelPath(String path) {
        this.path = path;
    }

    public final String getModelPath() {
        return path;
    }

    private SVM svm = SVM.create();

    /**
     * EasyPR的getFeatures回调函数, 用于从车牌的image生成svm的训练特征features
     */
    private SVMCallback features = new Features();

    /**
     * 模型存储路径
     */
    private String path = Paths.get("build","car","model","svm.xml").toAbsolutePath().toString();
}
车牌定位
import org.bytedeco.javacpp.opencv_imgcodecs;

import java.nio.file.Paths;
import java.util.Vector;

import static org.bytedeco.javacpp.opencv_core.*;
import static org.bytedeco.javacpp.opencv_imgproc.*;

/**
 * 车牌定位
 * @author 何翔
 */
public class PlateLocate {

    /**
     * 生活模式与工业模式切换
     *
     * @param islifemode
     *            如果为真,则设置各项参数为定位生活场景照片(如百度图片)的参数,否则恢复默认值。
     *
     */
    public void setLifemode(boolean islifemode) {
        if (islifemode) {
            setGaussianBlurSize(5);
            setMorphSizeWidth(9);
            setMorphSizeHeight(3);
            setVerifyError(0.9f);
            setVerifyAspect(4);
            setVerifyMin(1);
            setVerifyMax(30);
        } else {
            setGaussianBlurSize(DEFAULT_GAUSSIANBLUR_SIZE);
            setMorphSizeWidth(DEFAULT_MORPH_SIZE_WIDTH);
            setMorphSizeHeight(DEFAULT_MORPH_SIZE_HEIGHT);
            setVerifyError(DEFAULT_ERROR);
            setVerifyAspect(DEFAULT_ASPECT);
            setVerifyMin(DEFAULT_VERIFY_MIN);
            setVerifyMax(DEFAULT_VERIFY_MAX);
        }
    }

    /**
     * 定位车牌图像
     *
     * @param src
     *            原始图像
     * @return 一个Mat的向量,存储所有抓取到的图像
     */
    public Vector<Mat> plateLocate(Mat src) {
        Vector<Mat> resultVec = new Vector<Mat>();

        Mat src_blur = new Mat();
        Mat src_gray = new Mat();
        Mat grad = new Mat();

        int scale = SOBEL_SCALE;
        int delta = SOBEL_DELTA;
        int ddepth = SOBEL_DDEPTH;

        // 高斯模糊。Size中的数字影响车牌定位的效果。
        GaussianBlur(src, src_blur, new Size(gaussianBlurSize, gaussianBlurSize), 0, 0, BORDER_DEFAULT);
        if (debug) {
            opencv_imgcodecs.imwrite(Paths.get("build","car","res").toAbsolutePath().toString()+"/tmp/debug_GaussianBlur.jpg", src_blur);
        }

        // Convert it to gray 将图像进行灰度化
        cvtColor(src_blur, src_gray, CV_RGB2GRAY);
        if (debug) {
            opencv_imgcodecs.imwrite(Paths.get("build","car","res").toAbsolutePath().toString()+"/tmp/debug_gray.jpg", src_gray);
        }

        // 对图像进行Sobel 运算,得到的是图像的一阶水平方向导数。

        // Generate grad_x and grad_y
        Mat grad_x = new Mat();
        Mat grad_y = new Mat();
        Mat abs_grad_x = new Mat();
        Mat abs_grad_y = new Mat();

        Sobel(src_gray, grad_x, ddepth, 1, 0, 3, scale, delta, BORDER_DEFAULT);
        convertScaleAbs(grad_x, abs_grad_x);

        Sobel(src_gray, grad_y, ddepth, 0, 1, 3, scale, delta, BORDER_DEFAULT);
        convertScaleAbs(grad_y, abs_grad_y);

        // Total Gradient (approximate)
        addWeighted(abs_grad_x, SOBEL_X_WEIGHT, abs_grad_y, SOBEL_Y_WEIGHT, 0, grad);

        if (debug) {
            opencv_imgcodecs.imwrite(Paths.get("build","car","res").toAbsolutePath().toString()+"/tmp/debug_Sobel.jpg", grad);
        }

        // 对图像进行二值化。将灰度图像(每个像素点有256 个取值可能)转化为二值图像(每个像素点仅有1 和0 两个取值可能)。

        Mat img_threshold = new Mat();
        threshold(grad, img_threshold, 0, 255, CV_THRESH_OTSU + CV_THRESH_BINARY);

        if (debug) {
            opencv_imgcodecs.imwrite(Paths.get("build","car","res").toAbsolutePath().toString()+"/tmp/debug_threshold.jpg", img_threshold);
        }

        // 使用闭操作。对图像进行闭操作以后,可以看到车牌区域被连接成一个矩形装的区域。

        Mat element = getStructuringElement(MORPH_RECT, new Size(morphSizeWidth, morphSizeHeight));
        morphologyEx(img_threshold, img_threshold, MORPH_CLOSE, element);

        if (debug) {
            opencv_imgcodecs.imwrite(Paths.get("build","car","res").toAbsolutePath().toString()+"/tmp/debug_morphology.jpg", img_threshold);
        }

        // Find 轮廓 of possibles plates 求轮廓。求出图中所有的轮廓。这个算法会把全图的轮廓都计算出来,因此要进行筛选。

        MatVector contours = new MatVector();
        findContours(img_threshold, contours, // a vector of contours
                CV_RETR_EXTERNAL, // 提取外部轮廓
                CV_CHAIN_APPROX_NONE); // all pixels of each contours

        Mat result = new Mat();
        if (debug) {
            // Draw red contours on the source image
            src.copyTo(result);
            drawContours(result, contours, -1, new Scalar(0, 0, 255, 255));
            opencv_imgcodecs.imwrite(Paths.get("build","car","res").toAbsolutePath().toString()+"/tmp/debug_Contours.jpg", result);
        }

        // Start to iterate to each contour founded
        // 筛选。对轮廓求最小外接矩形,然后验证,不满足条件的淘汰。

        Vector<RotatedRect> rects = new Vector<RotatedRect>();

        for (int i = 0; i < contours.size(); ++i) {
            RotatedRect mr = minAreaRect(contours.get(i));
            if (verifySizes(mr))
                rects.add(mr);
        }

        int k = 1;
        for (int i = 0; i < rects.size(); i++) {
            RotatedRect minRect = rects.get(i);
            if (verifySizes(minRect)) {

                if (debug) {
                    Point2f rect_points = new Point2f(4);
                    minRect.points(rect_points);

                    for (int j = 0; j < 4; j++) {

                        Point pt1 = new Point(new CvPoint2D32f(rect_points.position(j)));

                        Point pt2 = new Point(new CvPoint2D32f(rect_points.position((j + 1) % 4)));

                        line(result, pt1, pt2, new Scalar(0, 255, 255, 255), 1, 8, 0);
                    }
                }

                // rotated rectangle drawing
                // 旋转这部分代码确实可以将某些倾斜的车牌调整正,但是它也会误将更多正的车牌搞成倾斜!所以综合考虑,还是不使用这段代码。
                // 2014-08-14,由于新到的一批图片中发现有很多车牌是倾斜的,因此决定再次尝试这段代码。

                float r = minRect.size().width() / minRect.size().height();
                float angle = minRect.angle();
                Size rect_size = new Size((int) minRect.size().width(), (int) minRect.size().height());
                if (r < 1) {
                    angle = 90 + angle;
                    rect_size = new Size(rect_size.height(), rect_size.width());
                }
                // 如果抓取的方块旋转超过m_angle角度,则不是车牌,放弃处理
                if (angle - this.angle < 0 && angle + this.angle > 0) {
                    // Create and rotate image
                    Mat rotmat = getRotationMatrix2D(minRect.center(), angle, 1);
                    Mat img_rotated = new Mat();
                    warpAffine(src, img_rotated, rotmat, src.size()); // CV_INTER_CUBIC

                    Mat resultMat = showResultMat(img_rotated, rect_size, minRect.center(), k++);
                    resultVec.add(resultMat);
                }
            }
        }
        if (debug) {
            opencv_imgcodecs.imwrite(Paths.get("build","car","res").toAbsolutePath().toString()+"/tmp/debug_result.jpg", result);
        }

        return resultVec;
    }

    // 设置与读取变量

    public void setGaussianBlurSize(int gaussianBlurSize) {
        this.gaussianBlurSize = gaussianBlurSize;
    }

    public final int getGaussianBlurSize() {
        return this.gaussianBlurSize;
    }

    public void setMorphSizeWidth(int morphSizeWidth) {
        this.morphSizeWidth = morphSizeWidth;
    }

    public final int getMorphSizeWidth() {
        return this.morphSizeWidth;
    }

    public void setMorphSizeHeight(int morphSizeHeight) {
        this.morphSizeHeight = morphSizeHeight;
    }

    public final int getMorphSizeHeight() {
        return this.morphSizeHeight;
    }

    public void setVerifyError(float error) {
        this.error = error;
    }

    public final float getVerifyError() {
        return this.error;
    }

    public void setVerifyAspect(float aspect) {
        this.aspect = aspect;
    }

    public final float getVerifyAspect() {
        return this.aspect;
    }

    public void setVerifyMin(int verifyMin) {
        this.verifyMin = verifyMin;
    }

    public void setVerifyMax(int verifyMax) {
        this.verifyMax = verifyMax;
    }

    public void setJudgeAngle(int angle) {
        this.angle = angle;
    }

    /**
     * 是否开启调试模式
     *
     * @param debug
     */
    public void setDebug(boolean debug) {
        this.debug = debug;
    }

    /**
     * 获取调试模式状态
     *
     * @return
     */
    public boolean getDebug() {
        return debug;
    }

    /**
     * 对minAreaRect获得的最小外接矩形,用纵横比进行判断
     *
     * @param mr
     * @return
     */
    private boolean verifySizes(RotatedRect mr) {
        float error = this.error;

        // China car plate size: 440mm*140mm,aspect 3.142857
        float aspect = this.aspect;
        int min = 44 * 14 * verifyMin; // minimum area
        int max = 44 * 14 * verifyMax; // maximum area

        // Get only patchs that match to a respect ratio.
        float rmin = aspect - aspect * error;
        float rmax = aspect + aspect * error;

        int area = (int) (mr.size().height() * mr.size().width());
        float r = mr.size().width() / mr.size().height();
        if (r < 1)
            r = mr.size().height() / mr.size().width();

        return area >= min && area <= max && r >= rmin && r <= rmax;
    }

    /**
     * 显示最终生成的车牌图像,便于判断是否成功进行了旋转。
     *
     * @param src
     * @param rect_size
     * @param center
     * @param index
     * @return
     */
    private Mat showResultMat(Mat src, Size rect_size, Point2f center, int index) {
        Mat img_crop = new Mat();
        getRectSubPix(src, rect_size, center, img_crop);

        if (debug) {
            opencv_imgcodecs.imwrite(Paths.get("build","car","res").toAbsolutePath().toString()+"/tmp/debug_crop_" + index + ".jpg", img_crop);
        }

        Mat resultResized = new Mat();
        resultResized.create(HEIGHT, WIDTH, TYPE);
        resize(img_crop, resultResized, resultResized.size(), 0, 0, INTER_CUBIC);
        if (debug) {
            opencv_imgcodecs.imwrite(Paths.get("build","car","res").toAbsolutePath().toString()+"/tmp/debug_resize_" + index + ".jpg", resultResized);
        }
        return resultResized;
    }

    // PlateLocate所用常量
    public static final int DEFAULT_GAUSSIANBLUR_SIZE = 5;
    public static final int SOBEL_SCALE = 1;
    public static final int SOBEL_DELTA = 0;
    public static final int SOBEL_DDEPTH = CV_16S;
    public static final int SOBEL_X_WEIGHT = 1;
    public static final int SOBEL_Y_WEIGHT = 0;
    public static final int DEFAULT_MORPH_SIZE_WIDTH = 17;
    public static final int DEFAULT_MORPH_SIZE_HEIGHT = 3;

    // showResultMat所用常量
    public static final int WIDTH = 136;
    public static final int HEIGHT = 36;
    public static final int TYPE = CV_8UC3;

    // verifySize所用常量
    public static final int DEFAULT_VERIFY_MIN = 3;
    public static final int DEFAULT_VERIFY_MAX = 20;

    final float DEFAULT_ERROR = 0.6f;
    final float DEFAULT_ASPECT = 3.75f;
    // 角度判断所用常量
    public static final int DEFAULT_ANGLE = 30;

    // 是否开启调试模式常量
    public static final boolean DEFAULT_DEBUG = true;

    // 高斯模糊所用变量
    protected int gaussianBlurSize = DEFAULT_GAUSSIANBLUR_SIZE;

    // 连接操作所用变量
    protected int morphSizeWidth = DEFAULT_MORPH_SIZE_WIDTH;
    protected int morphSizeHeight = DEFAULT_MORPH_SIZE_HEIGHT;

    // verifySize所用变量
    protected float error = DEFAULT_ERROR;
    protected float aspect = DEFAULT_ASPECT;
    protected int verifyMin = DEFAULT_VERIFY_MIN;
    protected int verifyMax = DEFAULT_VERIFY_MAX;

    // 角度判断所用变量
    protected int angle = DEFAULT_ANGLE;

    // 是否开启调试模式,0关闭,非0开启
    protected boolean debug = DEFAULT_DEBUG;
}
车牌识别
import org.bytedeco.javacpp.opencv_core.Mat;

import java.util.Vector;


/**
 * 车牌识别
 * @author 何翔
 *
 */
public class PlateRecognize {

    public int plateRecognize(Mat src, Vector<String> licenseVec) {
        //车牌方块集合
        Vector<Mat> plateVec = new Vector<Mat>();
        int resultPD = plateDetect.plateDetect(src, plateVec);
        if (resultPD == 0) {
            int num = (int) plateVec.size();
            for (int j = 0; j < num; j++) {
                Mat plate = plateVec.get(j);
                //获取车牌颜色
                String plateType = charsRecognise.getPlateType(plate);
                System.out.println("车牌颜色:" + plateType);
                //获取车牌号
                String plateIdentify = charsRecognise.charsRecognise(plate);
                System.out.println("车牌号:" + plateIdentify);
                String license = plateType + ":" + plateIdentify;
                licenseVec.add(license);
            }
        }
        return resultPD;
    }

    /**
     * 设置是否开启生活模式
     * @param lifemode
     */
    public void setLifemode(boolean lifemode) {
        plateDetect.setPDLifemode(lifemode);
    }

    /**
     * 是否开启调试模式
     * @param debug
     */
    public void setDebug(boolean debug) {
        plateDetect.setPDDebug(debug);
        charsRecognise.setCRDebug(debug);
    }

    private PlateDetect plateDetect = new PlateDetect();
    private CharsRecognise charsRecognise = new CharsRecognise();
}
其他参考
这个是 https://gitee.com/admin_yu/yx-image-recognition 项目的算法讲解,可作为参考。
图像通道
OpenCV 中,图像可以分别为1,2,3,4 通道
- 1 通道为灰度图;
- 2 通道的图像是RGB555和RGB565。2通道图在程序处理中会用到,如傅里叶变换,可能会用到,一个通道为实数,一个通道为虚数,主要是编程方便。RGB555是16位的,2个字节,5+6+5,第一字节的前5位是R,后三位+第二字节是G,第二字节后5位是B,可见对原图像进行压缩了
- 3 通道为彩色图(RGB);
- 4 通道为 RGBA ,是RGB加上一个A通道,也叫alpha通道,表示透明度,PNG图像是一种典型的4通道图像。alpha通道可以赋值0到1,或者0到255,表示透明到不透明
CvType 类型常量组合规则
- byte : 比特数,位数。 有 8byte,16byte,32byte,64byte;对应在Mat中,每个像素的所占的空间大小,8位即 CV_8
- U|S|F :
- U : unsigned int , 无符号整形
- S : signed int , 有符号整形
- F : float , 单精度浮点型, float类型本身即有符号
这里的有符号、无符号是针对图像二进制编码来讲的。我在写的过程中大多数情况下都是使用的无符号,即 CV_8U ,CV_16U,当有计算时 - C[channels]:图像的通道数
比如 CV_8UC3 即 8位无符号的3通道(RGB 彩色)图像
灰度图像
- 彩色图像通常包括R、G、B三个分量,灰度化就是使彩色图像的R、G、B三个分量相等的过程
- 灰度图像中每个像素仅具有一种样本颜色,其灰度是位于黑色与白色之间的多级色彩深度,
- 灰度值大的像素点比较亮,反之比较暗,像素值最大为255(表示白色),像素值最小为0(表示黑色)
Imgproc.cvtColor(inMat, dst, Imgproc.COLOR_BGR2GRAY);- https://leejason.blog.csdn.net/article/details/106416128
图像滤波(降噪)
- 图像滤波,即在尽量保留图像细节特征的条件下对目标图像的噪声进行抑制,是图像预处理中不可缺少的操作,其处理效果的好坏将直接影响到后续图像处理和分析的有效性和可靠性
- 目的有两类:一类是模糊;另一类是消除噪音
高斯滤波
也叫高斯模糊,模糊原理:
- 拿一个矩阵(3X3, 5X5)等,和原图从左向右从上到下分别进行卷积,将卷积值最后赋值个当前卷积的中心像素
- 矩阵的大小和矩阵的值,通常称矩阵为卷积核
- 用于 抑制噪声,平滑图像,防止把噪点也检测为边缘
- 高斯滤波相比于均值滤波对图像个模糊程度较小
public static final int BLUR_KERNEL = 3;  // 滤波内核大小必须是 正奇数
public static void gaussianBlur(Mat inMat, Mat dst) {
    Size ksize = new Size(BLUR_KERNEL, BLUR_KERNEL); //3x3 // 高斯滤波内核宽高可以不一样,但都必须正奇数
    Imgproc.GaussianBlur(inMat, dst, ksize, 0, 0, Core.BORDER_DEFAULT);
}
https://blog.csdn.net/qq_35294564/article/details/81142524
中值滤波
用像素点领域灰度值的中值来代替该像素点的灰度值也就是说用一片区域的中间值来代替所有值。可以除去最大,最小值
- 除去斑点噪声和椒盐噪声很有用。均值滤波噪声也被参与运算
- 中值滤波时间在均值滤波的5倍以上
public static final int BLUR_KERNEL = 3;  // 滤波内核大小必须是 正奇数
public static void medianBlur(Mat inMat, Mat dst) {
    Size ksize = new Size(BLUR_KERNEL, BLUR_KERNEL); //3x3
    Imgproc.MedianBlur(inMat, dst, ksize, 0, 0, Core.BORDER_DEFAULT);
}
均值滤波
均值滤波本身存在着固有的缺陷,即它不能很好地保护图像细节,在图像去噪的同时也破坏了图像的细节部分,从而使图像变得模糊,不能很好地去除噪声点。特别是椒盐噪声
public static final int BLUR_KERNEL = 5;  // 滤波内核大小必须是 正奇数
public static void blur(Mat inMat, Mat dst) {
    Point anchor = new Point(-1,-1);
    Size ksize = new Size(BLUR_KERNEL, BLUR_KERNEL);
    Imgproc.blur(inMat, dst, ksize, anchor, Core.BORDER_DEFAULT);
}
仿射变换
一般对图像的变化操作有放大、缩小、旋转等,统称为几何变换;主要的图像变换有:仿射变换、投影变换、极坐标变换;
对一个图像的图像变换主要有两大步骤:
- 实现空间坐标的转换,就是使图像从初始位置到终止位置的移动
- 使用一个插值算法完成输出图像的每个像素的灰度值
- INTER_NEAREST 最近邻插值
- INTER_LINEAR 双线性插值(默认)
- INTER_AREA 使用像素区域关系进行重采样 缩小图像的时候使用
- INTER_CUBIC 4x4像素邻域的双三次插值 放大图像的时候使用
- INTER_LANCZOS4 8x8像素邻域的Lanczos插值
平移
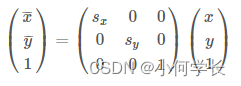
平移是最简单的仿射变换;如将空间坐标(x,y)沿着x轴移动100,沿着y轴移动200。平移后的坐标为(x+100,y+200)
将这个过程一般化后,假设任意的空间坐标(x,y)先沿着x轴平移Px再沿着y轴平移Py。得到的坐标为(x+Px,y+Py)。
用矩阵表示这个平移过程为:
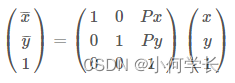
即: dst = A * inMat A为仿射矩阵
/**
 * @param pX 水平方向移动像素; 大于0则表示沿着轴正向移动,若小于0则表示沿着轴负向移动
 * @param pY 垂直方向移动像素; 大于0则表示沿着轴正向移动,若小于0则表示沿着轴负向移动
 */
public static void translateImg(Mat inMat, Mat dst, int pX, int pY){
    //定义平移矩阵 创建2行3列的全0矩阵;
    // 正常应该3×3,但是最后一行取值已经固定为 0 0 1
    Mat trans_mat = Mat.zeros(2, 3, CvType.CV_32FC1);
    trans_mat.put(0, 0, 1);
    trans_mat.put(0, 2, pX);
    trans_mat.put(1, 1, 1);
    trans_mat.put(1, 2, pY);
    // 仿射变换  size如果使用inMat,则保持原有画布尺寸大小,使用dst的size,可以自行调整画布大小
    Imgproc.warpAffine(inMat, dst, trans_mat, inMat.size());
}
如果已知inMat以及其放射变换后的dstMat矩阵,从而计算出变换后的坐标,就需要放射矩阵的计算,
主要的实现方法有:方程法,矩阵法,插值算法
缩放
一般设备采集到的图片像素比较大;像素过高,会导致计算时间耗时过高;可以考虑缩小图片来进行相关计算
注意:图片缩放算法可能导致车牌轻微变形,也会导致清晰度降低,影响计算结果
解决变形办法:
- 锁定宽高比就行缩放
- 提取到轮廓之后,将轮廓图还原成原图大小,然后从原图提取车牌切图
/**
 * 按最大宽度,计算放大/缩小比例
 * 锁定纵横比
 */
public static Mat zoom(Mat inMat, Integer maxWidth){
    Double ratio = maxWidth * 1.0 / inMat.width();
    Integer maxHeight = (int)Math.round(ratio * inMat.height());
    Mat dst = new Mat(maxHeight, maxWidth, inMat.type());
    zoom(inMat, dst, ratio, ratio, debug, tempPath);
    return dst;
}
/**
 * 不锁定纵横比
 * @param x 水平方向变换比例; 大于1则放大,小于1则缩小
 * @param y 垂直方向变换比例; 大于1则放大,小于1则缩小
 */
public static void zoom(Mat inMat, Mat dst, Double x, Double y){
    Mat trans_mat = Mat.zeros(2, 3, CvType.CV_32FC1);
    trans_mat.put(0, 0, x);
    trans_mat.put(1, 1, y);
    Imgproc.warpAffine(inMat, dst, trans_mat, dst.size()); // 仿射变换
}
warpAffine(Mat src, Mat dst, Mat M, Size dsize, int flags, int borderMode, Scalar borderValue)
warpAffine的默认值: int flags = INTER_LINEAR, int borderMode = BORDER_CONSTANT, Scalar borderValue = Scalar()
使用放射变换Imgproc.warpAffine,跟Imgproc.resize其实是一样的,可以通过参数选择插值算法;
/**
 * 放大、缩小图片,锁定横纵比
 */
public static Mat zoom(Mat inMat, Integer maxWidth) {
    Double ratio = maxWidth * 1.0 / inMat.width();
    Integer maxHeight = (int)Math.round(ratio * inMat.height());
    Mat dst = new Mat(maxHeight, maxWidth, inMat.type());
    if(ratio > 1.0){    // INTER_CUBIC 放大图像的时候使用
        Imgproc.resize(inMat, dst, dst.size(), ratio, ratio, Imgproc.INTER_CUBIC);
    } else {    // INTER_AREA 缩小图像的时候使用
        Imgproc.resize(inMat, dst, dst.size(), ratio, ratio, Imgproc.INTER_AREA);
    }
    return dst;
}
resize(Mat src, Mat dst, Size dsize, double fx, double fy, int interpolation)
- fx, fy 沿x轴,y轴的缩放系数
fx, fy 入参为零的时候,默认值为如下计算方式:
double fx = resized.cols() * 1.0 /inMat.cols();
double fy = resized.rows() * 1.0 /inMat.rows();
- interpolation 插入方式
- INTER_NEAREST        最近邻插值
- INTER_LINEAR        双线性插值(默认)
- INTER_AREA        使用像素区域关系进行重采样  缩小图像的时候使用
- INTER_CUBIC        4x4像素邻域的双三次插值   放大图像的时候使用
- INTER_LANCZOS4    8x8像素邻域的Lanczos插值
旋转

angle 旋转角度大于0则顺时针,小于0则逆时针
public static void rotateImg(Mat inMat, Mat dst, double angle, Point center){
    Mat img_rotated = Imgproc.getRotationMatrix2D(center, angle, 1); // 获取旋转矩阵
    Imgproc.warpAffine(inMat, dst, img_rotated, inMat.size());
}
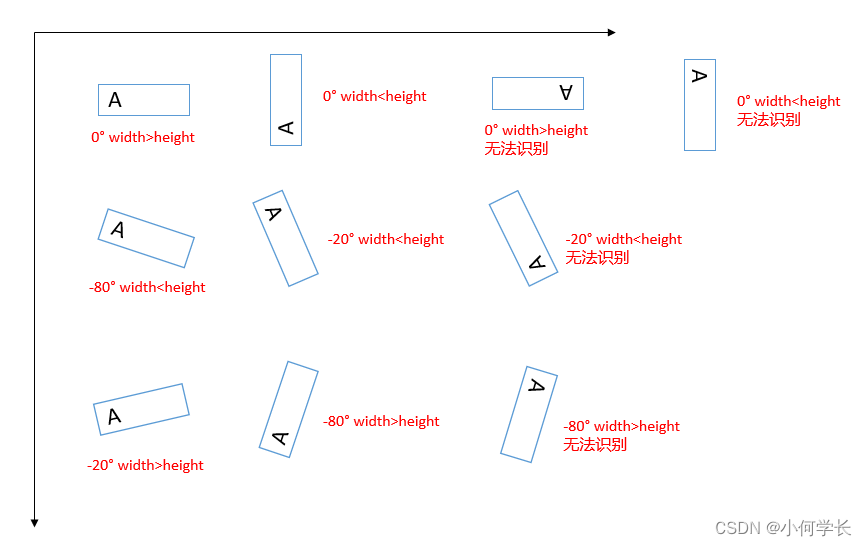
轮廓提取,获取到最小外接斜矩形,图片水平方向轴逆时针旋转,首次跟斜矩形平行时,平行的边即为矩形的width,这条边于水平方向的夹角,即为angle角度;所以在提取到斜矩形之后,需要判断width边跟height边的长短
旋转校正图片时,可以根据斜矩形矩形的angle进行旋转,如下:
错切

从原图取三个点,计算转后的三个点,从而得到变换矩阵,将原图进行转换
如上车牌图片,转换前得到车牌轮廓的最小外接矩形,经过转换之后,外接矩形的宽度要减少相应的像素,否则矩形过大,提取的车牌不精确
public static void warpPerspective(Mat inMat, Mat dst){
    // 原图四三顶点
    MatOfPoint2f srcPoints = new MatOfPoint2f();
    srcPoints.fromArray(new Point(0, 0), new Point(0, inMat.rows()), new Point(inMat.cols(), 0));
    // 目标图三个顶点
    MatOfPoint2f dstPoints = new MatOfPoint2f();
    dstPoints.fromArray(new Point(0 + 80, 0), new Point(0 - 80, inMat.rows()), new Point(inMat.cols() + 80, 0));
    Mat trans_mat  = Imgproc.getAffineTransform(srcPoints, dstPoints); // 变换矩阵
    Imgproc.warpAffine(inMat, dst, trans_mat, inMat.size());
}
投影变换
也叫透视变换; 是将图片投影到一个新的视平面
就好像放胶片电影一样,有一个光源,照射到胶片,得到幕布上的投影;随着光源位置的变换,幕布上的投影跟着变换
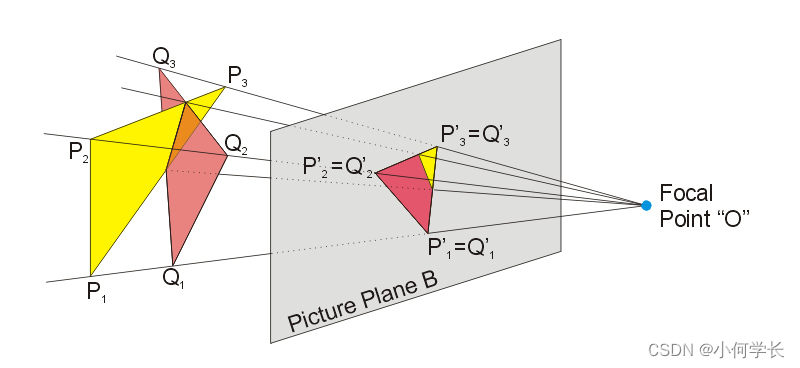
从原图inMat取四个点,计算转换后的四个点,从而得到变换矩阵,将原图进行转换
这里以原图四个顶点为例
public static void warpPerspective(Mat inMat, Mat dst){
    // 原图四个顶点
    MatOfPoint2f srcPoints = new MatOfPoint2f();
    srcPoints.fromArray(new Point(0, 0), new Point(0, inMat.rows()),
        new Point(inMat.cols(), 0), new Point(inMat.cols(), inMat.rows()));
    // 目标图四个顶点
    MatOfPoint2f dstPoints = new MatOfPoint2f();
    dstPoints.fromArray(new Point(0 + 80, 0), new Point(0 - 80, inMat.rows()),
        new Point(inMat.cols() + 80, 0) , new Point(inMat.cols() - 80, inMat.rows()));
    Mat trans_mat  = Imgproc.getPerspectiveTransform(srcPoints, dstPoints); // 变换矩阵
    Imgproc.warpPerspective(inMat, dst, trans_mat, inMat.size()); // 投影变换
}
相对于仿射变换的错切校正来说,错切校正是三点法,投影变换是四点法,对于车牌图像处理,二者的效果差不多,但是三点法执行效率要高
相关参考文档:https://www.cnblogs.com/supershuai/p/12317652.html
边缘检测
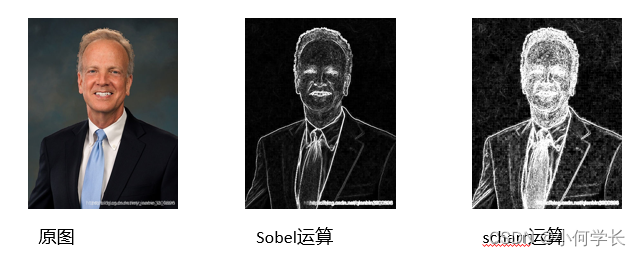
Sobel运算
- 也叫sobel算子,边缘检测算子
- 是一阶梯度算法;对图像中的像素点进行导数运算,得到图像的一阶水平方向导数;从而得到相邻两个像素点的差异值
- 具有平滑噪声作用,提供较为精确的边缘方向信息,边缘定位精度不够高。
- 当对精度要求不是很高时,是一种较为常用的边缘检测方法
public static final int SOBEL_SCALE = 1;
public static final int SOBEL_DELTA = 0;
public static final int SOBEL_X_WEIGHT = 1;
public static final int SOBEL_Y_WEIGHT = 0;
public static final int SOBEL_KERNEL = 3;// 内核大小必须为奇数且不大于31
public static final double alpha = 1.5; // 乘数因子
public static final double beta = 10.0; // 偏移量
public static void sobel(Mat inMat, Mat dst) {
    Mat grad_x = new Mat();
    Mat grad_y = new Mat();
    Mat abs_grad_x = new Mat();
    Mat abs_grad_y = new Mat();
    // 计算水平方向灰度梯度的绝对值
    Imgproc.Sobel(inMat, grad_x, CvType.CV_8U, 1, 0, SOBEL_KERNEL, SOBEL_SCALE, SOBEL_DELTA, Core.BORDER_DEFAULT);
    Core.convertScaleAbs(grad_x, abs_grad_x, alpha, beta);   // 增强对比度
    // 计算垂直方向灰度梯度的绝对值
    Imgproc.Sobel(inMat, grad_y, CvType.CV_8U, 0, 1, SOBEL_KERNEL, SOBEL_SCALE, SOBEL_DELTA, Core.BORDER_DEFAULT);
    Core.convertScaleAbs(grad_y, abs_grad_y, alpha, beta);
    // 计算结果梯度
    Core.addWeighted(abs_grad_x, SOBEL_X_WEIGHT, abs_grad_y, SOBEL_Y_WEIGHT, 0, dst);
}
scharr运算
scharr算子会带来更多图片的边缘细节
public static void scharr(Mat inMat, Mat dst) {
    Mat grad_x = new Mat();
    Mat grad_y = new Mat();
    Mat abs_grad_x = new Mat();
    Mat abs_grad_y = new Mat();
    //注意求梯度的时候我们使用的是Scharr算法,sofia算法容易受到图像细节的干扰
    Imgproc.Scharr(inMat, grad_x, CvType.CV_32F, 1, 0);
    Imgproc.Scharr(inMat, grad_y, CvType.CV_32F, 0, 1);
    //openCV中有32位浮点数的CvType用于保存可能是负值的像素数据值
    Core.convertScaleAbs(grad_x, abs_grad_x);
    Core.convertScaleAbs(grad_y, abs_grad_y);
    //openCV中使用release()释放Mat类图像,使用recycle()释放BitMap类图像
    grad_x.release();
    grad_y.release();
    Core.addWeighted(abs_grad_x, 0.5, abs_grad_y, 0.5, 0, dst);
    abs_grad_x.release();
    abs_grad_y.release();
}

若有收获,就点个赞吧
0 人点赞
