- 所示在日常的Linux管理工作中,这部分内容使用还是比较多的。下面我们主要介绍以下几个内容。
一、查看磁盘或者目录的容量
1. 命令 : df
“df” 查看已挂载磁盘的总容量、使用容量、剩余容量等,可以不加任何参数,默认是按k为单位显示的:
//查看硬盘的分配额[root@lamp ~]# dfFilesystem 1K-blocks Used Available Use% Mounted ondevtmpfs 751068 0 751068 0% /devtmpfs 763056 0 763056 0% /dev/shmtmpfs 763056 9832 753224 2% /runtmpfs 763056 0 763056 0% /sys/fs/cgroup/dev/mapper/centos-root 27245572 4250824 22994748 16% //dev/sda1 1038336 141364 896972 14% /boottmpfs 152612 0 152612 0% /run/user/0
“df” 常用选项有 “-i” “-h” “-k” “-m”等
//使用“-i” 查看inodes使用状况[root@lamp ~]# df -iFilesystem Inodes IUsed IFree IUse% Mounted ondevtmpfs 187767 385 187382 1% /devtmpfs 190764 1 190763 1% /dev/shmtmpfs 190764 779 189985 1% /runtmpfs 190764 16 190748 1% /sys/fs/cgroup/dev/mapper/centos-root 13629440 89169 13540271 1% //dev/sda1 524288 370 523918 1% /boottmpfs 190764 1 190763 1% /run/user/0
[root@lamp ~]# df -hFilesystem Size Used Avail Use% Mounted ondevtmpfs 734M 0 734M 0% /devtmpfs 746M 0 746M 0% /dev/shmtmpfs 746M 9.7M 736M 2% /runtmpfs 746M 0 746M 0% /sys/fs/cgroup/dev/mapper/centos-root 26G 4.1G 22G 16% //dev/sda1 1014M 139M 876M 14% /boottmpfs 150M 0 150M 0% /run/user/0
//“-h” 使用合适的单位显示,例如 ‘G’
//“-k”, “-m” 分别以K, M 为单位显示[root@lamp ~]# df -kFilesystem 1K-blocks Used Available Use% Mounted ondevtmpfs 751068 0 751068 0% /devtmpfs 763056 0 763056 0% /dev/shmtmpfs 763056 9832 753224 2% /runtmpfs 763056 0 763056 0% /sys/fs/cgroup/dev/mapper/centos-root 27245572 4250260 22995312 16% //dev/sda1 1038336 141364 896972 14% /boottmpfs 152612 0 152612 0% /run/user/0[root@lamp ~]# df -mFilesystem 1M-blocks Used Available Use% Mounted ondevtmpfs 734 0 734 0% /devtmpfs 746 0 746 0% /dev/shmtmpfs 746 10 736 2% /runtmpfs 746 0 746 0% /sys/fs/cgroup/dev/mapper/centos-root 26608 4151 22457 16% //dev/sda1 1014 139 876 14% /boottmpfs 150 0 150 0% /run/user/0
第一列是分区的名字,第二列为该分区总共的容量,第三列为已经使用了多少,第四列为还剩下多少,第五列为已经使用百分比,最后一列为挂载点;如果这个数值到达90%以上,那么就应该关注了,磁盘分区满了会引起系统崩溃。2. 命令 : du
“du” 用来查看某个目录或文件所占空间大小.
语法 : du [-abckmsh] [文件或者目录名] 常用的参数有:
“-a” 全部文件与目录大小都列出来。如果不加任何选项和参数只列出目录(包含子目录)大小。
//查看centos的目录大小[root@lamp opt]# du centos/0 centos/
由于centos目录文件比较多,所以在使用du -a 命令的时候,后面通过‘|’管道符进行输出前10行数据。
// u不指定单位的话,默认显示单位为K.[root@lamp opt]# du -a centos/0 centos/
“-b” 列出的值以bytes为单位输出。
“-k” 以KB为单位输出,和默认不加任何选项的输出值是一样的。
“-m” 以MB为单位输出
“-h” 系统自动调节单位,例如文件太小可能就几K,那么就以K为单位显示,如果大到几G,则就以G为单位显示。[root@lamp opt]# du -b /etc/passwd1338 /etc/passwd[root@lamp opt]# du -k /etc/passwd4 /etc/passwd[root@lamp opt]# du -m /etc/passwd1 /etc/passwd[root@lamp opt]# du -h /etc/passwd4.0K /etc/passwd
“-c” 最后加总[root@lamp ~]# du -c /etc/passwd4 /etc/passwd4 total“-s” 只列出总和[root@lamp opt]# du -s centos/0 centos/
二、磁盘分区格式化
作为一个Linux系统管理员,对于磁盘的操作必须要熟练。正式介绍Linux下分区工具之前,需要先给虚拟机添加一块磁盘。具体步骤如下:<br />1. 先关闭正在运行的Linux系统 init 0.<br />2. 到vmware的Linux虚拟机界面,点 “Edit virtual machine settings”(编辑虚拟机设置), 点一下左侧靠下面的 “Add...”(添加) 按钮。<br />3. 在左侧选中 “Hard Disk”(硬盘), 默认就是这一行,点下角的 “Next”(下一步), 继续点 “Next”(下一步).<br />4. 选择创建新的虚拟磁盘 “Next”(下一步)。<br />5. 选择将虚拟磁盘储存为单个文件 “Next”(下一步)。<br />6.点击完成,等待生成新的虚拟磁盘。
1. 命令 : fdisk
fdisk 是Linux下硬盘的分区工具,是一个非常实用的命令,但是fdisk只能划分小于2T的分区。
语法 : fdisk [-l ] [设备名称] 选项只有一个。
“-l” 后边不跟设备名会直接列出系统中所有的磁盘设备以及分区表,加上设备名会列出该设备的分区表。 ```bash [root@lamp ~]# fdisk -l
Disk /dev/sda: 32.2 GB, 32212254720 bytes, 62914560 sectors Units = sectors of 1 * 512 = 512 bytes Sector size (logical/physical): 512 bytes / 512 bytes I/O size (minimum/optimal): 512 bytes / 512 bytes Disk label type: dos Disk identifier: 0x000bec93
Device Boot Start End Blocks Id System /dev/sda1 * 2048 2099199 1048576 83 Linux /dev/sda2 2099200 62914559 30407680 8e Linux LVM
Disk /dev/sdb: 21.5 GB, 21474836480 bytes, 41943040 sectors Units = sectors of 1 * 512 = 512 bytes Sector size (logical/physical): 512 bytes / 512 bytes I/O size (minimum/optimal): 512 bytes / 512 bytes
Disk /dev/mapper/centos-root: 27.9 GB, 27913093120 bytes, 54517760 sectors Units = sectors of 1 * 512 = 512 bytes Sector size (logical/physical): 512 bytes / 512 bytes I/O size (minimum/optimal): 512 bytes / 512 bytes
Disk /dev/mapper/centos-swap: 3221 MB, 3221225472 bytes, 6291456 sectors Units = sectors of 1 * 512 = 512 bytes Sector size (logical/physical): 512 bytes / 512 bytes I/O size (minimum/optimal): 512 bytes / 512 bytes
//查看硬盘信息<br />通过fdisk -l 后面指定硬盘名称可以得知硬盘的具体信息。```bash[root@lamp ~]# fdisk -l /dev/sdaDisk /dev/sda: 32.2 GB, 32212254720 bytes, 62914560 sectorsUnits = sectors of 1 * 512 = 512 bytesSector size (logical/physical): 512 bytes / 512 bytesI/O size (minimum/optimal): 512 bytes / 512 bytesDisk label type: dosDisk identifier: 0x000bec93Device Boot Start End Blocks Id System/dev/sda1 * 2048 2099199 1048576 83 Linux/dev/sda2 2099200 62914559 30407680 8e Linux LVM
//可以看到刚才新增的一块磁盘 /dev/sdb 的信息。
“fdisk” 如果不加 “-l” 则进入另一个模式,在该模式下,可以对磁盘进行分区操作。
[root@lamp ~]# fdisk /dev/sdbWelcome to fdisk (util-linux 2.23.2).Changes will remain in memory only, until you decide to write them.Be careful before using the write command.Device does not contain a recognized partition tableBuilding a new DOS disklabel with disk identifier 0x92846d42.Command (m for help):
输入 ‘m’ 会列出常用的命令
Command (m for help): mCommand actiona toggle a bootable flagb edit bsd disklabelc toggle the dos compatibility flagd delete a partitiong create a new empty GPT partition tableG create an IRIX (SGI) partition tablel list known partition typesm print this menun add a new partitiono create a new empty DOS partition tablep print the partition tableq quit without saving changess create a new empty Sun disklabelt change a partition's system idu change display/entry unitsv verify the partition tablew write table to disk and exitx extra functionality (experts only)
不难理解这些字母的功能。常用的有’p’, ‘n’, ‘d’, ‘w’, ‘q’。
“p” 打印当前磁盘的分区情况。
Command (m for help): pDisk /dev/sdb: 21.5 GB, 21474836480 bytes, 41943040 sectorsUnits = sectors of 1 * 512 = 512 bytesSector size (logical/physical): 512 bytes / 512 bytesI/O size (minimum/optimal): 512 bytes / 512 bytesDisk label type: dosDisk identifier: 0x92846d42Device Boot Start End Blocks Id System
‘n’ 建立一个新的分区。
‘w’ 保存操作。
‘q’ 退出。
‘d’ 删除一个分区
下面把刚才增加的磁盘/dev/sdb进行分区操作。
先使用 ‘p’ 命令看一下/dev/sdb的分区状况,可以看到目前/dev/sdb没有任何分区,下面给它建立第一个分区。
[root@lamp ~]# fdisk /dev/sdbWelcome to fdisk (util-linux 2.23.2).Changes will remain in memory only, until you decide to write them.Be careful before using the write command.Device does not contain a recognized partition tableBuilding a new DOS disklabel with disk identifier 0x3119c821.Command (m for help): nPartition type:p primary (0 primary, 0 extended, 4 free)e extended
使用 ‘n’ 命令新建分区,它会提示是要 ‘e’ (扩展分区) 还是 ‘p’ (主分区)
Command (m for help): nPartition type:p primary (0 primary, 0 extended, 4 free)e extendedSelect (default p): pPartition number (1-4, default 1): 1First sector (2048-41943039, default 2048): 2048Last sector, +sectors or +size{K,M,G} (2048-41943039, default 41943039): +5GPartition 1 of type Linux and of size 5 GiB is set
输入 ‘p’ 后,会提示分区数,这里写 ‘1’, 因为是第一个分区,当然你也可以写 ‘2’ 或 ‘3’, 如果你直接回车的话,会继续提示你必须输入一个数字,接着又提示第一个柱面从哪里开始,默认是 ‘1’, 你可以写一个其他的数字,不过这样就浪费了空间,所以还是写 ‘1’ ,或者你直接回车也会按 ‘1’ 处理,接着是让输入最后一个柱面的数值,也就是说你需要给这个分区分多大空间,即写 “+5G”, 这样即方便又不容易出错。用 ‘p’ 查看已经多出了一个分区
Command (m for help): pDisk /dev/sdb: 21.5 GB, 21474836480 bytes, 41943040 sectorsUnits = sectors of 1 * 512 = 512 bytesSector size (logical/physical): 512 bytes / 512 bytesI/O size (minimum/optimal): 512 bytes / 512 bytesDisk label type: dosDisk identifier: 0x3119c821Device Boot Start End Blocks Id System/dev/sdb1 2048 10487807 5242880 83 Linux
继续上面的操作,一直创建主分区到4, 然后再一次创建分区的时候则会提示你输入e;
这是因为,在Linux中最多只能创建4个主分区,那如果你想多创建几个分区如何做?很容易,在创建完第三个分区后,创建第四个分区时选择扩展分区。扩展分区,在最后一列显示为 “Extended”, 接下来继续创建分区。
Command (m for help): pDisk /dev/sdb: 21.5 GB, 21474836480 bytes, 41943040 sectorsUnits = sectors of 1 * 512 = 512 bytesSector size (logical/physical): 512 bytes / 512 bytesI/O size (minimum/optimal): 512 bytes / 512 bytesDisk label type: dosDisk identifier: 0x3119c821Device Boot Start End Blocks Id System/dev/sdb1 2048 10487807 5242880 83 Linux/dev/sdb2 10487808 20973567 5242880 83 Linux/dev/sdb3 20973568 31459327 5242880 83 Linux/dev/sdb4 31459328 41943039 5241856 83 Linux
这时候再分区和以前有区别了,不再选择是主分区还是扩展分区了,而是直接定义大小。当分完三个主分区后,第四个扩展分区需要把剩余的磁盘空间全部划分给扩展分区,不然的话剩余的空间会浪费,因为分完扩展分区后,再划分新的分区时是在已经划分的扩展分区里来分的。其中/dev/sdb4为扩展分区,这个分区是不可以格式化的,你可以把它看成是一个空壳子,能使用的为/dev/sdb5, 其中/dev/sdb5为/dev/sdb4的子分区,这个子分区叫做逻辑分区。如果你发现分区分的不合适,想删除掉某个分区这就用到了 ‘d’ 命令。
Command (m for help): dPartition number (1-4, default 4): 1Partition 1 is deletedCommand (m for help): pDisk /dev/sdb: 21.5 GB, 21474836480 bytes, 41943040 sectorsUnits = sectors of 1 * 512 = 512 bytesSector size (logical/physical): 512 bytes / 512 bytesI/O size (minimum/optimal): 512 bytes / 512 bytesDisk label type: dosDisk identifier: 0x3119c821Device Boot Start End Blocks Id System/dev/sdb2 10487808 20973567 5242880 83 Linux/dev/sdb3 20973568 31459327 5242880 83 Linux/dev/sdb4 31459328 41943039 5241856 83 Linux
//使用d命令删除第一个分区
输入 ‘d’ 会提示要删除哪个分区,可以选择从 1-5 其中1-3是主分区(sdb1, sdb2, sdb3),4是扩展分区(sdb4),5是逻辑分区(sdb5),如果输入5,则直接把逻辑分区sdb5删除掉,但是如果输入4的话,会把整个扩展分区sdb4 kill掉,当然也包含扩展分区里面的逻辑分区sdb5。在刚才的分区界面直接 Ctrl + C 退出来,这样刚刚的分区全部都取消了,现在重新来做分区
Command (m for help): nPartition type:p primary (0 primary, 0 extended, 4 free)e extendedSelect (default p): ePartition number (1-4, default 1): 1First sector (2048-41943039, default 2048):Using default value 2048Last sector, +sectors or +size{K,M,G} (2048-41943039, default 41943039):Using default value 41943039Partition 1 of type Extended and of size 20 GiB is setCommand (m for help): pDisk /dev/sdb: 21.5 GB, 21474836480 bytes, 41943040 sectorsUnits = sectors of 1 * 512 = 512 bytesSector size (logical/physical): 512 bytes / 512 bytesI/O size (minimum/optimal): 512 bytes / 512 bytesDisk label type: dosDisk identifier: 0x3119c821Device Boot Start End Blocks Id System/dev/sdb1 2048 41943039 20970496 5 Extended
//直接创建扩展分区
Command (m for help): nPartition type:p primary (0 primary, 1 extended, 3 free)l logical (numbered from 5)Select (default p): lAdding logical partition 5First sector (4096-41943039, default 4096):Using default value 4096Last sector, +sectors or +size{K,M,G} (4096-41943039, default 41943039): +5GPartition 5 of type Linux and of size 5 GiB is setCommand (m for help): pDisk /dev/sdb: 21.5 GB, 21474836480 bytes, 41943040 sectorsUnits = sectors of 1 * 512 = 512 bytesSector size (logical/physical): 512 bytes / 512 bytesI/O size (minimum/optimal): 512 bytes / 512 bytesDisk label type: dosDisk identifier: 0x3119c821Device Boot Start End Blocks Id System/dev/sdb1 2048 41943039 20970496 5 Extended/dev/sdb5 4096 10489855 5242880 83 Linux
三、格式化磁盘分区
1. 命令 : mke2fs, mkfs.ext2, mkfs.ext3, mkfs.ext4
当用man查询这四个命令的帮助文档时,你会发现我们看到了同一个帮助文档,这说明四个命令是一样的。mke2fs常用的选项有:
‘-b’ 分区时设定每个数据区块占用空间大小,目前支持1024, 2048 以及4096 bytes每个块。
‘-i’ 设定inode的大小
‘-N’ 设定inode数量,有时使用默认的inode数不够用,所以要自定设定inode数量。
‘-c’ 在格式化前先检测一下磁盘是否有问题,加上这个选项后会非常慢
‘-L’ 预设该分区的标签label
‘-j’ 建立ext3格式的分区,如果使用mkfs.ext3 就不用加这个选项了
‘-t’ 用来指定什么类型的文件系统,可以是ext2, ext3 也可以是 ext4.
[root@lamp ~]# mke2fs -t ext4 /dev/sdbmke2fs 1.42.9 (28-Dec-2013)/dev/sdb is entire device, not just one partition!Proceed anyway? (y,n) yFilesystem label=OS type: LinuxBlock size=4096 (log=2)Fragment size=4096 (log=2)Stride=0 blocks, Stripe width=0 blocks1310720 inodes, 5242880 blocks262144 blocks (5.00%) reserved for the super userFirst data block=0Maximum filesystem blocks=2153775104160 block groups32768 blocks per group, 32768 fragments per group8192 inodes per groupSuperblock backups stored on blocks:32768, 98304, 163840, 229376, 294912, 819200, 884736, 1605632, 2654208,4096000Allocating group tables: doneWriting inode tables: doneCreating journal (32768 blocks): doneWriting superblocks and filesystem accounting information: done
2. 命令 : e2label
用来查看或修改分区的标签
[root@lamp ~]# e2label /dev/sdb Test[root@lamp ~]# e2label /dev/sdbTest
四、挂载/卸载磁盘
在上面的内容中做了磁盘的分区和格式化,那么格式化完了后,如何去用它呢?这就涉及到了挂载这块磁盘。
在挂载某个分区前需要先建立一个挂载点,这个挂载点是以目录的形式出现的。一旦把某一个分区挂载到了这个挂载点(目录)下,那么再往这个目录写数据使,则都会写到该分区中。这就需要你注意一下,在挂载该分区前,挂载点(目录)下必须是个空目录。其实目录不为空并不影响所挂载分区的使用,但是一旦挂载上了,那么该目录下以前的东西就不能看到了。只有卸载掉该分区后才能看到。
1. 命令 : mount
如果不加任何选项,直接运行 “mount” 命令,会显示如下信息。
[root@lamp ~]# mountsysfs on /sys type sysfs (rw,nosuid,nodev,noexec,relatime,seclabel)proc on /proc type proc (rw,nosuid,nodev,noexec,relatime)devtmpfs on /dev type devtmpfs (rw,nosuid,seclabel,size=751068k,nr_inodes=187767,mode=755)securityfs on /sys/kernel/security type securityfs (rw,nosuid,nodev,noexec,relatime)tmpfs on /dev/shm type tmpfs (rw,nosuid,nodev,seclabel)devpts on /dev/pts type devpts (rw,nosuid,noexec,relatime,seclabel,gid=5,mode=620,ptmxmode=000)tmpfs on /run type tmpfs (rw,nosuid,nodev,seclabel,mode=755)tmpfs on /sys/fs/cgroup type tmpfs (ro,nosuid,nodev,noexec,seclabel,mode=755)cgroup on /sys/fs/cgroup/systemd type cgroup (rw,nosuid,nodev,noexec,relatime,seclabel,xattr,release_agent=/usr/lib/systemd/systemd-cgroups-agent,name=systemd)pstore on /sys/fs/pstore type pstore (rw,nosuid,nodev,noexec,relatime)cgroup on /sys/fs/cgroup/freezer type cgroup (rw,nosuid,nodev,noexec,relatime,seclabel,freezer)cgroup on /sys/fs/cgroup/memory type cgroup (rw,nosuid,nodev,noexec,relatime,seclabel,memory)cgroup on /sys/fs/cgroup/cpu,cpuacct type cgroup (rw,nosuid,nodev,noexec,relatime,seclabel,cpuacct,cpu)cgroup on /sys/fs/cgroup/pids type cgroup (rw,nosuid,nodev,noexec,relatime,seclabel,pids)cgroup on /sys/fs/cgroup/net_cls,net_prio type cgroup (rw,nosuid,nodev,noexec,relatime,seclabel,net_prio,net_cls)cgroup on /sys/fs/cgroup/blkio type cgroup (rw,nosuid,nodev,noexec,relatime,seclabel,blkio)cgroup on /sys/fs/cgroup/perf_event type cgroup (rw,nosuid,nodev,noexec,relatime,seclabel,perf_event)cgroup on /sys/fs/cgroup/hugetlb type cgroup (rw,nosuid,nodev,noexec,relatime,seclabel,hugetlb)cgroup on /sys/fs/cgroup/devices type cgroup (rw,nosuid,nodev,noexec,relatime,seclabel,devices)cgroup on /sys/fs/cgroup/cpuset type cgroup (rw,nosuid,nodev,noexec,relatime,seclabel,cpuset)configfs on /sys/kernel/config type configfs (rw,relatime)/dev/mapper/centos-root on / type xfs (rw,relatime,seclabel,attr2,inode64,noquota)selinuxfs on /sys/fs/selinux type selinuxfs (rw,relatime)debugfs on /sys/kernel/debug type debugfs (rw,relatime)mqueue on /dev/mqueue type mqueue (rw,relatime,seclabel)hugetlbfs on /dev/hugepages type hugetlbfs (rw,relatime,seclabel)systemd-1 on /proc/sys/fs/binfmt_misc type autofs (rw,relatime,fd=35,pgrp=1,timeout=0,minproto=5,maxproto=5,direct,pipe_ino=14261)/dev/sda1 on /boot type xfs (rw,relatime,seclabel,attr2,inode64,noquota)sunrpc on /var/lib/nfs/rpc_pipefs type rpc_pipefs (rw,relatime)tmpfs on /run/user/0 type tmpfs (rw,nosuid,nodev,relatime,seclabel,size=152612k,mode=700)
这个命令可以查看当前系统已经挂载的所有分区,以及分区文件系统的类型,挂载点和一些选项等信息,所以如果想知道某个分区的文件系统类型直接用该命令查看即可。下面先建立一个空目录,然后在目录里建一个空白文档。
[root@lamp ~]# mkdir /newdir[root@lamp ~]# touch /newdir/newfile.txt[root@lamp ~]# ls !$ls /newdir/newfile.txt/newdir/newfile.txt
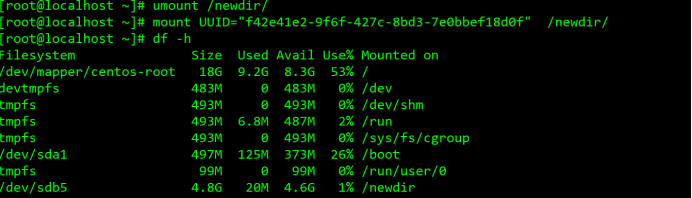
//把刚才格式化的 /dev/sdb5 挂载到 /newdir 上
[root@lamp ~]# mount /dev/sdb /newdir/
2. 命令 : blkid
在日常的运维工作中遇到过这样的情况,一台服务器上新装了两块磁盘,磁盘a(在服务器上显示为sdc)和磁盘b(在服务器上显示为sdd),有一次把这两块磁盘都拔掉了,然后再重新插上,重启机器,结果磁盘编号调换了,a变成了sdd,b变成了sdc(这是因为把磁盘插错了插槽),问题来了。通过上边的学习,你挂载磁盘是通过/dev/hdb1 这样的分区名字来挂载的,如果先前加入到了/etc/fstab 中,结果系统启动后则会挂载错分区。下面介绍如何避免这种情况发生。
[root@lamp ~]# blkid/dev/sda1: UUID="d38f5204-7c4a-4805-8a15-084dd05b60b8" TYPE="xfs"/dev/sda2: UUID="1KVGCi-JFnb-L2y5-aPEz-YVHk-xXc7-mHVQ77" TYPE="LVM2_member"/dev/sr0: UUID="2020-04-22-00-54-00-00" LABEL="CentOS 7 x86_64" TYPE="iso9660" PTTYPE="dos"/dev/sdb: LABEL="Test" UUID="a970cc9f-5fc5-4076-98b7-9962bf33678a" TYPE="ext4"/dev/mapper/centos-root: UUID="3da3803b-e5fb-4eb2-bfbc-daaaef829bcb" TYPE="xfs"/dev/mapper/centos-swap: UUID="d22c6954-6461-4c07-86a1-d69725638ec0" TYPE="swap"
//这样可以获得全部磁盘分区的UUID,如果格式化的时候指定了 LABEL 则该命令也会显示LABEL值,甚至连文件系统类型也会显示。当然这个命令后面也可以指定哪个分区。
[root@lamp ~]# blkid /dev/sdb/dev/sdb: LABEL="Test" UUID="a970cc9f-5fc5-4076-98b7-9962bf33678a" TYPE="ext4"
3. 命令 : umount
在上面的小实验中,多次用到这个命令,这个命令也简单的很,后边可以跟挂载点,也可以跟分区名(/dev/hdb1), 但是不可以跟LABEL和UUID.
umount 命令有一个非常有用的选项那就是 ‘-l’, 有时候你会遇到不能卸载的情况,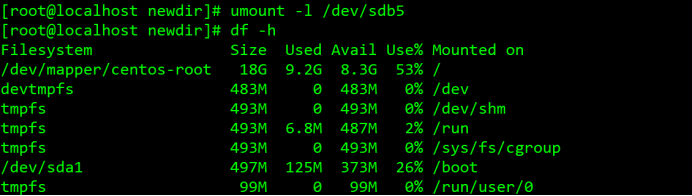
4. 建立一个swap文件增加虚拟内存
从装系统时就接触过这个swap了,它类似与windows的虚拟内存,分区的时候一般大小为内存的2倍,如果你的内存超过8G,那么你分16G似乎是没有必要了。分16G足够日常交换了。然而,还会有虚拟内存不够用的情况发生。如果真遇到了,莫非还要重新给磁盘分区?当然不能,那我们就增加一个虚拟的磁盘出来。基本的思路就是:建立swapfile -> 格式化为swap格式 -> 启用该虚拟磁盘.<br /><br /> “dd” 这个命令经常用到,所以请你也要掌握它的使用方法,其实也不难,用 “if” 指定源,基本上除了 “/dev/zero” 外基本上不会写别的,而/dev/zero 是UNIX系统特有的一个文件,它可以提供源源不断的 “0”, 关于它的其他信息请你在网上查一下资料。 “of” 指定目标文件, “bs” 定义块的大小, “count” 定义块的数量,这两个参数的多少决定了目标文件的大小,目标文件大小 = bs x count. 用dd建了一个大小为400M的文件,然后格式化成swap格式.<br />
5. LVM讲解
1.什么是LVM?
LVM是逻辑盘卷管理(Logical Volume Manager)的简称,它是Linux环境下对磁盘分区进行管理的一种机制,LVM是建立在硬盘和分区之上的一个逻辑层,来提高磁盘分区管理的灵活性。
2.为什么要使用LVM?
在日常工作或者学习中,随着电脑的不断被使用,我们的磁盘空间可能会越来越小,这时候,我们不能直接更换大硬盘,因为硬盘有价,数据无价,这时候我们就可以使用LVM,LVM将存储虚拟化,使用逻辑卷,你不会受限于物理磁盘的大小,另外,和硬件相关的存储设置被其隐藏,你能不用停止应用或卸载文件系统来调整卷大小或数据迁移.这样能减少操作成本,LVM最大的特点就是可以对磁盘进行动态管理。因为逻辑卷的大小是可以动态调整的,而且不会丢失现有的数据。如果我们新增加了硬盘,其也不会改变现有上层的逻辑卷。作为一个动态磁盘管理机制,逻辑卷技术大大提高了磁盘管理的灵活性。
3.LVM工作机制?
LVM就是通过将底层的物理硬盘抽象的封装起来,然后以逻辑卷的方式呈现给上层应用。在传统的磁盘管理机制中,我们的上层应用是直接访问文件系统,从而对底层的物理硬盘进行读取,而在LVM中,其通过对底层的硬盘进行封装,当我们对底层的物理硬盘进行操作时,其不再是针对于分区进行操作,而是通过一个叫做逻辑卷的东西来对其进行底层的磁盘管理操作。
4.逻辑卷管理概念?
(1) 物理卷(PV, Physical Volume)
物理卷就是指磁盘,磁盘分区或从逻辑上和磁盘分区具有同样功能的设备(如RAID),是LVM的基本存储逻辑块,但和基本的物理存储介质(如分区、磁盘等)比较,却包含有和LVM相关的管理参数。当前LVM允许你在每个物理卷上保存这个物理卷的0至2份元数据拷贝.默认为1,保存在设备的开始处.为2时,在设备结束处保存第二份备份.
(2) 卷组(VG, Volume Group)
LVM卷组类似于非LVM系统中的物理硬盘,其由物理卷组成。能在卷组上创建一个或多个“LVM分区”(逻辑卷),LVM卷组由一个或多个物理卷组成。
(3) 逻辑卷(LV, Logical Volume)
LVM的逻辑卷类似于非LVM系统中的硬盘分区,在逻辑卷之上能建立文件系统(比如/home或/usr等)。

若有收获,就点个赞吧
0 人点赞
