两阶段终止模式
当我们在执行线程一时,想要终止线程二,这时就需要使用 interrupt() 来优雅的停止线程二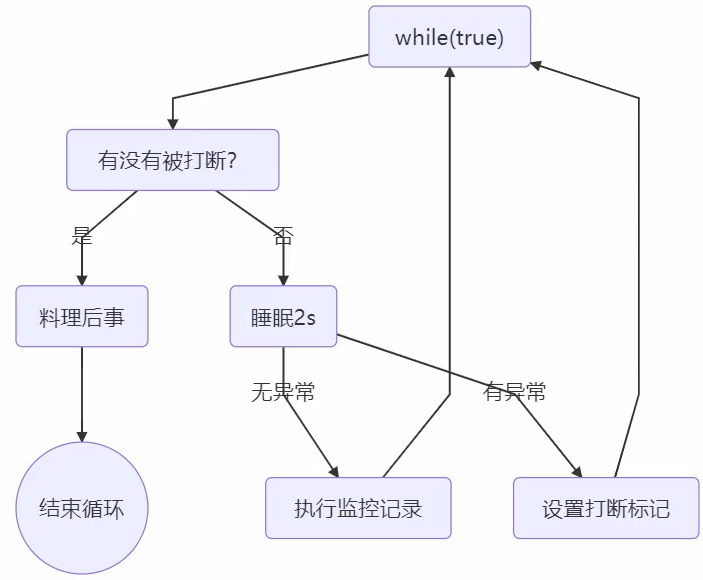
interrupt() 实现
public class Test7 {public static void main(String[] args) throws InterruptedException {Monitor monitor = new Monitor();monitor.start();Thread.sleep(3500);monitor.stop();}}class Monitor {Thread monitor;// 启动监控器线程public void start() {// 设置线控器线程,用于监控线程状态monitor = new Thread() {@Overridepublic void run() {// 开始不停的监控while (true) {// 判断当前线程是否被打断了if(Thread.currentThread().isInterrupted()) {System.out.println("处理后续任务");// 终止线程执行break;}System.out.println("监控器运行中...");try {// 线程休眠Thread.sleep(1000);} catch (InterruptedException e) {e.printStackTrace();// 如果是在休眠的时候被打断,不会将打断标记设置为true,这时要重新设置打断标记Thread.currentThread().interrupt();}}}};monitor.start();}// 用于停止监控器线程public void stop() {//打断线程monitor.interrupt();}}
volatile 关键字实现
package com;public class Uninterruptible {public static void main(String[] args) throws InterruptedException {Monitor monitor = new Monitor();monitor.start();Thread.sleep(3500);monitor.stop();}}class Monitor {Thread monitor;// 设置标记,用于判断是否被终止了private volatile boolean stop = false;// 启动监控器线程public void start() {//设置线控器线程,用于监控线程状态monitor = new Thread() {@Overridepublic void run() {// 开始不停的监控while (true) {if (stop) {System.out.println("处理后续任务");break;}System.out.println("监控器运行中...");try {// 线程休眠Thread.sleep(1000);} catch (InterruptedException e) {System.out.println("被打断了");}}}};monitor.start();}// 用于停止监控器线程public void stop() {// 打断线程(设置打断标记,在线程sleep时打断抛出异常)monitor.interrupt();// 修改标记stop = true;}}
保护性暂停模式
wait()、notify() 的应用
保护性暂停模式的定义即: Guarded Suspension,用一个线程等待另一个线程的执行结果
- 有一个结果需要从一个线程传递到另一个线程,让他们关联同一个 GuardedObject
- 如果有结果不断从一个线程到另一个线程那么可以使用消息队列
- JDK 中,join()、Future 的实现,采用的就是保护性暂停模式
-
实现
class GuardedObject {private Object response;private final Object lock = new Object();public Object get() {synchronized (lock) {// 条件不满足则等待,避免虚假唤醒while (response == null) {try {lock.wait();} catch (InterruptedException e) {e.printStackTrace();}}return response;}}public void complete(Object response) {synchronized (lock) {// 条件满足,通知等待线程this.response = response;lock.notifyAll();}}}
带超时判断的实现
class GuardedObjectV2 {private Object response;private final Object lock = new Object();public Object get(long millis) {synchronized (lock) {// 开始时间long begin = System.currentTimeMillis();// 经历的时间long timePassed = 0;while (response == null) {// 这一轮循环应该等待的时间long waitTime = millis - timePassed;// 经历的时间超过了最大等待时间时,退出循环if (waitTime <= 0) {break;}try {lock.wait(waitTime);} catch (InterruptedException e) {e.printStackTrace();}timePassed = System.currentTimeMillis() - begin;}return response;}}public void complete(Object response) {synchronized (lock) {this.response = response;lock.notifyAll();}}}
多任务版实现
如果需要在多个类之间使用 GuardedObject 对象,作为参数传递很不方便,因此设计一个用来解耦的中间类, 这样不仅能够解耦【结果等待者】和【结果生产者】,还能够同时支持多个任务的管理
class GuardedObject {// 新增 id 用来标识 GuardedObjectprivate int id;public GuardedObject(int id) {this.id = id;}public int getId() {return id;}// 结果private Object response;// 获取结果。timeout 表示要等待多久public Object get(long millis) {synchronized (this) {long begin = System.currentTimeMillis();long timePassed = 0;while (response == null) {long waitTime = millis - timePassed;if (waitTime <= 0) {break;}try {this.wait(waitTime);} catch (InterruptedException e) {e.printStackTrace();}timePassed = System.currentTimeMillis() - begin;}return response;}}// 产生结果public void complete(Object response) {synchronized (this) {this.response = response;this.notifyAll();}}}
中间解耦类
class Mailboxes {private static Map<Integer, GuardedObject> boxes = new Hashtable<>();private static int id = 1;// 产生唯一 idprivate static synchronized int generateId() {return id++;}public static GuardedObject getGuardedObject(int id) {return boxes.remove(id);}public static GuardedObject createGuardedObject() {GuardedObject go = new GuardedObject(generateId());boxes.put(go.getId(), go);return go;}public static Set<Integer> getIds() {return boxes.keySet();}}
业务相关类 ```java class People extends Thread { @Override public void run() {
// 收信GuardedObject guardedObject = Mailboxes.createGuardedObject();log.debug("开始收信 id:{}", guardedObject.getId());Object mail = guardedObject.get(5000);log.debug("收到信 id:{}, 内容:{}", guardedObject.getId(), mail);
} }
class Postman extends Thread { private int id; private String mail;
public Postman(int id, String mail) {this.id = id;this.mail = mail;}@Overridepublic void run() {GuardedObject guardedObject = Mailboxes.getGuardedObject(id);log.debug("送信 id:{}, 内容:{}", id, mail);guardedObject.complete(mail);}
}
public static void main(String[] args) throws InterruptedException { for (int i = 0; i < 3; i++) { new People().start(); } Thread.sleep(1); for (Integer id : Mailboxes.getIds()) { new Postman(id, “内容” + id).start(); } }
<a name="WGXAF"></a># 顺序控制模式<a name="UI2pU"></a>## 固定运行顺序比如,必须先 2 后 1 打印- 固定运行顺序 - wait() / notify() 实现```javastatic final Object LOCK = new Object();// 判断先执行的内容是否执行完毕static Boolean judge = false;public static void main(String[] args) {new Thread(()->{synchronized (LOCK) {while (!judge) {try {LOCK.wait();} catch (InterruptedException e) {e.printStackTrace();}}System.out.println("2");}}).start();new Thread(()->{synchronized (LOCK) {System.out.println("1");judge = true;// 执行完毕,唤醒所有等待线程LOCK.notifyAll();}}).start();}
- 固定运行顺序 - park() / unpark() 实现 ```java Thread t1 = new Thread(() -> { try { Thread.sleep(1000); } catch (InterruptedException e) { } // 当没有『许可』时,当前线程暂停运行;有『许可』时,用掉这个『许可』,当前线程恢复运行 LockSupport.park(); System.out.println(“1”); });
Thread t2 = new Thread(() -> { System.out.println(“2”); // 给线程 t1 发放『许可』(多次连续调用 unpark 只会发放一个『许可』) LockSupport.unpark(t1); });
t1.start(); t2.start();
<a name="VA5Jg"></a>## 交替输出线程 1 输出 a 5 次,线程 2 输出 b 5 次,线程 3 输出 c 5 次。现在要求输出 abcabcabcabcabc- 交替输出 - wait() / notify() 实现```javapublic static void main(String[] args) {SyncWaitNotify syncWaitNotify = new SyncWaitNotify(1, 5);new Thread(() -> {syncWaitNotify.print(1, 2, "a");}, "t1").start();new Thread(() -> {syncWaitNotify.print(2, 3, "b");}, "t1").start();new Thread(() -> {syncWaitNotify.print(3, 1, "c");}, "t1").start();}class SyncWaitNotify {// 线程的执行标记:1->a 2->b 3->cprivate int flag;// 输出 abc 的循环次数private int loopNumber;public SyncWaitNotify(int flag, int loopNumber) {this.flag = flag;this.loopNumber = loopNumber;}public void print(int waitFlag, int nextFlag, String str) {for (int i = 0; i < loopNumber; i++) {synchronized (this) {while (this.flag != waitFlag) {try {this.wait();} catch (InterruptedException e) {e.printStackTrace();}}System.out.print(str);this.flag = nextFlag;this.notifyAll();}}}}
交替输出 - await() / signal() 实现 ```java public class Uninterruptible { static AwaitSignal awaitSignal = new AwaitSignal(); static Condition conditionA = awaitSignal.newCondition(); static Condition conditionB = awaitSignal.newCondition(); static Condition conditionC = awaitSignal.newCondition();
public static void main(String[] args) throws InterruptedException {
new Thread(() -> {awaitSignal.print("a", conditionA, conditionB);},"t1").start();new Thread(() -> {awaitSignal.print("b", conditionB, conditionC);},"t2").start();new Thread(() -> {awaitSignal.print("c", conditionC, conditionA);},"t3").start();Thread.sleep(1000);awaitSignal.lock();try {conditionA.signal();} finally {awaitSignal.unlock();}
} }
class AwaitSignal extends ReentrantLock {
private int loopNumber = 5;public void print(String str, Condition condition, Condition nextCondition) {for (int i = 0; i < loopNumber; i++) {this.lock();try {//全部进入等待状态condition.await();System.out.print(str);nextCondition.signal();} catch (InterruptedException e) {e.printStackTrace();} finally {this.unlock();}}}
}
- 交替输出 - park() / unpark()```javapublic class Uninterruptible {public static void main(String[] args) {SyncPark syncPark = new SyncPark();Thread t1 = new Thread(() -> {syncPark.print("a");});Thread t2 = new Thread(() -> {syncPark.print("b");});Thread t3 = new Thread(() -> {syncPark.print("c");});syncPark.setThreads(t1, t2, t3);syncPark.start();}}class SyncPark {private int loopNumber = 5;private Thread[] threads;public void setThreads(Thread... threads) {this.threads = threads;}public void start() {for (Thread thread : threads) {thread.start();}LockSupport.unpark(threads[0]);}public void print(String str) {for (int i = 0; i < loopNumber; i++) {LockSupport.park();System.out.print(str);LockSupport.unpark(nextThread());}}private Thread nextThread() {Thread current = Thread.currentThread();int index = 0;for (int i = 0; i < threads.length; i++) {if (threads[i] == current) {index = i;break;}}if (index < threads.length - 1) {return threads[index + 1];} else {return threads[0];}}}
犹豫模式
犹豫模式 (Balking) 用在:一个线程发现另一个线程或本线程已经做了某一件相同的事,那么本线程就无需再做 了,直接结束返回
用一个标记来判断该任务是否已经被执行过了
@Service@Slf4jpublic class MonitorService {private volatile boolean stop;// 标记是否执行过 start()private volatile boolean starting;private Thread monitorThread;public void start() {synchronized (this) {if (starting) {return;}starting = true;}// 由于上面代码实现的 balking 模式,以下代码只可能被一个线程执行,因此无需互斥monitorThread = new Thread(() -> {while (!stop) {report();sleep(2);}log.info("监控线程已停止...");starting = false;});stop = false;log.info("监控线程已启动...");monitorThread.start();}public synchronized void stop() {stop = true;monitorThread.interrupt();}}

若有收获,就点个赞吧
0 人点赞
