1、动态添加class或style
有时候希望根据某个状态值来决定是否添加某个类,可以这样:
// 数组语法<div :class="['a',value==true?'b':'']"> //类a总是存在,当value为真时类b存在// 对象语法<div :class="{'a':true,'b':value}"> //类a,b都由value控制<div :style="{background:'url('+value.url+')'}"> //对于style,最好用对象语法,属性值取自当前vue实例
2、绑定事件函数
有两种方式:
// 方式1<div @click='handle'></div> //handle函数的this指向当前vue实例,并且会将event对象传入handle作第一个参数,通常可用event.target获取被点击的DOM元素// 方式2<div @click='handle("param1",$event)'></div> //handle函数的this指向当前实例,也可将$event传入handle,作用同上,一般用来获取被点击的DOM元素
3、关于箭头函数
vue的一些配置项,如mounted,beforeRouteEnter,beforeRouteLeave等,本身是一个函数,若使用箭头函数语法,则其内的this对象不是当前vue实例。因此这三个配置项不要用箭头函数,其它的配置项,如methods,computed,watch等接受对象作为配置的,其内的函数最好用箭头函数,另外setTimeout(fn,time)中的fn最好也用箭头函数。
4、数据传递
1、父子组件(prop down,event up)
- 一般而言,父组件通过prop传递属性给子组件,子组件事先需定义props属性,如果没有定义props,那这个传递过来的值会自动添加到子组件的根元素上;
- 子组件中一般通过触发某种自定义事件向父元素通信,因此一般在父元素中使用子组件的地方监听该事件名,该事件名是自定义的,因此要与子组件的一致。
<div id="counter-event-example"><p>{{ total }}</p><button-counter v-on:increment="incrementTotal"></button-counter><button-counter v-on:increment="incrementTotal"></button-counter></div>
Vue.component('button-counter', {template: '<button v-on:click="incrementCounter">{{ counter }}</button>',data: function () {return {counter: 0}},methods: {incrementCounter: function () {this.counter += 1this.$emit('increment')}},})new Vue({el: '#counter-event-example',data: {total: 0},methods: {incrementTotal: function () {this.total += 1}}})
- 如果要在父元素中使用子组件的地方监听原生事件,可用@click.native
- 普通html标签上用@click是原生事件,自定义组件中用@click是自定义事件
2、非父子组件
有时候,非父子关系的两个组件之间也需要通信。在简单的场景下,可以使用一个空的 Vue 实例作为事件总线:
var bus = new Vue()// 触发组件 A 中的事件bus.$emit('id-selected', 1)/ 在组件 B 创建的钩子中监听事件bus.$on('id-selected', function (id) {// ...}.bind(this))//绑定作用域
5、不能触发视图更新的操作
- 数组
// 无法触发vm.items[indexOfItem] = newValuevm.items.length = newLength// 可以触发Vue.set(example1.items, indexOfItem, newValue)example1.items.splice(newLength)
- 对象
var vm = new Vue({data: {a: 1}})// `vm.a` 现在是响应式的vm.b = 2// `vm.b` 不是响应式的var vm = new Vue({data: {userProfile: {name: 'Anika'}}})Vue.set(vm.userProfile, 'age', 27) //响应式
3、watch对象变化:
'messages': { // messages是一个数组,监听数组或对象的变化handler: function(newValue, old) {if (newValue.length == 0) {setTimeout(() => {history.back();}, 1000)}},deep: true}
6、关于beforeRouteEnter和beforeRouteLeave
- beforeRouteEnter(to,from,next) 无法访问当前vue实例,一般用于从localStorage中读取数据恢复页面,比如从页面a到b,在从b回到a,若a有数据变化(ajax拉取)就更新页面,否则不更新;或者还原当前滚动条位置
- beforeRouteLeave(to,from,next) 可访问当前vue实例,一般用于页面离开时将某些状态保存在localStorage中,例如当前滚动条位置
- 二者都必须显示调用next函数
7、keep-alive和router-view混合使用
// 这是目前用的比较多的方式<keep-alive><router-view v-if="$route.meta.keepAlive"></router-view></keep-alive><router-view v-if="!$route.meta.keepAlive"></router-view>...routes: [{ path: '/', redirect: '/index', component: Index, meta: { keepAlive: true }},{path: '/common',component: TestParent,children: [{ path: '/test2', component: Test2, meta: { keepAlive: true } }]}....// 表示index和test2都使用keep-alive
若有三个页面A->B->C,希望A->B时B拉新数据;C返回B时B不拉新数据,且保存B到C之前的位置,该如何做?
1、给B设置keepAlive:true;
2、在B的beforeRouteEnter中做获取数据的操作,该钩子的三个参数可以判断B的上一个页面,从而决定是否拉数据;
在B的beforeRouteLeave里用localStorage记录位置,并清除和页面展现相关的数据状态;
3、在接口回调里最好用EventCenter这种观察者模式来触发数据获取成功的事件
4、在B的mounted钩子里接受数据获取成功的事件,就可以拿到数据
5、在B的activated钩子里取localStorage里的位置
8、router-link常用方式
<!-- 命名的路由 --><router-link :to="{ name: 'user', params: { userId: 123 }}">User</router-link><!-- 带查询参数,下面的结果为 /register?plan=private --><router-link :to="{ path: 'register', query: { plan: 'private' }}">Register</router-link>//对应jsthis.$route.params.userIdthis.$route.query.plan
9、过度动画
- 单元素过渡
transition包一个含有v-if或v-show指令的元素就行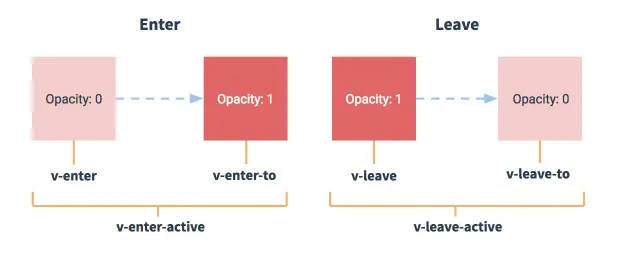
- 多元素过渡
transition下只能有一个根元素,所以多元素时必须用v-if,v-else来保证只有一个,此外,多个相同标签时,最好给每个标签设置key - 多组件过渡
用动态组件即可 - 列表过渡
需用transition-group组件包裹,被包裹元素必须设置key,其他和单元素一样
10、数据拉取
- 数据获取操作最早可以放在每个组件的beforeRouteEnter里,然后利用观察者模式把数据传到beforeMount钩子函数里做逻辑操作
beforeRouteEnter(to, from, next) {let feed_id = to.params.id;if (from.name != 'CommentDetail' && feed_id) {getArticleDetail({feed_id: feed_id}).then(res => EventCenter.$emit('renderArticle', res));getComment({feed_id: feed_id}).then(res => EventCenter.$emit('renderComment', res));}next();}beforeMount(){// 1、渲染文章详情EventCenter.$on('renderArticle', res => {});// 2、渲染文章评论EventCenter.$on('renderComment', res => {})}
11、插件 or 组件
对于全局使用频率较高的最好写成插件,而不是组件。例如loading,toast之类,若写成组件,则需要在每个父组件中引入该组件,比较麻烦,写成插件就可以直接调用
import $ from 'n-zepto';import Vue from 'vue';export default {install() {var timer = null;Vue.prototype.$alerTip = function(text, delay, options) {var defaultCssObject = {position: 'fixed',display: 'flex',alignItems: 'center',justifyContent: 'center',zIndex: 10000,minWidth: '1.5rem',margin: '0 auto',left: 'calc((100% - 1.5rem) / 2)',bottom: '1.4rem',borderRadius: '.1rem',height: '.5rem',lineHeight: '.5rem',background: '#000',opacity: 0.85,color: 'white',};var cssObject = options || defaultCssObject;var temp = `<div class="v-toast">${text}</div>`;var $div = $(temp);$div.css(cssObject);$('body').append($div);clearTimeout(timer);timer = setTimeout(() => {$('.v-toast').remove();timer = null;}, delay);}}}
12、vue父子组件生命周期执行顺序问题
父子组件钩子执行顺序:
father created
father before mounted
son created
son before mount
son mounted
father mounted
所以,你在父组件 beforeMounted 中已初始化的值一定可以通过props下发到子组件
13、vue-router切换页面滚动条位置问题
注意:scrollBehavior只有在history.pushState可用时才有效,而该方法仅兼容到IE10(移动端可放心使用)
const router = new VueRouter({routes,scrollBehavior (to, from, savedPosition) {if (savedPosition) {return savedPosition} else {if (from.meta.keepAlive) { // 通过meta属性精细控制from.meta.savedPosition = document.body.scrollTop;}return { x: 0, y: to.meta.savedPosition || 0 }}}})
14、vue库的引入问题
vue提供众多版本库文件,在使用*.vue单文件组件的开发模式时,只需引入vue.runtime.min.js即可,该库体积最小,不过要注意初始化vue实例时,不能用template选项,而应该换为render,其他组件中的template会被vue-loader转化为类似h=>h(Component)这种形式,本质上是将模板编译的时机从运行时转移到了编译时(只有初始化时不能用template选项,因为vue-loader 和 vue 都无法识别)
new Vue({el: '#app',router,render: h => h(App)})// webpack对应修改:alias: {'vue$': 'vue/dist/vue.runtime.min.js'}
15、三种路由钩子执行顺序问题
全局:beforeEach,beforeResolve,afterEach
组件:beforeRouteEnter,beforeRouteUpdate,beforeRouteLeave
路由:beforeEnter
调用要离开路由的组件守卫beforeRouteLeave
调用全局前置守卫:beforeEach
在重用的组件里调用 beforeRouteUpdate
调用路由独享守卫 beforeEnter。
解析异步路由组件。
在将要进入的路由组件中调用beforeRouteEnter
调用全局解析守卫 beforeResolve
导航被确认。
调用全局后置钩子的 afterEach 钩子。
16、mixins 的合并策略
语法是:mixins:[Component1,Component2],其中每个Component的选项和正常的Vue选项一致
1、对于 data 选项,采取合并的策略,同名属性以组件为主
2、对于同名钩子函数将合并为一个数组,都将被调用。且混入对象的钩子将在组件自身钩子之前调用
3、对于值为对象的选项,例如 methods、components 和 directives,将被合并为同一个对象。两个对象键名冲突时,取组件对象的键值对
17、常用的全局API
- Vue.extend(ops)
使用基础 Vue 构造器,创建一个“子类”。参数是一个包含组件选项的对象 - Vue.use( plugin )
安装 Vue.js 插件。如果插件是一个对象,必须提供 install 方法。如果插件是一个函数,它会被作为 install 方法。install 方法调用时,会将 Vue 作为参数传入 - Vue.nextTick( [callback, context] )
在下次 DOM 更新循环结束之后执行延迟回调。在修改数据之后立即使用这个方法,获取更新后的 DOM
18、其他
- 做下拉刷新时,如果你的列表依赖于data,data里的数据依赖好几个接口,那么在刷新时不要直接更改data,而应该做一个临时变量data_tem,让data_tem变化,等data_tem稳定后再赋值给data。这样可以有效避免页面闪烁
- provide / inject
这对选项需要一起使用,以允许一个祖先组件向其所有子孙后代注入一个依赖,不论组件层次有多深,并在起上下游关系成立的时间里始终生效。
性能优化
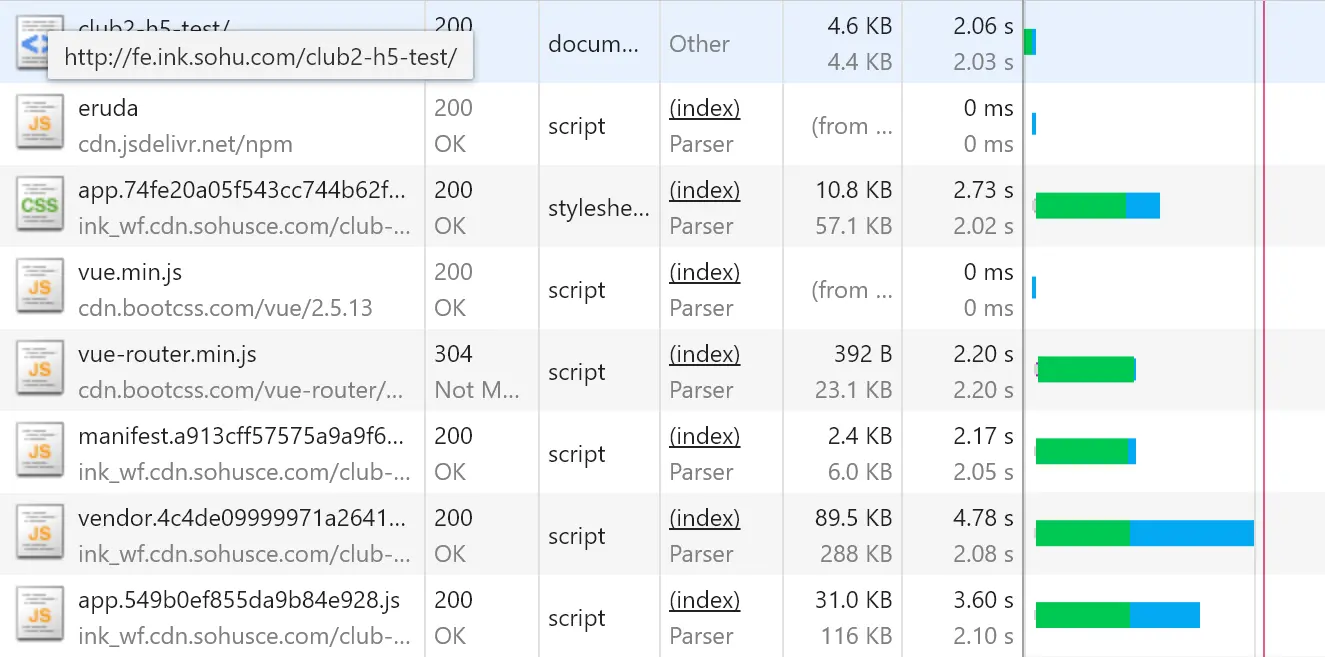
- 从vendor中提取框架js文件,改为由CDN加载
优化前: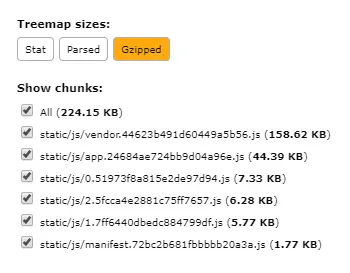
文件组成: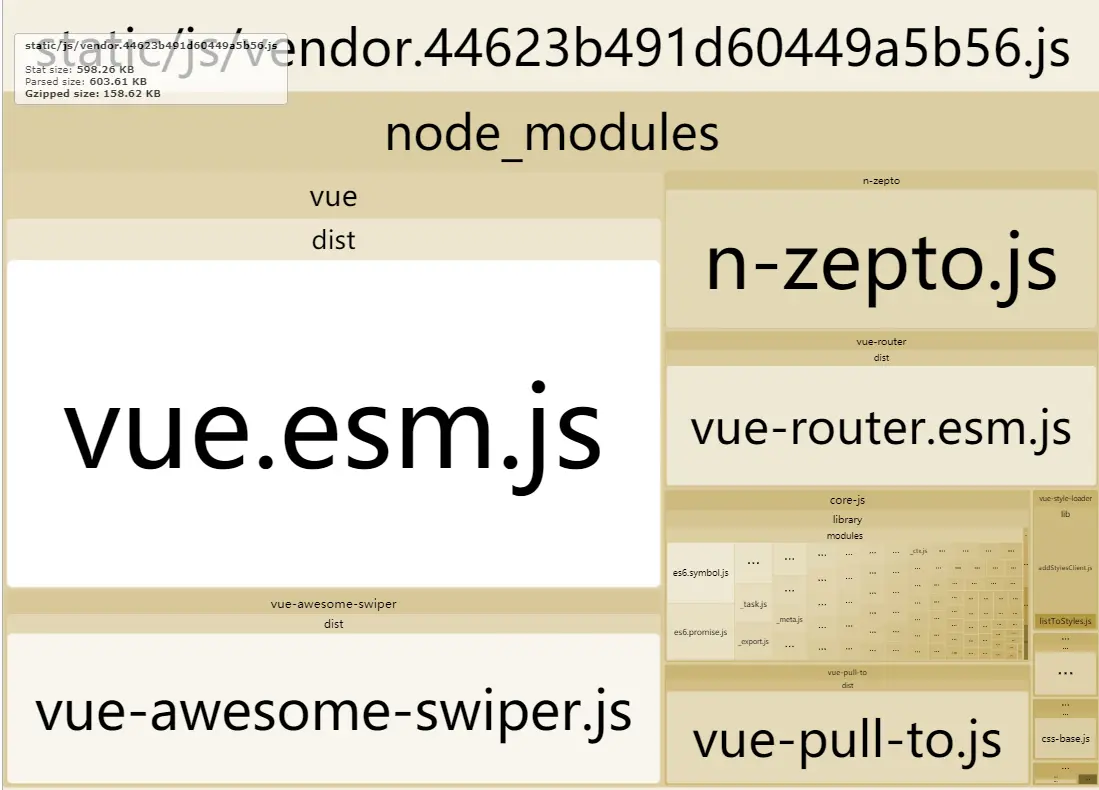
优化后: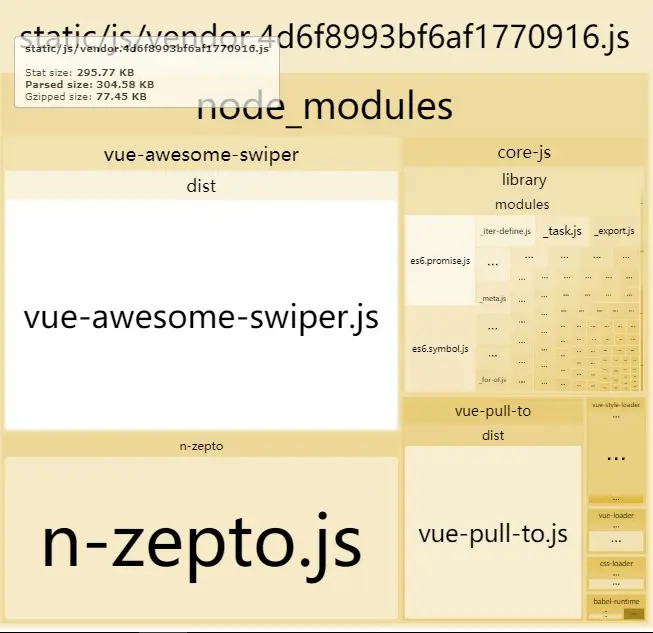
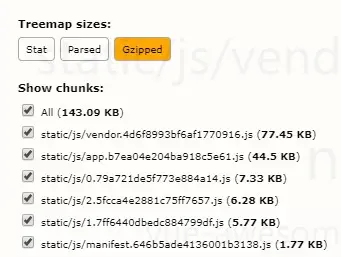
vendor.js文件减少了约50%
具体做法:
1、在webpack.base.conf.js中添加externals字段,如下:
externals: {'vue': 'Vue', //key为业务代码中引入vue时的模块名,value为使用CDN加载的js文件中的全局变量'vue-router': 'VueRouter'},
2、在html中引入vue,vue-router的cdn链接
<script src="https://cdn.bootcss.com/vue/2.5.13/vue.min.js"></script><script src="https://cdn.bootcss.com/vue-router/2.7.0/vue-router.min.js"></script>
3、注释掉 Vue.use(Router)之类的代码(待定)
- 页面级组件按需加载,用webpack打成异步组件
比如有5个页面级组件,那么在主app.js里只用留主页面组件,其他四个可以按需加载
{path: '/detail/:id',name: 'Detail',// component: Detailcomponent: resolve => {// require.ensure([], () => resolve(require('@/pages/detail')), 'Detail');require.ensure([], () => resolve(require('@/pages/detail-h5')), 'Detail');}}
这样可以减小app.js文件大小
效果:
优化前:
优化后: