请参考github该项目https://github.com/easzlab/kubeasz
1 基本信息
1.1 kubernetes组件通信示意图

1.2 部署结构图
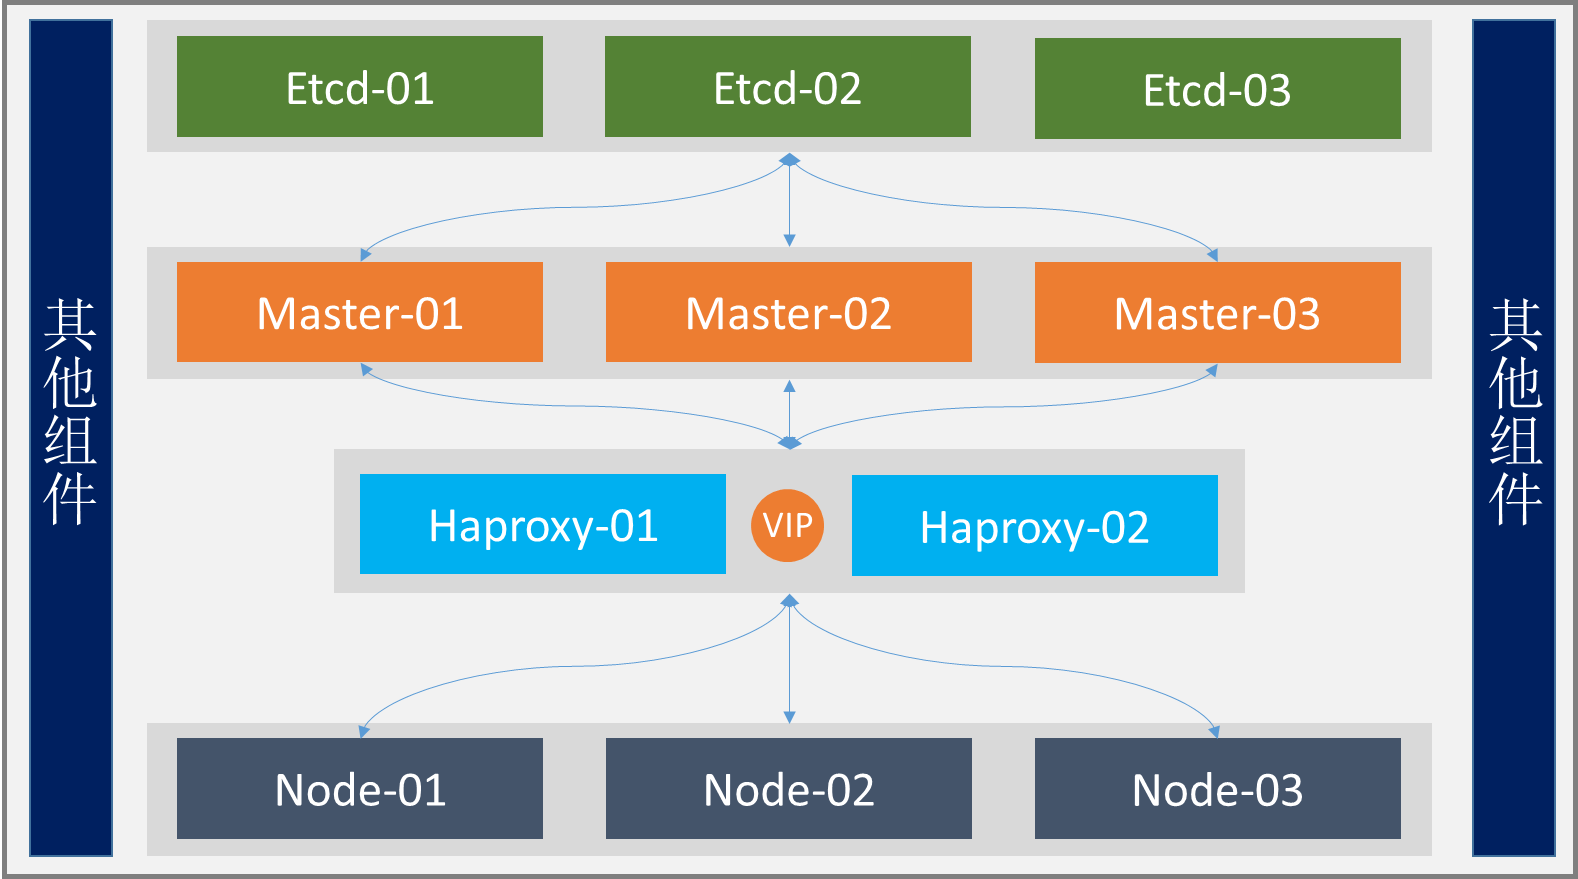
1.3 主机IP
| 主机 | IP | 作用 |
|---|---|---|
| VIP | 10.0.0.248 | 集群VIP |
| master-01 | 10.0.0.11 | master节点 |
| master-02 | 10.0.0.12 | master节点 |
| master-03 | 10.0.0.13 | master节点 |
| etcd-01 | 10.0.0.14 | etcd节点 |
| etcd-02 | 10.0.0.15 | etcd节点 |
| etcd-03 | 10.0.0.16 | etcd节点 |
| haproxy-01 | 10.0.0.17 | 负载均衡 |
| haproxy-01 | 10.0.0.18 | 负载均衡 |
| node-01 | 10.0.0.19 | node节点 |
| node-02 | 10.0.0.20 | node节点 |
2 部署
2.1 安装keepalived
在两个负载节点上分别安装Keepalived
root@haproxy-01/02:~# apt install -y keepalived
配置节点01
root@haproxy-01:~# cat /etc/keepalived/keepalived.conf! Configuration File for keepalivedglobal_defs {notification_email {acassen}notification_email_from Alexandre.Cassen@firewall.locsmtp_server 192.168.200.1smtp_connect_timeout 30router_id LVS_DEVEL}vrrp_instance VI_1 {state MASTERinterface ens32garp_master_delay 10smtp_alertvirtual_router_id 60priority 100advert_int 1authentication {auth_type PASSauth_pass 1111}virtual_ipaddress {10.0.0.248 label ens32:110.0.0.249 label eth32:210.0.0.250 label eth32:310.0.0.251 label ens32:410.0.0.252 label ens32:5}}
配置节点02
root@haproxy-01:~# cat /etc/keepalived/keepalived.conf! Configuration File for keepalivedglobal_defs {notification_email {acassen}notification_email_from Alexandre.Cassen@firewall.locsmtp_server 192.168.200.1smtp_connect_timeout 30router_id LVS_DEVEL}vrrp_instance VI_1 {state MASTERinterface ens32garp_master_delay 10smtp_alertvirtual_router_id 60priority 99advert_int 1authentication {auth_type PASSauth_pass 1111}virtual_ipaddress {10.0.0.248 label ens32:110.0.0.249 label eth32:210.0.0.250 label eth32:310.0.0.251 label ens32:410.0.0.252 label ens32:5}}
启动并开机自启
root@haproxy-01/02:~# systemctl enable --now keepalived.service
2.2 安装Haproxy
在两个负载节点上安装haproxy
root@haproxy-01/02:~# apt install -y haproxy
配置节点01
root@haproxy-01:~# cat /etc/haproxy/haproxy.cfggloballog /dev/log local0log /dev/log local1 noticechroot /var/lib/haproxystats socket /run/haproxy/admin.sock mode 660 level admin expose-fd listenersstats timeout 30suser haproxygroup haproxydaemon# Default SSL material locationsca-base /etc/ssl/certscrt-base /etc/ssl/private# See: https://ssl-config.mozilla.org/#server=haproxy&server-version=2.0.3&config=intermediatessl-default-bind-ciphers ECDHE-ECDSA-AES128-GCM-SHA256:ECDHE-RSA-AES128-GCM-SHA256:ECDHE-ECDSA-AES256-GCM-SHA384:ECDHE-RSA-AES256-GCM-SHA384:ECDHE-ECDSA-CHACHA20-POLY1305:ECDHE-RSA-CHACHA20-POLY1305:DHE-RSA-AES128-GCM-SHA256:DHE-RSA-AES256-GCM-SHA384ssl-default-bind-ciphersuites TLS_AES_128_GCM_SHA256:TLS_AES_256_GCM_SHA384:TLS_CHACHA20_POLY1305_SHA256ssl-default-bind-options ssl-min-ver TLSv1.2 no-tls-ticketsdefaultslog globalmode httpoption httplogoption dontlognulltimeout connect 5000timeout client 50000timeout server 50000errorfile 400 /etc/haproxy/errors/400.httperrorfile 403 /etc/haproxy/errors/403.httperrorfile 408 /etc/haproxy/errors/408.httperrorfile 500 /etc/haproxy/errors/500.httperrorfile 502 /etc/haproxy/errors/502.httperrorfile 503 /etc/haproxy/errors/503.httperrorfile 504 /etc/haproxy/errors/504.httplisten k8s-6443bind 10.0.0.248:6443mode tcpserver 10.0.0.11 10.0.0.11:6443 check inter 2s fall 3 rise 3server 10.0.0.12 10.0.0.12:6443 check inter 2s fall 3 rise 3server 10.0.0.13 10.0.0.13:6443 check inter 2s fall 3 rise 3
配置节点02
root@haproxy-01:~# cat /etc/haproxy/haproxy.cfggloballog /dev/log local0log /dev/log local1 noticechroot /var/lib/haproxystats socket /run/haproxy/admin.sock mode 660 level admin expose-fd listenersstats timeout 30suser haproxygroup haproxydaemon# Default SSL material locationsca-base /etc/ssl/certscrt-base /etc/ssl/private# See: https://ssl-config.mozilla.org/#server=haproxy&server-version=2.0.3&config=intermediatessl-default-bind-ciphers ECDHE-ECDSA-AES128-GCM-SHA256:ECDHE-RSA-AES128-GCM-SHA256:ECDHE-ECDSA-AES256-GCM-SHA384:ECDHE-RSA-AES256-GCM-SHA384:ECDHE-ECDSA-CHACHA20-POLY1305:ECDHE-RSA-CHACHA20-POLY1305:DHE-RSA-AES128-GCM-SHA256:DHE-RSA-AES256-GCM-SHA384ssl-default-bind-ciphersuites TLS_AES_128_GCM_SHA256:TLS_AES_256_GCM_SHA384:TLS_CHACHA20_POLY1305_SHA256ssl-default-bind-options ssl-min-ver TLSv1.2 no-tls-ticketsdefaultslog globalmode httpoption httplogoption dontlognulltimeout connect 5000timeout client 50000timeout server 50000errorfile 400 /etc/haproxy/errors/400.httperrorfile 403 /etc/haproxy/errors/403.httperrorfile 408 /etc/haproxy/errors/408.httperrorfile 500 /etc/haproxy/errors/500.httperrorfile 502 /etc/haproxy/errors/502.httperrorfile 503 /etc/haproxy/errors/503.httperrorfile 504 /etc/haproxy/errors/504.httplisten k8s-6443bind 10.0.0.248:6443mode tcpserver 10.0.0.11 10.0.0.11:6443 check inter 2s fall 3 rise 3server 10.0.0.12 10.0.0.12:6443 check inter 2s fall 3 rise 3server 10.0.0.13 10.0.0.13:6443 check inter 2s fall 3 rise 3
启动并开机自启
root@haproxy-01/02:~# systemctl enable --now haproxy
注意
在两个节点都是正常的情况下,由于一个节点没有VIP地址,所以会存在haproxy无法监听的情况,需要开启一个内核参数——net.ipv4.ip_nonlocal_bind = 1
root@haproxy-02:~# vim /etc/sysctl.confnet.ipv4.ip_nonlocal_bind = 1root@haproxy-02:~# sysctl -p
2.3 安装k8s
参考github项目https://github.com/easzlab/kubeasz
此安装步骤以master01为分发节点,安装ansible,安装步骤都在这个节点上面执行
安装ansible
root@master-01:~# apt install -y ansible
配置免密
root@master-01:~# ssh-keygenroot@master-01:~# ssh-copy-id 10.0.0.11root@master-01:~# ssh-copy-id 10.0.0.12root@master-01:~# ssh-copy-id 10.0.0.13root@master-01:~# ssh-copy-id 10.0.0.14root@master-01:~# ssh-copy-id 10.0.0.15root@master-01:~# ssh-copy-id 10.0.0.16root@master-01:~# ssh-copy-id 10.0.0.17root@master-01:~# ssh-copy-id 10.0.0.18root@master-01:~# ssh-copy-id 10.0.0.19
下载项目源码、二进制及离线镜像
# 下载工具脚本ezdown,举例使用kubeasz版本3.1.1root@master-01:~# export release=3.1.1root@master-01:~# wget https://github.com/easzlab/kubeasz/releases/download/${release}/ezdownroot@master-01:~# chmod +x ./ezdown# 使用工具脚本下载root@master-01:~# ./ezdown -D
所有包以及相关文件都在/etc/kubeasz目录下面
root@master-01:~# cd /etc/kubeasz/root@master-01:/etc/kubeasz# lltotal 100drwxrwxr-x 12 root root 225 Jan 6 02:29 ./drwxr-xr-x 105 root root 8192 Jan 6 06:52 ../-rw-rw-r-- 1 root root 20304 Sep 25 03:41 ansible.cfgdrwxr-xr-x 3 root root 4096 Jan 6 02:25 bin/drwxr-xr-x 3 root root 28 Jan 6 02:29 clusters/drwxrwxr-x 8 root root 92 Sep 25 07:30 docs/drwxr-xr-x 2 root root 4096 Jan 6 02:27 down/drwxrwxr-x 2 root root 70 Sep 25 07:30 example/-rwxrwxr-x 1 root root 24629 Sep 25 03:41 ezctl*-rwxrwxr-x 1 root root 15031 Sep 25 03:41 ezdown*-rw-rw-r-- 1 root root 301 Sep 25 03:41 .gitignoredrwxrwxr-x 10 root root 145 Sep 25 07:30 manifests/drwxrwxr-x 2 root root 322 Sep 25 07:30 pics/drwxrwxr-x 2 root root 4096 Sep 25 07:30 playbooks/-rw-rw-r-- 1 root root 6222 Sep 25 03:41 README.mddrwxrwxr-x 22 root root 323 Sep 25 07:30 roles/drwxrwxr-x 2 root root 48 Sep 25 07:30 tools/
创建集群配置实例
创建一个新的集群名称为k8s-cluster-01
root@master-01:/etc/kubeasz# ./ezctl new k8s-cluster-01
然后根据提示配置’/etc/kubeasz/clusters/k8s-cluster-01/hosts’ 和 ‘/etc/kubeasz/clusters/k8s-cluster-01/config.yml’:根据前面节点规划修改hosts 文件和其他集群层面的主要配置选项;其他集群组件等配置项可以在config.yml 文件中修改。
修改hosts文件
root@master-01:/etc/kubeasz/clusters/k8s-cluster-01# cat hosts# 'etcd' cluster should have odd member(s) (1,3,5,...)[etcd]10.0.0.1410.0.0.1510.0.0.16# master node(s)[kube_master]10.0.0.1110.0.0.1210.0.0.13# work node(s)[kube_node]10.0.0.1910.0.0.20# [optional] harbor server, a private docker registry# 'NEW_INSTALL': 'true' to install a harbor server; 'false' to integrate with existed one[harbor]#10.0.0.8 NEW_INSTALL=false# [optional] loadbalance for accessing k8s from outside[ex_lb]10.0.0.17 LB_ROLE=master EX_APISERVER_VIP=10.0.0.248 EX_APISERVER_PORT=644310.0.0.18 LB_ROLE=backup EX_APISERVER_VIP=10.0.0.248 EX_APISERVER_PORT=6443# [optional] ntp server for the cluster[chrony]#10.0.0.1[all:vars]# --------- Main Variables ---------------# Secure port for apiserversSECURE_PORT="6443"# Cluster container-runtime supported: docker, containerdCONTAINER_RUNTIME="docker"# Network plugins supported: calico, flannel, kube-router, cilium, kube-ovnCLUSTER_NETWORK="calico"# Service proxy mode of kube-proxy: 'iptables' or 'ipvs'PROXY_MODE="ipvs"# K8S Service CIDR, not overlap with node(host) networkingSERVICE_CIDR="10.96.0.0/16"# Cluster CIDR (Pod CIDR), not overlap with node(host) networkingCLUSTER_CIDR="10.224.0.0/16"# NodePort RangeNODE_PORT_RANGE="30000-40000"# Cluster DNS DomainCLUSTER_DNS_DOMAIN="cluster.local"# -------- Additional Variables (don't change the default value right now) ---# Binaries Directorybin_dir="/usr/bin"# Deploy Directory (kubeasz workspace)base_dir="/etc/kubeasz"# Directory for a specific clustercluster_dir="{{ base_dir }}/clusters/k8s-cluster-01"# CA and other components cert/key Directoryca_dir="/etc/kubernetes/ssl"
修改config.yml
哪些组件需要安装或者不安装,配置ture或者no即可
root@master-01:/etc/kubeasz/clusters/k8s-cluster-01# cat config.yml############################# prepare############################# 可选离线安装系统软件包 (offline|online)INSTALL_SOURCE: "online"# 可选进行系统安全加固 github.com/dev-sec/ansible-collection-hardeningOS_HARDEN: false# 设置时间源服务器【重要:集群内机器时间必须同步】ntp_servers:- "ntp1.aliyun.com"- "time1.cloud.tencent.com"- "0.cn.pool.ntp.org"# 设置允许内部时间同步的网络段,比如"10.0.0.0/8",默认全部允许local_network: "0.0.0.0/0"############################# role:deploy############################# default: ca will expire in 100 years# default: certs issued by the ca will expire in 50 yearsCA_EXPIRY: "876000h"CERT_EXPIRY: "438000h"# kubeconfig 配置参数CLUSTER_NAME: "k8s-cluster-01"CONTEXT_NAME: "context-{{ CLUSTER_NAME }}"############################# role:etcd############################# 设置不同的wal目录,可以避免磁盘io竞争,提高性能ETCD_DATA_DIR: "/var/lib/etcd"ETCD_WAL_DIR: ""############################# role:runtime [containerd,docker]############################# ------------------------------------------- containerd# [.]启用容器仓库镜像ENABLE_MIRROR_REGISTRY: true# [containerd]基础容器镜像SANDBOX_IMAGE: "easzlab/pause-amd64:3.5"# [containerd]容器持久化存储目录CONTAINERD_STORAGE_DIR: "/var/lib/containerd"# ------------------------------------------- docker# [docker]容器存储目录DOCKER_STORAGE_DIR: "/var/lib/docker"# [docker]开启Restful APIENABLE_REMOTE_API: false# [docker]信任的HTTP仓库INSECURE_REG: '["127.0.0.1/8"]'############################# role:kube-master############################# k8s 集群 master 节点证书配置,可以添加多个ip和域名(比如增加公网ip和域名)MASTER_CERT_HOSTS:- "10.0.0.250"- "ikubernetes.xsc.org"#- "www.test.com"# node 节点上 pod 网段掩码长度(决定每个节点最多能分配的pod ip地址)# 如果flannel 使用 --kube-subnet-mgr 参数,那么它将读取该设置为每个节点分配pod网段# https://github.com/coreos/flannel/issues/847NODE_CIDR_LEN: 24############################# role:kube-node############################# Kubelet 根目录KUBELET_ROOT_DIR: "/var/lib/kubelet"# node节点最大pod 数MAX_PODS: 200# 配置为kube组件(kubelet,kube-proxy,dockerd等)预留的资源量# 数值设置详见templates/kubelet-config.yaml.j2KUBE_RESERVED_ENABLED: "no"# k8s 官方不建议草率开启 system-reserved, 除非你基于长期监控,了解系统的资源占用状况;# 并且随着系统运行时间,需要适当增加资源预留,数值设置详见templates/kubelet-config.yaml.j2# 系统预留设置基于 4c/8g 虚机,最小化安装系统服务,如果使用高性能物理机可以适当增加预留# 另外,集群安装时候apiserver等资源占用会短时较大,建议至少预留1g内存SYS_RESERVED_ENABLED: "no"# haproxy balance modeBALANCE_ALG: "roundrobin"############################# role:network [flannel,calico,cilium,kube-ovn,kube-router]############################# ------------------------------------------- flannel# [flannel]设置flannel 后端"host-gw","vxlan"等FLANNEL_BACKEND: "vxlan"DIRECT_ROUTING: false# [flannel] flanneld_image: "quay.io/coreos/flannel:v0.10.0-amd64"flannelVer: "v0.13.0-amd64"flanneld_image: "easzlab/flannel:{{ flannelVer }}"# [flannel]离线镜像tar包flannel_offline: "flannel_{{ flannelVer }}.tar"# ------------------------------------------- calico# [calico]设置 CALICO_IPV4POOL_IPIP=“off”,可以提高网络性能,条件限制详见 docs/setup/calico.mdCALICO_IPV4POOL_IPIP: "Always"# [calico]设置 calico-node使用的host IP,bgp邻居通过该地址建立,可手工指定也可以自动发现IP_AUTODETECTION_METHOD: "can-reach={{ groups['kube_master'][0] }}"# [calico]设置calico 网络 backend: brid, vxlan, noneCALICO_NETWORKING_BACKEND: "brid"# [calico]更新支持calico 版本: [v3.3.x] [v3.4.x] [v3.8.x] [v3.15.x]calico_ver: "v3.19.2"# [calico]calico 主版本calico_ver_main: "{{ calico_ver.split('.')[0] }}.{{ calico_ver.split('.')[1] }}"# [calico]离线镜像tar包calico_offline: "calico_{{ calico_ver }}.tar"# ------------------------------------------- cilium# [cilium]CILIUM_ETCD_OPERATOR 创建的 etcd 集群节点数 1,3,5,7...ETCD_CLUSTER_SIZE: 1# [cilium]镜像版本cilium_ver: "v1.4.1"# [cilium]离线镜像tar包cilium_offline: "cilium_{{ cilium_ver }}.tar"# ------------------------------------------- kube-ovn# [kube-ovn]选择 OVN DB and OVN Control Plane 节点,默认为第一个master节点OVN_DB_NODE: "{{ groups['kube_master'][0] }}"# [kube-ovn]离线镜像tar包kube_ovn_ver: "v1.5.3"kube_ovn_offline: "kube_ovn_{{ kube_ovn_ver }}.tar"# ------------------------------------------- kube-router# [kube-router]公有云上存在限制,一般需要始终开启 ipinip;自有环境可以设置为 "subnet"OVERLAY_TYPE: "full"# [kube-router]NetworkPolicy 支持开关FIREWALL_ENABLE: "true"# [kube-router]kube-router 镜像版本kube_router_ver: "v0.3.1"busybox_ver: "1.28.4"# [kube-router]kube-router 离线镜像tar包kuberouter_offline: "kube-router_{{ kube_router_ver }}.tar"busybox_offline: "busybox_{{ busybox_ver }}.tar"############################# role:cluster-addon############################# coredns 自动安装dns_install: "no"corednsVer: "1.8.4"ENABLE_LOCAL_DNS_CACHE: nodnsNodeCacheVer: "1.17.0"# 设置 local dns cache 地址LOCAL_DNS_CACHE: "169.254.20.10"# metric server 自动安装metricsserver_install: "no"metricsVer: "v0.5.0"# dashboard 自动安装dashboard_install: "no"dashboardVer: "v2.3.1"dashboardMetricsScraperVer: "v1.0.6"# ingress 自动安装ingress_install: "no"ingress_backend: "traefik"traefik_chart_ver: "9.12.3"# prometheus 自动安装prom_install: "no"prom_namespace: "monitor"prom_chart_ver: "12.10.6"# nfs-provisioner 自动安装nfs_provisioner_install: "no"nfs_provisioner_namespace: "kube-system"nfs_provisioner_ver: "v4.0.1"nfs_storage_class: "managed-nfs-storage"nfs_server: "192.168.1.10"nfs_path: "/data/nfs"############################# role:harbor############################# harbor version,完整版本号HARBOR_VER: "v2.1.3"HARBOR_DOMAIN: "harbor.yourdomain.com"HARBOR_TLS_PORT: 8443# if set 'false', you need to put certs named harbor.pem and harbor-key.pem in directory 'down'HARBOR_SELF_SIGNED_CERT: true# install extra componentHARBOR_WITH_NOTARY: falseHARBOR_WITH_TRIVY: falseHARBOR_WITH_CLAIR: falseHARBOR_WITH_CHARTMUSEUM: true
安装
等待以下执行完毕,及安装完成,也可以分开执行,具体步骤可以—help查看
root@master-01:/etc/kubeasz# ./ezctl setup k8s-cluster-01 all

若有收获,就点个赞吧
0 人点赞
