一、SpringDataJPA的相关使用
1.1JPA基础
Hibernate是一个全自动的ORM框架,是对JDBC技术的封装。他在实体类和数据库表之间建立了映射关系,使得程序员可以使用面向对象的思想来操作数据库,而Hibernate会自动给我生成SQL语句。
JPA的全称是java persistence api,即Java持久化API,他不是框架,是一套规范,即一系列接口没有提供实现类,JPA的作用使得所有实现了JPA规范的ORM框架可以自由切换,
1.2JAP实现增删改查(略)
注意:JPA只是sun公司提供的相关接口,我们开发使用的是相关实现类(这里使用Hibernate进行实现)
1.3SpringDataJPA的操作介绍
导入Maven坐标
<?xml version="1.0" encoding="UTF-8"?><project xmlns="http://maven.apache.org/POM/4.0.0"xmlns:xsi="http://www.w3.org/2001/XMLSchema-instance"xsi:schemaLocation="http://maven.apache.org/POM/4.0.0 http://maven.apache.org/xsd/maven-4.0.0.xsd"><parent><artifactId>study-springdata</artifactId><groupId>com.study</groupId><version>1.0-SNAPSHOT</version></parent><modelVersion>4.0.0</modelVersion><artifactId>study-spring-data-jpa</artifactId><dependencies><!-- Mysql的坐标--><dependency><groupId>mysql</groupId><artifactId>mysql-connector-java</artifactId><version>5.1.6</version></dependency><!-- 演示JPA我们要导入一个实现JPA规范的框架,这里使用Hibernate--><dependency><groupId>org.hibernate</groupId><artifactId>hibernate-entitymanager</artifactId><version>5.0.7.Final</version></dependency><!-- Junit单元测试--><dependency><groupId>junit</groupId><artifactId>junit</artifactId><version>4.13</version></dependency><!-- Spring的相关Jar包--><!-- Spring的核心jar包--><dependency><groupId>org.springframework</groupId><artifactId>spring-context</artifactId><version>5.1.6.RELEASE</version></dependency><!-- Spring的测试--><dependency><groupId>org.springframework</groupId><artifactId>spring-test</artifactId><version>5.1.6.RELEASE</version></dependency><!-- spring的ORM包--><dependency><groupId>org.springframework</groupId><artifactId>spring-orm</artifactId><version>5.1.6.RELEASE</version></dependency><!-- aspectj表达式(切面表达式)--><dependency><groupId>org.aspectj</groupId><artifactId>aspectjweaver</artifactId><version>1.8.7</version></dependency><!-- Spring整合SpringData的包--><dependency><groupId>org.springframework.data</groupId><artifactId>spring-data-jpa</artifactId><version>2.1.8.RELEASE</version></dependency></dependencies></project>
创建实体类(使用注解配置映射关系) ```java package com.study.entity;
import javax.persistence.*; import java.io.Serializable; import java.util.Date;
/**
- @author zbw
- @describe:对应数据库实体类
- @email 1030184932@qq.com
@create 2021-06-05-16:40 */ //对于Hibernate实体类要和表建立联系:注意我们面向的Java提供的JPA规范,所以这个注解的坐标是javax包下的 @Entity//这个注解很重要,有这个注解才会把实体类和表做映射 @Table(name = “article”)//这个注解表示和数据库的表建立对应关系,name表示指向那张表 public class Article implements Serializable { @Column(name = “aid”)//指定属性和表的字段的对应关系 @Id//表示该列为主键 @GeneratedValue(strategy = GenerationType.AUTO)//指定主键生成策略 private Integer aid; @Column(name = “author”)//这个注解还有一些其他的属性,用来指定建表的时候表字段长度类型等一些属性 private String author; @Column(name = “create_time” ) private Date createTime; @Column(name = “title”) private String title;
public Integer getAid() {
return aid;}
public void setAid(Integer aid) {
this.aid = aid;}
public String getAuthor() {
return author;}
public void setAuthor(String author) {
this.author = author;}
public Date getCreateTime() {
return createTime;}
public void setCreateTime(Date createTime) {
this.createTime = createTime;}
public String getTitle() {
return title;}
public void setTitle(String title) {
this.title = title;} }
- **创建Spring的核心配置文件application.xml**
```xml
<?xml version="1.0" encoding="UTF-8"?>
<beans xmlns="http://www.springframework.org/schema/beans"
xmlns:context="http://www.springframework.org/schema/context" xmlns:p="http://www.springframework.org/schema/p"
xmlns:aop="http://www.springframework.org/schema/aop" xmlns:tx="http://www.springframework.org/schema/tx"
xmlns:xsi="http://www.w3.org/2001/XMLSchema-instance" xmlns:jpa="http://www.springframework.org/schema/data/jpa"
xsi:schemaLocation="http://www.springframework.org/schema/beans http://www.springframework.org/schema/beans/spring-beans-4.0.xsd
http://www.springframework.org/schema/context http://www.springframework.org/schema/context/spring-context-4.0.xsd
http://www.springframework.org/schema/aop http://www.springframework.org/schema/aop/spring-aop-4.0.xsd http://www.springframework.org/schema/tx http://www.springframework.org/schema/tx/spring-tx-4.0.xsd
http://www.springframework.org/schema/util http://www.springframework.org/schema/util/spring-util-4.0.xsd http://www.springframework.org/schema/data/jpa http://www.springframework.org/schema/data/jpa/spring-jpa.xsd">
<!-- 配置包扫描-->
<context:component-scan base-package="com.study"/>
<!-- 配置数据源-->
<bean id="dataSource" class="org.springframework.jdbc.datasource.DriverManagerDataSource">
<property name="driverClassName" value="com.mysql.jdbc.Driver"/>
<!-- xml中不支持&需要对这个符号进行转义,使用&代替&,这里要指定字符集否则会出现中文乱码-->
<property name="url" value="jdbc:mysql://182.92.71.236:3306/springdata?useUnicode=true&characterEncoding=UTF-8&autoReconnect=true&serverTimezone=Asia/Shanghai"/>
<property name="username" value="root"/>
<property name="password" value="root"/>
</bean>
<!-- 配置managerEntityFactory-->
<bean id="entityManagerFactory" class="org.springframework.orm.jpa.LocalContainerEntityManagerFactoryBean">
<!-- 注入数据源-->
<property name="dataSource" ref="dataSource"/>
<!-- 配置实体类-->
<property name="packagesToScan" value="com.study.entity"/>
<!-- 添加适配器:让SpringData来兼容Hibernate的配置(这些配置是Hibernate的)-->
<property name="jpaVendorAdapter">
<bean class="org.springframework.orm.jpa.vendor.HibernateJpaVendorAdapter">
<!-- 配置数据库名称-->
<property name="database" value="MYSQL"/>
<!-- 配置是否自动建表true表示会自动建表,false表示不会自动建表-->
<property name="generateDdl" value="true"/>
<!-- 是否打印SQL-->
<property name="showSql" value="true"/>
</bean>
</property>
</bean>
<!-- 声明事务管理器-->
<bean id="transactionManager" class="org.springframework.orm.jpa.JpaTransactionManager">
<property name="dataSource" ref="dataSource"/>
</bean>
<!-- jpa的repository配置
base-package:填写dao接口的包名,因为dao我们只是声明了接口,这个配置它会为这个包下的所有接口产生代理对象
-->
<jpa:repositories base-package="com.study.dao"
entity-manager-factory-ref="entityManagerFactory"
transaction-manager-ref="transactionManager"/>
</beans>
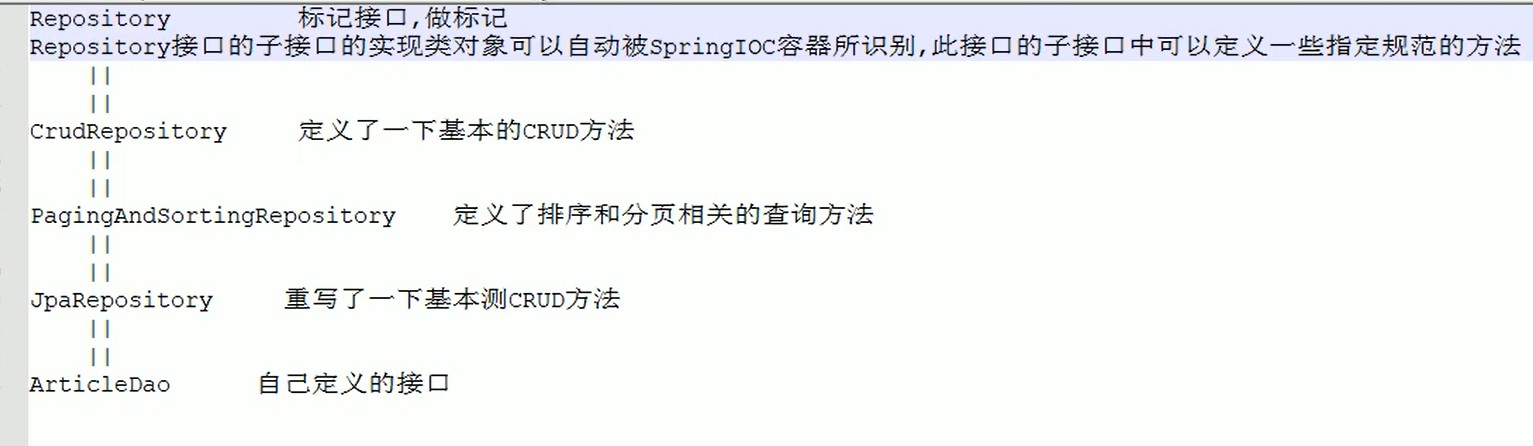
- 编写dao接口
使用SpringDataJPA操作数据库,只需要按照框架的规范提供dao接口,不要提供接口定义的方法,也不要为接口提供实现类,就可以完成基本的数据库增删改查操作
1.创建一个dao接口,并实现JpaRepository<实体类,主键类型>:用来完成基本的增删改查操作和JpaSpecificationExecutor<实体类类型>:用于复杂的查询操作(分页查询等),并提供相应的泛型
package com.study.dao;

import com.study.entity.Article;
import org.springframework.data.jpa.repository.JpaRepository;
import org.springframework.data.jpa.repository.JpaSpecificationExecutor;
//操作数据库的Dao接口
//SpringDataJAP 规范要求我们自定义dao接口继承extends JpaRepository<Article,Integer>, JpaSpecificationExecutor<Article>
public interface ArticleDao extends JpaRepository<Article,Integer>, JpaSpecificationExecutor<Article> {
}
- 进行crud的测试 ```java package com.study.springdata; import com.study.dao.ArticleDao; import com.study.entity.Article; import org.junit.Test; import org.junit.runner.RunWith; import org.springframework.beans.factory.annotation.Autowired; import org.springframework.test.context.ContextConfiguration; import org.springframework.test.context.junit4.SpringJUnit4ClassRunner;
import java.util.Date; import java.util.Optional; //这两个配置可以保证测试的时候有Spring的容器存在,所以我们可以注入相关Bean对象 @RunWith(SpringJUnit4ClassRunner.class) @ContextConfiguration(“classpath:application.xml”) public class SpringDataTest { @Autowired private ArticleDao articleDao;
@Test
public void testSave(){
    Article article = new Article();
    article.setTitle("测试SpringDataJPA的保存操作");
    article.setCreateTime(new Date());
    article.setAuthor("朱博文");
    articleDao.save(article);
}
@Test
public void testGet(){
    Optional<Article> optional = articleDao.findById(2);
    Article article = optional.get();
    System.out.println(article);
}
@Test
public void testDelete(){
    Article article = new Article();
    article.setAid(1);
    articleDao.delete(article);
}
@Test
public void testUpdate(){
    Article article = new Article();
    article.setTitle("测试SpringDataJPA的保存操作2121");
    article.setCreateTime(new Date());
    article.setAuthor("朱博文1212");
    article.setAid(2);
    //传递ID就是修改
    articleDao.save(article);
}
}
<br />注意:SpringDataJPA会对我们定义dao接口生成代理对象,然后底层调用就是原生的JPA方法进行操作数据库,所以最终进行操作数据库的还是原生的JPA的API,所以SpringDataJPA只是对JAP进行了一层封装,达到简化dao层的开发
- **SpringData本地SQL**
在我们进行Dao层操作执行SQL时,有些SQL很复杂,使用SpringData操作非常麻烦,这样可以进行本地SQL(即写SQL语句进行执行),这种方式不推荐
```java
package com.study.dao;
import com.study.entity.Article;
import org.springframework.data.jpa.repository.JpaRepository;
import org.springframework.data.jpa.repository.JpaSpecificationExecutor;
import org.springframework.data.jpa.repository.Query;
import java.util.List;
//操作数据库的Dao接口
//SpringDataJAP 规范要求我们自定义dao接口继承extends JpaRepository<Article,Integer>, JpaSpecificationExecutor<Article>
public interface ArticleDao extends JpaRepository<Article,Integer>, JpaSpecificationExecutor<Article> {
//自定义本地SQL
@Query(value = "select * from article where title like %?1% and author like %?2%",nativeQuery = true)
List<Article> findArticleByTitleAndAuthor(String title, String author);
}
SpringData进行动态查询 ```java package com.study.springdata;
  import com.mysql.jdbc.StringUtils;
  import com.study.dao.ArticleDao;
  import com.study.entity.Article;
  import org.junit.Test;
  import org.junit.runner.RunWith;
  import org.springframework.beans.factory.annotation.Autowired;
  import org.springframework.data.domain.Page;
  import org.springframework.data.domain.PageRequest;
  import org.springframework.data.domain.Pageable;
  import org.springframework.data.domain.Sort;
  import org.springframework.data.jpa.domain.Specifications;
  import org.springframework.test.context.ContextConfiguration;
  import org.springframework.test.context.junit4.SpringJUnit4ClassRunner;

  import javax.persistence.criteria.*;
  import java.util.ArrayList;
@RunWith(SpringJUnit4ClassRunner.class) @ContextConfiguration(“classpath:application.xml”) public class Specification { @Autowired private ArticleDao articleDao; //使用SpringDataJPA动态拼接条件 @Test public void test(){
  final String title="sf";
  //添加一个匿名内部类
  articleDao.findAll(new org.springframework.data.jpa.domain.Specification<Article>() {
      /**
       * 动态拼装条件:当title不为空,加入这个条件
       * @param root :代表实体类对象,我们可用它来获取属性值
       * @param criteriaQuery:用于生成SQL
       * @param criteriaBuilder:用于拼接条件
       * @return
       */
      public Predicate toPredicate(Root<Article> root, CriteriaQuery<?> criteriaQuery, CriteriaBuilder criteriaBuilder) {
          //当title不为空拼接该条件
          ArrayList<Predicate> list = new ArrayList<Predicate>();
          if(StringUtils.isNullOrEmpty(title)){
              //拼接查询条件
              Predicate predicate = criteriaBuilder.equal(root.get("title").as(String.class), title);
              list.add(predicate);
          }
          return criteriaBuilder.and(list.toArray(new Predicate[]{}));
      }
  });
}
/**
- 测试分页
*/
public void testPage(){
final String title=”sf”;
//添加分页
Pageable pageable=PageRequest.of(0,1);
//添加一个匿名内部类
Page
page= articleDao.findAll(new org.springframework.data.jpa.domain.Specification () {
},pageable); } /**/** * 动态拼装条件:当title不为空,加入这个条件 * @param root :代表实体类对象,我们可用它来获取属性值 * @param criteriaQuery:用于生成SQL * @param criteriaBuilder:用于拼接条件 * @return */ public Predicate toPredicate(Root<Article> root, CriteriaQuery<?> criteriaQuery, CriteriaBuilder criteriaBuilder) { //当title不为空拼接该条件 ArrayList<Predicate> list = new ArrayList<Predicate>(); if(StringUtils.isNullOrEmpty(title)){ //拼接查询条件 Predicate predicate = criteriaBuilder.equal(root.get("title").as(String.class), title); list.add(predicate); } return criteriaBuilder.and(list.toArray(new Predicate[]{})); } - 测试分页排序
*/
public void testPageAndSort(){
final String title=”sf”;
//添加分页和排序
Pageable pageable=PageRequest.of(0,1,Sort.by(Sort.Order.asc(“aid”)));
//添加一个匿名内部类
Page
page= articleDao.findAll(new org.springframework.data.jpa.domain.Specification () {
},pageable); } }/** * 动态拼装条件:当title不为空,加入这个条件 * @param root :代表实体类对象,我们可用它来获取属性值 * @param criteriaQuery:用于生成SQL * @param criteriaBuilder:用于拼接条件 * @return */ public Predicate toPredicate(Root<Article> root, CriteriaQuery<?> criteriaQuery, CriteriaBuilder criteriaBuilder) { //当title不为空拼接该条件 ArrayList<Predicate> list = new ArrayList<Predicate>(); if(StringUtils.isNullOrEmpty(title)){ //拼接查询条件 Predicate predicate = criteriaBuilder.equal(root.get("title").as(String.class), title); list.add(predicate); } return criteriaBuilder.and(list.toArray(new Predicate[]{})); }
- 测试分页
*/
public void testPage(){
final String title=”sf”;
//添加分页
Pageable pageable=PageRequest.of(0,1);
//添加一个匿名内部类
Page
- **SpringDataJPA实现多表操作**

**<br />**一对一**<br />在关系型数据库中,表和表之间存在一对一、一对多、多对多的关系,而实现了ORM思想的框架,我们通过操作实体类就可以操作表,通过配置实体类和实体类之间的关系来达到操作表之间的关系,操作步骤

1. 首先确认两张表之间的关系
1. 实体类中描述出两个实体类之间的关系
1. 配置出实体类和数据库表的关系映射(使用注解描述)

**思路:首先创建两个实体类,然后声明两个声明两个类之间的关系,由于是一对一所以类间的关系就是互相作为对方的属性,然后声明表关系,并选择关联比较的少的来维护关系,另一方则放弃关系维护**
```java
package com.study.entity;
import javax.persistence.*;
import java.io.Serializable;
import java.util.Date;
    @Entity
    @Table(name = "article")
public class Article implements Serializable {
    @Column(name = "aid")
    @Id
    @GeneratedValue(strategy = GenerationType.AUTO)
    private Integer aid;
    @Column(name = "author")
    private String author;
    @Column(name = "create_time" )
    private Date createTime;
    @Column(name = "title")
    private String title;

    //声明类之间的关系,放弃关系维护使用mappedBy属性="当前类在对方类的属性名",cascade设置级联保存
    @OneToOne(mappedBy = "article",cascade = CascadeType.PERSIST)
    private ArticleData articleData;
    //TODO:get/set
}

//文章内容:它和article是一对一的关系,通过外键进行关联,外键不需要定义属性是通过注解进行配置的
    @Entity
    @Table(name = "article_data")
public class ArticleData implements Serializable {
    @Id
    @GeneratedValue(strategy = GenerationType.AUTO)//指定主键生成策略
    private Integer id;
    @Column(name = "content")
    private String content;
    //声明类之间的关系:一对一是互相作为对方的属性
    @OneToOne
    //声明表之间的关系:name表示外键名,referencedColumnName关联的主键名,unique表示是否添加唯一索引,如果不添加就是一对多
    @JoinColumn(name = "article_id",referencedColumnName = "aid",unique = true)
    private Article article;
    //TODO:get/set
}
一对多
在一的一方建立集合多的一方还是单一属性来实现类之间的关联关系,在一的一方添加@OneToOne(mappedBy = “article”)并放弃关系维护,多的一方添加@ManyToOne,在多的一方进行关系维护使用 @JoinColumn(name = “article_id”,referencedColumnName = “aid”)来维护关系,这里不能添加unique=true(唯一约束),如果添加就成一对一了
多对多
两个实体类之间都是使用集合来描述类之间的关系,然后都使用@ManyToMany注解来描述类之间的关系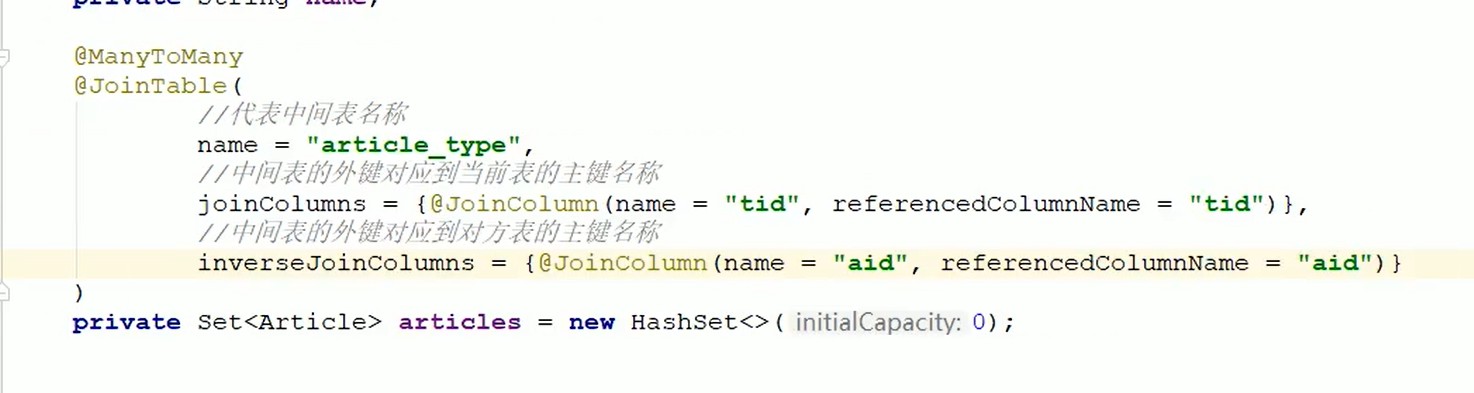
然后是放弃关系维护@ManayToMany(mappedBy=”当前类在对方类属性名称”
注意:多对多关系中,中间表是没有实体类的,通过注解来进行编写

若有收获,就点个赞吧
0 人点赞
