一、Mybatis-Plus简介
1、简介
MyBatis-Plus(opens new window)(简称 MP)是一个 MyBatis(opens new window)的增强工具,在 MyBatis 的基础上只做增强不做改变,为简化开发、提高效率而生。
2、特性
- 无侵入:只做增强不做改变,引入它不会对现有工程产生影响,如丝般顺滑
- 损耗小:启动即会自动注入基本 CURD,性能基本无损耗,直接面向对象操作
- 强大的 CRUD 操作:内置通用 Mapper、通用 Service,仅仅通过少量配置即可实现单表大部分 CRUD 操作,更有强大的条件构造器,满足各类使用需求
- 支持 Lambda 形式调用:通过 Lambda 表达式,方便的编写各类查询条件,无需再担心字段写错
- 支持主键自动生成:支持多达 4 种主键策略(内含分布式唯一 ID 生成器 - Sequence),可自由配置,完美解决主键问题
- 支持 ActiveRecord 模式:支持 ActiveRecord 形式调用,实体类只需继承 Model 类即可进行强大的 CRUD 操作
- 支持自定义全局通用操作:支持全局通用方法注入( Write once, use anywhere )
- 内置代码生成器:采用代码或者 Maven 插件可快速生成 Mapper 、 Model 、 Service 、 Controller 层代码,支持模板引擎,更有超多自定义配置等您来使用
- 内置分页插件:基于 MyBatis 物理分页,开发者无需关心具体操作,配置好插件之后,写分页等同于普通 List 查询
- 分页插件支持多种数据库:支持 MySQL、MariaDB、Oracle、DB2、H2、HSQL、SQLite、Postgre、SQLServer 等多种数据库
- 内置性能分析插件:可输出 SQL 语句以及其执行时间,建议开发测试时启用该功能,能快速揪出慢查询
- 内置全局拦截插件:提供全表 delete 、 update 操作智能分析阻断,也可自定义拦截规则,预防误操作
3、支持数据库
任何能使用 MyBatis 进行 CRUD, 并且支持标准 SQL 的数据库,具体支持情况如下,如果不在下列表查看分页部分教程 PR 您的支持。
- MySQL,Oracle,DB2,H2,HSQL,SQLite,PostgreSQL,SQLServer,Phoenix,Gauss ,ClickHouse,Sybase,OceanBase,Firebird,Cubrid,Goldilocks,csiidb
- 达梦数据库,虚谷数据库,人大金仓数据库,南大通用(华库)数据库,南大通用数据库,神通数据库,瀚高数据库
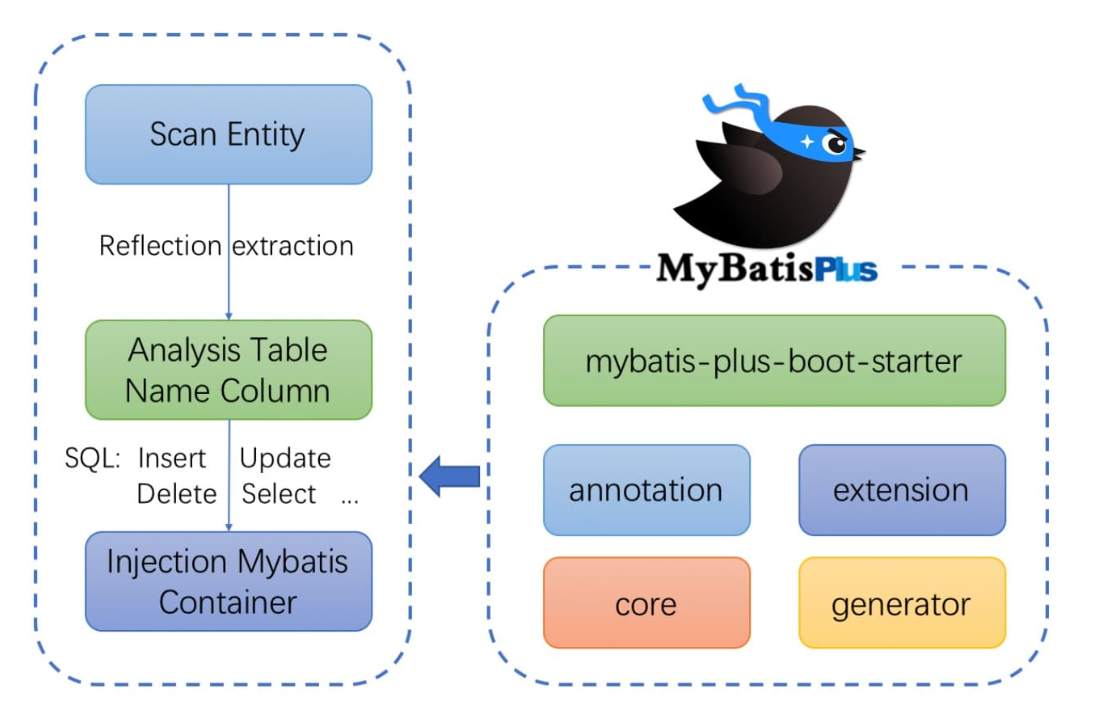
4、框架结构
5、代码及文档地址
官方地址:http://mp.baomidou.com 链接
代码发布地址:
Github: https://github.com/baomidou/mybatis-plus
Gitee: https://gitee.com/baomidou/mybatis-plus
文档发布地址:https://baomidou.com/pages/24112f
二、集成MP
1.创建测试表
-- 创建库CREATE DATABASE db_mp;-- 使用库USE db_mp;-- 创建表CREATE TABLE tb_employee(emp_id INT(11) PRIMARY KEY AUTO_INCREMENT,emp_lastname VARCHAR(50),emp_email VARCHAR(50),emp_gender CHAR(1),emp_age int);INSERT INTO tb_employee(emp_lastname,emp_email,emp_gender,emp_age) VALUES('Tom','tom@atguigu.com',1,22);INSERT INTO tb_employee(emp_lastname,emp_email,emp_gender,emp_age) VALUES('Jerry','jerry@atguigu.com',0,25);INSERT INTO tb_employee(emp_lastname,emp_email,emp_gender,emp_age) VALUES('Black','black@atguigu.com',1,30);INSERT INTO tb_employee(emp_lastname,emp_email,emp_gender,emp_age) VALUES('White','white@atguigu.com',0,35);SELECT * from tb_employee;
2.创建JavaBean
package xyz.zhouge.mp.pojo;/*** @BelongsProject: mp* @BelongsPackage: xyz.zhouge.mp.pojo* @CreateTime: 2022-05-18 14:48* @Description: TODO* @Version: 1.0* @Author:zhouge*/public class Employee {private Integer id ;private String lastName ;private String email ;private String gender ;private Integer age ;public Employee() {}public Employee(Integer id, String lastName, String email, String gender, Integer age) {this.id = id;this.lastName = lastName;this.email = email;this.gender = gender;this.age = age;}public Integer getId() {return id;}public void setId(Integer id) {this.id = id;}public String getLastName() {return lastName;}public void setLastName(String lastName) {this.lastName = lastName;}public String getEmail() {return email;}public void setEmail(String email) {this.email = email;}public String getGender() {return gender;}public void setGender(String gender) {this.gender = gender;}public Integer getAge() {return age;}public void setAge(Integer age) {this.age = age;}@Overridepublic String toString() {return "Employee{" +"id=" + id +", lastName='" + lastName + '\'' +", email='" + email + '\'' +", gender='" + gender + '\'' +", age=" + age +'}';}}
3.依赖配置
1>在pom文件中添加依赖
<!-- mp 依赖 --><dependency><groupId>com.baomidou</groupId><artifactId>mybatis-plus</artifactId><version>2.3</version></dependency><!--junit --><dependency><groupId>junit</groupId><artifactId>junit</artifactId><version>4.12</version></dependency><!-- log4j --><dependency><groupId>log4j</groupId><artifactId>log4j</artifactId><version>1.2.17</version></dependency><!-- c3p0 --><dependency><groupId>com.mchange</groupId><artifactId>c3p0</artifactId><version>0.9.5.2</version></dependency><!-- mysql --><dependency><groupId>mysql</groupId><artifactId>mysql-connector-java</artifactId><version>8.0.26</version></dependency><!-- spring --><dependency><groupId>org.springframework</groupId><artifactId>spring-context</artifactId><version>5.3.12</version></dependency><dependency><groupId>org.springframework</groupId><artifactId>spring-orm</artifactId><version>5.3.12</version></dependency>
特别说明: Mybatis 及 Mybatis-Spring 依赖请勿加入项目配置,以免引起版本冲突!!! Mybatis-Plus 会自动帮你维护!
2>配置mybatis核心配置文件
<?xml version="1.0" encoding="UTF-8" ?><!DOCTYPE configurationPUBLIC "-//mybatis.org//DTD Config 3.0//EN""http://mybatis.org/dtd/mybatis-3-config.dtd"><configuration></configuration>
3>配置log4j日志文件配置信息
<?xml version="1.0" encoding="UTF-8" ?><!DOCTYPE log4j:configuration SYSTEM "log4j.dtd"><log4j:configuration xmlns:log4j="http://jakarta.apache.org/log4j/"><appender name="STDOUT" class="org.apache.log4j.ConsoleAppender"><param name="Encoding" value="UTF-8" /><layout class="org.apache.log4j.PatternLayout"><param name="ConversionPattern" value="%-5p %d{MM-dd HH:mm:ss,SSS} %m (%F:%L) \n" /></layout></appender><logger name="java.sql"><level value="debug" /></logger><logger name="org.apache.ibatis"><level value="info" /></logger><root><level value="debug" /><appender-ref ref="STDOUT" /></root></log4j:configuration>
4>添加数据库连接配置文件
mysql.driver=com.mysql.jdbc.Drivermysql.url=jdbc:mysql://localhost:3306/db_mp?useSSL=false&useUnicode=true&characterEncoding=utf-8&serverTimezone=GMT%2B8mysql.username=rootmysql.password=123456
5>添加applicationContext配置
<?xml version="1.0" encoding="UTF-8"?><beans xmlns="http://www.springframework.org/schema/beans"xmlns:xsi="http://www.w3.org/2001/XMLSchema-instance"xmlns:context="http://www.springframework.org/schema/context"xmlns:tx="http://www.springframework.org/schema/tx"xmlns:mybatis-spring="http://mybatis.org/schema/mybatis-spring"xsi:schemaLocation="http://mybatis.org/schema/mybatis-springhttp://mybatis.org/schema/mybatis-spring-1.2.xsdhttp://www.springframework.org/schema/beanshttp://www.springframework.org/schema/beans/spring-beans.xsdhttp://www.springframework.org/schema/contexthttp://www.springframework.org/schema/context/spring-context-4.0.xsdhttp://www.springframework.org/schema/txhttp://www.springframework.org/schema/tx/spring-tx-4.0.xsd"><!--1.配置数据源--><context:property-placeholder location="classpath:database.properties"/><bean id="c3P0PooledDataSource" class="com.mchange.v2.c3p0.ComboPooledDataSource"><property name="driverClass" value="${mysql.driver}"/><property name="jdbcUrl" value="${mysql.url}"/><property name="user" value="${mysql.username}"/><property name="password" value="${mysql.password}"/></bean><!--2.配置事务管理器--><bean id="transactionManager" class="org.springframework.jdbc.datasource.DataSourceTransactionManager"><!--注入数据源--><property name="dataSource" ref="c3P0PooledDataSource"/></bean><!--3.基于注解的事务管理--><tx:annotation-driven transaction-manager="transactionManager"/><!--4.配置Mybatis-Plus SqlSessionFactoryBean--><bean id="mybatisSqlSessionFactoryBean" class="com.baomidou.mybatisplus.spring.MybatisSqlSessionFactoryBean"><!--4.1注入数据源--><property name="dataSource" ref="c3P0PooledDataSource"/><!--4.2注入mybatis配置文件--><property name="configLocation" value="classpath:mybatis-config.xml"/><!--4.3配置别名--><property name="typeAliasesPackage" value="xyz.zhouge.mp.pojo"/></bean><!--5.配置mybatis扫描mapper接口的路径--><bean id="mapperScannerConfigurer" class="org.mybatis.spring.mapper.MapperScannerConfigurer"><!--扫描mapper 接口的位置--><property name="basePackage" value="xyz.zhouge.mp.mapper"/></bean></beans>
4.测试
public class TestApplicationContext {private ApplicationContext ioc = new ClassPathXmlApplicationContext("applicationContext.xml");@Testpublic void test() throws Exception{//在容器中获取数据源DataSource dataSource = ioc.getBean("c3P0PooledDataSource", DataSource.class);//获取连接Connection connection = dataSource.getConnection();System.out.println(connection);}}
5.集成MP
Mybatis-Plus 的集成非常简单,对于 Spring,我们只需要把 Mybatis自带的 SqlSessionFactoryBean 替换为 MP自带的 MybatisSqlSessionFactoryBean 即可。
<!--4.配置Mybatis-Plus SqlSessionFactoryBean--><bean id="mybatisSqlSessionFactoryBean" class="com.baomidou.mybatisplus.spring.MybatisSqlSessionFactoryBean"><!--4.1注入数据源--><property name="dataSource" ref="c3P0PooledDataSource"/><!--4.2注入mybatis配置文件--><property name="configLocation" value="classpath:mybatis-config.xml"/><!--4.3配置别名--><property name="typeAliasesPackage" value="xyz.zhouge.mp.pojo"/></bean>
三、HelloWorld案例
1.通用的CRUD
2.插入操作
3.更新操作
4.查询操作
5.删除操作
6.MP启动注入SQL原理分析
7.通用CRUD小结
四、EntityWrapper 条件构造器
五、ActiveRecord 活动记录
六、代码生成器
七、插件扩展
八、自定义全局操作
九、公共字段填充
十、Oracle主键 Sequence
十一、IDEA 快速开发插件

若有收获,就点个赞吧
0 人点赞
