1 Spring Cloud Stream
消息中间件主要解决应用解耦、异步消息、流量削峰等问题,实现高性能、高可用、可伸缩和最终一致性架构。
1.1 概述
Spring Cloud Stream由一个中间件中立的核组成。
应用用过spring stream 插入的input 和output 通道与外界交流的。
通道通过指定中间件binder实现与外部代理连接
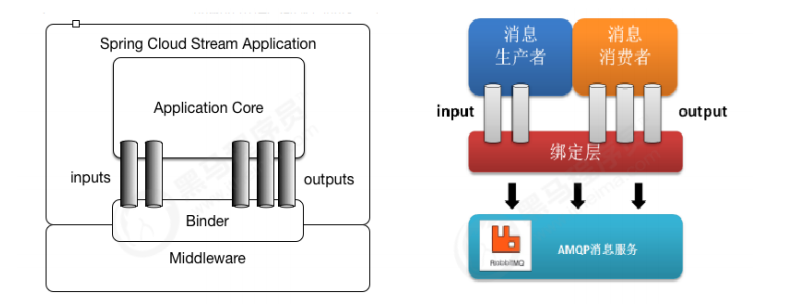
- 最底层是消息服务
- 中间层是绑定层,绑定层和底层的消息服务进行绑定
- 顶层是消息生产者和消息消费者,顶层可以向绑定层生产消息和获取消息消费
1.2 核心概念
绑定器binder
- 在没有绑定器的情况下,spring boot应用要直接与消息中间件进行信息交互时,由于中间件构建的初衷不同,实现细节上有较大差异,使得实现的消息交互逻辑会非常笨重,对中间件细节有太重的依赖
- 通过定义绑定器作为中间层,实现应用程序与消息中间件细节之间的隔离。通过向应用程序暴露统一的channel通过,使得应用程序不需要在考虑各种不同的消息中间件的实现
发布/订阅模型
当一条消息被投递到消息中间件之后,会通过共享的topic主题进行广播,消息消费者在订阅的主题中收到它并触发自身业务逻辑处理
topic代表共享消息给消费者的地方。
1.3 案例
案例通过rabbitmq作为消息中间件,完成案例
消息生产者
<dependency><groupId>org.springframework.cloud</groupId><artifactId>spring-cloud-starter-stream-rabbit</artifactId><version>3.1.5</version></dependency>
定义bingding
发送消息时需要定义一个接口,不同的是接口的返回对象时MessageChannel
package com.example.demo.config;

import org.springframework.cloud.stream.annotation.Output;
import org.springframework.messaging.MessageChannel;

public interface Source {
    String OUTPUT="output";

    @Output("output")
    MessageChannel output();
}
接口声明了一个binding命名为“output”,这个binding生命了一个消息输出流,也就是消息的生产者
application.yml
spring:
  cloud:
    stream:
      bindings:
        output:
          destination: itcast-default #指定了消息发送的目的地,对应 RabbitMQ,会发送到 exchange 是 itcastdefault 的所有消息队列中。
          contentType: text/plain #指定消息类型
测试
package com.example.demo;

import com.example.demo.config.Source;
import org.springframework.beans.factory.annotation.Autowired;
import org.springframework.beans.factory.annotation.Qualifier;
import org.springframework.boot.CommandLineRunner;
import org.springframework.boot.SpringApplication;
import org.springframework.boot.autoconfigure.SpringBootApplication;
import org.springframework.cloud.stream.annotation.EnableBinding;
import org.springframework.messaging.MessageChannel;
import org.springframework.messaging.support.MessageBuilder;

@SpringBootApplication
@EnableBinding(Source.class)
public class DemoApplication implements CommandLineRunner {

    @Autowired
    @Qualifier("output")
    MessageChannel output;

    public static void main(String[] args) {
        SpringApplication.run(DemoApplication.class, args);
    }

    @Override
    public void run(String... args) throws Exception {
//        发送mq消息
        output.send(MessageBuilder.withPayload("hello world").build());

    }
}
消息消费者
 <dependency>
        <groupId>org.springframework.cloud</groupId>
        <artifactId>spring-cloud-starter-stream-rabbit</artifactId>
    </dependency>
定义bingding
接受消息时需要定义一个接口
package com.example.demo.config;

import org.springframework.cloud.stream.annotation.Input;
import org.springframework.messaging.SubscribableChannel;

public interface Sink {
    String INPUT="input";

    @Input("input")
    SubscribableChannel input();
}
接口声明了一个binding命名为“input”
application.yml
spring:
  cloud:
    stream:
      bindings:
        input:
         destination: itcast-default  #指定了消息获取的目的地,对应于MQ就是 exchange
测试
package com.example.demo;

import com.example.demo.config.Sink;
import org.springframework.boot.SpringApplication;
import org.springframework.boot.autoconfigure.SpringBootApplication;
import org.springframework.cloud.stream.annotation.EnableBinding;
import org.springframework.cloud.stream.annotation.StreamListener;
import org.springframework.messaging.Message;

@SpringBootApplication
@EnableBinding(Sink.class)
public class DemoApplication  {

//    监听 binding 为 Sink.INPUT 的消息
    @StreamListener(Sink.INPUT)
    public  void input(Message<String> message){
        System.out.println("监听收到:"+message.getPayload());
    }

    public static void main(String[] args) {
        SpringApplication.run(DemoApplication.class, args);
    }


}
1.4 自定义消息通道
package com.example.demo.config;

import org.springframework.cloud.stream.annotation.Input;
import org.springframework.cloud.stream.annotation.Output;
import org.springframework.messaging.MessageChannel;
import org.springframework.messaging.SubscribableChannel;

public interface OrderProcessor {
    String INPUT_ORDER="inputOrder";
    String OUTPUT_ORDER="outputOrder";

    @Input(INPUT_ORDER)
    SubscribableChannel inputOrder();

    @Output(OUTPUT_ORDER)
    MessageChannel  outputOrder();
}
上述接口中,定义了一个订单输入和订单输出两个binding
使用时需要在@EnableBinding注解中,添加自定义接口
使用@StreamListener做监听时,需要指定 OrderProcessor.INPUT_ORDER
spring:
 cloud:
   stream:
     defaultBinder: defaultRabbit
     bindings:
       inputOrder:
         destination: mqTestOrder
       outputOrder:
         destination: mqTestOrder
1.5 消息分组
- 通常在生产环境,我们的每个服务都不会以单节点的方式运行在生产环境,当同一个服务启动多个实例的时候,这些实例都会绑定到同一个消息通道的目标主题(Topic)上。
- 默认情况下,当生产者发出一条消息到绑定通道上,这条消息会产生多个副本被每个消费者实例接收和处理
- 有些情况,希望生产者产生的消息只被其中一个实例消费,这个时候我们需要为这些消费者设置消费组来实现这样的功能。
实现的方式非常简单,我们只需要在服务消费者端设置spring.cloud.stream.bindings.input.group 属性即可
server:
 port: 7003 #服务端口
spring:
 application:
   name: rabbitmq-consumer #指定服务名
 rabbitmq:
   addresses: 127.0.0.1
   username: itcast
   password: itcast
   virtual-host: myhost
 cloud:
   stream:
     bindings:
       input:
         destination: itcast-default
       inputOrder:
         destination: testChannel
         group: group-2
     binders:
       defaultRabbit:
         type: rabbit
在同一个group中的多个消费者只有一个可以获取到消息并消费
1.6 消息分区
同一个特征的数据被同一个实例消费
消息消费者配置
spring:
    cloud:
   stream:
     instance-count: 2 #数指定了当前消费者的总实例数量
     instance-index: 0 #设置当前实例的索引号
     bindings:
       input:
         destination: itcast-default
       inputOrder:
         destination: testChannel
         group: group-2
         consumer:
           partitioned: true #开启消费者分区功能
     binders:
       defaultRabbit:
         type: rabbit
消息生产者配置
spring:
 application:
   name: rabbitmq-producer #指定服务名
 rabbitmq:
   addresses: 127.0.0.1
   username: itcast
   password: itcast
   virtual-host: myhost
 cloud:
   stream:
     bindings:
       input:
         destination: itcast-default
         producer:
           partition-key-expression: payload #指定了分区键的表达式规则
           partition-count: 2 #数指定了消息分区的数量
     binders:
       defaultRabbit:
         type: rabbit
2 Springcloud config
2.1 配置中心
2.1.1 概述
微服务的配置管理的需求:
- 集中配置管理,一个微服务架构中可能有成百上千个微服务,所以集中管理配置很重要
- 不同环境不同配置,比如数据源配置在不同环境中是不同的
- 运行期间可动态调整
- 配置修改后可自动更新
2.1.2 常见配置中心
Apollo(阿波罗)是携程框架部门研发的分布式配置中心,能够集中化管理应用不同环境、不同集群的配置,配置修改后能够实时推送到应用端,并且具备规范的权限、流程治理等特性,适用于微服务配置管理场景。
Disconf 专注于各种「分布式系统配置管理」的「通用组件」和「通用平台」, 提供统一的「配置管理服务」包括 百度、滴滴出行、银联、网易、拉勾网、苏宁易购、顺丰科技 等知名互联网公司正在使用!「disconf」在「2015 年度新增开源软件排名 TOP 100(OSC开源中国提供)」中排名第16强。
2.2 Springcloud config简介
他是一个解决分布式系统的配置管理方案,包含client和server两部分
server提供配置文件的存储、以接口的形式将配置文件的内容提供出去
client通过接口获取数据、并依据此数据初始化自己应用
服务端特性:
- HTTP为外部配置提供基于资源的API
- 属性值的加密和解密(对称加密和非对称加密)
- 通过使用@EnableConfigServer在spring boot应用中简单嵌入
客户端特性
- 绑定config服务端,并使用远程的属性初始化spring 环境
- 属性值的加密和解密(对称加密和非对称加密)
2.3 入门
Config Server是一个可横向扩展、集中式的配置服务器,它用于集中管理应用程序各个环境下的配置,默认使用Git存储配置文件内容,也可以使用SVN存储,或者是本地文件存储
准备工作
注册码云
创建项目config-repo
上传配置文件
spring:
  cloud:
    config:
      name: product #应用名称,需要对应git中配置文件名称的前半部分
      profile: pro #开发环境
      label: master #git中的分支
      #uri: http://localhost:10000 #config-server的请求地址
      #通过注册中心获取config-server配置
      discovery:
        enabled: true #开启服务发现
        service-id: config-server
eureka:
  client:
    service-url:
      defaultZone: http://localhost:9000/eureka/
  instance:
    prefer-ip-address: true #使用ip地址注册
    instance-id: ${spring.cloud.client.ip-address}:${server.port}
搭建服务端程序
            <dependency>
            <groupId>org.springframework.cloud</groupId>
            <artifactId>spring-cloud-starter-netflix-eureka-server</artifactId>
        </dependency>
启动类添加注解@EnableConfigServer //开启配置中心服务端功能
application.yml
server:
 port: 10000 #服务端口
spring:
 application:
   name: config-server #指定服务名
 cloud:
   config:
     server:
       git:
         uri: https://gitee.com/it-lemon/config-repo.git
         username:
         password:
测试
修改客户端程序
                 <dependency>
            <groupId>org.springframework.cloud</groupId>
            <artifactId>spring-cloud-starter-config</artifactId>
        </dependency>
删除application.yml
添加bootstrap.yml
spring:
 cloud:
   config:
     name: product
     profile: dev
     label: master
     uri: http://localhost:8080
手动刷新
                 <dependency>
            <groupId>org.springframework.boot</groupId>
            <artifactId>spring-boot-starter-actuator</artifactId>
        </dependency>
在对应的controller类加上@RefreshScope
配置文件中开发端点
management:
 endpoints:
   web:
     exposure:
       include: /bus-refresh
2.4 配置中心的高可用
客户端都是直接调用配置中心的server端来获取配置文件信息。这样就存在了一个问题,客户端和服务端的耦合性太高,如果server端要做集群,客户端只能通过原始的方式来路由,server端改变IP地址的时候,客户端也需要修改配置,不符合springcloud服务治理的理念。
springcloud提供了这样的解决方案,我们只需要将server端当做一个服务注册到eureka中,client端去eureka中去获取配置中心server端的服务既可。
2.4.1 服务端改造
                <dependency>
            <groupId>org.springframework.cloud</groupId>
            <artifactId>spring-cloud-config-server</artifactId>
            <version>3.0.5</version>
        </dependency>
        <dependency>
            <groupId>org.springframework.cloud</groupId>
            <artifactId>spring-cloud-starter-eureka</artifactId>
            <version>1.4.7.RELEASE</version>
        </dependency>
server:
 port: 10000 #服务端口
spring:
 application:
   name: config-server #指定服务名
 cloud:
   config:
     server:
       git:
         uri: https://gitee.com/it-lemon/config-repo.git
         username:
         password:

eureka:
 client:
   serviceUrl:
     defaultZone: http://localhost:8000/eureka/   ## 注册中心eurka地址
先启动eureka注册中心,在启动server端,在浏览器中访问:http://localhost:8761/ 就会看到server端已经注册了到注册中心了。
2.4.2 服务端改造
<dependency>
            <groupId>org.springframework.cloud</groupId>
            <artifactId>spring-cloud-starter-config</artifactId>
            <version>3.0.5</version>
        </dependency>
        <dependency>
            <groupId>org.springframework.boot</groupId>
            <artifactId>spring-boot-starter-web</artifactId>
        </dependency>
        <dependency>
            <groupId>org.springframework.cloud</groupId>
            <artifactId>spring-cloud-starter-eureka</artifactId>
            <version>1.4.7.RELEASE</version>
        </dependency>
        <dependency>
            <groupId>org.springframework.boot</groupId>
            <artifactId>spring-boot-starter-test</artifactId>
        </dependency>
server:
  port: 9002 #服务端口
spring:
  application:
    name: stream_producer #指定服务名
  cloud:
    config:
       name: product
       profile: dev
       label: master
       uri: http://localhost:8080
       discovery:
         enabled: true #从eureka中获取配置中心信息
         service-id: config-server
eureka:
  client:
    register-with-eureka: false #是否将自己注册到注册中心
    fetch-registry: false #是否从eureka中获取注册信息
    service-url: #配置暴露给Eureka Client的请求地址
      defaultZone: http://127.0.0.1:8761/eureka/
2.5 消息总线
在微服务架构中,通常会使用轻量级的消息代理来构建一个共用的消息主题来连接各个微服务实例,它广播的消息会被所有在注册中心的微服务实例监听和消费,也称消息总线。
SpringCloud中也有对应的解决方案,SpringCloud Bus 将分布式的节点用轻量的消息代理连接起来,可以很容易搭建消息总线,配合SpringCloud config 实现微服务应用配置信息的动态更新
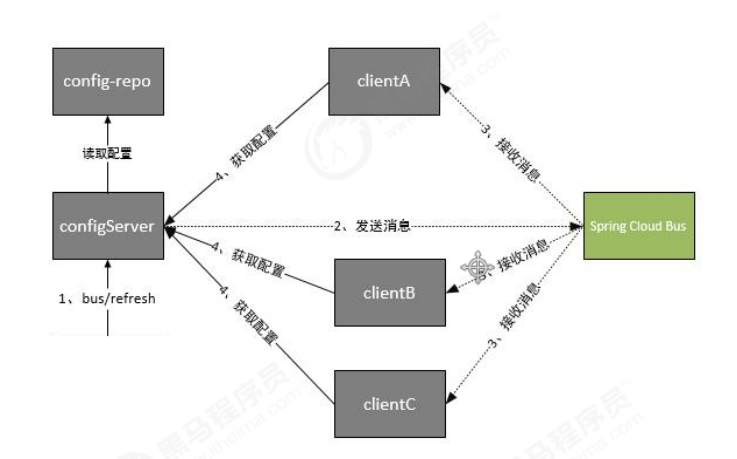
Spring Cloud Bus做配置更新的步骤:
- 提交代码触发post请求给bus/refresh
- server端接收到请求并发送给spring cloud bus
- bus接到消息并通知其他客户端
- 其他客户端接收到通知,请求server端获取最新配置
- 全部客户端均获取到最新的配置
消息总线整合配置中心
                 <dependency>
            <groupId>org.springframework.cloud</groupId>
            <artifactId>spring-cloud-starter-config</artifactId>
            <version>3.0.5</version>
        </dependency>
        <dependency>
            <groupId>org.springframework.boot</groupId>
            <artifactId>spring-boot-starter-actuator</artifactId>
        </dependency>
        <dependency>
            <groupId>org.springframework.cloud</groupId>
            <artifactId>spring-cloud-bus</artifactId>
            <version>3.0.3</version>
        </dependency>
        <dependency>
            <groupId>org.springframework.cloud</groupId>
            <artifactId>spring-cloud-starter-stream-rabbit</artifactId>
            <version>3.1.5</version>
        </dependency>
服务端配置
server:
 port: 10000 #服务端口
spring:
 application:
   name: config-server #指定服务名
 cloud:
   config:
     server:
       git:
         uri: https://gitee.com/it-lemon/config-repo.git
 rabbitmq:
   host: 127.0.0.1
   port: 5672
   username: guest
   password: guest
management:
 endpoints:
   web:
     exposure:
       include: bus-refresh
eureka:
 client:
   serviceUrl:
     defaultZone: http://127.0.0.1:8761/eureka/
 instance:
   preferIpAddress: true
   instance-id: ${spring.cloud.client.ip-address}:${server.port}
#spring.cloud.client.ip-address:获取ip地址
客户端配置
server:
 port: 9002
eureka:
 client:
   serviceUrl:
     defaultZone: http://127.0.0.1:8761/eureka/
spring:
 cloud:
   config:
     name: product
     profile: dev
     label: master
     discovery:
       enabled: true
       service-id: config-server
需要在码云对应的配置文件中添加rabbitmq的配置信息

若有收获,就点个赞吧
0 人点赞
