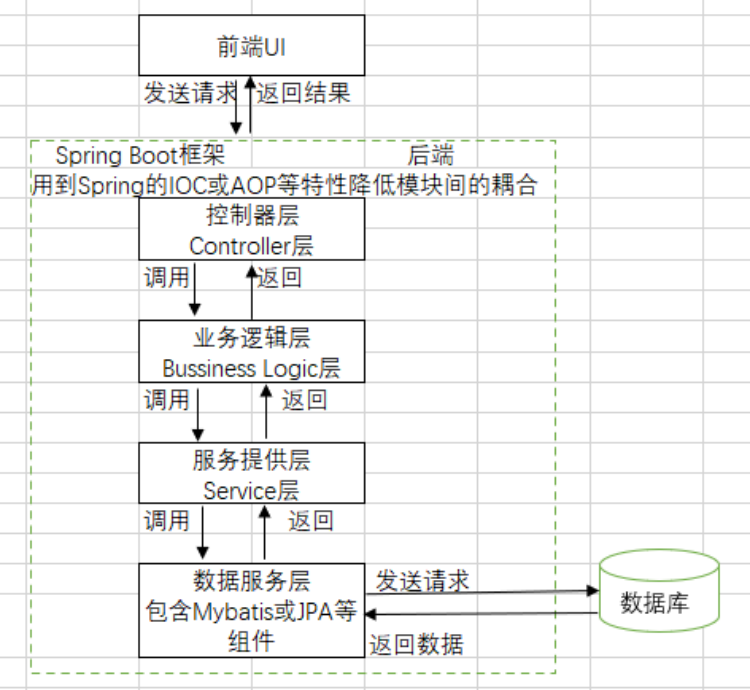
控制反转
将自己new对象的过程交给容器去做。
传统项目中,类里面主动定义需要依赖的对象,当修改下层类的时候,需要逐层往上修改其他类,耦合度太高。
而在IoC开发模式中,由Spring管理类之间的依赖关系,降低了耦合度,减少了维护的工作量。
Demo
通过一个Demo了解IoC的做法
首先,定义一个Tool类,里面有打印的方法
public class Tool {public void print(){System.out.println("Use tool to Coding");}}
编写实现配置管理Bean类的Config.java代码
@Configuration
public class Config {
    @Bean("tool")
    public Tool init(){
        return new Tool();
    }
}
编写调用Tool对象的testClass.java类
public class TestClass {
    public static void main(String[] args){
        ApplicationContext applicationContext = new AnnotationConfigApplicationContext(Config.class);
        Tool tool = (Tool)applicationContext.getBean("tool");
        tool.print();
    }
}
分析:
在main函数里面,第一行首先根据Config类初始化了ApplicationContext对象,因为在Config类中定义了名为tool的Bean,所以能够通过getBean方法获取到Tool类对象,并调用其print方法。
明显区别于传统开发中的new方法。
Tool tool = new Tool();
tool.print();
IoC原理
Bean与Spring容器
在Spring开发运行环境中,Bean可以理解成一个个具体的类。ApplicationContext对象是具象化的Spring容器,在项目启动时,Spring容器从配置文件或配置类当中读取各种Bean依赖关系,运行时根据必要的配置创建对应的Bean类。
通用框架

SpringBoot启动类
@SpringBootApplication注解
通过Demo开始这章的学习
@SpringBootApplication
public class SpringBootApp {
    public static void main(String[] args) {
        SpringApplication.run(SpringBootApp.class, args);
    }
}
首先需要知道@SpringBootApplication注解包括以下三个注解:
@ComponentScan:扫描本包下的所有路径,读取@Service等注解标识的类到Spring容器。@Configuration:在IoC中讲过用法,可以通过@Bean注解往Spring容器中配置类。@EnableAutoConfiguration:自动读取通过@Bean注解配置好的类,并且到classpath指定的路径读取配资好的类,将控制权教给Spring容器配置热部署
修改代码后不需要重新启动项目,在测试环境中可以更方便调试,但在生产环境,变更代码和重启服务器需要慎重,一般需要复杂的流程审批,不建议使用热部署。<dependencies> <dependency> <groupId>org.springframework.boot</groupId> <artifactId>spring-boot-devtools</artifactId> <optional>true</optional> </dependency> ... </dependencies>使用banner定制启动信息
在resouces路径下新建banner.txt,定义如下信息。 ```xml Application Version: Version 1.0 Spring Boot Version: ${spring-boot.version} Spring Boot formatted Version: ${spring-boot.formatted-version}
Welcome to Sprint Boot App
启动项目后可以在控制台看到如下效果<br /><br />想要关闭banner中的启动信息
```java
@SpringBootApplication
public class SpringBootApp {
public static void main(String[] args) {
//SpringApplication.run(SpringBootApp.class, args);
SpringApplication app = new SpringApplication(SpringBootApp.class);
app.setBannerMode(Banner.Mode.OFF);
app.run(args);
}
}
编写控制器
@Controller注解
往启动类所在包内,创建controller包,因为前面所说的@ComponentScan注解,会自动扫描该包下的程序。
@RestController
public class Controller {
    @RequestMapping("/index")
    public String indexPage(){
        return "index";
    }
    @RequestMapping("/welcome")
    public String welcomePage(){
        return "welcome";
    }
}
类名随意,不影响。但需要用@RestController注解标识。
同样在内部处理请求的方法名随意,需要用@RequestMapping注解标识处理的url格式。
上述代码可以在访问http://localhost:8080/welcome网址后看到“welcome”输出。
@ReuqestMapping映射请求
@RequestMapping注解用于映射url请求,有如下常用参数
- value:映射的url请求
- method:请求的Http方法,GET、POST、PUT和DELETE
-
从请求读取参数
也就是在上述params或其他方式携带的参数,在控制器中可以通过
@PathVarible和@RequestParam注解对应读取参数。演示代码:@RestController public class ControllerForPath { //请求里包含{id}参数 @RequestMapping(value = "/getPersonByID/{id}") public String getPersonByID(@PathVariable String id){ return "The ID is:" + id; } //请求里包含{id}和{name}参数 @RequestMapping("/getPersonByIDAndName/{id}/{name}") public String getPersonByIDAndName(@PathVariable String id,@PathVariable String name){ return "The ID is:" + id + ", name is:" + name; } //参数定义在params里 @RequestMapping(value = "/getAccountByID",params = {"id"}) public String getAccountByID(@RequestParam String id){ return "The Account ID is:" + id ; } }注意观察上面三个请求的不同处理方式,得出结论
当参数写在url请求里时,比如
/getPersonByID/{id},通过@PathVariable注解读取参数。如果通过@RequestParam传入,比如/getAccountByID?id=1,则需要用@RequestParam传递参数。@PathVariable和@RequestParam注解都是用在参数前,所用的参数名必须和url请求携带的参数名一致,否则会报错。produces参数返回JSON格式结果
之前的demo返回的都是文本类型,有时候我们需要将输出内容转成JSON格式,对此可以使用@RequestMapping注解的produces参数实现。
可以看到,定义了@RestController public class ControllerForJSON { @RequestMapping(value = "/demoJSON",produces = {"application/json"}) public HashMap demoJSON(){ HashMap accountHM = new HashMap(); accountHM.put("id","001"); accountHM.put("name","Peter"); accountHM.put("balance","1000"); return accountHM; } }produces参数,返回的account对象被自动转换成了JSON格式输出。
编写业务逻辑类
前面在控制类中处理完url请求直接就返回值了,但在真实的开发里还要往下找对应业务请求,控制类和业务类分层处理。@Service注解编写业务处理类
@Service
public class AccountService {
  public HashMap getAccountByID(String id){
      HashMap accountHM = new HashMap();
      accountHM.put("ID",id);
      accountHM.put("balance",1500);
      return accountHM;
  }
}
@RestController
public class Controller {
    @Autowired
    AccountService accountService;
    @RequestMapping("/getAccountByID/{id}")
    public HashMap getAccountByID(@PathVariable String id){
        return accountService.getAccountByID(id);
    }
}
- 业务逻辑类需要使用
@Service注解修饰 - 在控制器类中,可以通过
@Autowired注解引入业务处理类,并调用封装的业务逻辑方法
ps:面试题:@Autowired注解和@Resource注解的区别?
编写和读取配置文件
SpringBoot项目中,一般存放两类参数:SpringBoot服务本身相关参数:端口、工作协议等,业务有关参数:数据库配置等。配置文件一般在resources目录下,以.prperties或.yml格式。
.properties配置文件
在resoucres目录下新建application.properties配置文件
server.port=8888
db.username=sa
然后在Controller.java控制类中进行调用
@RestController
public class Controller {
    @Autowired
    private Environment env;//用此对象读取参数
    @RequestMapping("/getParam")
    public String getParam(){
        return "db.username is:" + env.getProperty("db.username");
    }
}
.yml配置文件
将application.properties文件替换为application.yml文件
server:
  port: 8888
db:
  username: sa
  pwd: 123
获取的方式一样,使用env.getProperty方法读取参数
@Autowired
private Environment env;
@RequestMapping("/getYmlParam")
public String getYmlParam(){
    return "db.username is:" + env.getProperty("db.username") + ", db.pwd is:" + env.getProperty("db.pwd");
}
@Value注解读取配置文件
除了使用Enviroment对象的getProperty方法读取配置文件的参数外,还可以通过@Value注解读取。
@RestController
public class ControllerForValue {
    //用@Value注解读取参数
    @Value("${db.username}")
    private String username;
    @Value("${db.pwd}")
    private String pwd;
    @RequestMapping("/getParamFromValue")
    public String getParamFromValue(){
        //输出读取到的参数
        return "db.username is:" + username + ", db.pwd is:" + pwd;
    }
}
通过代码得知@Value注解的用法是在括号中使用“${db.username}”的形式读取配置文件的参数并赋予该注解修饰的变量。
参考&推荐
《搭建Spring Boot开发环境》
CSDN·IoC控制反转有什么好处?

