ER 图
在开始业务开发之前,我们需要对我们应用的表结构和表与表之间的关系进行设计。
用来描述数据库结构最直观有效的方式就是 ER 图。
ER 是 Entity Relationship 的缩写,也就是实体关系图。实体,是指程序中的某一个抽象概念。比如用户、文章、评论等。在数据库中的话,可以理解成表。每个实体具有一个属性集合,属性在数据库中的概念就是列/字段。实体与实体之间通过某个属性进行关联,产生联系。这个属性通常就是表的主键。
现在我们应该已经明白了 ER 图中的基本概念和关系,接下来我们开始设计 ER 图。
dbdiagram.io
设计 ER 图的软件有很多,它们大都拥有将 ER 图导出为创建数据库语句的能力。
这里我们选择使用 dbdiagram.io,原因是它非常轻量,运行在 Web 平台,不需要额外下载客户端。它的构建方式非常简单,我们只需要学习一点简单地 DSL 语法就够了。使用它设计好 ER 图后,我们可以导出 PDF/PNG/SQL 等各种格式,非常方便。同时它还是免费的。
DBML 语法
BDML 是 dbdiagram 提供的一套用于定义数据库模型结构的 DSL。它的语法非常简单,我们只需要几分钟就能学会。
表和字段
下面是创建了一个用户表的 DBML 语法。
Table user { id int [PK] username varchar eamil varchar createdAt timestamp countryId int Note: '这是一张用户表' }
我们来解释一下上面的语法。
使用 Table tableName { } 的语法就可以创建表。
大括号中的每一行都表示一个字段,字段格式为 字段名 字段类型 [字段设置],其中字段设置是可选的。
字段类型可以是任意的单词,只要数据库支持即可。
字段设置可以有如下几个设置:
Note: '注释内容': 字段注释PK: 主键。null/not null: 该列为空或不可为空。unique: 该列的值必须唯一。default: value: 默认值。increment: 该列自增。
第 8 行是表的注释,格式为 Note: '注释内容'。
索引与关系
下面的语法创建了一张国家表,并与用户表进行了关联。
Table country { id int [PK] recordId uuid [not null] name varchar Indexes { recordId } } Ref: country.recordId < user.countryId
我们来解释一下上面的语法。
第 6-8 行是创建索引。
索引的语法与表很像,通过 Indexes {}语法来创建索引。其中每一行都是一个索引。
第 11 行是关联语法,将 country.recordId 以一对多的形式关联到 user.countryId。
如果想描述一对一的关系,使用 -,描述一对多的关系,使用 > 或 <,描述多对多关系,使用 <>。
DBML 的语法我们了解到这里就可以对图灵鸟社区的数据结构进行设计了。
为什么使用 recordId?
这里解释一下为什么需要 recordId 字段。
recordId 是一个唯一索引,和数据库自动生成的 id 很像。
第一点,当我们的数据库面临高并发或者数据量过大而要对数据库分库分表或者改进为分布式数据库时,使用数据库自增 id 的方案就不太合适了,因为它会限制住高并发的性能。这时我们需要使用另一种高效的算法来生成全局唯一的 id。比较常见的方案是 uuid 和 snowflake 算法。其中 snowflake 更好一些,因为 uuid 太长了,会占用很多存储空间,而且 uuid 不具有有序性,所以写操作的性能不好。尽管如此,我们这里仍然选择使用 uuid,原因就是它非常简单,当后面出现性能问题时我们可以再换为 snowflake 方案。这也是一个系统设计原则:在做系统设计时不应该在早期过度关注性能。
其次,某些场景需要展示给前端用户唯一 id 时,使用数据库自增 id 不太合适。比如竞争对手的公司在我们系统中注册了一个用户,通过用户 id 的大小就可以推断出我们的用户量。除了用户以外,还有很多模块都可能用到 id,比如订单 id,竞争对手下一单就可以得知订单量,这是非常可怕的。所以 recordId 也可以充当业务中的订单号、流水号之类的数据。除了直接展示外,在浏览器地址栏中显示的动态路由使用这个 id 也会更加合适。
为什么不使用下划线命名法来命名字段?
如果你有一些数据库设计经验,应该发现我在上面的字段命名中使用的是驼峰命名法,而不是驼峰命名法。
国内很多数据库教程或者在实际的企业项目开发中总是喜欢使用下划线命名法。主要的理由有如下两点:
第一点,有些数据库不支持大小写,迁移比较麻烦,比如 MySQL 迁移到 Oracle。但我认为这一点可以忽略,因为发生数据库迁移的情况非常少,几乎没有。
第二点,MySQL 中不区分大小写。
我们选用 PostgreSQL 数据库,它是支持区分大小写的,所以我们也就没必要把表的字段设计为下划线命名法。在程序中还是使用驼峰命名法为主,如果使用下划线命名法还需要对字段进行转换,得不偿失。
设计 ER 图
首先我们进入到 dbdiagram 网站。

点击 Create your diagram,开始创建 ER 图。
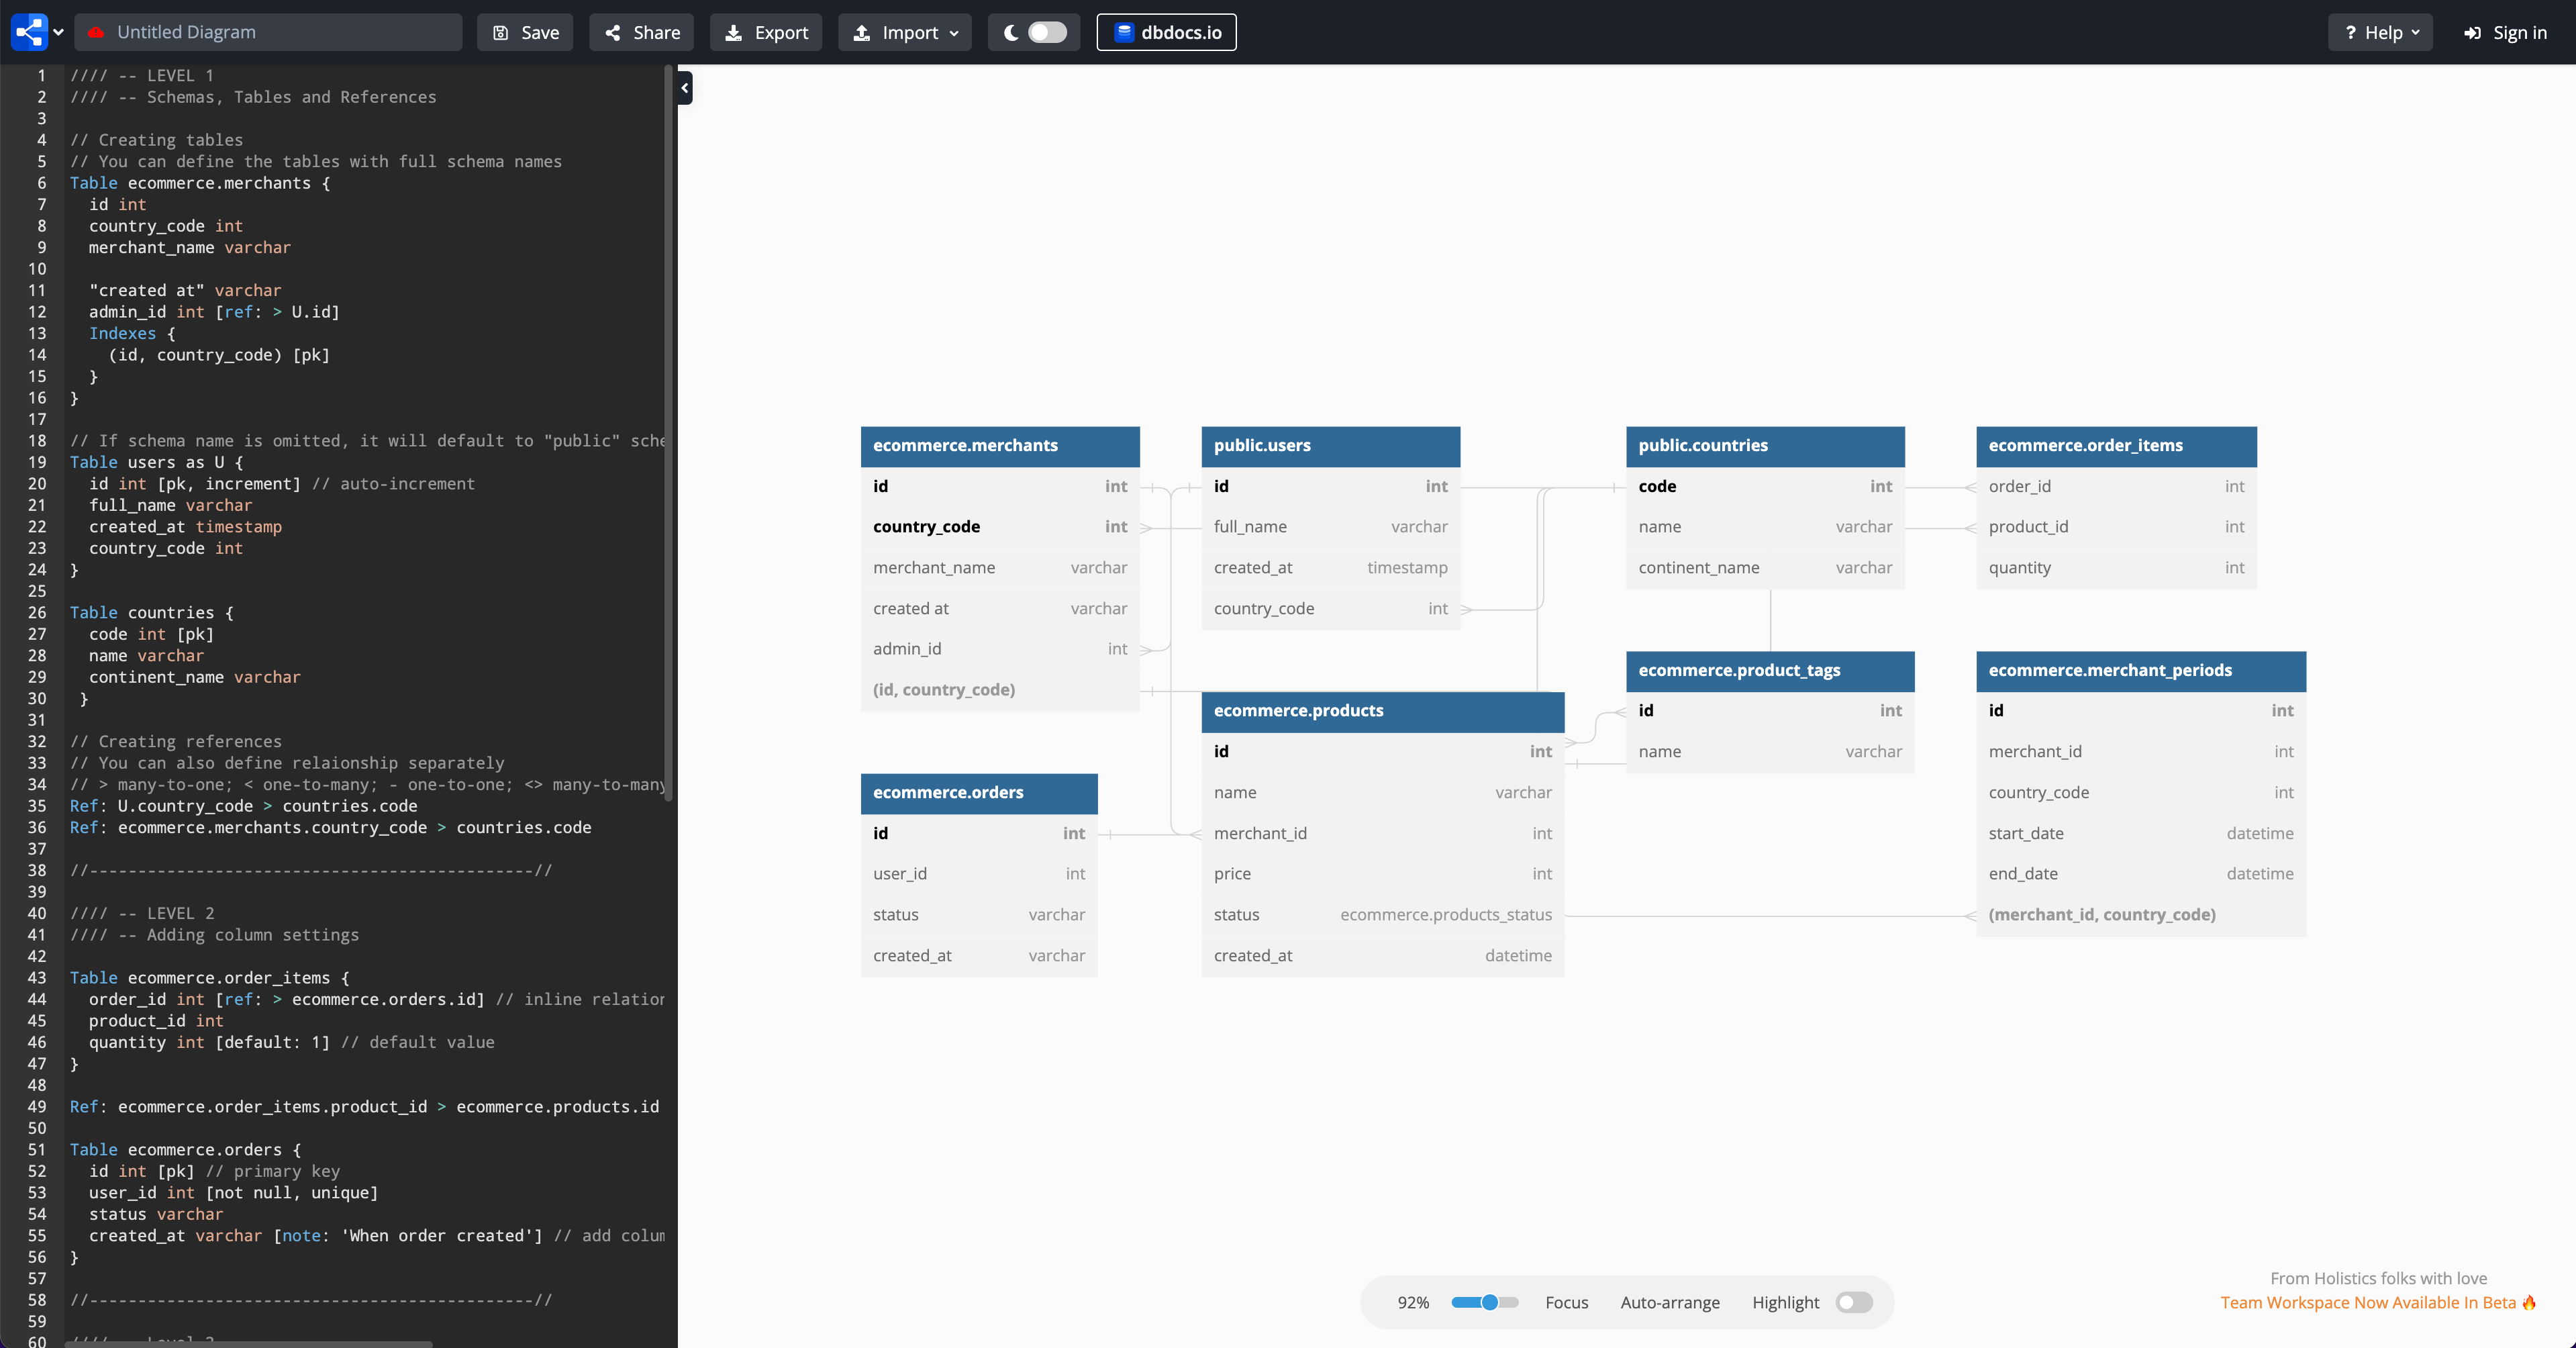
如果你是第一次使用它的话,dbdiagram 会帮我们创建一个 Demo,主要目的是为了演示一些关键的语法该怎么用。

我们之前已经学习了 DBML 基本语法,所以这里生成的 Demo 我们不需要了,直接删除掉即可。
ER 图的设计应该是由局部到全局,我们先把每个实体,也就是表设计好,再去设计它们之间的关系。
用户表
首先来设计用户表。
用户的基本信息包括:昵称、简介、邮箱、头像、手机号、生日、性别、地址。
Table User { id int [pk, increment] recordId uuid [not null, default: `gen_random_uuid()`] nikename varchar [not null, unique, Note: '昵称'] profile varchar [Note: '简介'] email varchar [unique, Note: '邮箱'] avatar varchar [Note: '头像'] phone varchar [unique, Note: '手机号'] birthday timestamp [Note: '生日'] gender int [Note: '性别,0-女 1-男'] address varchar [Note: '地址'] createdAt timestamp [not null, default: `now()`, Note: '创建时间'] updatedAt timestamp [not null, Note: '更新时间'] deletedAt timestamp [Note: '删除时间', default: null] Indexes { nikename } }
其中 createdAt、updatedAt 和 deletedAt 是每张表都有的属性,用来记录这条记录的创建、更新和删除时间。当我们对数据进行删除时,只需要设置 deletedAt 的值。在查询时,只要 deletedAt 为 null,才是有效数据。这种做法也叫做逻辑删除或软删除。
软删除可以实现恢复数据,通常用来防止用户误操作导致的数据丢失。某些监管部门也会要求被删除的数据保留一段时间。
文章表
文章与用户的的关系是 N 对 1,这种关系我们可以将 userId 放到文章表的字段中。
Table Post { id int [pk, increment] recordId uuid [not null, default: `gen_random_uuid()`] title varchar [not null, unique, Note: '标题'] cover varchar [Note: '封面'] content text [not null, Note: '内容'] isDraft bool [not null, Note: '是否为草稿'] userId uuid [not null, Note: '用户ID'] createdAt timestamp [not null, default: `now()`, Note: '创建时间'] updatedAt timestamp [not null, Note: '更新时间'] deletedAt timestamp [Note: '删除时间', default: null] Indexes { title } } Ref: Post.userId > User.recordId
评论表
评论和用户的关系是 N 对 1,一个用户可以发表多条评论,一条评论只能由一个用户发表,所以 userId 可以放到评论表的字段中。
评论和文章的关系是 N 对 1,一条评论只可以属于一篇文章,一篇文章可以有多条评论,所以 postId 也可以放到评论表的字段中。
评论和评论的关系是 N 对 1,一条评论只可以属于一条父评论,一条评论可以有多条子评论,所以 commentId 也可以放到评论表的字段中,这里我们使用 parentId。
Table Comment { id int [pk, increment] recordId uuid [not null, default: `gen_random_uuid()`] userId uuid [not null, Note: '发表用户ID'] postId uuid [not null, Note: '文章ID'] content text [not null, Note: '评论内容'] parentId uuid [Note: '父评论ID'] createdAt timestamp [not null, default: `now()`, Note: '创建时间'] updatedAt timestamp [not null, Note: '更新时间'] deletedAt timestamp [Note: '删除时间', default: null] } Ref: Comment.userId > User.recordId Ref: Comment.postId > Post.recordId Ref: Comment.parentId > Comment.recordId
收藏表
收藏表是一张中间关系表,用来关联用户与文章,关系是 N 对 N,一个用户可以收藏多篇文章,一篇文章可以被多个用户收藏。
Table Collect { id int [pk, increment] recordId uuid [not null, default: `gen_random_uuid()`] userId uuid [not null] postId uuid [not null] createdAt timestamp [not null, default: `now()`, Note: '创建时间'] updatedAt timestamp [not null, Note: '更新时间'] deletedAt timestamp [Note: '删除时间', default: null] } Ref: Collect.userId > User.recordId Ref: Collect.postId > Post.recordId
关注表
关注表是一张中间关系表,用来关联用户与用户,关系是 N 对 N,一个用户可以关注多个用户,一个用户可以被多个用户关注。
Table Fllow { id int [pk, increment] recordId uuid [not null, default: `gen_random_uuid()`] followerId uuid [not null, Note: '关注者ID'] followedId uuid [not null, Note: '被关注者ID'] createdAt timestamp [not null, default: `now()`, Note: '创建时间'] updatedAt timestamp [not null, Note: '更新时间'] deletedAt timestamp [Note: '删除时间', default: null] } Ref: Fllow.followerId > User.recordId
点赞表
点赞表是一张中间关系表,用来关联用户与文章,关系是 N 对 N,一个用户可以点赞多篇文章,一篇文章可以被多个用户点赞。
Table Like { id int [pk, increment] recordId uuid [not null, default: `gen_random_uuid()`] userId uuid [not null, Note: '用户ID'] postId uuid [not null, Note: '文章ID'] isEffective bool [not null] createdAt timestamp [not null, default: `now()`, Note: '创建时间'] updatedAt timestamp [not null, Note: '更新时间'] deletedAt timestamp [Note: '删除时间', default: null] } Ref: Like.userId > User.recordId Ref: Like.postId > Post.recordId
浏览表
浏览表的结构很简单,只有两个有效字段,一个是 show,表示文章被其他人在列表中刷到的展现数;另一个是 read,表示被其他人打开文章。
这类数据会频繁读写,属于热数据。而写是非常消耗性能的,所以这类数据我们会使用 redis 进行缓存,在某个网站访问低谷期将数据同步回数据库,比如凌晨三点。
Table View { id int [pk, increment] recordId uuid [not null, default: `gen_random_uuid()`] postId uuid [not null] show int read int createdAt timestamp [not null, default: `now()`, Note: '创建时间'] updatedAt timestamp [not null, Note: '更新时间'] deletedAt timestamp [Note: '删除时间', default: null] } Ref: View.postId > Post.recordId
标签表
Table Tag { id int [pk, increment] recordId uuid [not null, default: `gen_random_uuid()`] name varchar [not null, unique] createdAt timestamp [not null, default: `now()`, Note: '创建时间'] updatedAt timestamp [not null, Note: '更新时间'] deletedAt timestamp [Note: '删除时间', default: null] Indexes { name } }
分类表
Table Category { id int [pk, increment] recordId uuid [not null, default: `gen_random_uuid()`] name varchar [not null, unique] createdAt timestamp [not null, default: `now()`, Note: '创建时间'] updatedAt timestamp [not null, Note: '更新时间'] deletedAt timestamp [Note: '删除时间', default: null] Indexes { name } }
文章标签表
标签和文章的关系是 N 对 N,一个标签可以属于多篇文章,一篇文章可以拥有多个标签。
Table PostTag { id int [pk, increment] recordId uuid [not null, default: `gen_random_uuid()`] postId uuid [not null] tagId uuid [not null] createdAt timestamp [not null, default: `now()`, Note: '创建时间'] updatedAt timestamp [not null, Note: '更新时间'] deletedAt timestamp [Note: '删除时间', default: null] } Ref: PostTag.postId > Post.recordId Ref: PostTag.tagId > Tag.recordId
文章分类表
分类和文章的关系是 1 对 N,一个分类可以属于多篇文章,一篇文章只可以拥有一个分类。按照正常套路,我们应该在文章表中增加一个分类 ID 字段就可以了,但我们是先设计的文章表,后设计的分类表,所以使用中间表的方式,这样可以提高扩展性。
Table PostCategory { id int [pk, increment] recordId uuid [not null, default: `gen_random_uuid()`] postId uuid [not null] categoryId uuid [not null] createdAt timestamp [not null, default: `now()`, Note: '创建时间'] updatedAt timestamp [not null, Note: '更新时间'] deletedAt timestamp [Note: '删除时间', default: null] } Ref: PostCategory.postId > Post.recordId Ref: PostCategory.categoryId > Category.recordId
置顶表
Table Top { id int [pk, increment] recordId uuid [not null, default: `gen_random_uuid()`] postId uuid [not null] createdAt timestamp [not null, default: `now()`, Note: '创建时间'] updatedAt timestamp [not null, Note: '更新时间'] deletedAt timestamp [Note: '删除时间', default: null] } Ref: Top.postId > Post.recordId
推荐表
Table Recommend { id int [pk, increment] recordId uuid [not null, default: `gen_random_uuid()`] postId uuid [not null] createdAt timestamp [not null, default: `now()`, Note: '创建时间'] updatedAt timestamp [not null, Note: '更新时间'] deletedAt timestamp [Note: '删除时间', default: null] } Ref: Recommend.postId > Post.recordId
内容分析表
Table ContentAnalysis { id int [pk, increment] recordId uuid [not null, default: `gen_random_uuid()`] userId uuid [not null] postId uuid [not null] wordCount int [Note: '字数'] creationPoint int [Note: '创作分'] showCount int [Note: '展现量'] viewCount int [Note: '阅读量'] likeCount int [Note: '点赞量'] commentCount int [Note: '评论量'] collectCount int [Note: '收藏量'] createdAt timestamp [not null, default: `now()`, Note: '创建时间'] updatedAt timestamp [not null, Note: '更新时间'] deletedAt timestamp [Note: '删除时间', default: null] } Ref: ContentAnalysis.userId > User.recordId Ref: ContentAnalysis.postId > Post.recordId
关注者分析表
Table FllowAnalysis { id int [pk, increment] recordId uuid [not null, default: `gen_random_uuid()`] userId uuid [not null] activeCount int [Note: '活跃关注者'] newCount int [Note: '新增关注'] cancelCount int [Note: '取消关注'] createdAt timestamp [not null, default: `now()`, Note: '创建时间'] updatedAt timestamp [not null, Note: '更新时间'] deletedAt timestamp [Note: '删除时间', default: null] } Ref: FllowAnalysis.userId > User.recordId
内容分析表和关注者分析表都属于热数据。
我们同样要使用 redis 进行缓存写操作,然后在网站访问低谷期同步到数据库中。
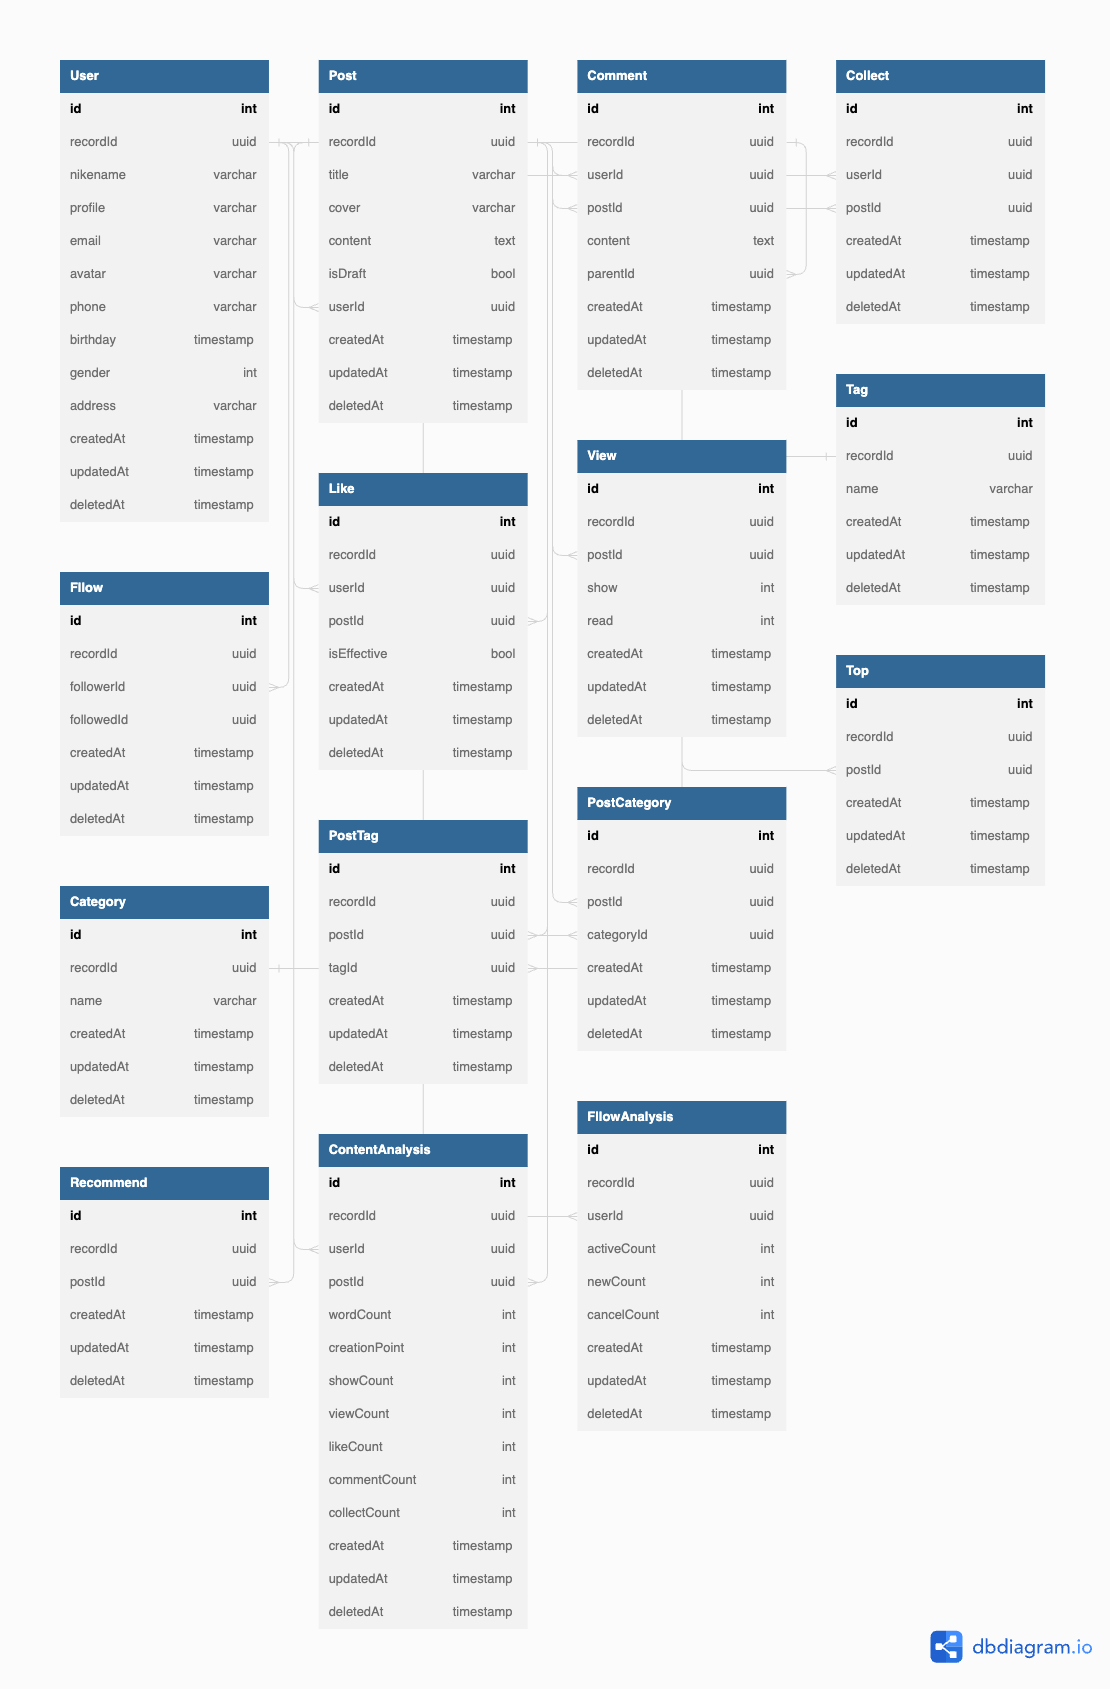
到这里,基本的 ER 图就设计好了。
一共只有 15 张表,解构清晰,并不复杂。

导出为 SQL
设计完成之后,我们需要把 ER 图导出为 SQL。
在导出之前,我们需要将所有的关系都删掉,就是 Ref: xxx这些代码。为什么要这么做呢?因为我们不需要真实的物理外键。
在《阿里巴巴 Java 开发手册》中也有明确规定,禁止直接使用物理外键,要在业务层面使用逻辑外键进行关联。
这么做的原因有几点。
第一点,物理外键约束性极强,它保证了绝对的一致性,但是不考虑性能。但是我们会更关注性能,有些脏数据我们可以逻辑删除,延迟删除,甚至不需要删除。
第二点,外键在数据库重构和扩展时非常麻烦。比如分库分表时。
使用物理外键带来的缺点比它自身的优点更多,所以我们没必要自找麻烦。这也是为什么业界比较喜欢在程序层进行逻辑关联的原因。
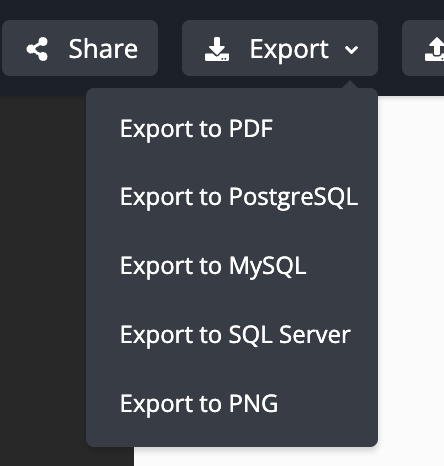
点击上方导航栏中的 Export 按钮进行导出。导出是需要登录 Github 账号的。

我们选择 Export to PostgreSQL,因为我们接下来使用的数据库就是 PostgreSQL。
导出的 SQL 文件如下:
我们会在下一课中使用这个 SQL 来初始化我们的数据库。

