作者 Robby Qiu, Second State 开发与 WasmEdge 贡献者
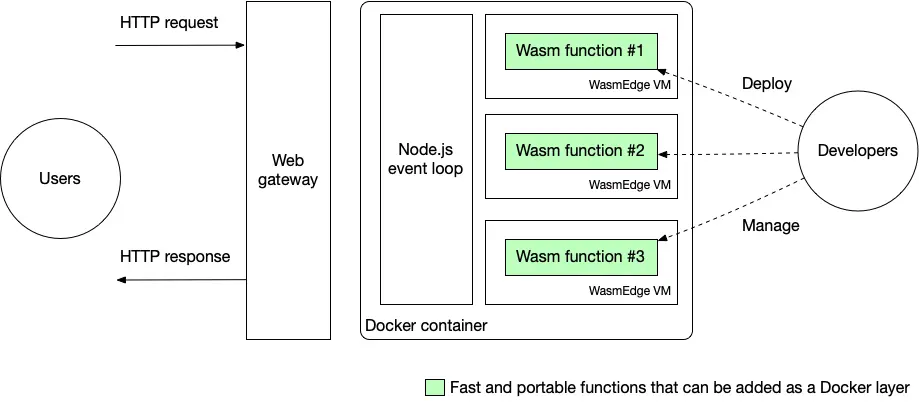
Serverless 函数为开发者节省了管理后端基础设施的大量麻烦。Serverless 还简化了开发过程,因为开发者只需关注业务本身的逻辑。本文是有关如何在 Amazon 的 serverless 计算平台 AWS Lambda 上编写和部署 WebAssembly serverless 函数的分步指南。在我们的演示中,WebAssembly 函数使用 WasmEdge runtime 执行。下图显示了我们解决方案的整体架构。

在本文的第一部分,我们将解释为什么 WebAssembly 是 serverless 函数极佳的 runtime。我们将 WebAssembly 字节码(通常由 Rust、C++ 编译得来)、高级编程语言(例如 Python 和 JavaScript)以及机器本机可执行文件(本机客户端或 NaCl)进行比较。然后,在第二部分,我们将演示两个 serverless 函数示例,都是用 Rust 编写并编译为 WebAssembly 进行部署。第一个示例展示了 WasmEdge 快速处理图像的能力,而第二个示例运行由 WasmEdge 的 TensorFlow 扩展提供支持的 AI 推理。
为什么选择 WebAssembly?
简单回答是 WebAssembly 快速、安全且可移植。那么具体是为什么呢?下面是详细回答。
WebAssembly vs. Python 和 JavaScript
DataDog 最近的一项调查发现大部分 AWS Lambda serverless 函数是用 JavaScript 和 Python 写的。 二者是世界上最流行的两种编程语言,所以这并不出人意料。
但是,众所周知,高级语言运行速度非常慢。 事实上,根据发表在Science上的一篇论文 ,Python 比用 C 或 C++ 编写的相同程序最多慢 60,000 倍。
因此,虽然 JavaScript 和 Python 非常适合简单的函数,但它们不适合计算密集型任务,例如图像、视频、音频和自然语言处理,这些在现代应用程序中越来越普遍。
另一方面,WebAssembly 的性能与 C/C++ 编译的本机二进制文件 (NaCl) 相当,同时仍保持与高级语言 runtime 相关的可移植性、安全性和可管理性。 WasmEdge 是市场上目前最快的WebAssembly runtime 之一。
WebAssembly vs. 原生客户端
但是,当两者都在 Docker 容器或者 microVM 内部运行的时候, WebAssembly 相比 NaCl 的优势有哪些呢?
我们对未来的愿景是在原生基础设施中, WebAssembly 作为一个替代轻量级 runtime,与 Docker 和 microVM 并行运行。与类似 Docker 的容器或 microVM 相比,WebAssembly 性能更加出色并且消耗的资源更少。但就目前而言,AWS Lambda 和许多其他平台仅支持在 microVM 内运行 WebAssembly。尽管如此,与运行容器化的 NaCl 程序相比,在 microVM 中运行 WebAssembly 函数仍然具有许多优势。
首先,WebAssembly 为单个函数提供了细粒度的 runtime 隔离。一个微服务可以有多个函数并支持在一个 microVM 中运行的服务。 WebAssembly 可以让微服务更安全、更稳定。
其次,WebAssembly 字节码是可移植的。即使在容器内,NaCl 仍然依赖于安装在 OS 上的底层 CPU、操作系统和动态库。 而 WebAssembly 字节码应用程序是跨平台的。开发者只需编写一次即可部署在任何云、任何容器和任何硬件平台上。
第三,WebAssembly 应用易于部署和管理。与 NaCl 动态库和可执行文件相比,它们的平台依赖性和复杂性要少得多。
最后,WebAssembly 是多语言的。 C/C++、Rust、Swift、Kotlin 程序都可以轻松编译成 WebAssembly。 WebAssembly 甚至支持 JavaScript。 WasmEdge Tensorflow API 提供了以 Rust 编程语言执行 Tensorflow 模型的最符合习惯的方式。
我们能够看到,WebAssembly + WasmEdge 是一个更好的选择。为了实际见证这个结论,让我们深入示例,亲自上手吧!
前期准备
由于我们的 demo WebAssembly 函数是用 Rust 写的,你需要安装一个 Rust 编译器。 确保你添加了 wasm32-wasi 编译器目标(如下),从而生成 WebAssembly 字节码。
$ rustup target add wasm32-wasi
该 demo 应用程序前端是 Next.js 写的,并部署在 AWS Lambda 上。我们假设你已经有使用 Next.js 和 Lambda 的基础知识了。
案例1:图像处理
我们的第一个 demo 应用程是让用户上传一个图像,然后用户调用 serverless 函数将其变成黑白的。 你可以查看已经通过 GitHub Pages 部署好的实时 demo。
demo 链接: https://second-state.github.io/aws-lambda-wasm-runtime/

Fork demo 应用程序的 GitHub repo ,就可以开始部署自己的函数了。将应用程序部署在 AWS Lambda 上的具体流程,请参考 repository 中的 README 教程。
模板 GitHub repo:https://github.com/second-state/aws-lambda-wasm-runtime
创建函数
模板 repo 是一个标准的 Next.js 应用程序。后端 serverless 函数是在 api/functions/image_grayscale 文件夹。 src/main.rs 文件包含 Rust 程序的源代码。 该 Rust 程序从 STDIN 读取数据,然后输出黑白图片到 STDOUT。
use hex;use std::io::{self, Read};use image::{ImageOutputFormat, ImageFormat};fn main() {let mut buf = Vec::new();io::stdin().read_to_end(&mut buf).unwrap();let image_format_detected: ImageFormat = image::guess_format(&buf).unwrap();let img = image::load_from_memory(&buf).unwrap();let filtered = img.grayscale();let mut buf = vec![];match image_format_detected {ImageFormat::Gif => {filtered.write_to(&mut buf, ImageOutputFormat::Gif).unwrap();},_ => {filtered.write_to(&mut buf, ImageOutputFormat::Png).unwrap();},};io::stdout().write_all(&buf).unwrap();io::stdout().flush().unwrap();}
可以使用 Rust 的 cargo 工具将 Rust 程序构建为 WebAssembly 字节码或者本机代码。
$ cd api/functions/image-grayscale/$ cargo build --release --target wasm32-wasi
将 build artifact 复制到 api 文件夹。
$ cp target/wasm32-wasi/release/grayscale.wasm ../../
当我们构建 docker 镜像时,会执行
api/pre.sh。pre.sh安装 WasmEdge runtime,然后将每个 WebAssembly 字节码程序编译为原生so库以加快执行速度。
创建服务脚本,加载函数
[api/hello.js](https://github.com/second-state/aws-lambda-wasm-runtime/blob/main/api/hello.js) 脚本加载 WasmEdge runtime,在 WasmEdge 中启动编译了的 WebAssembly 程序,并将已上传的图片数据通过 STDIN传递。 注意 [api/hello.js](https://github.com/second-state/aws-lambda-wasm-runtime/blob/main/api/hello.js) 运行已编译的由 [api/pre.sh](https://github.com/second-state/aws-lambda-wasm-runtime/blob/main/api/pre.sh) 产生的 grayscale.so 文件,以达到更佳的性能。
const { spawn } = require('child_process');const path = require('path');function _runWasm(reqBody) {return new Promise(resolve => {const wasmedge = spawn(path.join(__dirname, 'wasmedge'), [path.join(__dirname, 'grayscale.so')]);let d = [];wasmedge.stdout.on('data', (data) => {d.push(data);});wasmedge.on('close', (code) => {let buf = Buffer.concat(d);resolve(buf);});wasmedge.stdin.write(reqBody);wasmedge.stdin.end('');});}
hello.js的 exports.handler 部分导出一个异步函数处理程序,用于每次调用 serverless 函数时处理不同的事件。 在这个例子中,我们只是通过调用上面的函数来处理图像并返回结果,但你可以根据需要定义更复杂的事件处理行为。 我们还需要返回一些 Access-Control-Allow header 以避免在从浏览器调用 servereless 时发生跨域资源共享 Cross-Origin Resource Sharing (CORS) 错误。 如果你在复制我们的示例时遇到 CORS 错误,你可以在此处查看更多有关 CORS 错误的信息。
exports.handler = async function(event, context) {var typedArray = new Uint8Array(event.body.match(/[\da-f]{2}/gi).map(function (h) {return parseInt(h, 16);}));let buf = await _runWasm(typedArray);return {statusCode: 200,headers: {"Access-Control-Allow-Headers" : "Content-Type,X-Amz-Date,Authorization,X-Api-Key,X-Amz-Security-Token","Access-Control-Allow-Origin": "*","Access-Control-Allow-Methods": "DELETE, GET, HEAD, OPTIONS, PATCH, POST, PUT"},body: buf.toString('hex')};}
构建 Docker 镜像用于 Lambda 部署
现在我们有了 WebAssembly 字节码函数和脚本来加载和连接到 Web 请求。 为了将它们部署为 AWS Lambda 上的函数服务,仍然需要将整个内容打包到 Docker 镜像中。
我们不会详细介绍如何构建 Docker 镜像并在 AWS Lambda 上部署,你可以参考 README 中的 deploy 部分 。 但是,我们将突出显示 [Dockerfile](https://github.com/second-state/aws-lambda-wasm-runtime/blob/tensorflow/api/Dockerfile) 中的一部分,以避免一些陷阱。
FROM public.ecr.aws/lambda/nodejs:14# Change directory to /var/taskWORKDIR /var/taskRUN yum update -y && yum install -y curl tar gzip# Bundle and pre-compile the wasm filesCOPY *.wasm ./COPY pre.sh ./RUN chmod +x pre.shRUN ./pre.sh# Bundle the JS filesCOPY *.js ./CMD [ "hello.handler" ]
首先,我们从 AWS Lambda 的 Node.js 基础镜像 构建镜像。使用 AWS Lambda 基础镜像的优势在于它包含了 Lambda Runtime 接口客户端 (RIC),当我们在 AWS Lambda 部署 Docker 镜像时需要这个。 Amazon Linux 使用 yum 作为包管理器。
这些基本镜像包含 Amazon Linux Base 操作系统、给定语言的 runtime、依赖项和 Lambda runtime 接口客户端 (RIC),它实现 Lambda Runtime API。 Lambda Runtime API 客户端允许你的 runtime 从 Lambda 服务接收请求并向其发送请求。
其次,我们需要将我们的函数及其所有依赖项放在 /var/task 目录中。 AWS Lambda 不会执行其他文件夹中的文件。
第三,我们需要在启动容器时定义默认命令。 CMD [ "hello.handler" ] 意味着只要调用 serverless 函数,我们就会调用 hello.js 中的 handler 函数。回想一下,我们在前面的步骤中通过 hello.js 中的 exports.handler = ... 定义并导出了 handler 函数。
可选:在本地测试 Docker 镜像
你可以按照 AWS 给出的指南在本地测试从 AWS Lambda 的基础镜像中构建的 Docker 镜像。 本地测试需要 AWS Lambda Runtime Interface Emulator (RIE) ,它已经安装在所有 AWS Lambda 的基础镜像中。 要测试你的镜像,首先,通过运行以下命令启动 Docker 容器:
docker run -p 9000:8080 myfunction:latest
该命令在你的本地机器设置了一个函数端点 http://localhost:9000/2015-03-31/functions/function/invocations.
然后从一个独立的终端窗口,运行:
curl -XPOST "http://localhost:9000/2015-03-31/functions/function/invocations" -d '{}'
你应在终端中获得预期的输出。
如果你不想使用来自 AWS Lambda 的基础镜像,你也可以使用自己的基础镜像并在构建 Docker 镜像时安装 RIC 和/或 RIE。 只需按照 AWS 给出的指南,从替代基础镜像部分创建镜像即可。
就是这样! 构建 Docker 镜像后,你可以按照 repo 中的 README 概述的步骤将其解压到 AWS Lambda 。 现在,你的serverless 函数已准备就绪!让我们看看第二个高难度的函数
案例2: AI推理
第二个 demo 应用程序是让用户上传图片,然后触发一个 serverless 函数对图片上的主要物品进行识别。

它与上一个示例位于同一 GitHub repo 中,但位于 tensorflow 分支中。 用于图像分类的后端 serverless 函数位于 tensorflow 分支的 api/functions/image-classification 文件夹中。 src/main.rs文件包含 Rust 程序的源代码。 Rust 程序从 STDIN 读取图像数据,然后将脚本输出输出到 STDOUT。 它利用 WasmEdge Tensorflow API 来运行 AI 推理。
AI 推理模板:https://github.com/second-state/aws-lambda-wasm-runtime/tree/tensorflow
pub fn main() {// Step 1: Load the TFLite modellet model_data: &[u8] = include_bytes!("models/mobilenet_v1_1.0_224/mobilenet_v1_1.0_224_quant.tflite");let labels = include_str!("models/mobilenet_v1_1.0_224/labels_mobilenet_quant_v1_224.txt");// Step 2: Read image from STDINlet mut buf = Vec::new();io::stdin().read_to_end(&mut buf).unwrap();// Step 3: Resize the input image for the tensorflow modellet flat_img = wasmedge_tensorflow_interface::load_jpg_image_to_rgb8(&buf, 224, 224);// Step 4: AI inferencelet mut session = wasmedge_tensorflow_interface::Session::new(&model_data, wasmedge_tensorflow_interface::ModelType::TensorFlowLite);session.add_input("input", &flat_img, &[1, 224, 224, 3]).run();let res_vec: Vec<u8> = session.get_output("MobilenetV1/Predictions/Reshape_1");// Step 5: Find the food label that responds to the highest probability in res_vec// ... ...let mut label_lines = labels.lines();for _i in 0..max_index {label_lines.next();}// Step 6: Generate the output textlet class_name = label_lines.next().unwrap().to_string();if max_value > 50 {println!("It {} a <a href='https://www.google.com/search?q={}'>{}</a> in the picture", confidence.to_string(), class_name, class_name);} else {println!("It does not appears to be any food item in the picture.");}}
你可以使用 cargo 工具构建 Rust 程序为 WebAssembly 字节码或本机代码。
$ cd api/functions/image-classification/$ cargo build --release --target wasm32-wasi
将 build artifacts 复制到 api 文件夹中。
$ cp target/wasm32-wasi/release/classify.wasm ../../
同样,api/pre.sh 脚本会在此应用程序中安装 WasmEdge runtime 及其 Tensorflow 依赖项。 它还在部署时将 classify.wasm 字节码程序编译为 classify.so 原生共享库。
[api/hello.js](https://github.com/second-state/aws-lambda-wasm-runtime/blob/tensorflow/api/hello.js) 脚本加载 WasmEdge runtime,在 WasmEdge 中启动已编译的 WebAssembly 程序 , 并通过 STDIN 传递上传的图像数据。 注意 [api/hello.js](https://github.com/second-state/aws-lambda-wasm-runtime/blob/tensorflow/api/hello.js) 运行 [api/pre.sh](https://github.com/second-state/aws-lambda-wasm-runtime/blob/tensorflow/api/pre.sh) 生成的已编译的 classify.so文件以获得更好的性能。 Handler 函数和我们前面的例子类似,这里不再详述了。
const { spawn } = require('child_process');const path = require('path');function _runWasm(reqBody) {return new Promise(resolve => {const wasmedge = spawn(path.join(__dirname, 'wasmedge-tensorflow-lite'),[path.join(__dirname, 'classify.so')],{env: {'LD_LIBRARY_PATH': __dirname}});let d = [];wasmedge.stdout.on('data', (data) => {d.push(data);});wasmedge.on('close', (code) => {resolve(d.join(''));});wasmedge.stdin.write(reqBody);wasmedge.stdin.end('');});}exports.handler = ... // _runWasm(reqBody) is called in the handler
你可以按照上一个示例中讲述的方式构建 Docker 镜像并部署该函数。 现在你已经创建了一个用于主题分类的 Web 应用程序!
展望未来
从部署在 AWS Lambda 上的 Docker 容器运行 WasmEdge 是一种向 Web 应用程序添加高性能函数的简单方法。 展望未来,更好的方法是使用WasmEdge作为容器本身。 这样就无需 Docker 和 Node.js 来装 WasmEdge。这样一来,我们运行 serverless 函数的效率就更高了。 WasmEdge 已经与 Docker 工具兼容。 如果你有兴趣加入 WasmEdge 和 CNCF 一起进行这项激动人心的工作,请告诉我们!

