1. 使用pdman新建一张测试表
新建一张stu表,用于我们测试通用Mapper和RestfulAPI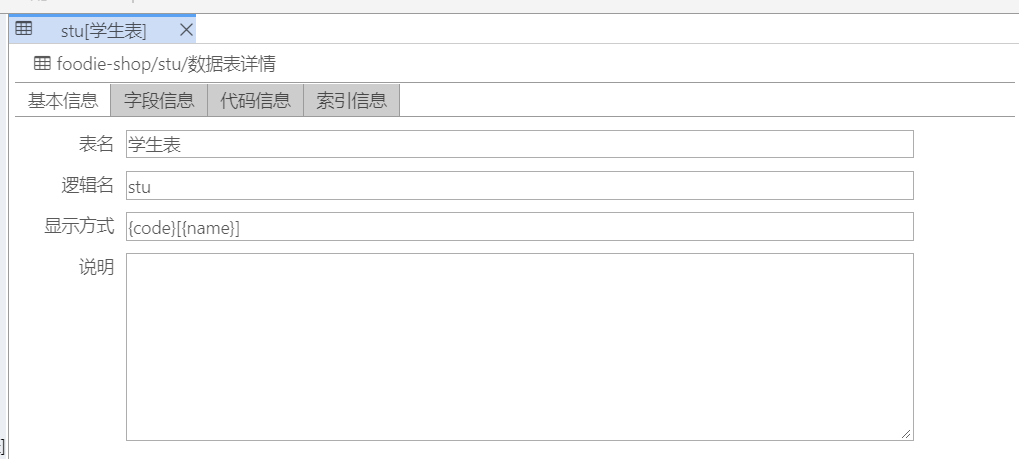
然后在stu表中增加几个字段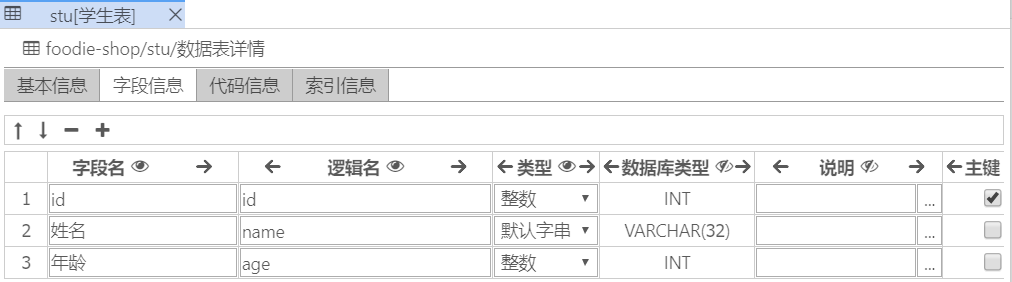
2.使用逆向工具生成相关代码
打开mybatis-generator工程,在generatorConfig.xml中,只放一个stu表配置即可
<table tableName="stu"></table>
其他的表全都注释掉,因为逆向工具生成是增量生成,而不是覆盖!
把相关代码拷贝到foodie-dev对应的目录中
3.code service&controller
3.1在foodie-shop-service工程中写业务接口
业务代码:
package com.architects.service;import com.architects.pojo.Stu;public interface StuService {Stu getStuInfo(int id);void saveStu();void updateStu(int id);void deleteStu(int id);}
3.2在foodie-shop-service工程中写业务的实现类
实现类代码:
package com.architects.service.impl;import com.architects.mapper.StuMapper;import com.architects.pojo.Stu;import com.architects.service.StuService;import org.springframework.beans.factory.annotation.Autowired;import org.springframework.stereotype.Service;import org.springframework.transaction.annotation.Propagation;import org.springframework.transaction.annotation.Transactional;@Servicepublic class StuServiceImpl implements StuService {@Autowiredprivate StuMapper stuMapper;@Transactional(propagation = Propagation.SUPPORTS)@Overridepublic Stu getStuInfo(int id) {return stuMapper.selectByPrimaryKey(id);}@Transactional(propagation = Propagation.REQUIRED)@Overridepublic void saveStu() {Stu stu = new Stu();stu.setId(110);stu.setAge(18);stu.setName("jack");stuMapper.insert(stu);}@Transactional(propagation = Propagation.REQUIRED)@Overridepublic void updateStu(int id) {Stu stu = new Stu();stu.setId(id);stu.setName("chaining");stuMapper.updateByPrimaryKey(stu);}@Transactional(propagation = Propagation.REQUIRED)@Overridepublic void deleteStu(int id) {stuMapper.deleteByPrimaryKey(id);}}
3.3在foodie-shop-api工程中写控制层
package com.architects.controller;import com.architects.service.StuService;import org.springframework.beans.factory.annotation.Autowired;import org.springframework.web.bind.annotation.GetMapping;import org.springframework.web.bind.annotation.PostMapping;import org.springframework.web.bind.annotation.RestController;/*** @ClassName StuFooController* @Description:* @Author ning.chai@foxmail.com* @Date 2020/12/31 0031* @Version V1.0**/@RestControllerpublic class StuFooController {@Autowiredprivate StuService stuService;@GetMapping("/getStu")public Object getStu(int id){return stuService.getStuInfo(id);}@PostMapping("/saveStu")public Object saveStu(){stuService.saveStu();return "OK";}@PostMapping("/updateStu")public Object updateStu(int id){stuService.updateStu(id);return "OK";}@PostMapping("/deleteStu")public Object deleteStu(int id){stuService.deleteStu(id);return "OK";}}
3.4运行测试
可以使用常用的post man工具进行测试,我用的IDEA2020.2.3中带有测试工具,简单的接口可以通过内置的测试工具进行测试
新版的IDEA在写controller的时候,会有net的图标,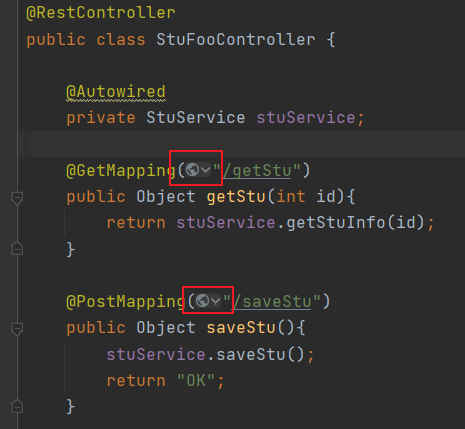
点击之后就可以自动新建一个HTTP Client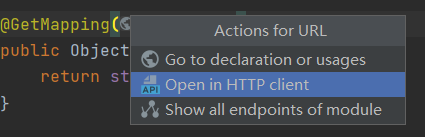
还可以选择测试的地址和端口,很方便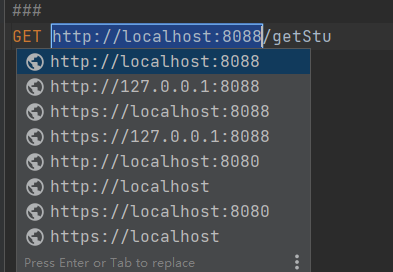
我们先测试一个GET请求,因此书写格式如下:
GET http://localhost:8088/getStu?id=1


4.解决IDEA注入报异常
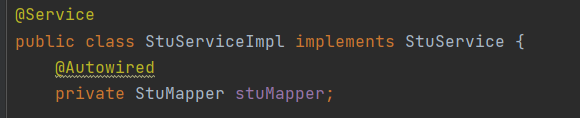
使用IDEA开发过程中,用到Spring的 @Autowired 注解时,就会报异常,如下图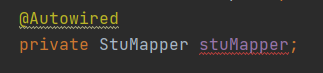
其实这是IDEA的问题,在eclipse中不会有这个问题,解决方法为:
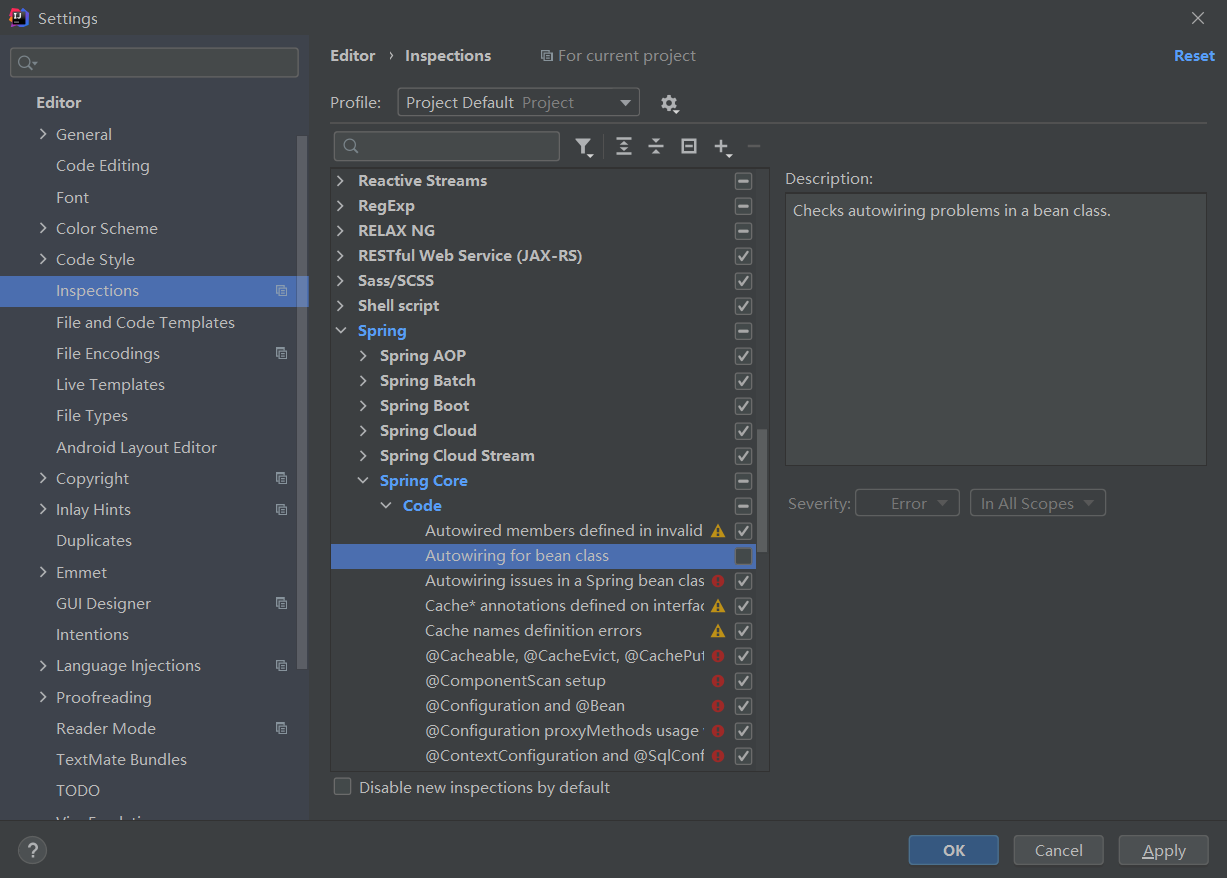
- 打开File-Setting
- 找到inspections-Spring-SpringCore-Code
- 取消勾选AutoWiring for bean class
- 点击Apply后点击ok

若有收获,就点个赞吧
0 人点赞
