CNI Container Network Interface容器网络接口是一个基于插件的功能,以简化k8s网络。
CNI 的主要目标是为管理员提供足够的控制权来监控流量,同时减少手动配置网络所需的时间。
- Without network address translation (NAT), Pods on a node can communicate with Pods on all other nodes.
- A node’s agents (such as system daemons and kubelet) can communicate with all the node’s Pods.
- Without NAT, Pods in a node’s host network can communicate with Pods on all other nodes.
CNI 允许 Kubernetes 提供商开发独特的网络模型,CNI 插件提供命名空间隔离、流量和 IP 过滤,Kubernetes 默认不提供这些功能。
流行的CNI插件:Flannel、Calico 和 Cilium
CNI 概述
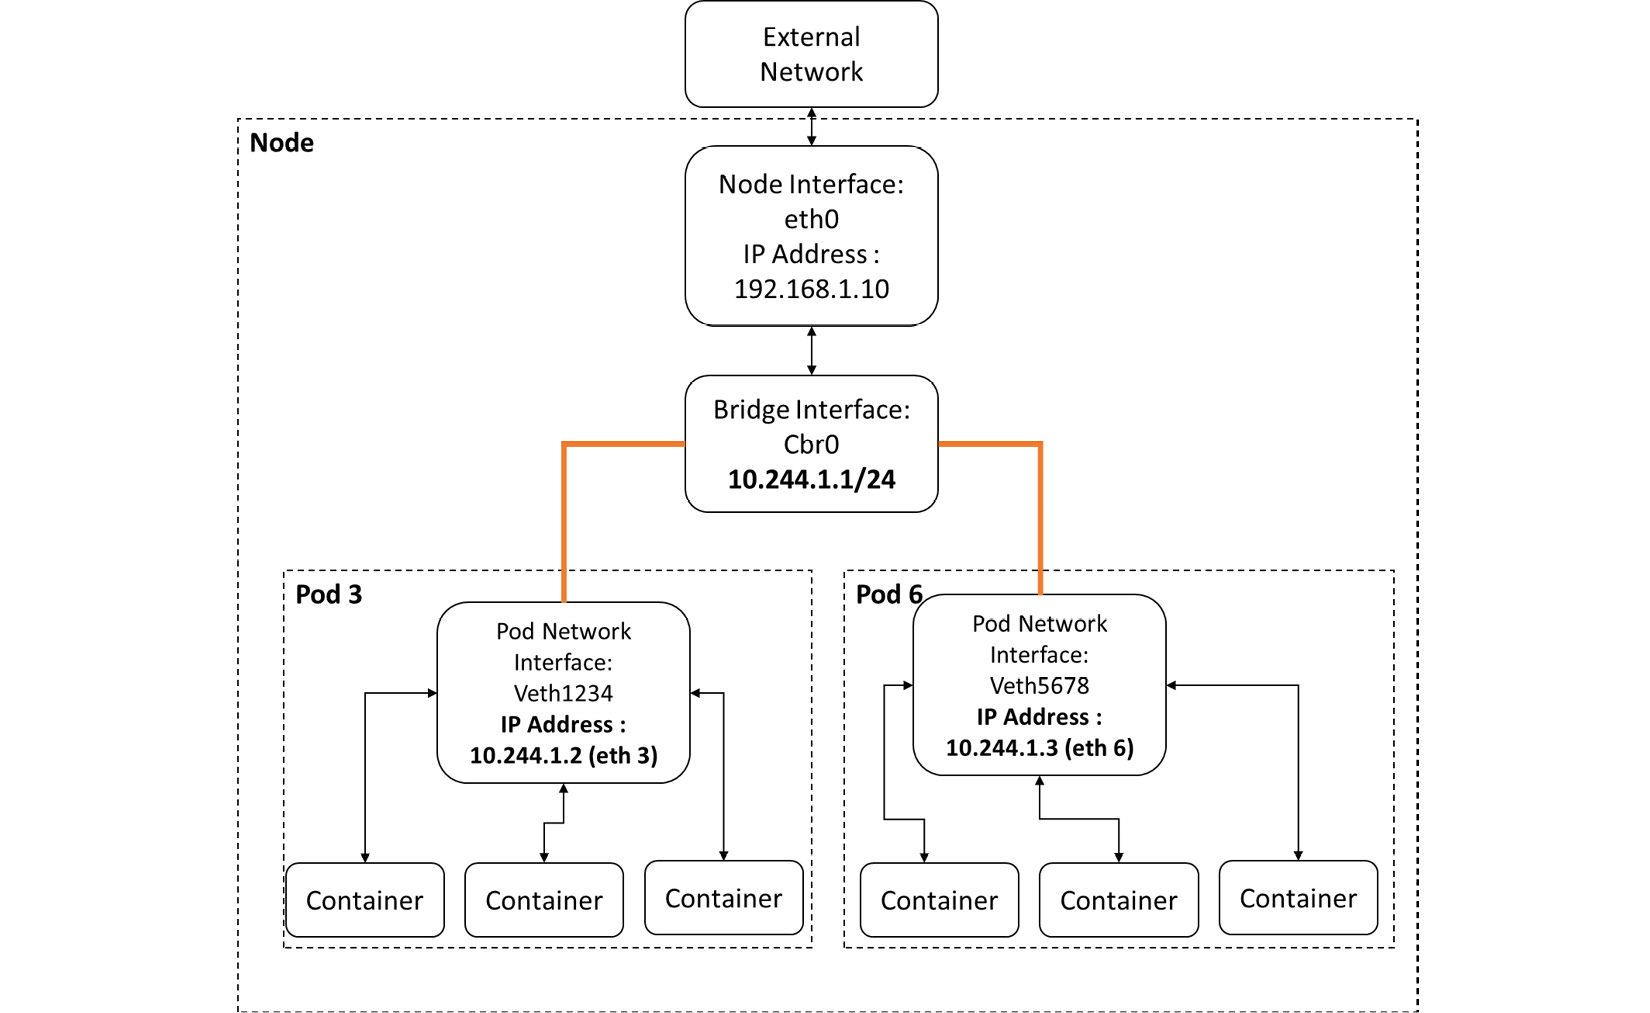
当 Kubernetes 调度 Pod 在节点上执行时,节点的 Linux 内核会为 Pod 生成一个网络命名空间,
并建立一个虚拟网络接口VIF virtual network interface(拥有一个IP)。
Linux网桥允许同一节点的pods相互通信
eth0为节点的物理网络接口
CNI 是一个网络框架,使用一组标准和模块来启动动态设置的网络资源。插件规范详细介绍了用于配置网络、配置 IP 地址和维护多主机通信的接口。
CNI轻松连接Kubernetes上下文中的kubelet代理,允许在Pods之间使用底层underlay或overlay网络进行自动网络配置。
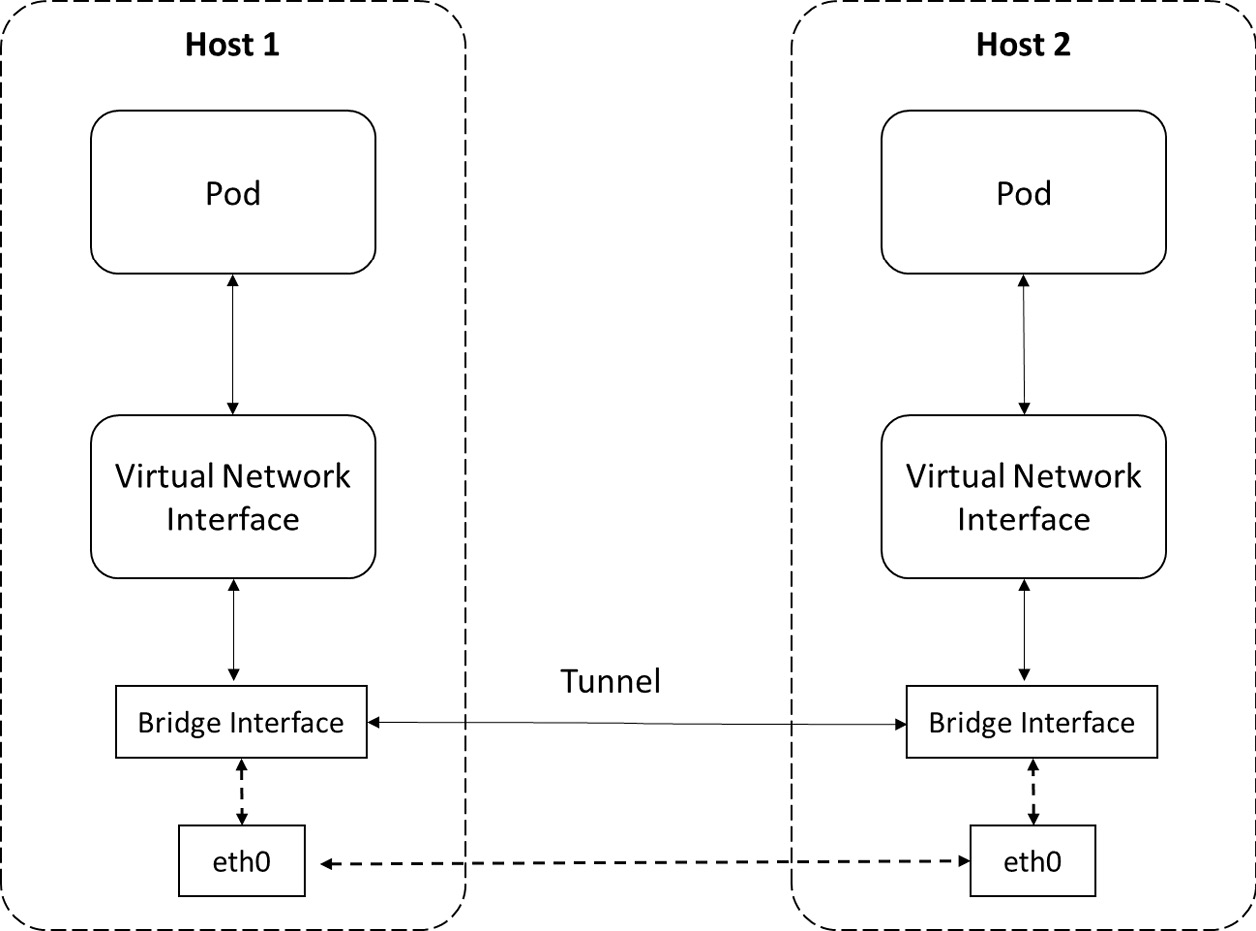
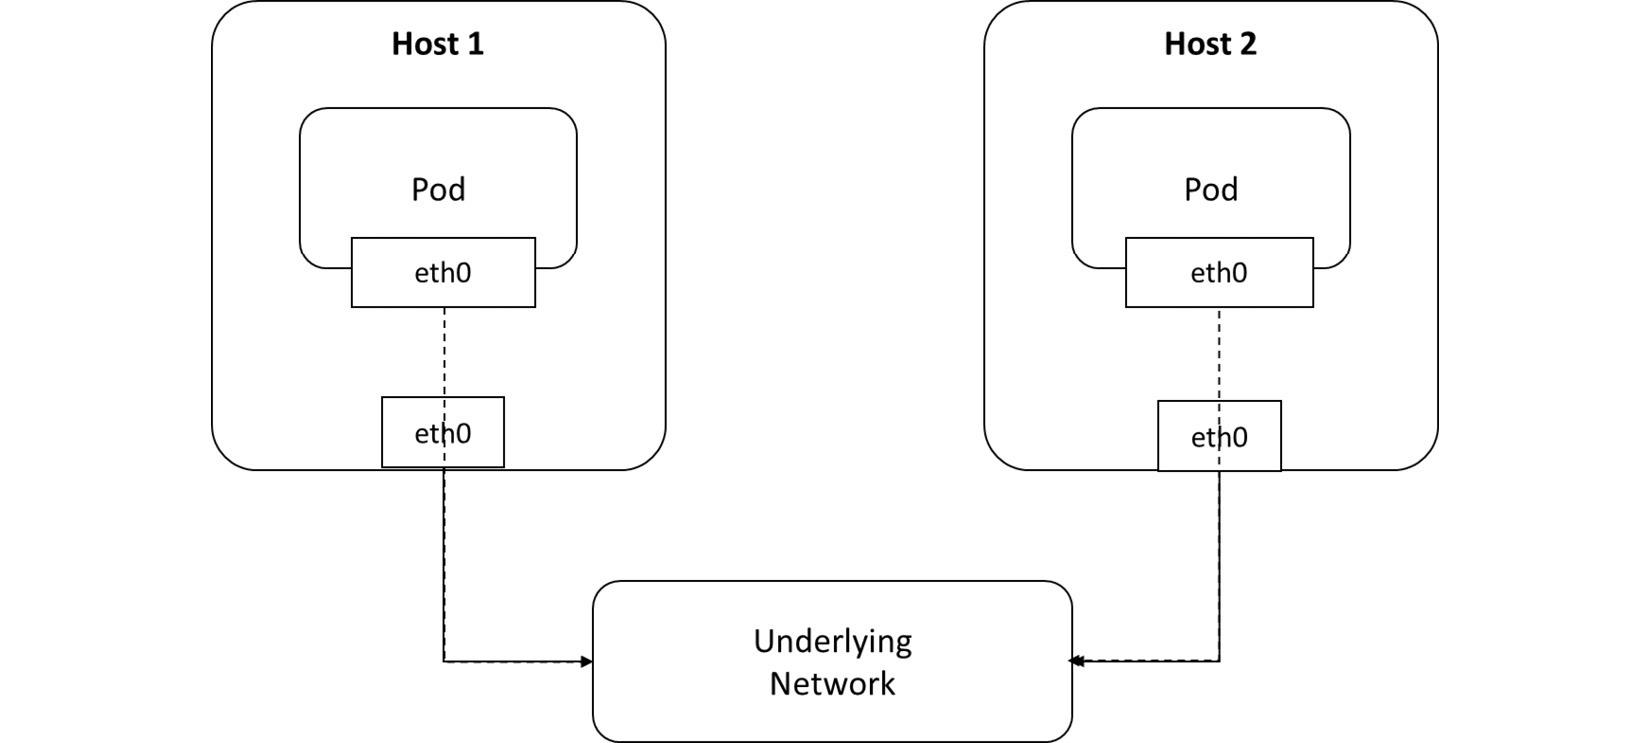
underlay 和 overlay network 模式
Overlay mode—A container in Overlay mode is independent of the host’s IP address range. Tunnels are established between hosts during cross-host communication, and all packets in the container Classless Inter-Domain Routing (CIDR) block are encapsulated (using a virtual interface such as Virtual eXtensible Local Area Network, or VXLAN) as packets exchanged between hosts in the underlying physical network. This mode eliminates the underlying network’s dependency, and you can see an overview of it in the following diagram:
Underlay mode—Containers and hosts are located at the same network layer and share the same position in Underlay mode. Container network interconnection is determined by the underlying network (physical level of the networking layer), which consists of routers and switches. As a result, the underlying capabilities are heavily reliant on this mode. You can see an overview of this in the following diagram:
定义网络配置类型后,运行时创建容器加入的网络,使用 CNI 插件将接口添加到容器命名空间,使用IP 地址管理( IPAM ) 插件来分配链接的子网和路由。除了 Kubernetes 网络,CNI 还支持软件定义网络( SDN ) 方法来提供统一的容器通信跨集群。
pod3和pod6的通信流程
位于单个节点
- A packet leaves from Pod 3 through the eth3 interface and reaches the cbr0 bridge interface through the veth1234 virtual interface.
- The packet leaves veth1234 and reaches cbr0, looking for the address of Pod 6.
- The packet leaves cbr0 and is redirected to veth5678.
- The packet leaves cbr0 through veth5678 and reaches the Pod 6 network through the eth6 interface.
k8s会定期销毁和重建pod,因此必须使用拥有稳定IP并具备负载均衡的服务。
Kubernetes应用程序编程接口(API)服务器跟踪应用程序的Pods,节点上的kubelet进程使用此列表(API跟踪的列表)来配置iptables规则,将流量定向到适当的Pod。
位于不同节点
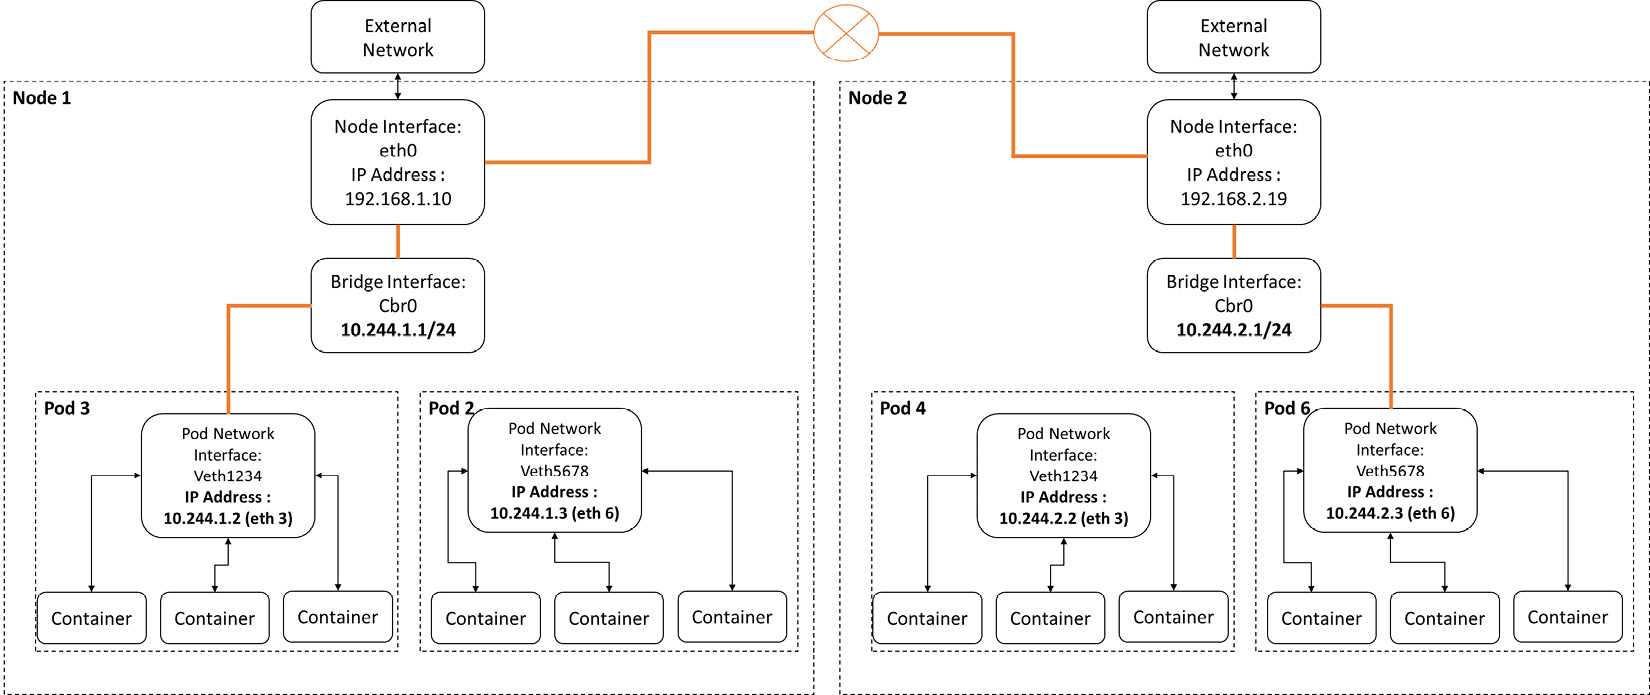
- A packet leaves from Pod 3 through the eth3 interface and reaches the cbr0 bridge interface through the veth1234 virtual interface.
- The packet leaves veth1234 and reaches cbr0, looking for the address of Pod 6.
- The packet leaves cbr0 and is redirected to eth0.
- The packet then leaves eth0 from node 1 and reaches the gateway.
- The packet leaves the gateway and reaches the eth0 interface on node 2.
- The packet leaves eth0 and reaches cbr0, looking for the address of Pod 6.
- The packet leaves cbr0 through veth5678 and reaches the Pod 6 network through the eth6 interface.
配置Calico
Calico 是用于 Kubernetes 环境最流行的开源 CNI 插件,具有强大的网络管理安全功能,以及主机和Pod连接的全面视图。
集群中的每个节点有三个Calico组件:Felix,BIRD,confd
Felix:一个代理,用于处理节点路由
BIRD,confd:用于管理路由配置变换
Calico 使用边界网关协议( BGP ) 路由协议而不是采用覆盖(overlay)网络来路由消息节点之间。
允许Pod之间通信的三种标识符:
- Other Pods that are permissible (exception: a Pod cannot block access to itself)
- Namespaces that are allowed
- IP blocks that are allowed (exception: traffic to and from the node where a Pod is running is always allowed, regardless of the IP address of the Pod or the node)
# 验证Calico CNI插件是否启动kubectl get pods -A| grep calico# 创建部署kubectl create deployment nginx --image=nginx# expose deploymentkubectl expose deployment nginx --port=80# 查看服务是否暴露exposekubectl get svc# 创建一个新 Pod 并在 Pod 内打开一个 shell 会话kubectl run access --rm -ti --image busybox /bin/sh# 从pod内访问nginx服务wget -q nginx -O -
使用NetworkPolicy进行隔离
为默认名称空间中的所有Pod创建一个NetworkPolicy,它实现了默认拒绝行为
kind: NetworkPolicyapiVersion: networking.k8s.io/v1metadata:name: default-denyspec:podSelector:matchLabels: {}
podSelector为空表示它适用于命名空间中的所有pods
kubectl apply -f calico-policy.yaml# 创建一个新 Pod 并在 Pod 内打开一个 shell 会话kubectl run access --rm -ti --image busybox /bin/sh# 从pod内访问nginx服务wget -q nginx -O -# 访问超时
启动访问
kind: NetworkPolicyapiVersion: networking.k8s.io/v1metadata:name: access-nginxspec:podSelector:matchLabels:app: nginxingress:- from:- podSelector:matchLabels:run: access
podSelector selects Pods with matching labels of type app: nginx. server
The ingress rule allows traffic if it matches the from section. client
NetworkPolicy 允许从带有run: access标签的 Pod 到带有app: nginx标签的 Pod的流量。标签由kubectl自动创建并基于资源名称
Traffic from Pods with the run: access label to Pods with the app: nginx label is allowed by the NetworkPolicy. Labels are created automatically by kubectl and are based on the resource name:
kubectl apply -f calico-policy-modified.yaml# 创建一个新 Pod 并在 Pod 内打开一个 shell 会话kubectl run access --rm -ti --image busybox /bin/sh# 从pod内访问nginx服务wget -q nginx -O -# 正常访问# 创建一个不带access标签的pod进行访问kubectl run access1 --rm -ti --image busybox /bin/shwget -q nginx -O -
配置Cilium

若有收获,就点个赞吧
0 人点赞
