命令行工具 - 中文版
命令行工具苹果官网原文地址
1、简介
什么是命令行工具包? 命令行工具包(Command Line Tools)是一个小型的独立包(package)
可以从Xcode中单独下载,它允许你在macOS中进行命令行开发。它由macOS SDK和命令行工具(例如Clang)组成,这些工具安装在/Library/Developer/CommandLineTools**目录中。
2、安装
下载命令行工具(Command Line Tools)在macOS 10.9的Xcode中是不可用的。我如何在我的机器上安装它们? 在macOS 10.9和更高版本中,Xcode偏好设置选项(Preferences)的下载窗格不支持下载命令行工具。使用以下任何方法在您的系统上安装命令行工具:
通过下载Xcode安装
如果Xcode安装在你的机器上,那么就没有必要安装它们。
Xcode与你所有的命令行工具捆绑在一起。macOS 10.9及更高版本包括许多垫片程序或包装可执行文件。这些垫片程序安装在/usr/bin中,可以将/usr/bin中包含的任何工具映射到Xcode中相应的工具。(垫片(计算机)是一个关于计算机程序语言的小作品)xcrun就是这样的垫片之一,它允许你从命令行中找到或运行Xcode内的任何工具。使用它可以从命令行调用Xcode中的任何工具,
示例1、使用xcrun在终端应用程序中运行dwarfdump。
$ xcrun dwarfdump --uuid MySample.app/MySampleUUID: AD019F0E-1318-3F9F-92B6-9F95FBEBBE6F (armv7) MySample.app/MySampleUUID: BB59C973-06AC-388F-8EC1-FA3701C9E264 (arm64) MySample.app/MySample从苹果开发者官网下载安装
命令行工具包(Command Line Tools)可以在苹果开发者的下载页面上下载。
用您的Apple ID登录,然后搜索并下载适合您的机器的命令行工具包,如macOS 10.12,如图1所示。
图1 命令行工具包的下载页面。注意:在macOS 10.9及更高版本中,当命令行工具的新版本可供更新时,软件更新会通知您。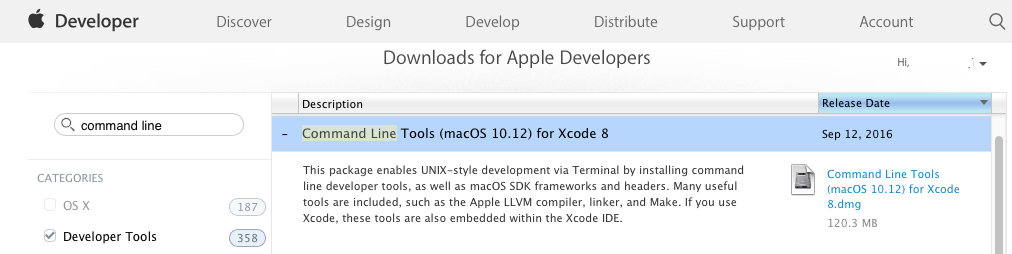
通过终端安装
您可以通过运行xcode-select —install命令来安装命令行工具包
注意:macOS与xcode-select捆绑在一起,这是一个命令行工具,安装在/usr/bin中。它允许你管理Xcode和其他BSD开发工具的active developer目录。有关更多信息,请参见手册页。
3、卸载
通过删除Xcode卸载
Xcode包含了所有命令行工具。如果系统上安装了它,请删除Xcode它以卸载命令行工具。
通过删除指定目录卸载
如果/Library/Developer/CommandLineTools目录存在于您的系统中,删除这个目录就可以卸载命令行工具了。
4、查看使用的Xcode版本
我的机器上安装了多个版本的Xcode。命令行工具(Command Line Tools)当前使用的Xcode版本是什么? 示例2、打印命令行工具当前使用的Xcode版本。
$ xcode-select --print-path/Applications/Xcode8.3.3/Xcode.app/Contents/Developer
5、选择默认的Xcode版本
如何为Command Line Tools选择默认的Xcode版本? 在终端运行以下命令可为命令行工具选择默认的Xcode版本
path/to/ 就是你希望用来开发的Xcode版本所在路径
$ sudo xcode-select -switch <path/to/>Xcode.app示例:设置默认的Xcode版本
$ sudo xcode-select -switch /Applications/Xcode8.3.3/Xcode.app
6、使用xcodebuild构建工程
如何使用命令行构建工程? xcodebuild是一个允许你使用命令行在Xcode工程和workspaces执行构建,查询,分析,测试和归档操作的命令行工具。
它可以在包含一个或多个target的工程执行,也可以在包含scheme的工程或者workspace执行。xcodebuild为这些操作提供了多种选项,具体参考其主页。默认情况下,xcodebuild将命令的输出保存在Xcode应用程序所在位置首选项窗格中定义的位置中。
下面提供部分xcodebuild用法。以下命令需要进入到project或者workspace所在目录才能生效。列出workspace中所有的schemes
列出workspace中所有的schemes
your_workspace_name就是你workspace的名称
xcodebuild -list -workspace <your_workspace_name>.xcworkspace
$ cd /Users/username/Desktop/MyApplication$ xcodebuild -list -workspace MyApplication.xcworkspaceInformation about workspace "MyApplication":Schemes:iOSApptvOSAppmacOSAppiOSWithWatchAppiOSWithWatchApp WatchKit App列出你project中所使用到的targets
列出你project中所使用到的targets, build configurations, schemes,使用以下命令
your_workspace_name就是你project的名称
xcodebuild -list -project <your_project_name>.xcodeproj
$ cd /Users/username/Desktop/MyProject$ xcodebuild -list -project MyProject.xcodeprojInformation about project "MyProject":Targets:iOSiOSTestsiOSUITestswatchOS AppwatchOS App ExtensiontvOStvOSTeststvOSUITestsmacOSmacOSTestsmacOSUITestsBuild Configurations:DebugReleaseIf no build configuration is specified and -scheme is not passed then "Debug" is used.Schemes:iOSwatchOS ApptvOSmacOS构建一个scheme
在project中构建一个scheme,在终端运行以下命令
其中和build分别是要构建的方案的名称和要在scheme上执行的操作
xcodebuild -scheme <your_scheme_name> build
$ xcodebuild -scheme tvOS build=== BUILD TARGET tvOS OF PROJECT MyProject WITH CONFIGURATION Debug ===...注意:xcodebuild支持很多操作比如build, analyze, and archive,这些操作都可以在你的target或者scheme上面执行,如示例7所示,当没有显式地指定操作,默认执行build
使用配置文件构建target
使用配置文件构建target,运行以下终端命令
其中和 分别是要构建的目标的名称和配置文件的名称。有关xcconfig文件的更多信息,请参考Xcode Help’s Build configuration file reference
xcodebuild -target <your_target_name> -xcconfig <your_configuration_file>.xcconfig示例:使用配置文件构建一个iOS target
要更改xcodebuild命令的输出位置,请使用SYMROOT(构建产品路径)和DSTROOT(安装构建产品位置)构建设置,前者为调试产物和. dsym文件的位置,后者为发布过程中所生成的文件位置。想了解更多关于构建过程中的信息,请参考Xcode Help’s Build setting reference
$ xcodebuild -target iOS -xcconfig configuration.xcconfigBuild settings from configuration file 'configuration.xcconfig':IPHONEOS_DEPLOYMENT_TARGET = 10SWIFT_TREAT_WARNINGS_AS_ERRORS = YES=== BUILD TARGET watchOS Extension OF PROJECT MyProject WITH THE DEFAULT CONFIGURATION (Debug) ===...=== BUILD TARGET watchOS App OF PROJECT MyProject WITH THE DEFAULT CONFIGURATION (Debug) ===...=== BUILD TARGET iOS OF PROJECT MyProject WITH THE DEFAULT CONFIGURATION (Debug) ===...设置app的debug版本位置
$ xcodebuild -scheme iOS SYMROOT="/Users/username/Desktop/DebugLocation"Build settings from command line:SYMROOT = "/Users/username/Desktop/DebugLocation"=== BUILD TARGET watchOS Extension OF PROJECT MyProject WITH CONFIGURATION Debug ===...=== BUILD TARGET watchOS App OF PROJECT MyProject WITH CONFIGURATION Debug ===...=== BUILD TARGET iOS OF PROJECT MyProject WITH CONFIGURATION Debug ===...设置app的released版本位置
$ xcodebuild-scheme ios DSTROOT="/Users/username/Desktop/ReleaseLocation" archive Build settings from command lire:DSTROO =/Users/username/Desktop/ReleaseLocation== BUILD TARGET watchos Extension OE PROJECT MvProiect WITH CONEIGURATION Release m..=== BUILD TARGET watchos ApD OF PROJECT MvProiect WITH CONEIGURATTON Release s..==BUILD TARGET iOS OE PROJECT MyProject WITH CONFIGURATION Release =s …..7、设置默认的xcodebuild配置
我的应用程序有多个构建配置,怎么给xcodebuild设置默认配置呢 在Xcode中,项目信息窗口的configuration部分提供了一个弹出式菜单,用于设置xcodebuild在构建目标时使用的默认配置。使用这个弹出菜单选择xcodebuild的默认构建配置,如图2所示。图2 将Debug模式设置为xcodebuild的默认构建配置

8、单元测试
如何使用命令行运行单元测试? xcodebuild为单元测试提供了几种方式
构建test单元测试
xcodebuild test [-workspace <your_workspace_name>][-project <your_project_name>]-scheme <your scheme name>-destination <destination-specifier>[-only-testinq:<test-identifier>[-skip-testing:<test-identifier>]
构建build-for-testing单元测试
xcodebuild build-for-testing [-workspace <your-workspace_name>]r-project <your project name>-scheme <your scheme name>-destination <destination-specifier>
构建test-without-building单元测试
xcodebuild test-without-building -workspace <your workspace name>-proiect <your project name>-scheme <your scheme name>-destination <destination-specifier>-only-testing:stest-identifiery
xcodebuild test-without-building -xctestrun <your xctestrun name>.xctestrun-destination <destination-specifier>[-only-testing:<test-identifier>]
单元测试需要指定一个acheme和一个destination,有关构建测试过程中的具体问题可以参考
How do I implement the Build For Testing and Test Without Building features from the command line?
当你的scheme包含在Xcode workspace中的时候可以使用-workspace可以指定workspace的名称
当你的scheme包含在Xcode project中的时候可以使用-project可以指定project的名称,如果在同一个目录下有多个xcode工程-project是必需的,如果只有一个xcode project可以不指定.
-destination选项可以允许你给单元测试指定一个路径,后面接的参数
-only-testing 和 -skip-testing是可选项,前者是运行一个指定的单元测试,后者是跳过指定的单元测试。两者都带有一个参数,该参数指定了要被执行的或者不被执行的单元,test-identifier参数的格式如下
TestTarget[/TestClass[/TestMethod]]
TestTarget 是必需的,这是test bundle的名称,TestClass 和 TestMethod都是可选项,前者代表类名,后者代表方法名
备注:关于scheme和destination的更多信息请查阅
Xcode Scheme Run your app in Simulator
对于macOS 应用,destinationspecifier支持platform和arch keys,如表1所示。这两个键都是在macOS中运行单元测试所必需的。
| Key | Description | Value |
|---|---|---|
| platform | The supported destination for your unit tests. | macOS |
| arch | The architecture to use to run your unit tests. | i386 or x86_64 |
示例10 在macOS64-bit环境下测试macOS scheme,很好的展示了在macOS上测试一个scheme的时候将destinationspecifier设置成platform=macOS,arch=x86_64
xcodebuild test -scheme macOS -destination ‘platform=macOS,arch=x86_64’
对于iOS或者tvOS应用程序,destinationspecifier所支持的平台,名称和id如表2所示
| Key | Description | Value |
|---|---|---|
| platform | The supported destination for your unit tests. | iOS (for iOS apps) tvOS (for tvOS apps) |
| name | The full name of your device to be used for your unit tests. | The name of your device as displayed in the Devices Organizer in Xcode. |
| id | The identifier of your device to be used for your unit tests. | See Locate a device identifier for more information about getting your device identifier. |
名称和id密钥可以和platform搭配使用,platform是必需的密钥,具体如示例11和12所示
示例11 在设备id为965058a1c30d845d0dcec81cd6b908650a0d701c上面测试iOS scheme
xcodebuild test -workspace MyApplication.xcworkspace -scheme iOSApp -destination 'platform=iOS,id=965058a1c30d845d0dcec81cd6b908650a0d701c'
示例12 在iPhone上面测试iOS 应用程序scheme
$ xcodebuild test -workspace MyApplication.xcworkspace -scheme iosApp -destination 'platform=ios. name=iphone...==BUILD TARGET iOSApp OF PROJECT iOSApp WITH CONFIGURATION Debug ==s=== BUILD TARGET ioSAppTests OF PROJECT iOSApp WITH CONFIGURATION Debuq ===:.== BUILD TARGET iOSAppUITests OF PROJECT ioSADD WIH CONEIGURATION Debuq ===..Test suite 'All tests' started at ...Test Suite "iosApprests.xctest' started at .Test suite "Secondmestclass" started at .Test Case .-liosAppTests.SecondTestclass testExampleAl' started.Test Case .-iosAppTests.SecondTestclass testExampleBl' started.Test Suite "Secondrestclass" passed at ....Test Suite 'iosAppTests' started at ....Test case '-[iosAppTests.iosAppTests testExamplel' started.Test case .-liosAppTests.iosAppTests testPerformanceExample]' started.Test suite 'iosApprests' passed at ...Test Suite 'iosAppuITests,xctest' started at...Test Suite 'iosAppUITests' started at...Test Case .-liosAppUITests.iosAppUITests testLabels1' started.Test Case .-iosAppUITests.iosAppUITests testToolbarl' started.TEST SUCCEEDED **
示例13 在iPhone上面不进行iOSAppUITests测试
xcodebuild test -workspace MyApplication.xcworkspace -scheme iOSApp -destination 'platform=iOS,name=iPhone' -skip-testing:iOSAppUITests
示例14 在iOSAppTests单元测试中只测试SecondTestClass的testExampleB
$ xcodebuild test-workspace MyApplication.xcworkspace -scheme ioSApp -destination 'platformeios, namesiphone' -only-testing: i0SAppTests/SecondTestClass/testExampleB.=== BUILD TARGET iOSApp OF PROJECT iOSApp WITH CONFIGURATION Debug ====== BUILD TARGET iOSAppTests OE PROJECT iOSApp WITH CONEIGURATION Debuq ==== BUILD TARGET iOSAppUITests OF PROJECT iOSApp WITH CONEIGURATION Debuq =Test suite 'Selected tests' started at ...rest suite 'iosAppTests,xctest' started at ...Test suite 'SecondTestclass' started at ..Test case '-riosAppTests. SecondTestclass testExampleBl' startedTest Case '-riosAppTests.SecondTestclass testExampleBl' passed (0.007 seconds).Test suite 'SecondTestclass' passed at ...**TEST SUCCEEDED**
对于iOS模拟器和tvOS模拟器中的应用程序,destinationspecifier所支持的键值对信息如表3所示
| Key | Description | Value |
|---|---|---|
| platform | The supported destination for your unit tests. | iOS Simulator (iOS apps) tvOS Simulator (tvOS apps) |
| name | The full name of the simulator (iOS simulator for iOS apps and tvOS Simulator for tvOS apps) to be used for your unit tests and as displayed in the run destination of your Xcode project. | The name of your device as displayed in the Devices Organizer in Xcode. |
| id | The identifier of your device to be used for your unit tests. | See Locate a device identifier for more information about getting your device identifier. |
| OS | The version of iOS or tvOS to simulate such as 9.0 or the string latest to indicate the most recent version of iOS supported by your version of Xcode. | An iOS version, tvOS version, or latest |
示例15 在 iPad Pro (12.9 inch)模拟器上测试iOS scheme
xcodebuild test -scheme iOS -destination 'platform=iOS Simulator,name=iPad Pro (12.9-inch),OS=10.2'
示例16 在标识符为D6FA2C2A-E297-406A-AA22-624B4834ACB2.的tvOS模拟器上面测试tvOS scheme
xcodebuild test -scheme tvOS -destination 'platform=tvOS Simulator,id=D6FA2C2A-E297-406A-AA22-624B4834ACB2'
示例17 在模拟器和 iPod touch上面测试iOS scheme
xcodebuild test -scheme iOS -destination 'platform=iOS Simulator,name=iPhone 6s,OS=10.3' -destination 'platform=iOS,name=iPod touch'
备注:xcodebuild会持续运行你的测试单元,比如在示例17当中,xcodebuild会先在模拟器中测试,然后再在 iPod touch上面测试
9、实现测试的build构建
如何在不从命令行构建特性的情况下实现用于测试的构建和测试? xcodebuild为Xcode的产品提供了build-for-testing 支持, Product > Build For > Testing 构建测试操作。必须指定一个方案才能使用它。在终端中执行以下命令即可使用:
xcodebuild build-for-testing [-workspace <your_workspace_name>][-project <your_project_name>]-scheme <your_scheme_name>-destination <destination-specifier>
查看如何从命令行运行单元测试? How do I run unit tests from the command line?有关xcodebuild build-for-testing选项的更多信息。
示例18: 使用由D6FA2C2A-E297-406A-AA22-624B4834ACB2标识的tvOS模拟器构建tvOS方案中的测试和相关目标
xcodebuild build-for-testing -scheme tvOS -destination 'platform=tvOS Simulator,id=D6FA2C2A-E297-406A-AA22-624B4834ACB2'
为测试而构建生成一个xctestrun文件,该文件保存在派生数据文件夹中。看到xcodebuild。有关xctestrun文件的更多信息,请访问xctestrun的手册页。
xcodebuild为Xcode的产品提供了test-without-building 支持,Product > Perform Action > Test
xcodebuild test-without-building [-workspace <your_workspace_name>][-project <your_project_name>]-scheme <your_scheme_name>-destination <destination-specifier>[-only-testing:<test-identifier>][-skip-testing:<test-identifier>]
查看如何从命令行运行单元测试?有关xcodebuild无构建测试选项的更多信息。How do I run unit tests from the command line?
重要提示:在使用scheme时,不构建测试在构建根(SYMROOT)中搜索捆绑包。因此,在运行此命令之前,一定要构建目标,或者构建根目录中包含要测试的包。有关SYMROOT的更多信息,请参见Xcode帮助的构建设置参考
在模拟器中使用iOS 10.1在iPhone SE上测试iOSApp方案。
xcodebuild test-without-building -workspace MyApplication.xcworkspace -scheme iOSApp -destination 'platform=iOS Simulator,name=iPhone SE,OS=10.1'
使用xctestrun文件时的用法
其中
xcodebuild test-without-building -xctestrun <your_xctestrun_name>.xctestrun-destination <destination-specifier>[-only-testing:<test-identifier>][-skip-testing:<test-identifier>]
重要提示:在使用xctestrun文件时,不构建测试将在文件中指定的路径上搜索bundle。因此,在运行此命令之前,请确保包存在于指定的路径中。
示例20:测试包和iOSApp_iphonesimulator中指定的其他参数。xctestrun使用由6DC4A7BA-EA7F-40D6-A327-A0A9DF82F7F6识别的iOS模拟器
$ cat iOSApp_iphonesimulator.xctestrun<?xml version="1.0" encoding="UTF-8"?><!DOCTYPE plist PUBLIC "-//Apple//DTD PLIST 1.0//EN" "http://www.apple.com/DTDs/PropertyList-1.0.dtd"><plist version="1.0"><dict><key>iOSAppTests</key><dict><key>BundleIdentifiersForCrashReportEmphasis</key><array><string>com.myapps.iOSApp</string><string>com.myapps.iOSAppTests</string><string>com.myapps.iOSAppUITests</string></array>…<key>TestBundlePath</key><string>__TESTHOST__/PlugIns/iOSAppTests.xctest</string><key>TestHostBundleIdentifier</key><string>com.myapps.iOSApp</string><key>TestHostPath</key><string>__TESTROOT__/Debug-iphonesimulator/iOSApp.app</string>…</dict><key>iOSAppUITests</key>…</dict></plist>$ xcodebuild test-without-building -xctestrun iOSApp_iphonesimulator.xctestrun -destination 'platform=iOS Simulator,id=6DC4A7BA-EA7F-40D6-A327-A0A9DF82F7F6'
示例21:测试除了在iOSApp_iphonesimulator中指定的iOSAppUITests之外的所有内容。xctestrun使用3D95DF14-E8B7-4A05-B65B-78F381B74B22识别的iOS模拟器
xcodebuild test-without-building -xctestrun iOSApp_iphonesimulator.xctestrun -destination 'platform=iOS Simulator,id=3D95DF14-E8B7-4A05-B65B-78F381B74B22' -skip-testing:iOSAppUITests
build-for-testing 和 test-without-building 提供了对持续集成系统的支持
10、配置 exportOptionsPlist Flag
可以传递什么key到exportOptionsPlist flag? 要获得-exportOptionsPlist的所有可用密钥,在Terminal中运行以下命令:
xcodebuild -help示例22、获取-exportOptionsPlist支持的所有键
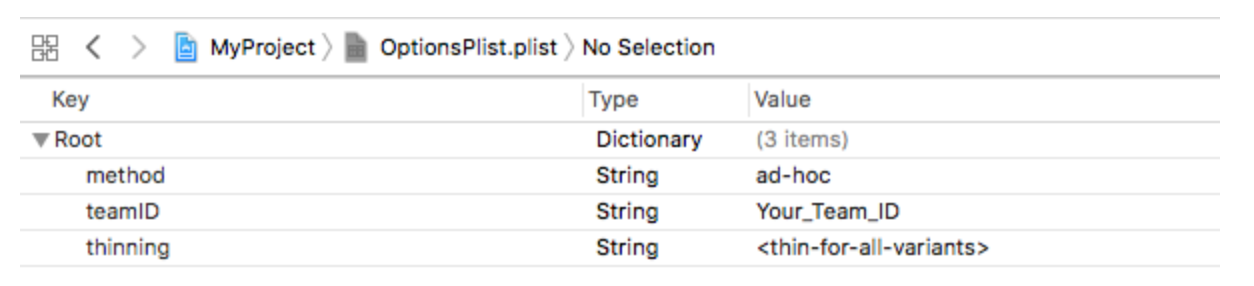
$ xcodebuild -helpUsage: xcodebuild [-project <projectname>] [[-target <targetname>]...|-alltargets] [-configuration <configurationname>] [-arch <architecture>]...Available keys for -exportOptionsPlist:compileBitcode : Bool...embedOnDemandResourcesAssetPacksInBundle : Bool...iCloudContainerEnvironment...manifest : Dictionary...method : String...onDemandResourcesAssetPacksBaseURL : String...teamID : String...thinning : String...uploadBitcode : Bool...uploadSymbols : Bool...参见图3,其中的示例文件包含-exportOptionsPlist标志的一些选项。
图3带有-exportOptionsPlist标志选项列表的Plist文件。
11、 导出distribution环境App
如何存档和导出distribution环境app?
在终端运行以下命令,其中
xcodebuild -exportArchive -archivePath <xcarchivepath> -exportPath <destinationpath> -exportOptionsPlist <path>
示例23、使用OptionsPlist.plist中保存的选项将iOSApp归档文件导出到发布位置。
xcodebuild -exportArchive -archivePath iOSApp.xcarchive -exportPath Release/MyApp -exportOptionsPlist OptionsPlist.plist

若有收获,就点个赞吧
0 人点赞
