如果说集群模式是在Redis中进行槽位的拆分,代理就是在Client对槽位进行拆分。目前比较流行的代理框架有:
- predixy:高性能全特征redis代理,支持Redis Sentinel和Redis Cluster。
- twemproxy:快速、轻量级memcached和redis代理,Twitter推特公司开发。
- codis:redis集群代理解决方案,豌豆荚公司开发,对redis源码有修改。
1 predixy
1.1 安装
访问GitHub地址:https://github.com/joyieldInc/predixy下载 ==> $ wget https://github.com/joyieldInc/predixy/releases/download/1.0.5/predixy-1.0.5-bin-amd64-linux.tar.gz解压 ==> $ tar xf predixy-1.0.5-bin-amd64-linux.tar.gz
1.2 配置
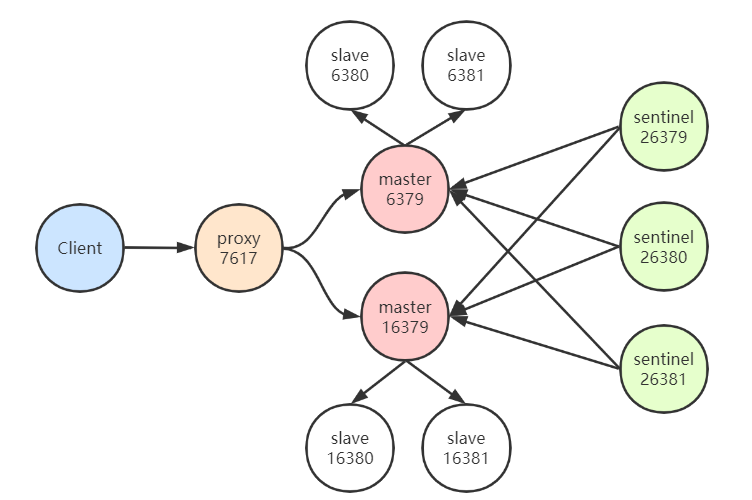
### predixy-1.0.5/conf/predixy.confInclude sentinel.conf# Include try.conf### predixy-1.0.5/conf/sentinel.confSentinelServerPool {Databases 16Hash crc16HashTag "{}" # 使用这个前缀,会hash到同一个集群Distribution modulaMasterReadPriority 60StaticSlaveReadPriority 50DynamicSlaveReadPriority 50RefreshInterval 1ServerTimeout 1ServerFailureLimit 10ServerRetryTimeout 1KeepAlive 120Sentinels {+ 127.0.0.1:26379+ 127.0.0.1:26380+ 127.0.0.1:26381}# 两套主从复制集群,配置两个GroupGroup m1 {}Group m2 {}}### 26379/sentinel.confport 26379sentinel monitor m1 127.0.0.1 6379 2sentinel monitor m2 127.0.0.1 16379 2### 26380/sentinel.confport 26380sentinel monitor m1 127.0.0.1 6379 2sentinel monitor m2 127.0.0.1 16379 2### 26381/sentinel.confport 26381sentinel monitor m1 127.0.0.1 6379 2sentinel monitor m2 127.0.0.1 16379 2
1.3 启动
### 准备目录用来存放redis的数据# mkdir 6379 6380 6381 16379 16380 16381 26379 26380 26381cp redis.conf 6379cp sentinel.conf 26379# 启动哨兵redis-server 26379/sentinel.conf --sentinelredis-server 26380/sentinel.conf --sentinelredis-server 26381/sentinel.conf --sentinel# 启动集群redis-server --port 6379redis-server --port 6380 --replicaof 127.0.0.1 6379redis-server --port 6381 --replicaof 127.0.0.1 6379redis-server --port 16379redis-server --port 16380 --replicaof 127.0.0.1 16379redis-server --port 16381 --replicaof 127.0.0.1 16379# 启动代理cd predixy/bin./predixy ../conf/predixy.conf
2 twemproxy
2.1 安装
访问GitHub地址:https://github.com/twitter/twemproxy# 下载项目==> $ git clone git@github.com:twitter/twemproxy.git,如果报错 ==> $ yum update nss# 准备环境$ yum install -y automake libtool# 安装==> $ autoreconf -fvi,如果报错,需要配置镜像源更新autoreconf==> $ ./configure==> $ make# 将nutcracker安装成为服务,并配置随开机启动cp src/nutcracker /usr/bin/cp scripts/nutcracker.init /etc/init.d/nutcrackerchkconfig --add nutcrackermkdir /etc/nutcrackercp conf/*.yml /etc/nutcracker/
2.2 配置
# vi /etc/nutcracker/nutcracker.ymlalpha:listen: 127.0.0.1:22121hash: fnv1a_64distribution: ketamaauto_eject_hosts: trueredis: trueserver_retry_timeout: 2000server_failure_limit: 1servers:- 127.0.0.1:6379:1- 127.0.0.1:6380:1
2.3 启动
### 准备目录用来存放redis的数据# mkdir 6379 6380# 启动服务redis-server --port 6379redis-server --port 6380# 启动代理systemctl start nutcracker

若有收获,就点个赞吧
0 人点赞
