响应触摸事件
编写:jdneo - 原文:http://developer.android.com/training/graphics/opengl/touch.html
让对象根据预设的程序运动(如让一个三角形旋转),可以有效地引起用户的注意,但是如果希望让OpenGL ES的图形对象与用户交互呢?让我们的OpenGL ES应用可以支持触控交互的关键点在于,拓展GLSurfaceView的实现,重写onTouchEvent()方法来监听触摸事件。
这节课将会向你展示如何监听触控事件,让用户旋转一个OpenGL ES对象。
配置触摸监听器
为了让我们的OpenGL ES应用响应触控事件,我们必须实现GLSurfaceView类中的onTouchEvent()方法。下面的例子展示了如何监听MotionEvent.ACTION_MOVE事件,并将事件转换为形状旋转的角度:
private final float TOUCH_SCALE_FACTOR = 180.0f / 320;private float mPreviousX;private float mPreviousY;@Overridepublic boolean onTouchEvent(MotionEvent e) {// MotionEvent reports input details from the touch screen// and other input controls. In this case, you are only// interested in events where the touch position changed.float x = e.getX();float y = e.getY();switch (e.getAction()) {case MotionEvent.ACTION_MOVE:float dx = x - mPreviousX;float dy = y - mPreviousY;// reverse direction of rotation above the mid-lineif (y > getHeight() / 2) {dx = dx * -1 ;}// reverse direction of rotation to left of the mid-lineif (x < getWidth() / 2) {dy = dy * -1 ;}mRenderer.setAngle(mRenderer.getAngle() +((dx + dy) * TOUCH_SCALE_FACTOR));requestRender();}mPreviousX = x;mPreviousY = y;return true;}
注意在计算旋转角度后,该方法会调用requestRender()来告诉渲染器现在可以进行渲染了。这种办法对于这个例子来说是最有效的,因为图形并不需要重新绘制,除非有一个旋转角度的变化。当然,为了能够真正实现执行效率的提高,记得使用setRenderMode()方法以保证渲染器仅在数据发生变化时才会重新绘制图形,所以请确保这一行代码没有被注释掉:
public MyGLSurfaceView(Context context) {...// Render the view only when there is a change in the drawing datasetRenderMode(GLSurfaceView.RENDERMODE_WHEN_DIRTY);}
公开旋转角度
上述样例代码需要我们公开旋转的角度,具体来说,是在渲染器中添加一个public成员变量。由于渲染器代码运行在一个独立的线程中(非主UI线程),我们必须同时将该变量声明为volatile。注意下面声明该变量的代码,另外对应的get和set方法也被声明为了public成员函数:
public class MyGLRenderer implements GLSurfaceView.Renderer {...public volatile float mAngle;public float getAngle() {return mAngle;}public void setAngle(float angle) {mAngle = angle;}}
应用旋转
为了应用触控输入所生成的旋转,注释掉创建旋转角度的代码,然后添加mAngle,该变量包含了触控输入所生成的角度:
public void onDrawFrame(GL10 gl) {...float[] scratch = new float[16];// Create a rotation for the triangle// long time = SystemClock.uptimeMillis() % 4000L;// float angle = 0.090f * ((int) time);Matrix.setRotateM(mRotationMatrix, 0, mAngle, 0, 0, -1.0f);// Combine the rotation matrix with the projection and camera view// Note that the mMVPMatrix factor *must be first* in order// for the matrix multiplication product to be correct.Matrix.multiplyMM(scratch, 0, mMVPMatrix, 0, mRotationMatrix, 0);// Draw trianglemTriangle.draw(scratch);}
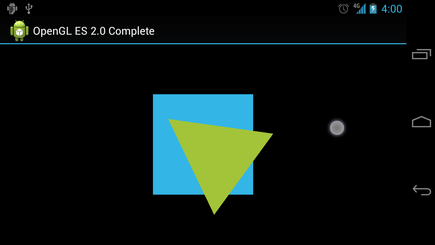
当完成了上述步骤,我们就可以运行这个程序,并通过手指在屏幕上的滑动旋转三角形了:

若有收获,就点个赞吧
0 人点赞


